Introduction
Welcome to the digital age, where staying connected is a necessity. Wi-Fi has become an integral part of our lives, allowing us to access the internet and stay connected with the world around us. Sharing Wi-Fi passwords between devices, however, can be a bit of a hassle, especially when using different operating systems like iOS and Android. Fortunately, there is a straightforward solution for iPhone users who want to share their Wi-Fi network with Android users.
In this article, we will guide you through the process of sharing a Wi-Fi password from an iPhone to an Android device. Whether you want to help out a friend or simply want to connect your Android device to your iPhone’s network, we’ve got you covered. So, sit back, grab your devices, and let’s get started!
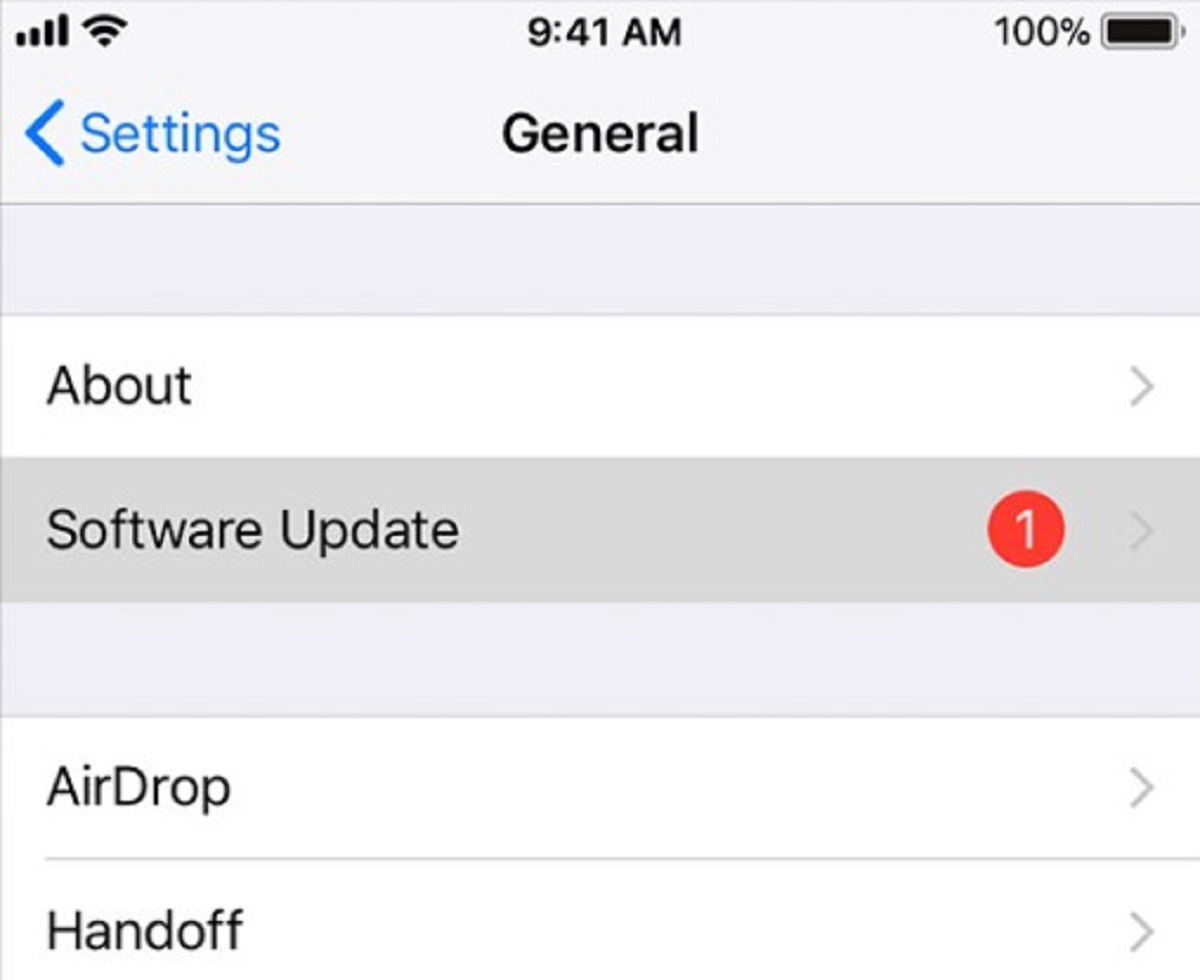
Before we begin, it’s important to note that the method we will be discussing involves using the built-in features of your iPhone and may vary slightly depending on the iOS version you are using. However, the general steps we’ll outline should work for most iPhone models.
Step 1: Connect to the Wi-Fi Network on your iPhone
The first step in sharing your Wi-Fi password from your iPhone to an Android device is to ensure that your iPhone is connected to the Wi-Fi network you want to share. If you haven’t connected to the network yet, follow these simple steps:
- Unlock your iPhone and open the “Settings” app.
- Scroll down and tap on the “Wi-Fi” option.
- You’ll see a list of available Wi-Fi networks. Locate the network you want to share and tap on it.
- If the network is secured with a password, you’ll be prompted to enter it. Go ahead and enter the correct password. If the network is open, you’ll be connected automatically.
- Once connected, you should see a checkmark next to the network name, indicating that your iPhone is successfully connected to the Wi-Fi network.
It is crucial to establish a stable connection before proceeding to the next steps. So, take a moment to ensure that your iPhone is connected to the desired Wi-Fi network.
In some cases, you may encounter issues connecting to the Wi-Fi network. If that happens, double-check the password and network name, or try restarting your iPhone before attempting the connection again.
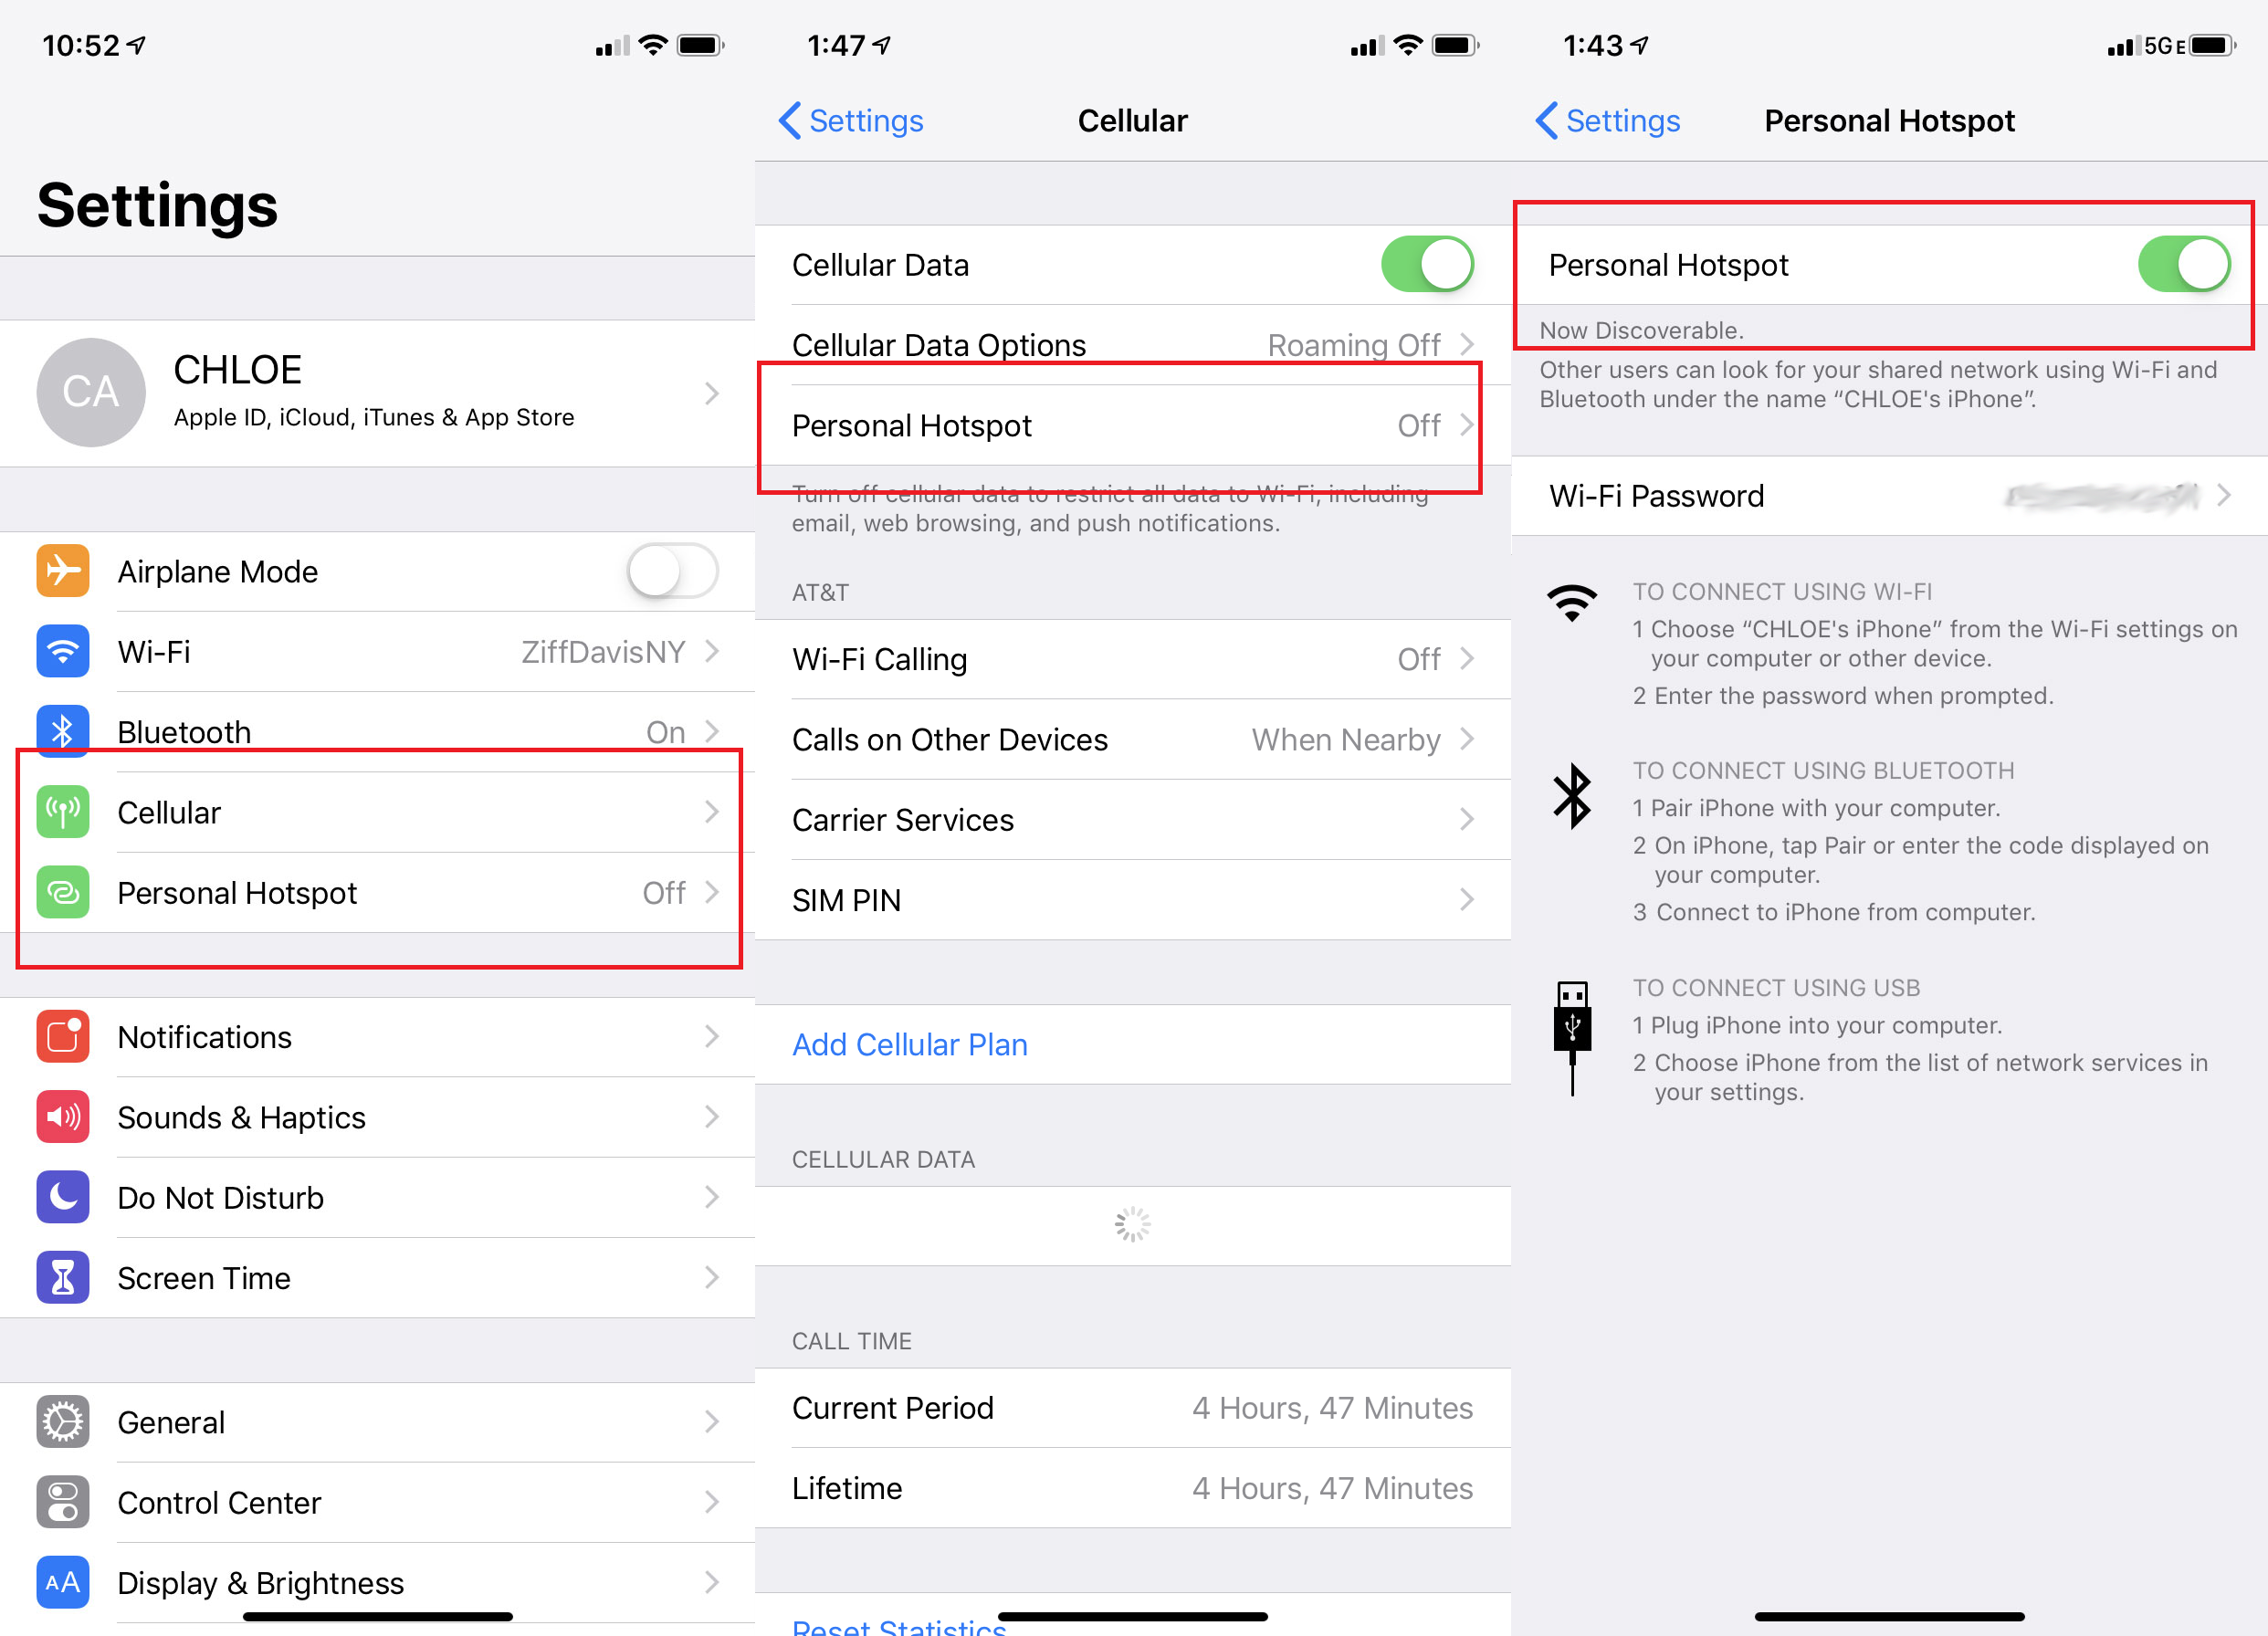
Step 2: Enable Wi-Fi Sharing on your iPhone
Once your iPhone is connected to the Wi-Fi network, you need to enable Wi-Fi sharing to share the network’s password with your Android device. Follow these steps to enable Wi-Fi sharing:
- Go to the “Settings” app on your iPhone.
- Scroll down and tap on the “Personal Hotspot” option.
- Toggle on the “Allow Others to Join” or “Family Sharing” option, depending on the iOS version you are using. This will enable Wi-Fi sharing and allow your Android device to connect to your iPhone’s network.
- Make a note of the Wi-Fi network name displayed below the toggle switch. This is the network name that your Android device will connect to.
Enabling Wi-Fi sharing on your iPhone is essential to establish a connection between your iPhone and Android device. Once Wi-Fi sharing is enabled, your Android device will be able to detect and connect to your iPhone’s network.
Note that the option to enable Wi-Fi sharing may differ slightly based on the iOS version you are using. However, the general process remains the same. If you are unable to find the “Personal Hotspot” option, try searching for it in the Settings search bar.
Step 3: Connect your Android device to your iPhone’s Wi-Fi network
Now that Wi-Fi sharing is enabled on your iPhone, it’s time to connect your Android device to your iPhone’s Wi-Fi network. Here’s how you can do it:
- Unlock your Android device and navigate to the “Settings” app.
- Tap on the “Wi-Fi” option to access the list of available networks.
- Your iPhone’s Wi-Fi network should be visible in the list. Look for the network name that you noted down in the previous step.
- Tap on your iPhone’s network name to initiate the connection process.
- Wait for your Android device to establish a connection with your iPhone’s network. This may take a few seconds.
- Once connected, you will see a “Connected” status next to your iPhone’s network name on your Android device.
It’s important to make sure that your Android device is in the range of your iPhone’s Wi-Fi network for a stable connection. If you are unable to find your iPhone’s network in the available networks list, try moving closer to your iPhone or refreshing the list by disabling and enabling Wi-Fi on your Android device.
Now that your Android device is connected to your iPhone’s Wi-Fi network, it’s time to proceed to the final step and enter the Wi-Fi password on your Android device.
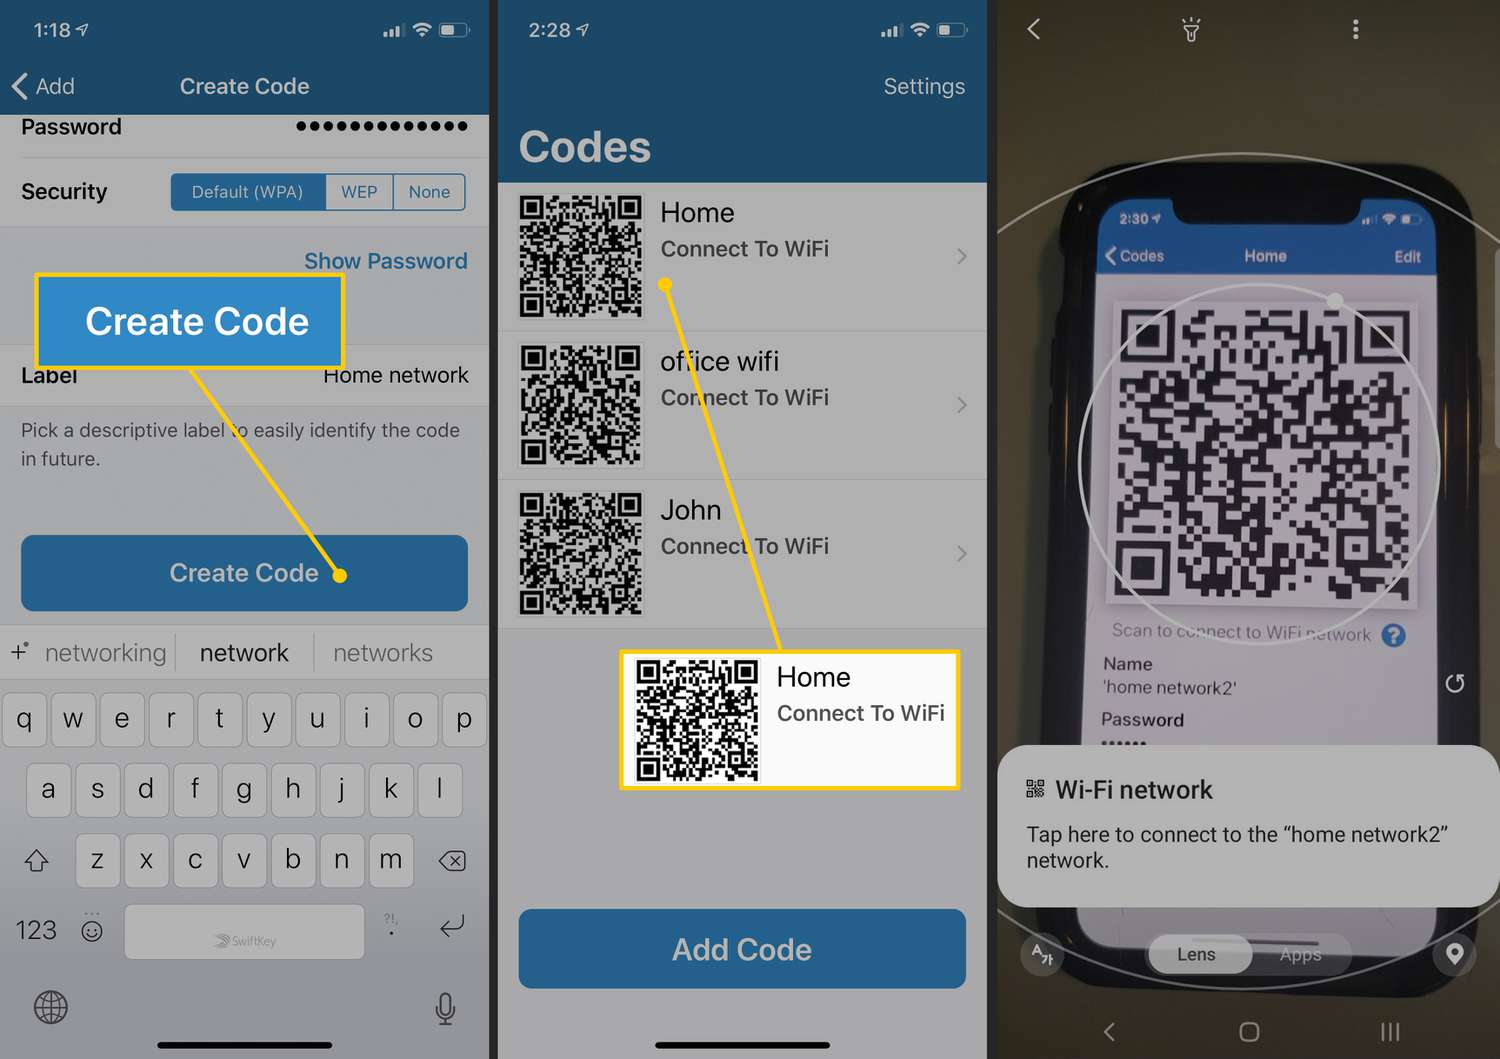
Step 4: Accept the Wi-Fi network on your Android device
After connecting your Android device to your iPhone’s Wi-Fi network, you will need to accept the network on your Android device for a successful connection. Here’s what you need to do:
- On your Android device, you may see a notification or a pop-up window asking you to sign in or acknowledge the Wi-Fi network. Tap on the notification or pop-up to proceed.
- A window will appear, displaying the network name and a security message. Take a moment to verify that the network name matches the one on your iPhone.
- Tap on the “Join” or “Accept” button to accept and connect to the Wi-Fi network on your Android device.
- If the Wi-Fi network requires a password, proceed to the next step. Otherwise, your Android device should now be connected to your iPhone’s Wi-Fi network.
If you don’t see a notification or pop-up window on your Android device, you can manually accept the Wi-Fi network by following these steps:
- Go to the “Settings” app on your Android device.
- Tap on the “Wi-Fi” option to access the list of available networks.
- Locate your iPhone’s Wi-Fi network in the list and tap on it.
- Tap on the “Connect” or “Join” button to initiate the connection process.
Once you have accepted the Wi-Fi network on your Android device, you’re just a few steps away from connecting to the network and enjoying internet access. Next, we’ll guide you through entering the Wi-Fi password on your Android device.
Step 5: Enter the Wi-Fi password on your Android device
Now that you have accepted the Wi-Fi network on your Android device, you need to enter the Wi-Fi password to establish a secure connection. Follow these steps to enter the Wi-Fi password:
- On your Android device, you will be prompted to enter the Wi-Fi password after accepting the network. Tap on the password field to bring up the keyboard.
- Using the keyboard, enter the Wi-Fi password exactly as it is on your iPhone.
- Double-check the password for any capitalization or special characters, as Wi-Fi passwords are case-sensitive.
- Once you have entered the password, tap on the “Connect” or “Join” button to proceed.
- Your Android device will now attempt to connect to the Wi-Fi network using the entered password.
- If the password you entered is correct, your Android device will establish a successful connection to the Wi-Fi network.
- Once connected, you will see the Wi-Fi network name with a “Connected” status in your Android device’s Wi-Fi settings.
If you are unable to establish a connection after entering the Wi-Fi password, double-check the password for any mistakes and try again. It’s crucial to enter the correct password to successfully connect to the network.
Congratulations! You have now successfully shared a Wi-Fi password from your iPhone to your Android device. You can enjoy browsing the internet and staying connected to the shared network on your Android device.
Remember, if you ever change the Wi-Fi password on your iPhone, you will need to repeat these steps to share the updated password with your Android device.
Conclusion
Sharing Wi-Fi passwords between devices can sometimes be a cumbersome process, especially when using different operating systems. However, this step-by-step guide has made it easy for iPhone users to share their Wi-Fi password with Android devices.
By following the simple steps outlined in this article, you can easily connect your Android device to your iPhone’s Wi-Fi network. From connecting to the Wi-Fi network on your iPhone, enabling Wi-Fi sharing, and connecting your Android device to your iPhone’s network, to accepting the Wi-Fi network and entering the password on your Android device, the entire process has been made clear and concise.
With the increasing need for connectivity in our daily lives, it’s essential to have a seamless way to share Wi-Fi passwords. Thanks to the built-in features of iPhones and Android devices, users can now share Wi-Fi networks effortlessly.
So, the next time you find yourself in a situation where you need to share your Wi-Fi network with an Android user, don’t fret. Just follow the steps outlined in this guide, and you’ll be able to share your Wi-Fi password hassle-free.
Remember, maintaining a stable Wi-Fi connection will ensure that your devices can communicate effectively and provide uninterrupted internet access. Additionally, always double-check the password and network details to ensure a smooth connection process.
Now that you know how to share a Wi-Fi password from your iPhone to your Android device, you can easily help friends and family connect to your network or effortlessly switch between devices without the hassle of manually entering passwords.
With this knowledge in your arsenal, stay connected, stay informed, and enjoy the convenience of sharing Wi-Fi passwords with ease!