Introduction
Welcome to our comprehensive guide on how to set up a second M.2 SSD in your computer. M.2 SSDs have become increasingly popular due to their compact form factor and lightning-fast speeds, making them an excellent choice for expanding storage or improving system performance.
In this article, we will take you through the process of selecting the right M.2 SSD for your needs, preparing your computer for installation, and the steps involved in installing and configuring the second M.2 SSD.
Whether you are a PC enthusiast looking to maximize storage capacity or a gamer seeking faster load times, this guide will equip you with the knowledge and skills necessary to successfully set up a second M.2 SSD.
Before we dive into the technical details, it is important to mention that setting up a second M.2 SSD requires some level of familiarity with computer hardware and basic troubleshooting. If you are not confident in your technical abilities, we recommend seeking the assistance of a qualified professional.
With that said, let’s get started on our journey to unleashing the full potential of your computer by setting up a second M.2 SSD.
Understanding M.2 SSDs
M.2 SSDs are a type of solid-state drive that utilize the M.2 form factor, which allows for a smaller and more streamlined design compared to traditional 2.5-inch SATA SSDs. These SSDs connect directly to the motherboard, either via a dedicated M.2 slot or through an M.2 adapter card.
One of the key advantages of M.2 SSDs is their impressive speed. They utilize the PCIe (Peripheral Component Interconnect Express) or NVMe (Non-Volatile Memory Express) interface, which enables them to achieve much faster transfer rates compared to traditional SATA SSDs. This means that M.2 SSDs can significantly improve your system’s overall performance, reducing boot times, application loading times, and file transfer speeds.
Another benefit of M.2 SSDs is their compact size. The M.2 form factor allows for easy installation in laptops, ultrabooks, and small form factor desktops, where space is limited. Additionally, M.2 SSDs do not require any power or data cables, simplifying the installation process and reducing cable clutter within your system.
It is also worth noting that M.2 SSDs come in different lengths and widths, indicated by various form factors such as 2280, 2260, and 2242. The numbers represent the dimensions of the SSD in millimeters, with the first two digits indicating the width and the remaining digits representing the length. When selecting an M.2 SSD, make sure to check the specifications of your motherboard or system to ensure compatibility.
While M.2 SSDs offer numerous advantages, there are a few considerations to keep in mind. M.2 SSDs generate more heat compared to traditional SSDs, so it is crucial to ensure proper airflow within your system to prevent overheating. Additionally, older motherboards may not support NVMe or PCIe M.2 SSDs and only offer compatibility with SATA-based M.2 SSDs. It is essential to consult your motherboard’s manual or specifications to determine which types of M.2 SSDs are supported.
Now that you have an understanding of what M.2 SSDs are and their benefits, let’s move on to selecting the right M.2 SSD for your needs.
Choosing the Right M.2 SSD
When it comes to choosing the right M.2 SSD, there are a few factors to consider to ensure optimal performance and compatibility with your system.
The first consideration is the capacity of the M.2 SSD. Determine your storage needs and choose a capacity that provides enough space for your operating system, applications, and files. M.2 SSDs are available in a wide range of capacities, from 128GB to several terabytes, so you can select the one that best suits your requirements.
Next, consider the speed of the M.2 SSD. As mentioned earlier, M.2 SSDs can utilize either the PCIe or NVMe interface, which significantly boosts their performance compared to SATA-based SSDs. Look for M.2 SSDs that support these faster interfaces to take full advantage of their speed capabilities.
It is also essential to pay attention to the endurance rating of the M.2 SSD. This rating indicates how durable the SSD is and how many write cycles it can withstand. Higher endurance ratings are especially important for users who frequently write large amounts of data to their drives, such as video editors or data professionals. Be sure to check the endurance rating provided by the manufacturer before making a purchase.
Take note of the form factor compatibility of the M.2 SSD with your motherboard or system. As mentioned earlier, M.2 SSDs come in different lengths and widths. Ensure that the SSD you choose matches the M.2 slot on your motherboard or the specifications of your system. Most modern motherboards support the 2280 form factor, but it is still a good idea to verify compatibility to avoid any compatibility issues.
Finally, consider the brand and reputation of the manufacturer. Opt for reputable brands that have a track record of producing reliable and high-quality SSDs. Reading reviews and checking user feedback can help you make an informed decision.
By considering these factors – capacity, speed, endurance, form factor compatibility, and brand reputation – you can confidently choose the right M.2 SSD that meets your needs and ensures optimal performance for your system.
Now that you have chosen the perfect M.2 SSD, it’s time to prepare your computer for the installation process, which we will cover in the next section.
Preparing Your Computer
Before installing the second M.2 SSD, it is crucial to properly prepare your computer to ensure a smooth installation process and avoid any potential issues. Follow these steps to get your computer ready:
1. Power Off and Disconnect: Turn off your computer and disconnect the power cable. This step is essential to prevent any electrical mishaps during the installation process.
2. Ground Yourself: Ground yourself by touching a grounded metal surface or using an anti-static wristband. This helps prevent any static electricity from damaging your computer components.
3. Gather Tools: Collect the necessary tools for the installation, such as a small Phillips head screwdriver. It is also helpful to have a flashlight handy to ensure visibility inside your computer case.
4. Locate M.2 Slot: Determine the location of the M.2 slot on your motherboard. Consult your motherboard manual or manufacturer’s website for its exact location. The M.2 slot is usually located near the CPU socket or close to the PCIe slots.
5. Check Compatibility: Confirm that your motherboard supports a second M.2 SSD. Some motherboards may have limitations or restrictions on the number of M.2 slots available or the type of SSD supported. Refer to your motherboard’s manual or specifications to verify compatibility.
6. Clear Space: Clear any obstructions or cables near the M.2 slot to ensure easy access during the installation process. This step helps prevent any accidental damage to other components or interference with the installation.
7. Update BIOS: Check if there are any BIOS updates available for your motherboard. Updating the BIOS ensures that your motherboard has the latest firmware, which can provide better compatibility and stability for your M.2 SSD.
By following these preparatory steps, you are now ready to proceed with the physical installation of the second M.2 SSD. In the next section, we will guide you through the installation process step by step.
Installing the Second M.2 SSD
Now that you have prepared your computer, it’s time to install the second M.2 SSD. Follow these steps to ensure a successful installation:
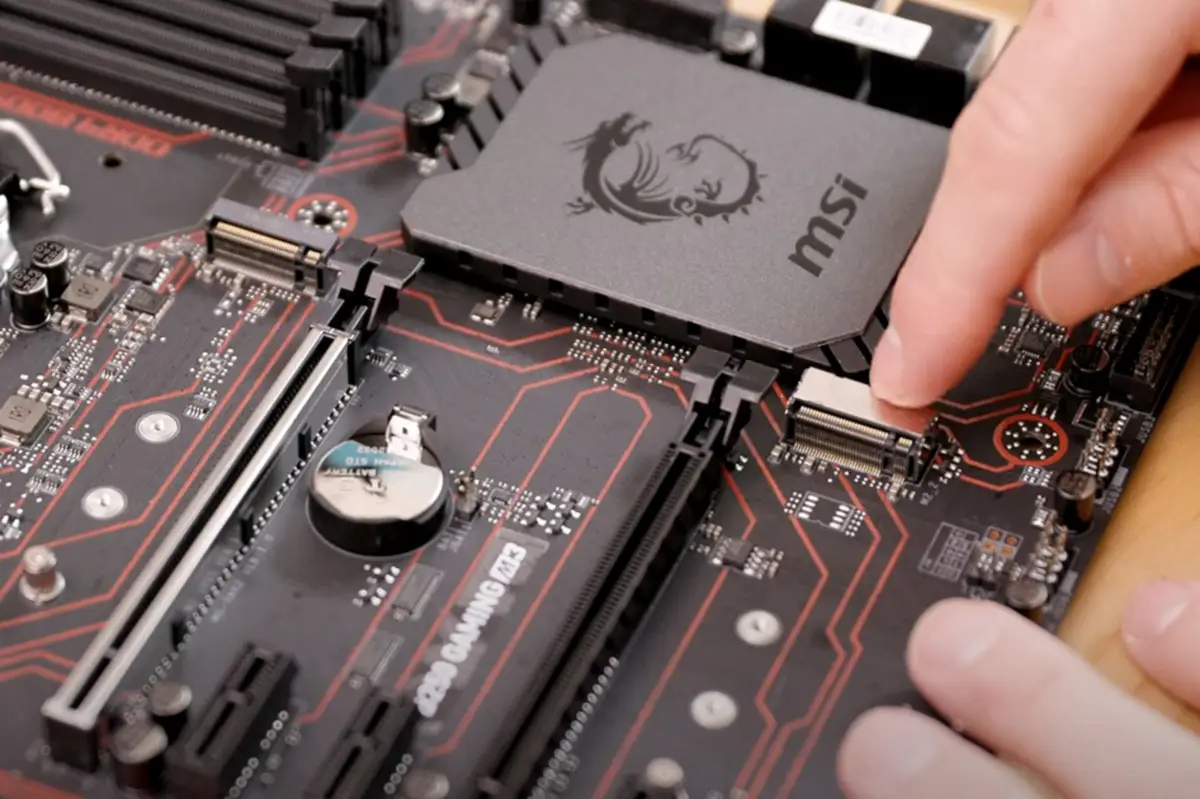
1. Locate the M.2 Slot: Identify the M.2 slot on your motherboard where you will be installing the second SSD. It is important to note that some motherboards may have multiple M.2 slots, so ensure that you choose the correct one for the installation.
2. Remove the Mounting Screw: Most M.2 slots have a securing screw that holds the SSD in place. Locate the mounting screw and use a small Phillips head screwdriver to remove it.
3. Insert the SSD: Hold the M.2 SSD by its edges and carefully align it with the slot. Insert the SSD at an angle, ensuring that the notches on the SSD align with the keying slot on the M.2 slot. Gently press the SSD down until it is fully seated in the slot.
4. Secure the SSD: Once the SSD is fully inserted, use the mounting screw you removed in Step 2 to secure the SSD in place. Be careful not to overtighten the screw, as it may damage the SSD or the motherboard.
5. Reassemble and Connect: If necessary, reassemble any components that were removed to gain access to the M.2 slot. Ensure that all cables and connectors are properly reconnected, including the power and data cables for other drives in your system.
6. Power On and Verify: Power on your computer and enter the BIOS to check if the second M.2 SSD is recognized. Consult your motherboard’s manual for instructions on accessing the BIOS. If the SSD is detected, you can proceed with configuring the BIOS settings, which we will cover in the next section.
Congratulations! You have successfully installed the second M.2 SSD into your computer. In the next section, we will guide you through the process of configuring the BIOS settings to ensure proper recognition and functionality of the newly installed SSD.
Configuring BIOS Settings
After installing the second M.2 SSD, it’s important to configure the BIOS settings to ensure that the SSD is recognized and functioning optimally. Follow these steps to configure the BIOS settings:
1. Access BIOS: Restart your computer and enter the BIOS setup. The key to access the BIOS may vary depending on your motherboard manufacturer. Common keys include Del, F2, F10, or Esc. Refer to your motherboard’s manual or manufacturer’s website for the specific key.
2. Navigate to Storage Settings: Once in the BIOS setup, navigate to the section that controls storage devices or SATA configuration. The specific location and naming may differ depending on your motherboard model.
3. Enable M.2 Slot: Look for an option to enable the M.2 slot. This option may be labeled as “M.2 PCIe Configuration” or similar. Ensure that the M.2 slot where you installed the second SSD is enabled.
4. Set Boot Order: Adjust the boot order if necessary to prioritize the operating system installation on the second M.2 SSD. This step ensures that your system boots from the correct SSD. Refer to the BIOS manual for instructions on modifying the boot order.
5. Save and Exit: Once you have made the necessary changes, save your settings and exit the BIOS setup. The specific key to save and exit may be F10 or a similar function key.
After configuring the BIOS settings, your computer should recognize the second M.2 SSD properly. However, it is recommended to double-check the recognition in the operating system. Proceed to the next section to learn how to initialize and format the second M.2 SSD.
Initializing and Formatting the Second M.2 SSD
Once you have configured the BIOS settings for the second M.2 SSD, the next step is to initialize and format the drive in your operating system. Follow these steps to complete the initialization and formatting:
1. Access Disk Management: In Windows, right-click the Start menu and select “Disk Management” from the context menu. This will open the Disk Management utility.
2. Identify the Second M.2 SSD: Look for the newly installed M.2 SSD in the list of drives. It should be labeled as “Unallocated” or “Not Initialized.”
3. Initialize the SSD: Right-click on the unallocated space of the second M.2 SSD and select “Initialize Disk.” Choose the appropriate disk initialization style (MBR or GPT) based on your requirements. Click “OK” to initialize the drive.
4. Create a New Partition: After initializing the second M.2 SSD, right-click on the unallocated space and select “New Simple Volume.” Follow the on-screen instructions to set the partition size, assign a drive letter, and choose the file system format (such as NTFS). Proceed with the prompts to complete the creation of the new partition.
5. Format the Partition: Once the partition is created, right-click on it and select “Format.” Choose the file system format and allocation unit size that best suits your needs. Click “OK” to format the partition.
6. Assign a Drive Letter: After formatting the partition, right-click on it and select “Change Drive Letter and Paths.” Click “Add” and choose an available drive letter to assign to the partition. Click “OK” to complete the process.
7. Verify the Formatting: Open “This PC” or “My Computer” to access the newly formatted drive. Ensure that it appears with the assigned drive letter and that you can write and read files to and from the drive.
By following these steps, you have successfully initialized and formatted the second M.2 SSD. Now you can begin using it for storage or as a dedicated drive for specific applications.
In the next section, we will discuss how to verify and confirm that the second M.2 SSD setup is functioning as expected.
Verifying the Second M.2 SSD Setup
After completing the initialization and formatting of the second M.2 SSD, it is crucial to verify that everything is functioning properly. Follow these steps to verify the setup:
1. Check Drive Recognition: Open “This PC” or “My Computer” and ensure that the second M.2 SSD is listed with the assigned drive letter. Confirm that you can read and write files to and from the drive without any issues.
2. Run Disk Benchmarking Software: To assess the performance of your newly installed M.2 SSD, consider running a disk benchmarking tool. These tools measure read and write speeds, as well as other performance metrics, allowing you to compare the performance of your second M.2 SSD with other drives.
3. Monitor Temperature: Keep an eye on the temperature of the second M.2 SSD using monitoring software or the BIOS. M.2 SSDs can generate more heat than traditional SSDs, so it’s important to ensure that the temperature remains within safe limits to prevent thermal throttling and potential damage to the drive.
4. Perform File Transfer Test: Copy large files or folders to and from the second M.2 SSD to verify its transfer speeds and performance. Check if the speeds are in line with the specifications provided by the manufacturer.
5. Verify Boot Time Reduction: If you have installed the operating system on the second M.2 SSD, compare the boot time with the previous setup. With the faster speeds of the M.2 SSD, you should experience a significant improvement in boot times.
6. Run Applications: Launch applications and games from the second M.2 SSD to assess the loading times and performance improvements. Compare these speeds to when the applications were run from a different drive to gauge the impact of the M.2 SSD on overall system performance.
By following these verification steps, you can ensure that the second M.2 SSD is properly set up and providing the desired performance benefits. If you encounter any issues or discrepancies, refer to the manufacturer’s documentation or seek assistance from technical support.
Now that you have successfully verified the setup, you can enjoy the enhanced storage capacity or improved performance offered by your second M.2 SSD.
Conclusion
Congratulations! You have successfully set up a second M.2 SSD in your computer. By following the steps outlined in this guide, you have expanded your storage capacity or improved your system’s performance to a whole new level.
In this article, we began by understanding the basics of M.2 SSDs and their benefits, including their compact size and lightning-fast speeds. We then delved into the process of selecting the right M.2 SSD for your needs, considering factors such as capacity, speed, endurance, form factor compatibility, and brand reputation.
After choosing the perfect M.2 SSD, we moved on to preparing your computer for installation, ensuring that you had the necessary tools and cleared any obstructions. We then provided a step-by-step guide on installing the second M.2 SSD into your system, securing it in place for optimal performance.
Next, we explored the essential task of configuring the BIOS settings to recognize and properly utilize the new M.2 SSD. These settings ensure that your system boots from the correct drive and maximizes the performance of your M.2 SSD.
Following the BIOS configuration, we walked you through the process of initializing and formatting the second M.2 SSD within your operating system. This step ensures that the drive is ready for use and allows you to allocate space and format it to your desired file system.
In the final section, we emphasized the importance of verifying the setup, including checking drive recognition, benchmarking performance, monitoring temperature, performing file transfer tests, and assessing boot times and application performance. These verifications enable you to ensure that your second M.2 SSD is functioning as intended and providing the expected benefits.
Setting up a second M.2 SSD is a fantastic way to expand storage capacity, increase system performance, and improve overall productivity. Whether you’re a gamer, creative professional, or power user, the addition of a second M.2 SSD can have a significant impact on your computing experience.
We hope that this guide has been informative and helpful in guiding you through the process of setting up a second M.2 SSD. With the knowledge and steps provided, you can confidently tackle this installation and take full advantage of the benefits of M.2 SSD technology.
Now, go ahead and enjoy the enhanced storage and performance capabilities that your second M.2 SSD brings to your computer!