Introduction
Welcome to our guide on how to set up a macro on your Logitech mouse! If you’re someone who spends a lot of time on your computer, whether for work or gaming, you probably know how repetitive certain tasks can be. This is where macros come in handy. A macro is a series of commands or actions that can be automated, allowing you to perform complex tasks or execute multiple commands with just a single mouse click.
Logitech mice are known for their durability, comfort, and their ability to be customized to suit individual needs. One of the most powerful features they offer is the ability to utilize macros. With Logitech’s gaming software, you can easily create, assign, and fine-tune macros to specific mouse buttons, streamlining your workflow and giving you an edge in gaming.
In this article, we will provide you with a step-by-step guide on how to set up a macro on your Logitech mouse. Whether you want to assign a macro to a button for quick text input, automate repetitive tasks, or gain an advantage in your favorite game, we’ve got you covered. So, let’s dive in and unlock the potential of your Logitech mouse!
What is a Macro?
Before we jump into the process of setting up a macro on your Logitech mouse, it’s important to understand what a macro actually is. In simple terms, a macro is a pre-recorded set of instructions or commands that can be assigned to a specific button on your mouse or keyboard. When you press that button, the macro is triggered and executes the recorded actions.
Macros can be incredibly useful in automating repetitive tasks or performing complex actions with just a single click. Instead of manually executing a series of commands or keystrokes, you can create a macro to handle them all for you. This not only saves you time and effort but also ensures consistency in your actions.
For example, imagine you frequently use certain applications or software that require a set of actions to be performed every time you launch them. With a macro, you can record those actions and assign them to a mouse button. Now, with just a click of that button, the macro will automatically perform all those actions, saving you from the repetitive and tedious process of doing them manually.
In the gaming world, macros have become a popular way to gain a competitive edge. Gamers can record complex sequences of commands or macros that allow them to perform combos, execute quick actions, or respond swiftly in intense gameplay situations. By assigning these macros to mouse buttons, gamers can access these actions with ease, giving them a significant advantage over their opponents.
Overall, macros are an incredibly useful tool that can enhance productivity, streamline workflow, and improve gaming performance. With Logitech’s customization options, you have the ability to create and assign macros to your mouse buttons, allowing you to personalize your mouse to suit your needs and make your computing experience more efficient.
Benefits of Using Macros on Your Logitech Mouse
Using macros on your Logitech mouse can bring numerous advantages to your computing experience. Here are some of the key benefits:
- Increased Efficiency: Macros enable you to automate repetitive tasks, saving you time and effort. Instead of executing a series of commands manually, you can assign them to a macro and perform them with just a single click. This can significantly speed up your workflow and improve your overall efficiency.
- Customization: Logitech mice come with advanced customization options that allow you to personalize your mouse to suit your specific needs. With macros, you can assign functions and actions to different mouse buttons, tailoring your mouse to match your workflow or gaming preferences. This level of customization can greatly enhance your user experience.
- Streamlined Workflow: If you find yourself performing a set of actions repeatedly while working or gaming, using macros can streamline your workflow. Whether it’s copying and pasting text, formatting documents, or executing a specific sequence of commands, macros can automate these tasks, freeing up your time and mental energy for more important tasks.
- Gaming Advantage: Macros have become increasingly popular among gamers for their ability to provide a competitive edge. By assigning complex commands or actions to macros, gamers can execute them quickly and effortlessly, giving them an advantage in fast-paced gaming scenarios. Macros can help perform combos, activate special abilities, or execute precise movements, all with the press of a button.
- Consistency: With macros, you can ensure consistency in your actions. By recording a sequence of commands, you eliminate the risk of human error or forgetting a step. This is particularly useful when performing tasks that require precise and repetitive actions, such as data entry or graphic design.
Overall, using macros on your Logitech mouse can improve your efficiency, streamline your workflow, provide a competitive advantage in gaming, and offer a higher level of customization. With the ability to automate repetitive tasks and perform complex actions with ease, macros can take your mouse usage to the next level.
Step-by-Step Guide: How to Set Up a Macro on Logitech Mouse
Setting up a macro on your Logitech mouse is a straightforward process. Just follow these step-by-step instructions:
- Step 1: Install Logitech Gaming Software
- Step 2: Open Logitech Gaming Software and Locate the Macro Settings
- Step 3: Creating a New Macro
- Step 4: Assigning the Macro to a Mouse Button
- Step 5: Testing and Fine-Tuning the Macro
The first thing you need to do is install the Logitech Gaming Software. This software provides you with advanced customization options, including macro creation and assignment. Visit the Logitech website and download the software compatible with your Logitech mouse model. Once downloaded, run the installer and follow the on-screen instructions to complete the installation process.
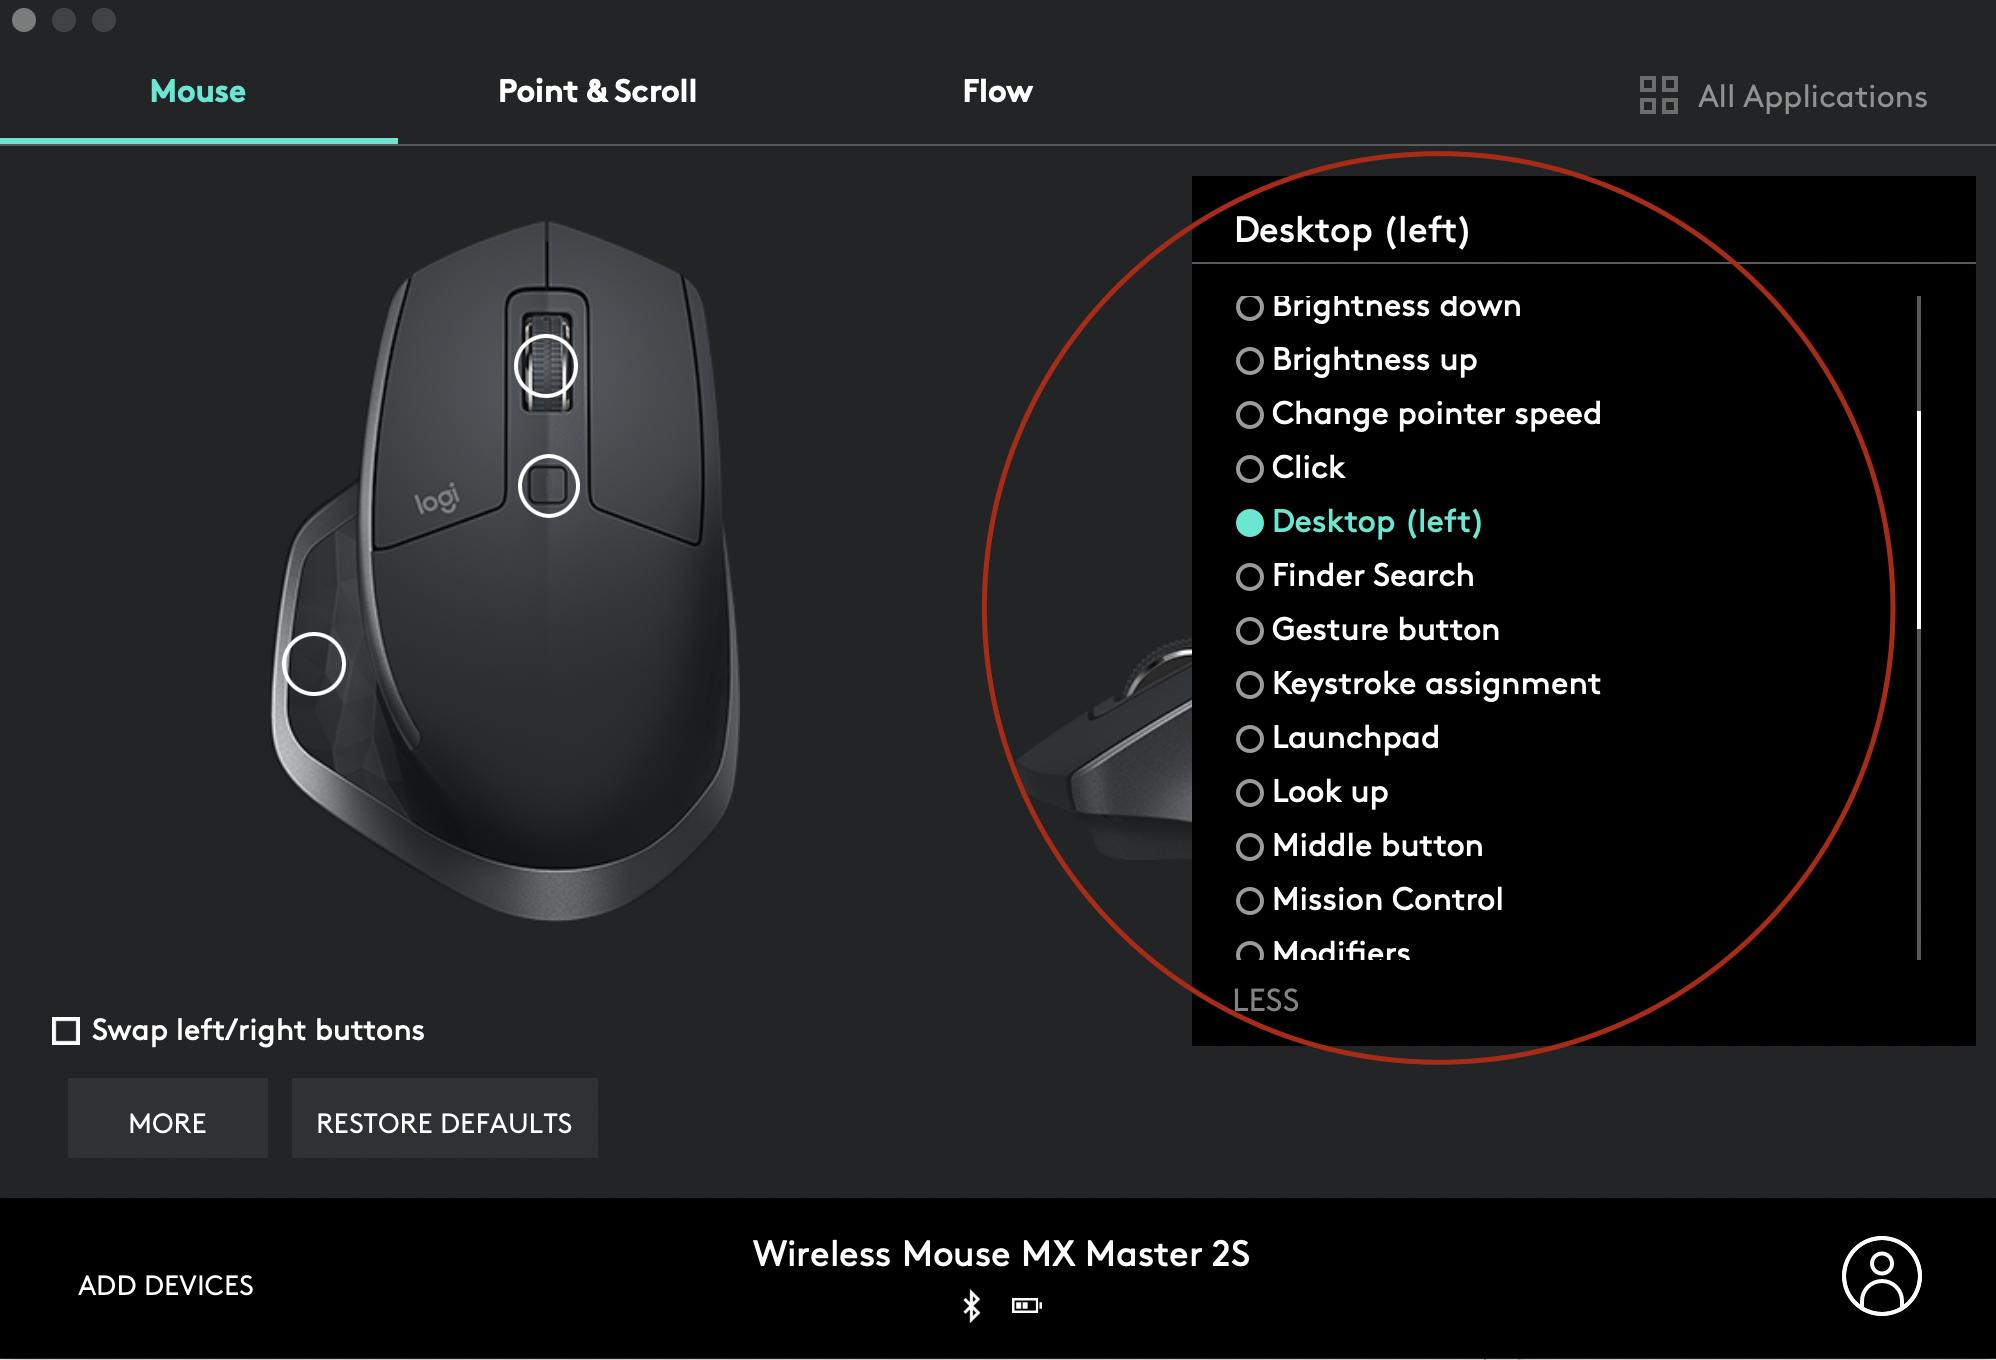
After installing the Logitech Gaming Software, open the program. The software will detect your Logitech mouse automatically. In the software interface, look for the macro settings or customization options. The location of these settings may vary slightly depending on the version of the software, but they are generally found in a dedicated “macros” or “customization” section.
In the macro settings, click on the option to create a new macro. You will be prompted to give your macro a name. Choose a descriptive name that will help you identify the macro easily.
Once you’ve created the macro, it’s time to assign it to a mouse button. Select the button you want to assign the macro to from a list of available buttons. You can assign a macro to any button on your Logitech mouse, including the standard left and right buttons, as well as additional buttons present on certain models.
After assigning the macro to a mouse button, it’s advisable to test it to ensure it performs the desired actions. Click the assigned button and observe the execution of the macro. If any adjustments or refinements are needed, you can go back to the macro settings, edit the macro, and make the necessary changes.
And that’s it! You have successfully set up a macro on your Logitech mouse. Repeat these steps as needed to create and assign macros to other buttons on your mouse. Unlock the full potential of your Logitech mouse by automating your most repetitive tasks or gaining a competitive advantage in gaming.
Step 1: Install Logitech Gaming Software
The first step in setting up a macro on your Logitech mouse is to install the Logitech Gaming Software. This software is specifically designed to provide advanced customization options and control over your Logitech gaming peripherals, including macro creation and assignment.
To begin, you need to visit the Logitech website and locate the download section for the Logitech Gaming Software. Make sure you choose the version that is compatible with your operating system. Once you’ve downloaded the installer file, double-click it to start the installation process.
Follow the on-screen instructions to complete the installation. The software will guide you through the installation steps, such as agreeing to the terms and conditions and selecting the destination folder for the software.
Once the installation is complete, you can launch the Logitech Gaming Software. Depending on your operating system, you may find it in the Start menu, Applications folder, or through a shortcut icon on your desktop.
When you open the Logitech Gaming Software, it will automatically detect your Logitech mouse and display it in the software interface. This ensures that you have the right communication between the software and your mouse for customization purposes.
By installing the Logitech Gaming Software, you gain access to a wide range of customization options not only for macros but also for DPI settings, button configuration, lighting effects, and more, depending on your specific Logitech mouse model. The software provides a user-friendly interface that makes it easy to navigate and customize your mouse according to your preferences.
Keep in mind that some older Logitech mouse models may use different software, such as Logitech SetPoint or Logitech Options, instead of the Logitech Gaming Software. Make sure to check the Logitech website for the appropriate software for your specific mouse model.
With the Logitech Gaming Software installed, you are now ready to move on to the next step of setting up a macro on your Logitech mouse, which involves opening the software and locating the macro settings.
Step 2: Open Logitech Gaming Software and Locate the Macro Settings
Once you have successfully installed the Logitech Gaming Software, the next step is to open the software and locate the macro settings. The Logitech Gaming Software provides a user-friendly interface where you can access and customize various settings, including macros, for your Logitech mouse.
To get started, launch the Logitech Gaming Software on your computer. You can usually find it in the Start menu, Applications folder, or through a shortcut icon on your desktop. When you open the software, it will automatically detect and display your Logitech mouse in the software interface.
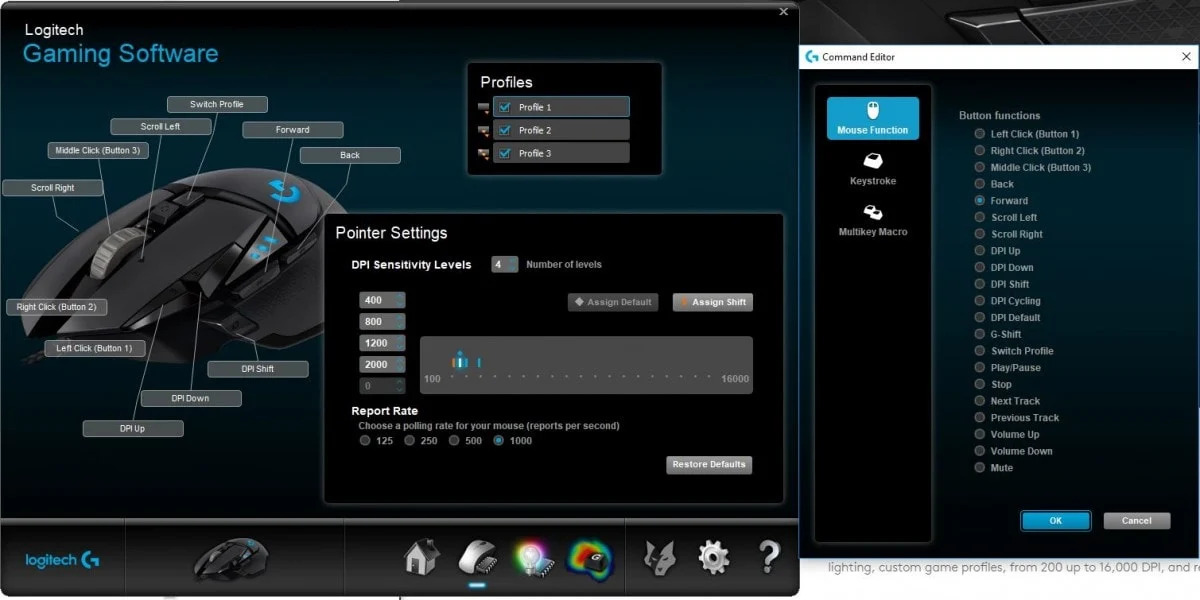
Once the software is open and your mouse is recognized, navigate to the section in the software that is dedicated to macros. The location of this section may vary slightly depending on the version of the Logitech Gaming Software you are using, but it is typically found in a tab or menu labeled “macros” or “customization”.
Within the macro settings section, you will find options to create, edit, and manage your macros. You may also have the ability to import or export macros, allowing you to share them with others or use predefined macros created by the Logitech community.
It’s worth noting that the specific features and options available in the macro settings may vary depending on your Logitech mouse model. Some advanced gaming mice may offer additional options such as delay settings, repeat functions, or the ability to assign macros to specific profiles.
Browsing through the macro settings, you may also come across the option to assign macros to specific profiles. Profiles allow you to create different sets of macros and button configurations for different applications or games. This can be handy if you want to automate certain tasks in one software but not in another.
Take some time to explore the macro settings in the Logitech Gaming Software. Familiarize yourself with the available options and layout, as you will be using these settings to create, assign, and manage your macros.
Now that you have opened the Logitech Gaming Software and located the macro settings, you are ready to move on to the next step of the process, which involves creating a new macro.
Step 3: Creating a New Macro
Now that you have opened the Logitech Gaming Software and located the macro settings, it’s time to create a new macro for your Logitech mouse. Creating a macro allows you to record a series of commands or actions that can be executed with just a single click of a button.
Follow these steps to create a new macro:
- Within the macro settings of the Logitech Gaming Software, look for an option or button to create a new macro. This may be labeled as “New Macro,” “Add Macro,” or similar.
- Click on the option to create a new macro. You will be prompted to provide a name for the macro. Choose a descriptive name that will help you easily identify the macro later on.
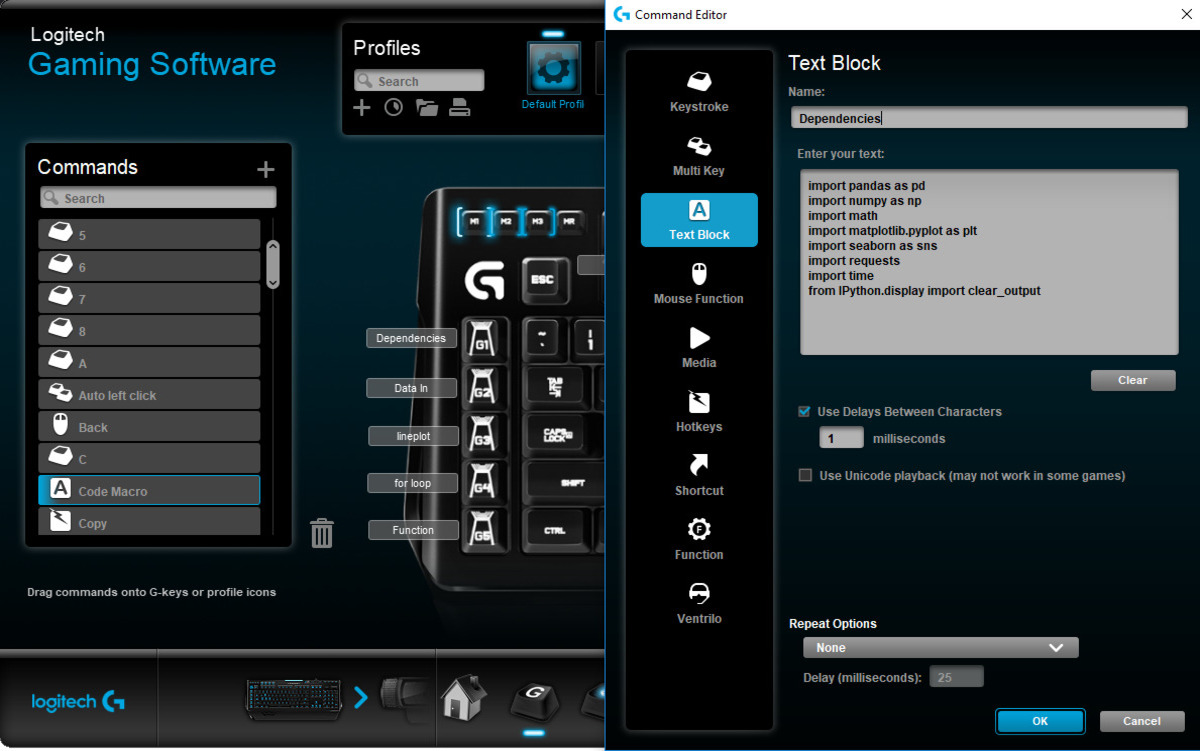
- After naming the macro, you will need to start recording your desired actions. Look for a “Record” or “Start Recording” button within the macro settings.
- Click on the “Record” button to begin recording your actions. From this point onwards, any action you perform on your mouse or keyboard will be recorded by the software.
- Carry out the actions or commands that you want to include in your macro. This can range from simple keystrokes, mouse clicks, or even complex sequences of commands.
- If needed, you can pause or stop the recording at any time by clicking on the appropriate buttons within the macro settings.
- Once you have recorded all the desired actions, click on the “Stop Recording” or “Save Macro” button to finalize the macro.
With these steps, you have successfully created a new macro on your Logitech mouse. The software will save the recorded actions and associate them with the macro name you provided. You can now proceed to the next step to assign the macro to a specific mouse button.
Keep in mind that the Logitech Gaming Software may offer additional options for editing or refining your macros. These options could include adjusting the playback speed, adding delays between actions, deleting or rearranging recorded steps, or adding conditions for more advanced customization. Explore the software’s capabilities to ensure your macro is tailored to your specific needs.
Now that you have created a new macro, move on to step 4 to learn how to assign it to a mouse button on your Logitech mouse.
Step 4: Assigning the Macro to a Mouse Button
After creating a new macro on your Logitech mouse using the Logitech Gaming Software, the next step is to assign the macro to a specific mouse button. This allows you to trigger the macro and execute the recorded actions with a single click. Here’s how to assign the macro to a mouse button:
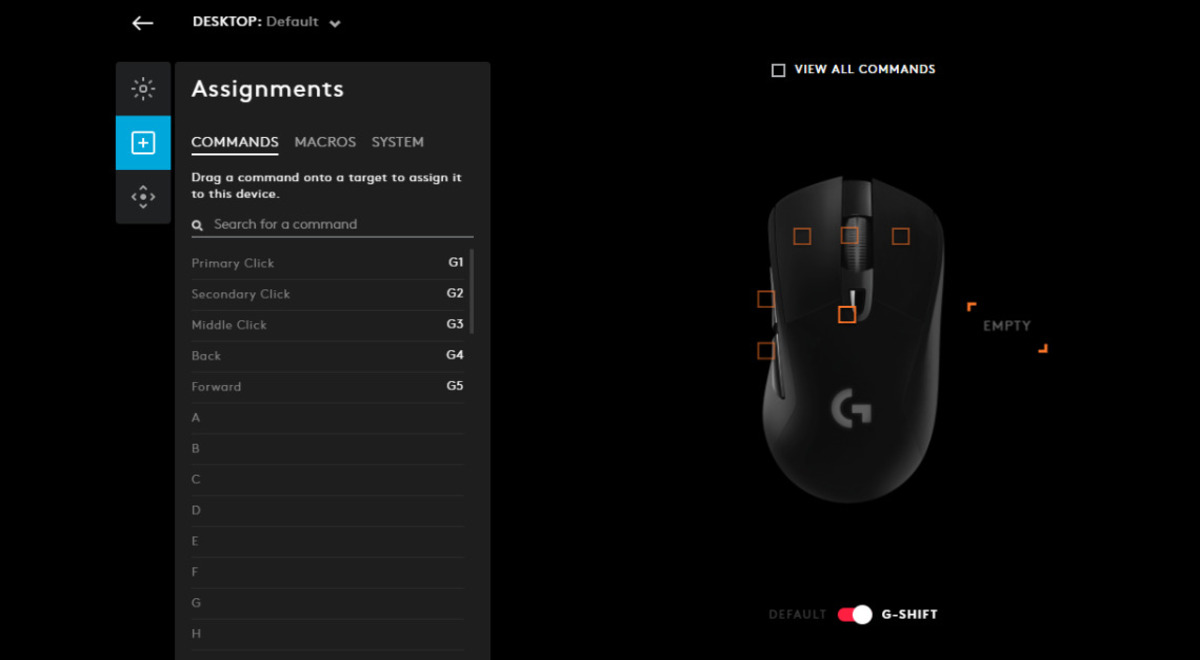
- Within the macro settings of the Logitech Gaming Software, look for the option to assign the macro to a mouse button. This may be labeled as “Assign Button,” “Button Assignment,” or similar.
- Click on the option to assign a button and you will be presented with a list of buttons available on your Logitech mouse.
- Select the button to which you want to assign the macro. This can include standard buttons like the left and right buttons, as well as any additional buttons present on your specific Logitech mouse model.
- Once you’ve selected the button, you will see the macro you created listed as an available option. Choose the macro from the list to assign it to the selected button.
- After assigning the macro to the button, you can further customize the button behavior if needed. This may include options such as a single click, double click, or a long press.
- Click on the “Apply” or “Save” button to apply the changes and save the macro assignment to the selected mouse button.
Once you have completed these steps, the macro will be assigned to the mouse button you selected. Whenever you press that button, the recorded actions of the macro will be executed, providing you with the desired functionality or automation.
It’s important to note that some Logitech mice may have additional buttons with specialized features like DPI adjustment buttons or profile switching buttons. You can assign macros to these buttons as well, expanding the capabilities of your Logitech mouse even further.
For gaming enthusiasts, assigning macros to mouse buttons can give you an edge in gameplay. You can program complex sequences of in-game actions, execute combos, or activate special abilities with just a single click, enhancing your gaming performance and efficiency.
Continue to the next step to learn how to test and fine-tune the macro to ensure it performs as expected.
Step 5: Testing and Fine-Tuning the Macro
After assigning a macro to a mouse button on your Logitech mouse, it’s important to test and fine-tune the macro to ensure it performs the desired actions accurately. This step allows you to make any necessary adjustments or refinements to optimize the functionality of the macro. Here’s how to test and fine-tune the macro:
- Ensure that the Logitech Gaming Software is still open on your computer.
- Take a moment to familiarize yourself with the assigned mouse button for the macro. Make sure you remember which button triggers the macro, as it will be necessary for testing purposes.
- Load the application or software where you want to use the macro. If the macro is intended for gaming purposes, open the game you wish to play.
- Click the assigned mouse button to trigger the macro. Observe the execution of the macro and verify that it performs the intended actions smoothly.
- If the macro doesn’t work as expected, return to the macro settings in the Logitech Gaming Software.
- Review the recorded actions of the macro and make any necessary adjustments. This may include adding delay between actions, re-recording certain steps, or deleting unnecessary actions.
- Repeat the testing process by clicking the assigned mouse button again to trigger the macro. Continue fine-tuning and testing until the macro performs exactly as desired.
- Once you’re satisfied with the macro’s performance, make sure to save any changes you made in the Logitech Gaming Software.
Testing and fine-tuning the macro is crucial to ensure that it automates the actions accurately and seamlessly. By carefully reviewing and adjusting the recorded steps, you can eliminate any potential issues or inconsistencies in the macro’s execution.
It’s important to note that the Logitech Gaming Software may offer additional options for further customization of macros, such as adjusting playback speed, adding conditions, or configuring profile-specific settings. Explore these options if you require advanced customization for your macros.
By testing and fine-tuning your macros, you can optimize their performance, saving you time and effort on repetitive tasks or providing a competitive advantage in gaming.
With the macro successfully tested and fine-tuned, you have completed the process of setting up a macro on your Logitech mouse. Enjoy the convenience, efficiency, and customization that macros bring to your computing or gaming experience!
Additional Tips and Tricks for Using Macros on Logitech Mouse
Now that you have set up macros on your Logitech mouse, here are some additional tips and tricks to help you make the most out of this powerful feature:
- Organize Your Macros: If you plan on creating multiple macros for different purposes, it’s helpful to organize them. Create folders or categories within the Logitech Gaming Software to keep your macros neatly organized and easily accessible.
- Explore Predefined Macros: The Logitech Gaming Software may offer a library of predefined macros for popular applications or games. Take advantage of these pre-made macros, as they can save you time and effort in creating macros from scratch.
- Combine Macros with Profiles: If your Logitech mouse supports profiles, consider using different profiles for specific applications or games. Assign macros to buttons within each profile to switch between different sets of macros effortlessly.
- Share Macros: If you’ve created a particularly useful macro, consider sharing it with others in the Logitech community. You can export your macros and share the file, allowing others to import and use them on their Logitech mice.
- Backup Your Macros: It’s always a good idea to regularly back up your macros. Export your macros as a backup file and store it in a safe location. This ensures that you don’t lose your macros in case of a software update or computer change.
- Experiment and Iterate: Don’t be afraid to experiment and iterate with your macros. Test different combinations of actions, adjust delays, and refine the macros based on your specific needs. Continuous improvement will help you achieve optimal customization and efficiency.
- Update Your Logitech Software: Periodically check for updates to the Logitech Gaming Software. Software updates often bring new features, bug fixes, and performance improvements. Keeping your software up to date ensures you have access to the latest functionalities and enhancements.
- Read Logitech Forums and Communities: Join Logitech forums and communities to learn from other users and share your experiences. Engaging in these platforms can provide you with additional tips, tricks, and inspiration for using macros on your Logitech mouse.
By following these tips and tricks, you can make the most out of macros on your Logitech mouse. Whether for productivity or gaming, macros offer a powerful way to automate tasks, improve efficiency, and enhance your overall user experience.
Remember to always respect the terms of use and guidelines of any application or game you use macros with. Ensure that your macros are used responsibly and in accordance with the rules set forth by the software developers or game publishers.
Now, armed with these tips and tricks, go ahead and explore the full potential of macros on your Logitech mouse!
Conclusion
Congratulations, you have successfully learned how to set up and use macros on your Logitech mouse! By utilizing the Logitech Gaming Software, you can easily create, assign, and fine-tune macros to enhance your productivity, streamline your workflow, and gain a competitive advantage in gaming.
Macros provide you with the ability to automate repetitive tasks, perform complex actions with a single click, and customize your Logitech mouse to suit your specific needs. Whether you’re a professional, a student, or a passionate gamer, macros can greatly simplify your computing experience and increase your efficiency.
Throughout this guide, we covered each step of the process, from installing the Logitech Gaming Software to creating and assigning macros to specific mouse buttons. We also explored additional tips and tricks to help you make the most out of macros, such as organizing your macros, exploring predefined macros, and experimenting with different combinations.
Remember to always test and fine-tune your macros to ensure they perform as intended. Regularly update your Logitech software to access new features and improvements. And don’t forget to back up your macros to prevent any loss in case of software updates or changes.
By harnessing the power of macros on your Logitech mouse, you can streamline your workflow, save time, and optimize your gaming performance. This powerful customization feature allows you to take full control of your mouse and create a computing experience tailored to your needs.
Keep exploring the possibilities, experimenting with different macros, and sharing your experiences with the Logitech community. There’s always more to learn and discover as you dive deeper into the world of macros.
Now, it’s time to put your newfound knowledge into action and start enjoying the benefits that macros bring to your Logitech mouse. Happy macro-ing!