Introduction
Have you ever found yourself performing repetitive tasks on your computer that require multiple clicks? It can be time-consuming and tedious, but there is a solution – an Auto Clicker. An Auto Clicker is a software program that automates mouse clicks, allowing you to save time and effort. In this guide, we will specifically focus on setting up an Auto Clicker using Logitech software.
Logitech is a well-known brand that produces a wide range of computer accessories, including mice. They also offer software that allows you to customize various settings and create macros to automate tasks. By utilizing the Logitech software, you can easily set up an Auto Clicker that suits your needs and improves your productivity.
In the following sections, we will walk you through the step-by-step process of setting up an Auto Clicker using Logitech software. We will also provide tips and tricks to help you make the most out of this useful tool. So, let’s get started and learn how to simplify your repetitive tasks with the help of an Auto Clicker!
What is an Auto Clicker?
An Auto Clicker is a software program that automates mouse clicks, eliminating the need for manual clicking. It is especially useful for tasks that involve repetitive clicking, such as gaming, data entry, or online form filling. With an Auto Clicker, you can save time and reduce physical strain on your hand.
An Auto Clicker works by replicating the mouse clicks you would normally perform. You can control the click interval, duration, and location on the screen where the clicks should be executed. This flexibility allows you to customize the Auto Clicker based on your specific needs.
Auto Clickers are commonly used in various industries and activities. For gamers, Auto Clickers can automate certain actions in games, such as repeatedly clicking to attack or gather resources. In data entry or form filling tasks, an Auto Clicker can speed up the process by automatically clicking on specified fields or buttons. Additionally, Auto Clickers can be helpful for web scraping, where repetitive actions need to be performed on websites to gather data.
One of the advantages of using Auto Clickers is that they can significantly increase productivity. By automating repetitive tasks, you can focus on more important aspects of your work or leisure activities. Moreover, Auto Clickers provide accuracy and consistency, as they eliminate the risk of human error that is common when performing monotonous tasks.
While Auto Clickers offer convenience and efficiency, it is important to use them responsibly and ethically. They should only be used for legitimate purposes and within the boundaries of applicable laws and regulations. It is essential to respect the terms of service of any software or platform you are using and ensure that your actions are not in violation of any rules or policies.
Now that you have a better understanding of what an Auto Clicker is, let’s proceed with learning how to set up an Auto Clicker using Logitech software.
Benefits of Using Auto Clicker
Using an Auto Clicker can bring numerous benefits to your workflow and overall productivity. Let’s explore some of the key advantages:
- Time Saving: One of the primary benefits of using an Auto Clicker is the time it saves. Performing repetitive clicking tasks manually can be time-consuming and monotonous. With an Auto Clicker, you can automate these actions, allowing you to focus on other important tasks or enjoy your leisure time.
- Increased Efficiency: By automating repetitive clicking tasks, an Auto Clicker enhances your efficiency. You can complete tasks faster and with greater accuracy, as the Auto Clicker ensures consistent clicks at the predetermined intervals.
- Reduced Physical Strain: Manual clicking can lead to physical strain, particularly when repetitive actions are involved. An Auto Clicker alleviates this strain by eliminating the need for constant mouse clicking. This can help reduce the risk of developing repetitive strain injuries and enhance overall comfort during computer use.
- Improved Gaming Performance: Gamers can greatly benefit from using Auto Clickers. Whether it’s for automating repetitive actions in games or optimizing clicking speed for increased efficiency, Auto Clickers provide an edge in gaming performance and can enhance the overall gaming experience.
- Flexible Customization: Auto Clickers offer customization options that allow you to tailor the clicking parameters to your specific needs. You can adjust the click interval, duration, and location on the screen where the clicks should be executed. This flexibility ensures that the Auto Clicker adapts to various tasks and scenarios.
- Accuracy and Consistency: Human error is eliminated when using an Auto Clicker, resulting in increased accuracy and consistent clicking. This is particularly crucial for tasks that require precise clicking sequences or data entry tasks that demand error-free input.
By harnessing the power of an Auto Clicker, you can streamline your workflow, reduce manual effort, and achieve higher levels of productivity. However, it’s important to use Auto Clickers responsibly and ethically, following applicable laws, terms of service, and guidelines provided by the software or platform you are using.
Step 1: Downloading the Logitech Software
The first step in setting up an Auto Clicker using Logitech software is to download the required software onto your computer. Here’s how you can do it:
- Go to the official Logitech website or use a trusted software download platform to download the Logitech Gaming Software or Logitech G HUB, depending on the specific Logitech product you have.
- Navigate to the support or downloads section of the website and search for the Logitech software compatible with your Logitech device.
- Click on the “Download” button or link to initiate the download process. Ensure that you download the software from the official Logitech website or a reputable source to avoid any potential security risks.
- Follow the on-screen instructions to complete the download. Depending on your internet connection speed, the download process may take a few moments.
- Once the software is downloaded, locate the installer file (usually in the “Downloads” folder) and double-click on it to start the installation process.
- Follow the installation wizard prompts to install the Logitech software on your computer. Make sure to read and accept any applicable terms and conditions.
- Once the installation is complete, you can launch the Logitech software and proceed to the next step.
Downloading the Logitech software is the initial step towards setting up an Auto Clicker. It provides the necessary platform to customize and configure your Logitech device for automation purposes. With the software installed, you are now ready to move on to the next steps in the setup process.
Step 2: Installing the Logitech Software
After downloading the Logitech software onto your computer, the next step in setting up an Auto Clicker is to install the software. Follow these instructions to install the Logitech software:
- Locate the installer file you downloaded in the previous step.
- Double-click on the installer file to initiate the installation process. You may be prompted to grant administrative privileges to proceed.
- Follow the installation wizard prompts that appear on your screen. Typically, you will be presented with a license agreement that you need to read and accept.
- Choose the destination folder where you want to install the Logitech software. You can either keep the default installation path or choose a custom location.
- Select any additional components or features that you want to install along with the main Logitech software. This step may vary depending on the specific Logitech product you have.
- Once you have made your selections, click on the “Install” or “Next” button to start the installation process.
- Wait for the installation to complete. The progress bar will indicate the installation progress, and it may take a few moments to finish.
- Once the installation is complete, you will be presented with an option to launch the Logitech software. Check the box if you want to open the software immediately, or leave it unchecked if you prefer to launch it manually later.
After completing the installation process, the Logitech software will be ready for use. You can now proceed to the next step in setting up the Auto Clicker using the Logitech software.
Step 3: Creating a New Profile
Once you have successfully installed the Logitech software on your computer, the next step in setting up an Auto Clicker is to create a new profile. Follow these steps to create a new profile:
- Launch the Logitech software by locating the program in your computer’s applications or by clicking on the desktop shortcut, if available.
- Once the software is open, navigate to the profiles section. This section may be named differently depending on the version of the Logitech software you are using, but it is usually found in the main menu or toolbar.
- In the profiles section, click on the option to create a new profile. This option is typically represented by a “+” or “Add” button.
- Give your new profile a meaningful name that will help you identify its purpose. For example, you can name it “Auto Clicker” or something similar.
- Choose the device that you want to assign this profile to. If you have multiple Logitech devices connected to your computer, select the appropriate one.
- Configure any additional settings or preferences for your profile. This step may include customization options such as lighting effects, sensitivity, or other device-specific settings.
- Save your new profile by clicking on the “Save” or “Apply” button. The Logitech software will typically confirm the successful creation of the new profile.
By creating a new profile, you are essentially establishing a dedicated space within the Logitech software where you can customize and configure specific settings for your Auto Clicker. This allows you to have different profiles for various tasks or applications, ensuring optimal performance and convenience.
With the new profile created, you are now ready to move on to the next step in setting up the Auto Clicker using the Logitech software.
Step 4: Activating the Macro
After creating a new profile in the Logitech software, the next step in setting up an Auto Clicker is to activate the macro functionality. A macro is a recorded sequence of actions that can be automated and assigned to a button on your Logitech device. Follow these steps to activate the macro:
- In the Logitech software, navigate to the macros section. This section may be found within the profile settings or in a separate tab, depending on the version of the software you are using.
- Click on the option to create a new macro. This option is typically represented by a “+” or “Add” button.
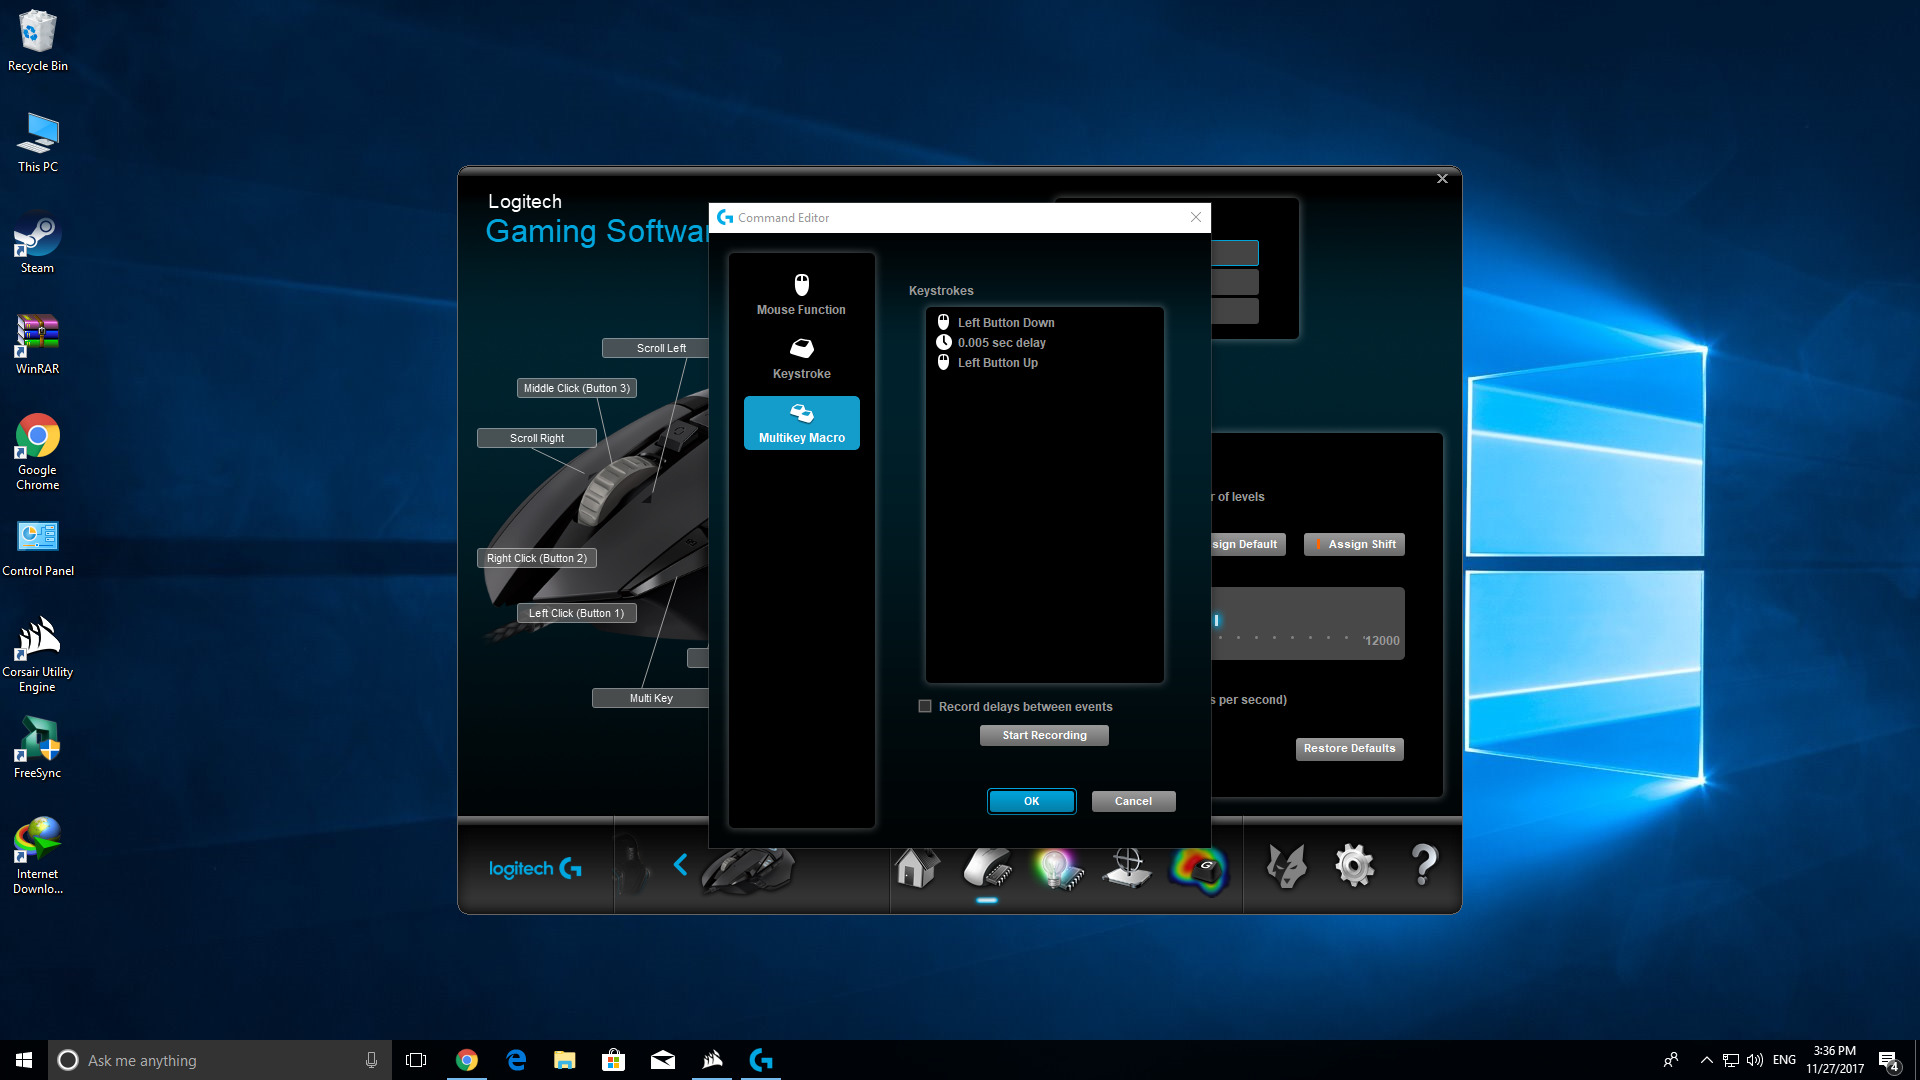
- A macro editor interface will appear, allowing you to record and configure the actions for the macro. Click on the “Record” or “Start Recording” button to begin recording your actions.
- Perform the clicking actions that you want to automate. For example, if you want to automate a single left-click, simply click on the desired location using your Logitech device.
- Once you have finished recording the actions, click on the “Stop Recording” or “Finish” button to conclude the recording process.
- Review the recorded macro and make any necessary adjustments. You can edit the timing or add additional actions if needed. This step allows you to fine-tune the automation process to suit your specific requirements.
- Save the macro by clicking on the “Save” or “Apply” button within the macro editor interface. The Logitech software will typically confirm the successful creation of the macro.
By activating the macro functionality and recording your desired actions, you are preparing the framework for the Auto Clicker to execute those actions automatically. With the macro created and saved, you can now proceed to the next step in setting up the Auto Clicker using the Logitech software.
Step 5: Setting up the Auto Clicker
After activating the macro functionality and recording the desired actions, the next step in setting up an Auto Clicker using Logitech software is to configure the settings for the Auto Clicker. Follow these steps to set up the Auto Clicker:
- In the Logitech software, navigate to the settings or configurations section. This section may be found within the macro settings or in a separate tab, depending on the version of the software you are using.
- Locate the macro that you created in the previous step and select it. This will allow you to access the specific settings for the Auto Clicker.
- Configure the click interval, which is the time delay between each click. This interval determines the speed at which the Auto Clicker performs the clicks. Adjust the interval based on your preferences and the requirements of the task.
- Set the number of clicks that the Auto Clicker should perform. This can be a specific number or an infinite loop, depending on your needs. For example, if you want the Auto Clicker to keep clicking until you manually stop it, you can set the click count to “infinite.”
- Choose the type of click you want the Auto Clicker to execute. It can be a left-click, right-click, or other types of clicks, depending on your requirements.
- Specify the location on the screen where the Auto Clicker should perform the clicks. This can be a specific coordinate or a pre-defined target area.
- Save the Auto Clicker settings by clicking on the “Save” or “Apply” button in the settings interface. The Logitech software will confirm the successful configuration of the Auto Clicker.
By setting up the Auto Clicker according to your preferences and task requirements, you are customizing the automation process to suit your needs. With the settings saved, you are ready to proceed to the next step and assign a hotkey to the Auto Clicker.
Step 6: Adjusting Click Speed and Delay
After setting up the basic parameters of the Auto Clicker, the next step is to adjust the click speed and delay to optimize the automation process. Fine-tuning these settings ensures that the Auto Clicker performs at the desired pace and achieves the desired outcomes. Follow these steps to adjust the click speed and delay:
- In the Logitech software, locate the settings or configurations section for the Auto Clicker. This section may be found within the macro settings or in a separate tab, depending on the version of the software you are using.
- Find the click speed or click interval setting. This setting determines the time interval between each click. Adjust this value based on the speed at which you want the Auto Clicker to perform the clicks. Smaller values result in faster clicking, while larger values introduce delays between clicks.
- Consider the specific requirements of your task and adjust the click speed accordingly. For tasks that demand quick and rapid clicking, a smaller interval (e.g., 10-50 milliseconds) may be appropriate. However, if precision and slower clicking are necessary, a larger interval (e.g., 100-500 milliseconds) may be more suitable.
- Review the click delay setting, if available. This setting allows you to introduce a delay before the Auto Clicker starts performing its clicks. Adjust this value based on your needs. For some tasks, a slight delay is necessary to allow the system or application to respond before the clicks are executed.
- Test the adjusted settings to ensure that the Auto Clicker performs as desired. Monitor the clicks and observe the timing to see if any further adjustments are needed.
- Once you are satisfied with the click speed and delay adjustments, save the settings in the Logitech software by clicking on the “Save” or “Apply” button in the settings interface. The software will indicate that the changes have been successfully applied.
By adjusting the click speed and delay, you can fine-tune the performance of the Auto Clicker, ensuring that it meets the requirements of your task while maintaining precision and accuracy. Proceed to the next step to assign a hotkey for convenient activation of the Auto Clicker.
Step 7: Assigning a Hotkey
To make the activation of the Auto Clicker more convenient and efficient, you can assign a hotkey that triggers the automation process with a simple key combination. By assigning a hotkey, you can quickly start and stop the Auto Clicker whenever needed. Follow these steps to assign a hotkey:
- In the Logitech software, navigate to the settings or configurations section for the Auto Clicker. This section may be found within the macro settings or in a separate tab, depending on the version of the software you are using.
- Locate the option to assign a hotkey to the Auto Clicker. This option is typically labeled as “Hotkey” or “Keyboard Shortcut.”
- Click on the option to assign a new hotkey. A dialogue box or input field will appear, allowing you to specify the key combination for the hotkey.
- Press the keys or combination of keys that you want to assign as the hotkey. It can be a single key, a combination of keys (e.g., Ctrl+Shift+C), or a function key (e.g., F1). Make sure to choose a combination that is easily accessible and memorable for your convenience.
- Save the assigned hotkey by clicking on the “Save” or “Apply” button in the settings interface. The Logitech software will confirm the successful assignment of the hotkey.
With the hotkey assigned, you can now activate and deactivate the Auto Clicker with a simple key combination. This makes it easier to control the automation process and allows for quick responsiveness to your tasks. Proceed to the next step to test and use the Auto Clicker.
Step 8: Testing and Using the Auto Clicker
After setting up the Auto Clicker and assigning a hotkey, it’s important to test it to ensure that it performs as expected. Testing allows you to verify the accuracy, speed, and functionality of the Auto Clicker before using it for your intended tasks. Follow these steps to test and use the Auto Clicker:
- Open an application or website where you want to use the Auto Clicker. Make sure that the location on the screen where you want the clicks to be performed is visible and accessible.
- Activate the Auto Clicker by pressing the assigned hotkey. This will start the automation process, and the Auto Clicker will begin performing the clicks at the specified interval.
- Observe the clicks and their timing. Ensure that the Auto Clicker is clicking in the correct location and at the desired speed. If any adjustments are needed, refer back to the earlier setup steps to fine-tune the Auto Clicker settings.
- During the testing phase, perform various actions in the application or website to ensure that the Auto Clicker responds accurately and performs the clicks consistently. This will help you validate whether the Auto Clicker aligns with your intended workflow.
- If the Auto Clicker is performing as expected, you can start using it for your tasks. Activate it by pressing the assigned hotkey whenever you need the automation process to begin. Deactivate it by pressing the hotkey again to stop the Auto Clicker.
- Monitor the usage of the Auto Clicker and make any necessary adjustments as you gain more experience. Fine-tuning the settings and optimizing the click speed may enhance your efficiency and effectiveness.
By testing and using the Auto Clicker, you can verify its functionality and ensure that it meets your requirements for automating repetitive clicking tasks. Take the time to familiarize yourself with its operation, and make any refinements as needed to enhance your workflow and productivity.
Tips and Tricks for Using Auto Clicker Efficiently
While an Auto Clicker can significantly boost your productivity, there are some tips and tricks that can help you use it more efficiently. Here are some recommendations to make the most out of your Auto Clicker:
- Customize Click Speed: Experiment with different click speeds to find the optimal setting for your specific task. Adjusting the click speed can ensure that the Auto Clicker performs at the desired pace, striking a balance between speed and accuracy.
- Consider Click Delay: In some cases, introducing a slight delay before the Auto Clicker starts performing its clicks can help with synchronization. Test different click delay settings to determine if it improves the performance and efficiency of the Auto Clicker for your particular task.
- Use Targeted Click Locations: Specify the exact location on the screen where you want the clicks to be executed. This is especially useful if you are working with specific buttons or elements on a webpage or application. Precise targeting ensures that the Auto Clicker performs the clicks exactly where you intend.
- Combine Macros and Auto Clicker: Take advantage of the macro functionality in Logitech software by creating more complex sequences of actions. By combining macros with the Auto Clicker, you can automate multi-step processes or perform a series of actions with a single hotkey.
- Test in Safe Environment: Before using the Auto Clicker in critical or sensitive tasks, test it in a safe and controlled environment. This allows you to understand its behavior and ensure that it performs as expected without any unintended consequences.
- Stay within Legal and Ethical Boundaries: Always use the Auto Clicker responsibly and within the confines of applicable laws and regulations. Be mindful of the terms of service of any software or platform you are using and avoid using the Auto Clicker for activities that may breach those terms or violate ethical guidelines.
- Regularly Update and Maintain: Keep your Logitech software and any associated drivers up to date. Regular updates ensure that you have the latest features, bug fixes, and security patches for a seamless Auto Clicker experience.
- Constantly Evaluate Efficiency: Continuously evaluate your usage of the Auto Clicker to identify areas for improvement. Assess if the Auto Clicker is genuinely enhancing your productivity and adjust the settings or workflows accordingly.
By implementing these tips and tricks, you can maximize the efficiency and effectiveness of your Auto Clicker usage. Remember to use the Auto Clicker responsibly and ethically, respecting the terms and guidelines of the software or platform you are using.
Conclusion
Setting up an Auto Clicker using Logitech software can greatly simplify your workflow and enhance your productivity. By automating repetitive clicking tasks, you can save time, reduce physical strain, and improve efficiency. Throughout this guide, we have covered the step-by-step process of setting up an Auto Clicker using Logitech software:
- Downloading the Logitech Software
- Installing the Logitech Software
- Creating a New Profile
- Activating the Macro
- Setting up the Auto Clicker
- Adjusting Click Speed and Delay
- Assigning a Hotkey
- Testing and Using the Auto Clicker
By following these steps, you can customize your Auto Clicker to fit your specific needs and tasks. Additionally, we have provided valuable tips and tricks to help you use the Auto Clicker efficiently, such as customizing click speed, considering click delay, using targeted click locations, combining macros with the Auto Clicker, and evaluating your usage for continuous improvement. Remember to update your Logitech software regularly and adhere to legal and ethical boundaries.
Using an Auto Clicker can revolutionize the way you approach repetitive clicking tasks, whether in gaming, data entry, or other activities. It frees up your time, reduces physical strain, and allows you to focus on more important aspects of your work or leisure. However, it’s essential to use the Auto Clicker responsibly and ethically, respecting the terms and guidelines of the software or platform you are using.
Now that you are equipped with the knowledge and steps to set up an Auto Clicker using Logitech software, go ahead and automate those repetitive tasks, streamline your workflow, and enjoy a more efficient and productive computer experience.