Introduction
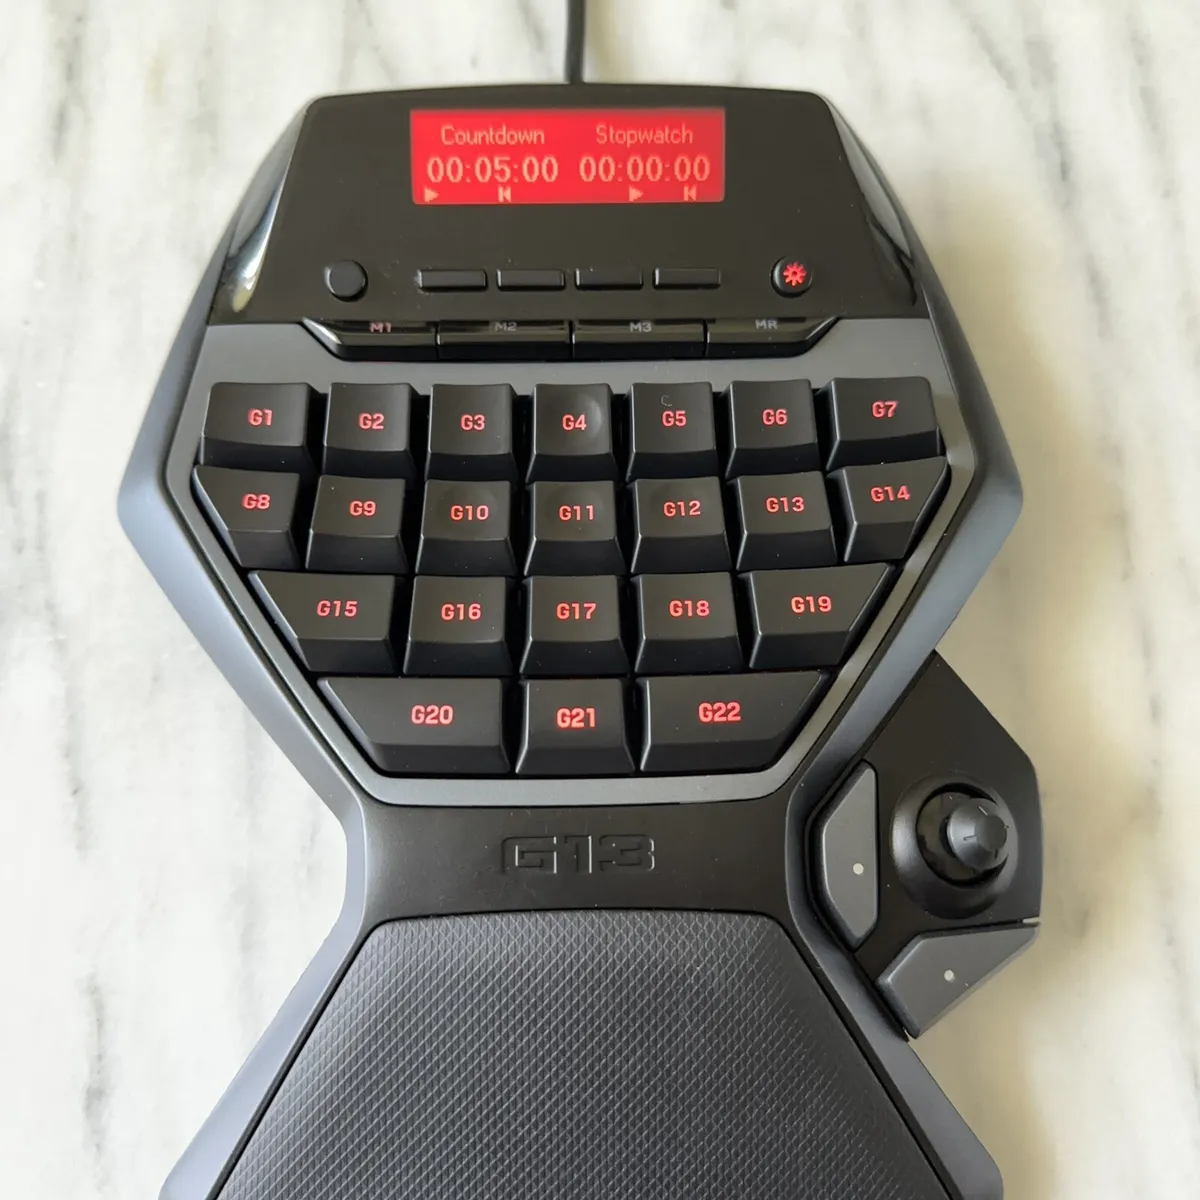
The Logitech G13 is a powerful gaming peripheral that offers a range of customizable features to enhance your gaming experience. Designed with comfort and precision in mind, the G13 combines a ergonomic design with a full array of programmable buttons and a built-in joystick, making it perfect for both casual and hardcore gamers.
Whether you play FPS, MMO, or any other genre of games, the Logitech G13 is a versatile tool that can give you a competitive edge. With its intuitive software, you can create custom profiles, assign macros, and even set up personalized game-specific configurations.
In this article, we will guide you on how to harness the full potential of the Logitech G13. From setting up the software to programming macros, we will walk you through each step, ensuring that you have a seamless and hassle-free experience.
So, if you’re ready to take your gaming to the next level, let’s dive in and explore the incredible capabilities of the Logitech G13!
Getting Started with Logitech G13
Before you can begin using the Logitech G13, there are a few essential steps you need to take to ensure a smooth setup process. Let’s go over the key points to get you started:
- Unboxing and Connecting
- Downloading the Logitech Software
- Installing the Logitech Software
- Connecting the G13 to the Logitech Software
- Updating Firmware
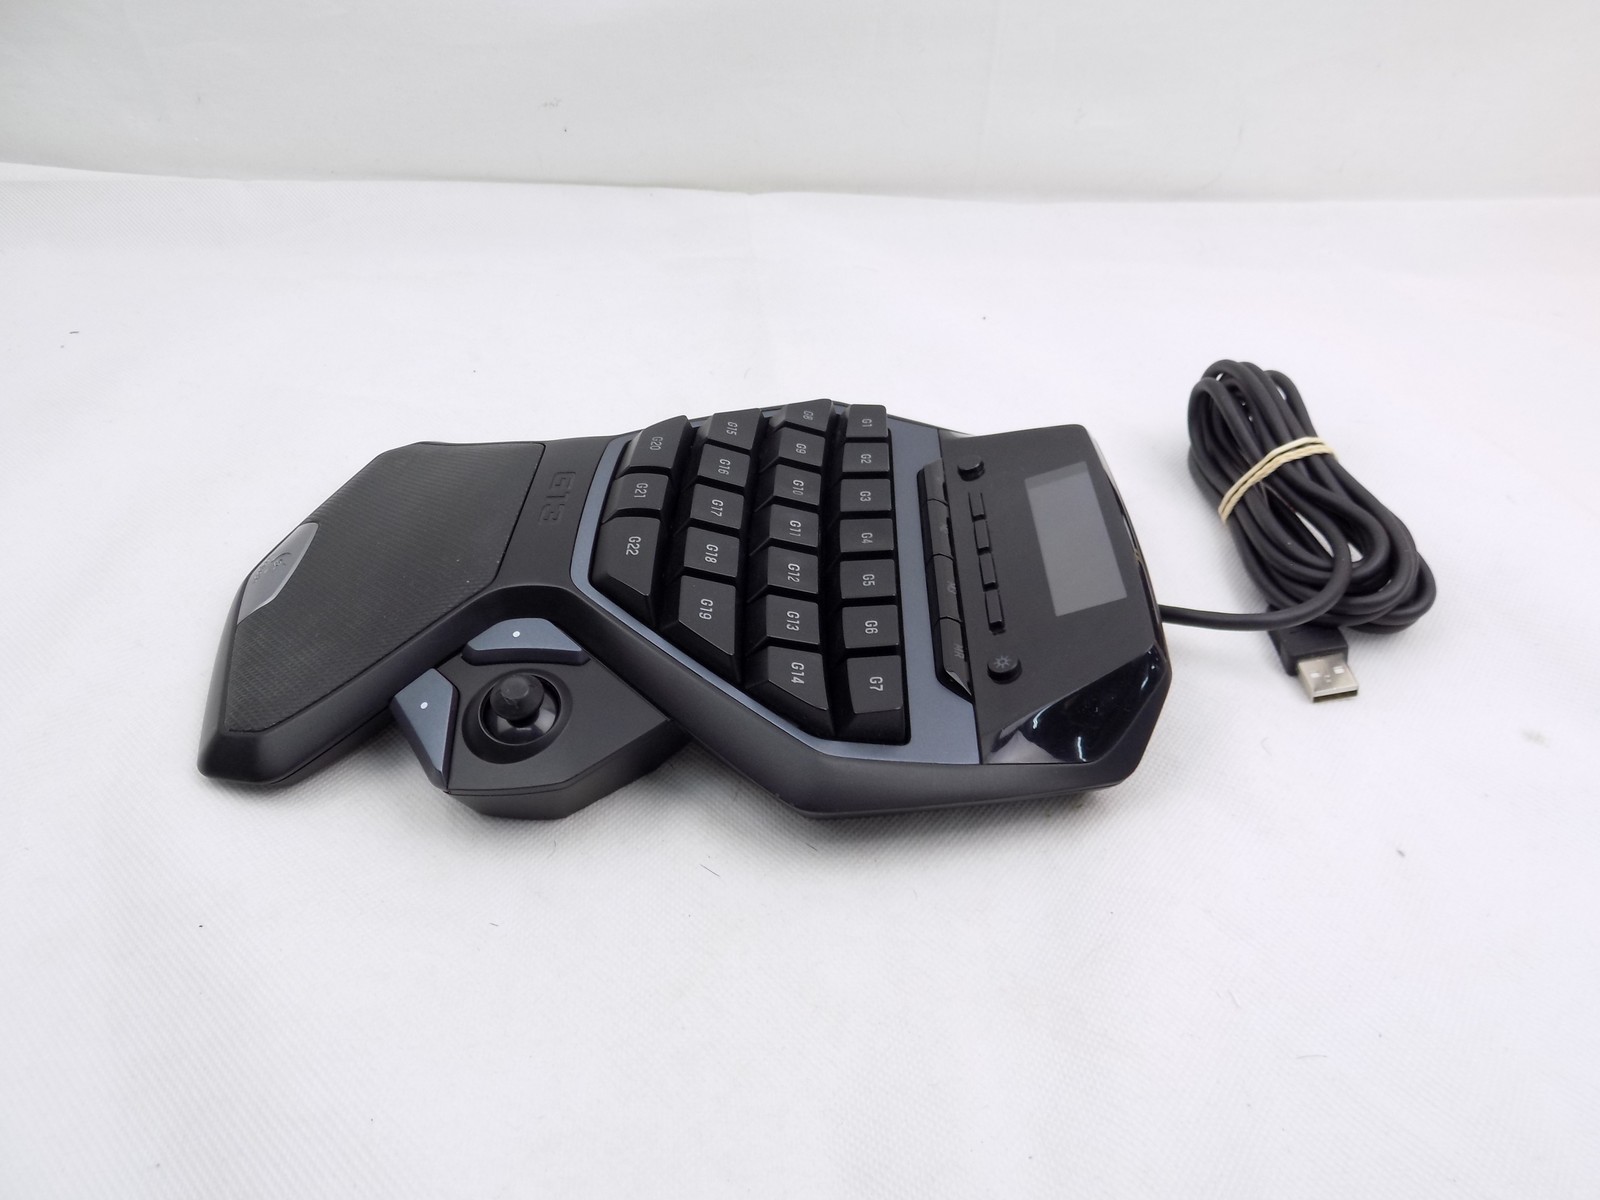
Start by unboxing your Logitech G13 and familiarize yourself with its components. Connect the G13 to your computer using the provided USB cable. Ensure that the cable is properly plugged into both the G13 and your computer’s USB port.
To fully unleash the power of the Logitech G13, you need to download the Logitech Gaming Software from the official Logitech website. This software provides you with the tools to customize your G13 according to your preferences.
After downloading the Logitech Gaming Software, run the installer and follow the on-screen instructions to install it on your computer. Once the installation is complete, restart your computer to ensure that the software is properly integrated.
Launch the Logitech Gaming Software and connect your G13 to the software by following the prompts displayed on the screen. These prompts may include updates or driver installations, so make sure to comply with them for optimal functionality.
Once your G13 is connected to the Logitech Software, check for any available firmware updates. These updates can improve compatibility, fix bugs, and enhance overall performance. Follow the instructions provided by the software to update your G13’s firmware.
With these steps completed, you are now ready to explore the various customization options and features offered by the Logitech G13. In the next section, we will delve deeper into the software and show you how to personalize your G13 to suit your gaming needs.
Setting Up the Logitech G13 Software
Once you have connected your Logitech G13 to your computer, it’s time to set up the Logitech Gaming Software. This software is essential for customizing your G13 and unlocking its full potential. Let’s walk through the steps to get your software up and running:
- Launching the Logitech Gaming Software
- Importing Game Profiles
- Creating New Game Profiles
- Adjusting GamePanel Settings
- Assigning G-Keys
Locate the Logitech Gaming Software on your computer and launch it. You can typically find it in your list of installed programs or by searching for it in the start menu. Once the software is open, you will be greeted with the main dashboard.
If you already have pre-configured game profiles that you want to use with your G13, you can import them into the Logitech Gaming Software. Click on the “Profiles” tab and select “Import Profiles.” Navigate to the location of the saved profiles on your computer and select them to import.
If you prefer to create your own custom game profiles, click on the “Profiles” tab and then click on the “Add Application” option. Browse and select the game executable file for which you want to create a profile. Give the profile a name and click “OK” to proceed.
The Logitech G13 features a GamePanel LCD screen that can display various information, such as in-game stats or system performance. To customize the GamePanel, click on the “GamePanel” tab in the Logitech Gaming Software. Here you can choose the widgets you want to display and arrange them according to your preference.
The G-Keys on the Logitech G13 can be programmed to perform a wide range of functions, from simple keyboard shortcuts to complex macros. To assign functions to the G-Keys, click on the “G-Keys” tab in the software. Select a G-Key from the list and choose the desired function from the drop-down menu or create a custom macro.
By following these steps, you can set up the Logitech Gaming Software and personalize your Logitech G13 to enhance your gaming experience. In the next section, we will explore the various customization options available for the GamePanel LCD.
Customizing the GamePanel LCD
The Logitech G13 is equipped with a GamePanel LCD, a small display located at the top of the device. This LCD screen can be customized to show a range of information, providing you with real-time updates while gaming. Here’s how you can customize the GamePanel LCD to suit your preferences:
- Opening the GamePanel Manager
- Selecting a Layout
- Adding Widgets
- Arranging Widgets
- Customizing Widget Settings
Launch the Logitech Gaming Software and click on the “GamePanel” tab. Here, you’ll find the GamePanel Manager, which allows you to customize the LCD screen.
In the GamePanel Manager, you’ll see a list of available layouts. These layouts determine how the information is displayed on the LCD screen. Choose a layout that best suits your needs, whether you prefer a large clock, system statistics, or game-specific data.
The GamePanel Manager offers a variety of widgets that you can add to your chosen layout. These widgets provide different types of information, such as CPU usage, RAM usage, or even Twitch chat. To add a widget, simply drag and drop it onto the LCD screen in the desired position.
Once you’ve added widgets to the LCD screen, you can arrange them to create a layout that suits your preferences. Click and drag the widgets to reposition them, or resize them by clicking and dragging the edges. Experiment with different arrangements until you find the setup that works best for you.
Each widget in the GamePanel Manager has its own settings that you can modify. Right-click on a widget and select “Edit Widget Properties” to access these settings. Here, you can customize the widget’s behavior, appearance, and the data it displays.
By customizing the GamePanel LCD, you can have important game information right at your fingertips, eliminating the need to switch between windows during gameplay. Experiment with different layouts and widgets to find the combination that enhances your gaming experience the most. In the next section, we’ll dive into configuring game profiles on the Logitech G13.
Configuring Game Profiles
The Logitech G13 allows you to create and configure game profiles, which are individual settings tailored to specific games. By setting up game profiles, you can optimize the G13’s functions for different games and seamlessly switch between them. Here’s how you can configure game profiles on the Logitech G13:
- Selecting a Game Profile
- Configuring Keyboard Buttons
- Assigning G-Keys
- Customizing Key Backlighting
- Saving and Activating Game Profiles
Launch the Logitech Gaming Software and click on the “Profiles” tab. Here, you’ll find a list of game profiles that you have already created or imported. Select the game profile you want to configure.
On the screen, you’ll see a graphical representation of the G13 keypad. Click on any of the keypad buttons to assign a keyboard key to it. This allows you to map specific game functions or keystrokes to the G13’s buttons. You can also assign mouse functions or macros to the keypad buttons.
The G-Keys on the G13 can also be configured for individual game profiles. Click on the “G-Keys” tab in the Logitech Gaming Software while the desired game profile is selected. Assign desired functions or macros to the G-Keys by selecting them from the drop-down menu.
If your Logitech G13 model has key backlighting, you can customize the color and intensity of the backlight for each game profile. Click on the “Lighting” tab and adjust the settings to your preference. This can help you identify different game profiles quickly.
Once you have finished configuring the game profile, click on the “Save” button to store the changes. To ensure that the game profile is active when you launch the associated game, enable “Automatic Game Detection” in the Logitech Gaming Software settings. This automatically switches to the corresponding game profile whenever the associated game is launched.
By configuring game profiles on the Logitech G13, you can have personalized settings tailored to each game you play. This allows for a streamlined and optimized gaming experience. In the next section, we’ll dive into programming the G-Keys on the G13.
Programming the G-Keys
The G-Keys on the Logitech G13 are programmable buttons that can be customized to perform a wide range of functions, including keyboard shortcuts, macros, and even launching applications. Programming the G-Keys allows you to streamline your workflow and execute complex commands with a single press. Let’s explore how you can program the G-Keys on the Logitech G13:
- Opening the Logitech Gaming Software
- Selecting a Game Profile
- Assigning Functions or Macros
- Keyboard Functions: Assign a specific key or combination of keys to a G-Key. This can be useful for mapping frequently used commands or shortcuts.
- Mouse Functions: Assign mouse actions, such as left-click, right-click, or scrolling, to a G-Key.
- Macros: Create and assign personalized macros to a G-Key. Macros allow you to automate a series of commands or keystrokes, making complex actions quick and simple.
- Recording Macros
- Testing and Editing
Launch the Logitech Gaming Software on your computer and connect your Logitech G13 if you haven’t already done so.
Choose the game profile for which you want to program the G-Keys from the list of profiles in the Logitech Gaming Software.
Click on the “G-Keys” tab in the Logitech Gaming Software. Depending on the specific game profile, you may have different options for programming the G-Keys:
If you choose to assign a macro to a G-Key, you can record the desired sequence of keystrokes and mouse actions. Click on the “Record” button and perform the actions you want to include in the macro. Once you’re done, click on the “Stop” button to save the macro.
After assigning functions or macros to the G-Keys, you can test them within the Logitech Gaming Software. Click on the G-Key you want to test, and the assigned function or macro will be executed. If needed, you can edit or re-record the assigned function or macro by selecting the corresponding G-Key.
By programming the G-Keys on the Logitech G13, you can greatly enhance your gaming experience. Assigning frequently used commands or macros to the G-Keys allows for quick and efficient execution, giving you a competitive edge. In the next section, we will explore using the joystick and thumbstick on the Logitech G13.
Using the Joystick and Thumbstick
The Logitech G13 features a joystick and a thumbstick, providing additional control options for gaming. These analog input devices can be used to navigate, control camera movements, or perform other in-game actions. Here’s how you can effectively utilize the joystick and thumbstick on the Logitech G13:
- Getting Familiar with the Joystick and Thumbstick
- Customizing Joystick and Thumbstick Sensitivity
- Assigning Functions to the Joystick and Thumbstick
- Testing and Adjusting
- Experimenting and Adapting
The joystick is located on the left side of the Logitech G13, while the thumbstick is positioned above the keypad. Take a moment to familiarize yourself with the feel and range of motion of each control, as these will be integral to your gaming experience.
The Logitech Gaming Software allows you to adjust the sensitivity of the joystick and thumbstick to match your preferences. Open the software, select the game profile you want to modify, and click on the “Joystick” or “Thumbstick” tab. From here, you can fine-tune the sensitivity settings to your liking.
With the Logitech Gaming Software open and the desired game profile selected, click on the “Joystick” or “Thumbstick” tab. Here, you can assign specific functions or actions to each control. These functions can include movements, camera panning, or any other in-game action you wish to assign to the joystick or thumbstick.
After assigning functions to the joystick and thumbstick, it’s important to test them within the Logitech Gaming Software. Click on the respective control and verify that the assigned function or action is performed as expected. If needed, you can make adjustments to the assigned functions or customize them further.
As with any new control input, it may take some time to adjust and find the optimal settings for your gameplay. Experiment and adapt to get comfortable with the joystick and thumbstick on the Logitech G13, allowing you to fully utilize their capabilities in your gaming sessions.
By effectively using the joystick and thumbstick on the Logitech G13, you can enhance your control and precision in games. These analog controls offer a more immersive and versatile gaming experience, giving you a competitive edge. In the next section, we’ll explore setting up macros on the Logitech G13.
Setting Up Macros
Macros are a powerful feature of the Logitech G13 that can greatly enhance your gaming performance. They allow you to automate a series of commands or keystrokes, saving you time and effort during gameplay. Setting up macros on the Logitech G13 is straightforward and can be done using the Logitech Gaming Software. Here’s how you can create and configure macros:
- Launching the Logitech Gaming Software
- Creating a New Macro
- Recording the Macro
- Editing and Refining the Macro
- Assigning Macros to Keys or G-Keys
Open the Logitech Gaming Software on your computer and connect your Logitech G13 if it isn’t already connected.
Click on the “Macros” tab in the Logitech Gaming Software. Here, you can view a list of existing macros or create a new one by clicking on the “New Macro” button.
To record a macro, click on the “Record” button in the Macro Editor. Perform the series of actions or keystrokes you want to include in the macro. Once you’re finished, click on the “Stop” button to end the recording.
The Macro Editor allows you to fine-tune your recorded macro. You can adjust the timing, add delays between actions, or edit individual actions within the macro to ensure optimal performance. This is particularly useful for complex macros that require precise timing.
Once you’ve created and refined your macro, you can assign it to a specific key or G-Key on the Logitech G13. In the Logitech Gaming Software, navigate to the desired game profile, select the key or G-Key you want to assign the macro to, and choose the corresponding macro from the list.
By setting up macros on the Logitech G13, you can streamline your gameplay and execute complex actions with a single button press. This not only saves time but also increases your efficiency during intense gaming sessions. In the next section, we’ll provide some advanced customization tips for the Logitech G13.
Advanced Customization Tips
While the Logitech G13 offers a wide range of customization options out of the box, there are some advanced techniques and tips that can take your gaming experience to the next level. Here are some advanced customization tips to help you maximize the potential of your Logitech G13:
- Creating Multi-Step Macros
- Utilizing Mode Shift
- Combining G-Keys and Macros
- Syncing Profiles with Games
- Sharing Profiles and Macros
Macros can be more than just a series of actions. Take advantage of the Logitech Gaming Software’s ability to create multi-step macros. These are macros that execute different actions depending on how long you hold down a key. This enables you to perform different functions with a single key, increasing flexibility and efficiency.
The Logitech G13 features a mode shift functionality that allows you to assign entirely new functions to keys or G-Keys when a specific button is held down. This effectively doubles the number of available actions within a game profile. Experiment with different mode shift configurations to find the setup that works best for you.
For complex games or tasks, consider combining multiple G-Keys and macros to perform intricate actions. By programming a sequence of G-Keys that activate different macros in succession, you can execute a chain of commands with a single press.
The Logitech Gaming Software allows you to sync specific game profiles with specific games. This ensures that the correct profile is automatically loaded whenever you launch a particular game. Take advantage of this feature so that you don’t have to manually switch profiles every time you switch games.
If you’ve created profiles or macros that you’re particularly proud of or find useful, consider sharing them with the Logitech gaming community. You can find and download profiles and macros created by other users, expanding your customization options and saving time on setup.
These advanced customization tips will help you unleash the full potential of your Logitech G13 and optimize your gaming experience. Remember to experiment and find the configurations that work best for your gaming style. With these tips in mind, you’re well on your way to dominating the gaming battlefield.
Troubleshooting and FAQs
While the Logitech G13 is a reliable gaming peripheral, occasionally, issues may arise. Here are some common troubleshooting steps and frequently asked questions to help you resolve any problems you encounter:
- My Logitech G13 is not being recognized by my computer. What should I do?
- My G-Keys or macros are not working in a specific game. What could be the problem?
- The GamePanel LCD is not displaying any information. What should I do?
- The backlighting on my Logitech G13 is not working. How can I fix it?
- Can I use the Logitech G13 with consoles or other non-PC platforms?
Try connecting the G13 to a different USB port on your computer. If that doesn’t work, ensure that you have installed the latest version of the Logitech Gaming Software. If the issue persists, try connecting the G13 to another computer to determine if the problem lies with the device or your computer.
Some games have built-in security features that do not recognize certain inputs as valid. To resolve this, check if the game has an option to allow external macros or keyboard inputs. You may need to enable this setting to use G-Keys or macros. Alternatively, you can set up specific commands within the game settings that match the G-Keys or macros on the Logitech G13.
Make sure that the GamePanel feature is enabled in the Logitech Gaming Software. If it is already enabled and the LCD is still not displaying anything, try disconnecting and reconnecting the Logitech G13. You can also try rebooting your computer or reinstalling the Logitech Gaming Software if the issue persists.
Ensure that the backlighting option is enabled in the Logitech Gaming Software. If it is enabled and the backlighting is still not working, check the settings for the specific game profile you are using. Some game profiles may have customized backlighting settings that override the global settings. Adjust the backlighting settings accordingly.
No, the Logitech G13 is designed specifically for use with computers. It is not compatible with consoles or other non-PC gaming platforms.
If you encounter any other issues with your Logitech G13, refer to the Logitech support website or reach out to their customer support for further assistance. Remember to provide detailed information about the problem you’re experiencing for a faster and more accurate resolution.
Conclusion
The Logitech G13 is a powerful gaming peripheral that offers a wide range of customization options to enhance your gaming experience. From its ergonomic design to the customizable GamePanel LCD and programmable G-Keys, the G13 provides gamers with an intuitive and versatile tool.
In this article, we have covered the essential steps to getting started with the Logitech G13, including connecting the device, downloading and installing the Logitech Gaming Software, and updating firmware. We also explored how to set up the software, customize the GamePanel LCD, configure game profiles, program the G-Keys, and use the joystick and thumbstick.
Additionally, we provided advanced customization tips to help you take full advantage of the Logitech G13’s capabilities, including creating multi-step macros, utilizing mode shift, combining G-Keys and macros, syncing profiles with games, and sharing profiles and macros with the community.
If you encounter any issues with your Logitech G13, we have provided troubleshooting tips and addressed frequently asked questions to help you resolve them.
The Logitech G13 is a powerful ally in your gaming arsenal, providing you with a competitive edge and enhancing your gaming performance. Take the time to explore the various customization options and experiment with different settings to find the configuration that works best for you.
With its ergonomic design, customizable features, and intuitive software, the Logitech G13 is a game-changer that will revolutionize the way you play. So, unleash your gaming potential and elevate your gaming experience with the Logitech G13!