Creating a Rule in Asana
Creating a Rule in Asana
Asana is a powerful project management tool that can help streamline your workflow and automate repetitive tasks. One of the key features of Asana is the ability to create rules, which are automated actions that are triggered by specific events. In this section, we will guide you through the process of creating a rule in Asana.
To create a rule in Asana, start by selecting the project and task for which you want to create the rule. This will determine where the rule will be applied and what tasks it will affect. Once you have chosen the project and task, click on the “Rules” tab on the right-hand sidebar.
Next, you’ll need to choose the trigger for the rule. This is the event that will activate the rule. Asana offers a range of triggers to choose from, such as when a task is assigned to a specific person, when a task is marked as completed, or when a due date is added to a task.
After selecting the trigger, you can choose the action for the rule. This is the automated task that will be executed when the trigger event occurs. Asana provides a variety of actions to choose from, including assigning a task to a specific person, adding a tag to a task, or changing the task’s due date.
Once you have selected the trigger and action, you can customize the rule’s settings. This includes specifying any additional conditions or filters for the rule, such as only applying the rule to tasks with a certain tag or assigning the rule to specific team members.
Before finalizing the rule, it’s important to test and activate it. Asana allows you to run a test of the rule to ensure that it is working as expected. Once you are satisfied with the test results, you can activate the rule, and it will start automatically executing the specified action when the trigger event occurs.
Managing and editing existing rules is also straightforward in Asana. Simply navigate to the “Rules” tab, and you will see a list of all the rules associated with the project and task. From here, you can edit the rule settings, deactivate a rule temporarily, or delete a rule altogether.
Creating rules in Asana can significantly increase your productivity and efficiency by automating repetitive tasks. By carefully selecting triggers and actions and customizing the rule’s settings, you can ensure that your workflow is optimized and tasks are completed seamlessly in Asana.
Selecting the Project and Task for the Rule
When creating a rule in Asana, one of the first steps is to select the project and task for which the rule will apply. This allows you to define the scope of the rule and determine which tasks it will affect. Here’s a step-by-step guide on how to select the project and task for your Asana rule.
To begin, open the project in Asana where you want to apply the rule. This can be an existing project or a new one that you create specifically for the rule. Once you’re in the project, navigate to the right-hand sidebar and click on the “Rules” tab.
Within the “Rules” tab, you will see a list of existing rules associated with the project. To create a new rule, click on the “+ Add Rule” button. This will open a new window where you can define the rule’s settings.
Next, you need to specify the trigger for the rule. The trigger is the event that will activate the rule. You can choose from a range of triggers, such as when a task is created, when a due date is added, or when a custom field is updated. Select the trigger that best suits your needs.
Once you have chosen the trigger, you can proceed to select the action for the rule. The action is the automated task that will be executed when the trigger event occurs. For example, you can assign a task to a specific team member, add a tag to a task, or change the task’s due date.
Now that you have defined the trigger and action, it’s time to refine the rule’s scope by selecting the project and task. In the rule settings window, you will see options to choose the project and task that the rule will apply to. You can select a specific project, all projects within a workspace, or choose to apply the rule to a particular section within a project.
Additionally, you can narrow down the scope by selecting specific tags, assignees, or custom fields for the rule to apply to. This allows for greater customization and precision in automating your tasks.
Once you have selected the project and task, reviewed the trigger and action, and customized any additional settings, you can save and activate the rule. You will now have a rule in place that will automatically perform the specified action when the trigger event occurs within the selected project and task.
By carefully selecting the project and task for your Asana rule, you can ensure that the rule is applied only where it is needed and that your workflow is optimized. This level of customization allows you to tailor the rule to your specific project and task requirements, improving efficiency and productivity in Asana.
Choosing the Trigger for the Rule
When creating a rule in Asana, one of the crucial steps is selecting the trigger. The trigger is the event that will initiate the rule and automate a specific action. By choosing the right trigger, you can ensure that your rule is triggered at the appropriate time and effectively streamlines your workflow. Here’s a step-by-step guide on how to choose the trigger for your Asana rule.
First, open the project in Asana where you want to create the rule. Navigate to the right-hand sidebar and click on the “Rules” tab. If you haven’t created any rules for this project yet, you will see an empty list.
Click on the “+ Add Rule” button, and a new window will appear where you can define the settings for the rule. In this window, you will find the option to select the trigger for the rule.
Asana offers a variety of triggers to choose from, depending on the specific event that you want to trigger the rule. For example, you can select a trigger when a task is created, when a due date is added or changed, when a task is assigned to a specific team member, or when a custom field is updated.
Consider the specific needs of your project and workflow when selecting the trigger. Think about the events that are most relevant for your team and the tasks they are working on. For example, if you have a project with strict deadlines, you may want to choose the trigger “When a task’s due date is changed” to ensure that all team members are promptly notified of any changes.
Additionally, you can select multiple triggers for a single rule. This can be helpful if you want the rule to be activated by more than one event. For example, you might want the rule to trigger when a task is marked as completed and also when a specific tag is added to the task.
Once you have chosen the trigger(s) for your rule, you can proceed to select the action(s) that will be automated when the trigger event occurs. The action is the task that Asana will perform automatically based on the trigger event. It can be assigning a task to a team member, adding a tag, changing due dates, or any other action that suits your workflow.
Choosing the right trigger(s) for your Asana rule is essential for automating your tasks efficiently. It ensures that the rule is activated exactly when you need it, saving you time and effort. By carefully considering your project’s requirements and workflow, you can select triggers that align with your team’s needs and create rules that enhance your productivity in Asana.
Choosing the Action for the Rule
Once you have selected the trigger for your Asana rule, the next step is to choose the action that will be performed automatically when the trigger event occurs. The action is the specific task or set of tasks that Asana will execute on your behalf, saving you time and effort. Here’s a step-by-step guide on how to choose the action for your Asana rule.
After selecting the trigger for your rule, you will have the option to choose the action within the rule settings window. Asana provides a range of actions to choose from, allowing you to customize the automation based on your project’s needs.
Some common actions you can choose in Asana include assigning a task to a specific team member, adding or removing tags, changing due dates, updating custom fields, or duplicating tasks. These actions can help streamline your workflow and ensure that tasks are managed efficiently.
Consider the specific requirements of your project when choosing the action. Think about the repetitive tasks or manual actions that you find yourself doing frequently. For example, if you often assign tasks to the same team member, you can choose the action “Assign task” and select the team member from the dropdown menu.
You can also select multiple actions for a single rule. This can be useful if you want to automate multiple tasks or actions when the trigger event occurs. For example, you can assign a task to a team member and add a specific tag to the task simultaneously.
Additionally, Asana allows you to set more advanced actions using custom rules. These rules can be tailored to specific conditions, such as adding comments, updating dependencies, or sending notifications to specific team members. These advanced actions can help fine-tune your automation and cater to the specific needs of your project.
Once you have chosen the action(s) for your rule, you can proceed to customize any additional settings or conditions that may be required. For example, you can specify additional filters like specific tags, assignees, or due dates to further refine the automation.
Choosing the right action(s) for your Asana rule is essential for automating your tasks effectively. It allows you to eliminate manual work and ensures that your project progresses smoothly. By considering the repetitive tasks or actions that can be automated, you can select actions that save time and improve efficiency in Asana.
Customizing the Rule’s Settings
Once you have selected the trigger and action for your Asana rule, the next step is to customize the rule’s settings. Customizing the settings allows you to fine-tune the automation and ensure it aligns with your project’s specific needs. Here’s a step-by-step guide on how to customize the settings of your Asana rule.
After selecting the trigger and action for your rule, you will find various options within the rule settings window to customize the rule further. These options enable you to define specific conditions or filters that must be met for the rule to activate.
One way to customize the rule is by narrowing down the scope of its application. For example, you can specify that the rule should only be applied to tasks with a certain tag or in a particular project section. This helps ensure that the rule is targeted to specific tasks that require the automated action.
You can also add additional conditions based on task attributes. For instance, you may want the rule to activate only if a task has a certain assignee, due date, or custom field value. By specifying these conditions, you have greater control over when the rule triggers.
Furthermore, Asana allows you to apply the rule to specific team members. This means that the rule will only take effect when the tasks are assigned to or updated by the designated team members. This level of customization can be particularly useful when you have tasks that require specific team members’ attention.
Another customization option is to set a timeframe for the rule to activate. If you want the rule to apply within a certain duration after the trigger event occurs, you can specify the timeframe in the rule settings. This provides flexibility and allows you to control when the automated action takes place.
Asana also provides the ability to add multiple actions and conditions to a single rule, giving you even more flexibility to customize the automation. This allows you to create more complex rule combinations that cater to your specific project requirements.
Once you have customized the rule’s settings according to your needs, it’s important to review and double-check them before saving and activating the rule. This ensures that the rule will function as intended and aligns with your desired automation parameters.
By customizing the settings of your Asana rule, you can tailor the automation to fit the unique requirements of your project. Fine-tuning the conditions, scope, timeframe, and team members involved allows you to create rules that optimize your workflow and enhance productivity in Asana.
Testing and Activating the Rule
Once you have configured the settings for your Asana rule, it’s time to test and activate it. Testing ensures that the rule functions as expected and activates the desired action when the trigger event occurs. Here’s a step-by-step guide on how to test and activate your Asana rule.
Before activating the rule, you have the option to run a test to ensure that it performs the desired action. To do this, review the rule settings and confirm that they reflect your intended automation. Once you are satisfied with the settings, proceed to run the test.
The test will simulate the trigger event for the rule. For example, if the trigger is when a task is assigned to a specific team member, the test will create a test task and assign it accordingly or use an existing task that meets the trigger condition. The rule’s action will then be executed on this test task.
Observe the results of the test. Verify that the action is performed correctly, such as the task being assigned to the designated team member or the relevant fields being updated. If the test is successful and the action is as expected, you can confidently proceed to activate the rule.
Activating the rule means that it will start running in your project, automating the action whenever the trigger event occurs. To activate the rule, simply click on the “Activate Rule” button within the rule settings window.
Once activated, the rule will continuously monitor the project and tasks for the trigger event. When the event occurs, the rule will automatically execute the specified action, saving you time and effort in manual task management.
It’s important to note that activating a rule doesn’t prevent you from making changes or edits to the rule later on. If you find that adjustments are needed, you can always go back to the rule settings, modify them as necessary, and retest and activate the updated rule.
By thoroughly testing and activating your Asana rule, you can ensure that it performs as intended and streamlines your workflow effectively. Testing provides confidence in the automation, while activating the rule enables you to benefit from time-saving and efficient task management in Asana.
Managing and Editing Existing Rules
As your project evolves, you may need to manage and edit existing rules in Asana to accommodate changing requirements or improve the automation. Fortunately, Asana provides easy-to-use features that allow you to manage and edit your rules efficiently. Here’s a detailed guide on how to manage and edit existing rules in Asana.
To begin managing rules, navigate to the project where the rules are applied and click on the “Rules” tab in the right-hand sidebar. Here, you will see a list of all the existing rules associated with the project.
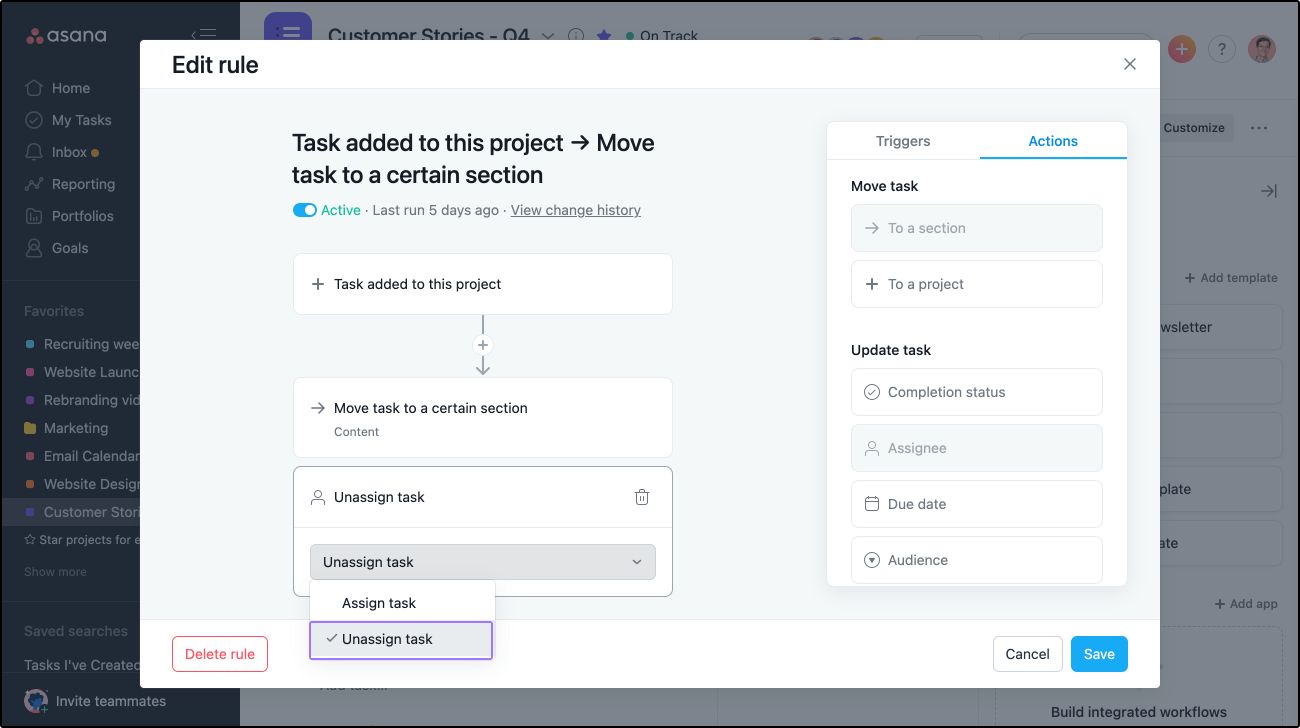
If you want to edit a rule, locate the rule in the list and click on the “Edit Rule” button. This will open the rule settings window, where you can make the necessary changes. You can modify the trigger event, action, as well as the settings and conditions of the rule based on your updated requirements.
After editing the rule, you can choose to run a test to ensure that the modified rule functions as expected. This is particularly important if the edits impact the trigger event or the conditions of the rule. Running a test allows you to verify that the automation performs as intended before activating the rule.
If you find that a rule is no longer needed or requires a significant overhaul, you have the option to delete it. To do this, locate the rule in the list and click on the “Delete Rule” button. Confirm the deletion to remove the rule from the project.
Keep in mind that if you deactivate a rule instead of deleting it, you can easily reactivate it later if needed. Deactivated rules will not be triggered, but their configurations and settings are still stored and accessible for future use.
Asana also allows you to reorder rules within the project. This can be helpful when you have multiple rules and want to ensure that they are executed in the desired sequence. To reorder rules, simply click and drag the rule to the desired position in the list.
Regularly reviewing and managing your rules ensures that they align with your project’s evolving needs and remain effective in automating tasks. By editing, deleting, or reordering rules as required, you can fine-tune the automation in Asana and optimize your workflow.
Managing and editing existing rules in Asana provides flexibility and control over your automation. Whether you need to make minor adjustments or major changes, Asana’s user-friendly interface makes it easy to manage your rules and ensure that they contribute to an efficient and streamlined project management process.
Deactivating and Deleting a Rule
As your project’s needs change, you may need to deactivate or delete existing rules in Asana. Deactivating a rule temporarily pauses its automation, while deleting a rule permanently removes it from your project. Here’s a step-by-step guide on how to deactivate and delete a rule in Asana.
To begin, navigate to the project where the rule is applied. Click on the “Rules” tab in the right-hand sidebar to view a list of the existing rules associated with the project.
If you want to temporarily pause the automation provided by a rule, you can deactivate it. Locate the rule in the list and click on the “Deactivate Rule” button. This will halt the rule’s execution, and it will no longer be triggered by the specified event.
Deactivating a rule allows you to temporarily suspend its automation without completely removing it from the project. This can be useful if you need to adjust the rule or if the current project requirements no longer necessitate its activation.
If you decide that a rule is no longer needed and want to remove it permanently, you can delete it. Locate the rule in the list and click on the “Delete Rule” button. Confirm the deletion to remove the rule from the project entirely.
Deleting a rule permanently removes its configurations and settings, and it cannot be undone. Therefore, it is important to ensure that you no longer require the rule’s automation before proceeding with the deletion.
Once a rule is deleted, it will no longer appear in the project’s rule list, and its automation will be completely removed. However, you can create a new rule with similar or different configurations at any time if the need arises.
Managing and reviewing your rules periodically allows you to optimize your workflow and ensure that only relevant rules are active. Deactivating or deleting unnecessary rules reduces clutter and helps maintain the effectiveness of your automation in Asana.
By deactivating or deleting rules as needed, you can fine-tune the automation in Asana and adapt it to your changing project requirements. This allows you to have more control over the rules applied to your tasks and ensures that they align with your specific project management needs.