Introduction
Subtitles are textual translations or transcriptions of dialogue and audio in a video. They play a crucial role in improving accessibility, language learning, and overall viewing experience for individuals who are hearing impaired or simply prefer to watch movies and TV shows with subtitles. While many DVDs come with built-in subtitles, there may be instances where you want to extract and save these subtitles as separate files. This is where Handbrake, a popular open-source video transcoder, comes in handy.
Handbrake allows you to rip subtitles from DVDs and save them in various formats, such as SRT, VobSub, PGS, and more. This means that you can have standalone subtitle files that you can use with other media players or even upload to online streaming platforms.
In this guide, we will walk you through the step-by-step process of using Handbrake to rip subtitles from a DVD. Whether you want to create your own custom subtitle files, extract subtitles for translation purposes, or simply have a backup of your favorite subtitles, Handbrake provides a straightforward and efficient solution.
What is Handbrake?
Handbrake is a free, open-source video transcoder that allows you to convert video files from one format to another. Originally designed for ripping DVDs, Handbrake has evolved into a versatile tool used by both professionals and enthusiasts alike. It supports a wide range of video formats and offers a variety of customization options to optimize the output file according to your needs.
Handbrake is available for multiple platforms, including Windows, macOS, and Linux, making it accessible to a large user base. It provides a user-friendly interface that simplifies the complex process of video transcoding, making it suitable for both beginners and experienced users.
Apart from its primary function of transcoding videos, Handbrake also allows users to extract subtitles from DVDs. This feature makes Handbrake a valuable tool for anyone who wants to have separate subtitle files for their video collection.
Handbrake offers various benefits that set it apart from other video transcoding software. Firstly, it is free and open-source, which means you don’t have to spend a dime to use its powerful features. Additionally, Handbrake offers a wide range of preset profiles that allow you to easily convert videos for different devices, such as smartphones, tablets, and gaming consoles. These presets ensure that your videos are optimized for playback on specific devices without requiring intricate manual settings.
Moreover, Handbrake provides advanced video editing features, such as cropping, scaling, and adding filters, giving you more control over the output file. The software also supports batch processing, allowing you to convert multiple videos simultaneously, saving you time and effort.
In summary, Handbrake is a versatile video transcoder that enables you to convert videos to different formats, as well as extract subtitles from DVDs. Its user-friendly interface, wide platform compatibility, and extensive customization options make it a top choice for both beginners and advanced users in the multimedia industry.
Why would you want to rip subtitles from a DVD?
Ripping subtitles from a DVD can be beneficial for several reasons. Here are some of the main motivations for extracting subtitles from DVDs:
- Accessibility: Subtitles provide accessibility to individuals who are deaf or hard of hearing. By ripping subtitles from a DVD, you can create standalone subtitle files that can be used with media players, allowing these individuals to enjoy your video content.
- Language Learning: If you’re learning a new language, having access to subtitles can greatly enhance your learning experience. By extracting subtitles from a DVD, you can practice reading and understanding the language while watching movies or TV shows in your target language.
- Translation: Subtitle extraction allows you to convert the dialogue and audio of a video into a text format. This is especially useful if you want to translate the subtitles into different languages or provide subtitles for a video in multiple languages.
- Customization: By ripping subtitles from a DVD, you can have full control over the subtitle appearance, including font style, size, color, and position. This gives you the flexibility to create custom subtitles that align with your preferences or fit the visual style of your video.
Furthermore, having separate subtitle files can be useful for video editing purposes. It allows you to make edits to the video without affecting the embedded subtitles, making the editing process more efficient and flexible.
In addition, ripping subtitles from a DVD allows you to have a backup of the subtitles in case the original DVD becomes damaged or lost. Having a separate copy of the subtitles ensures that you can still enjoy the video with subtitles even if the DVD itself is no longer usable.
Overall, extracting subtitles from DVDs opens up opportunities for improved accessibility, language learning, translation, customization, and backup purposes. Whether you want to cater to a wider audience, enhance your language skills, or have full control over the subtitles, ripping subtitles from a DVD is a valuable capability that Handbrake provides.
Step-by-step guide to ripping subtitles from DVD using Handbrake
Ripping subtitles from a DVD using Handbrake is a straightforward process. Here is a step-by-step guide to help you extract subtitles from a DVD effectively:
- Preparing the DVD: Start by inserting the DVD into your computer’s DVD drive. Ensure that the DVD is clean and free from any scratches or damages that may affect the playback and extraction process.
- Installing Handbrake: If you haven’t already done so, download and install Handbrake from the official Handbrake website (https://handbrake.fr/). Handbrake is available for Windows, macOS, and Linux platforms, so choose the appropriate version for your operating system.
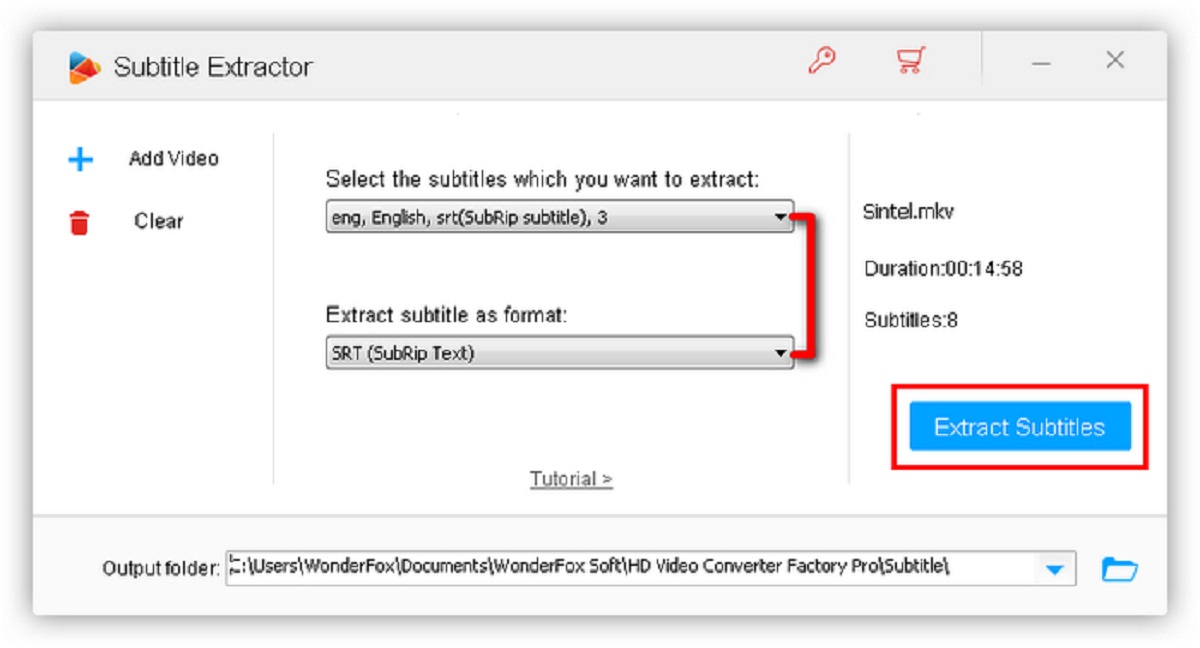
- Configuring Handbrake for subtitle ripping: Open Handbrake and go to the “Preferences” or “Settings” menu. In the “Subtitles” section, make sure the option to include subtitles is enabled. You can also choose the subtitle language and the format in which you want to save the subtitles (e.g., SRT, VobSub, PGS).
- Ripping subtitles using Handbrake: Click on the “Source” or “Open Source” button in Handbrake and select your DVD drive as the source. Handbrake will scan the DVD and display a list of available titles and chapters. Choose the appropriate title and chapter that contain the desired subtitles.
- Saving the ripped subtitles: Specify the output destination for the ripped subtitles. Choose a folder where you want to save the subtitle files and provide a suitable name for the file. Make sure to select the desired subtitle format in the output settings.
- Start the subtitle extraction process: Once you have configured all the necessary settings, click on the “Start” or “Encode” button in Handbrake to initiate the subtitle extraction process. Handbrake will analyze the DVD and extract the selected subtitles into the specified output folder.
- Verify and use the ripped subtitles: Once the subtitle extraction process is complete, navigate to the output folder and verify that the subtitle files have been successfully saved. You can now use these subtitle files with media players, video editors, or upload them to online platforms.
By following these step-by-step instructions, you can easily rip subtitles from a DVD using Handbrake. Remember to configure the subtitle settings according to your preferences and choose the appropriate output format for the ripped subtitles. Enjoy the flexibility and convenience of having standalone subtitle files for your video collection.
Preparing the DVD
Before you can begin ripping subtitles from a DVD using Handbrake, it’s important to properly prepare the DVD for the process. Here are the steps to follow to ensure a smooth and successful subtitle extraction:
- Inspect the DVD: Before inserting the DVD into your computer’s DVD drive, carefully examine it for any visible scratches, smudges, or damages. Even minor imperfections on the DVD’s surface can interfere with the playback and extraction process. If you notice any significant damages, consider using a professional DVD cleaning solution or contacting a specialist to help restore the DVD.
- Clean the DVD: Use a soft, lint-free cloth to gently clean the DVD’s surface. Wipe in a radial motion from the center of the DVD to the outer edge, avoiding any circular or swirling movements that may cause further scratches. Make sure to remove any fingerprints, dirt, or dust particles that could obstruct the DVD’s readability.
- Ensure a stable connection: When inserting the DVD into your computer’s DVD drive, ensure that the connection is secure and stable. Avoid inserting or removing the DVD while the drive is in use, as this can lead to errors or interruptions during the subtitle extraction process.
- Close any DVD-related programs: To minimize any potential conflicts or issues, close any programs that might be accessing or using the DVD, such as media players or disc burning software. These programs can interfere with Handbrake’s ability to read and extract the subtitles properly.
- Choose the correct DVD title: If the DVD contains multiple titles, each representing different content, make sure to select the appropriate title that contains the desired subtitles. In some cases, you may need to play the DVD on a compatible media player first to identify the correct title before proceeding with Handbrake.
By following these steps to prepare the DVD, you can ensure that the subtitle extraction process using Handbrake goes smoothly. Taking the time to clean and inspect the DVD, ensuring a stable connection, and closing any conflicting programs will help minimize errors and increase the chances of successfully ripping the desired subtitles. With a properly prepared DVD, you can proceed to the next steps of installing Handbrake and configuring it for subtitle extraction.
Installing Handbrake
To begin ripping subtitles from a DVD using Handbrake, you’ll first need to install the software on your computer. Follow these steps to install Handbrake:
- Visit the official Handbrake website: Go to the official Handbrake website at https://handbrake.fr/
- Choose your operating system: Handbrake is available for Windows, macOS, and Linux. Click on the download button that corresponds to your operating system to start the download.
- Run the installer: Once the download is complete, locate the installer file and run it. Follow the on-screen instructions to install Handbrake on your computer. Typically, this involves agreeing to the terms and conditions, selecting the installation location, and choosing any additional features or components you wish to include.
- Complete the installation: Once the installation process is complete, you will be prompted to launch Handbrake. You can choose to launch it immediately or do it later by accessing it from your computer’s application menu or desktop icon.
- Optional: Check for updates: After installing Handbrake, it’s a good idea to check for any available updates to ensure you have the latest version. Handbrake regularly releases updates that include bug fixes, improvements, and new features. Simply open Handbrake and navigate to the “Help” or “About” section to check for updates and follow the instructions provided.
Once you have successfully installed Handbrake, you are ready to proceed with configuring the software to rip subtitles from your DVD. The installation process is simple and user-friendly, allowing you to quickly set up Handbrake and take advantage of its powerful subtitle extraction capabilities. Whether you’re using Windows, macOS, or Linux, Handbrake provides a reliable and efficient solution for ripping subtitles and converting videos.
Configuring Handbrake for subtitle ripping
After installing Handbrake on your computer, the next step is to configure the software to rip subtitles from your DVD. Follow these steps to set up Handbrake for subtitle extraction:
- Open Handbrake: Launch Handbrake by clicking on the application icon or accessing it from your computer’s application menu.
- Access the Preferences or Settings: Once Handbrake is open, look for the Preferences or Settings menu. This may be located in the top navigation bar or under the File or Edit menu, depending on your operating system.
- Navigate to the Subtitles section: Within the Preferences or Settings menu, locate the Subtitles section. This is where you’ll find the options related to subtitle ripping and customization.
- Enable subtitle inclusion: Ensure that the option to include subtitles is enabled. Depending on the version of Handbrake, this may be a checkbox or a toggle switch. Enabling this option allows Handbrake to extract the subtitles from the DVD during the conversion process.
- Select the subtitle language: Depending on the DVD, there may be multiple subtitle tracks in different languages. Choose the desired subtitle language from the available options. If you want to extract subtitles in multiple languages, you may need to repeat the subtitle ripping process for each language.
- Choose the output format: Handbrake supports various subtitle formats, such as SRT, VobSub, and PGS. Select the format that suits your needs or is compatible with your media player or video editing software. Keep in mind that not all formats may be supported by all players, so choose accordingly.
Once you have configured the subtitle settings in Handbrake, you are ready to begin the subtitle extraction process. These settings ensure that Handbrake includes the selected subtitles from the DVD and saves them in the desired format. With Handbrake properly configured for subtitle ripping, you can move on to selecting the DVD source and initiating the extraction process.
Ripping subtitles using Handbrake
Once you have prepared the DVD, installed Handbrake, and configured the subtitle settings, you are ready to start ripping the subtitles using Handbrake. Follow these steps to extract subtitles from a DVD:
- Open Handbrake: Launch Handbrake on your computer by clicking on the application icon or accessing it from your application menu.
- Select the DVD source: In Handbrake, click on the “Source” or “Open Source” button to select the DVD you want to extract subtitles from. A dialog box will open, allowing you to choose the DVD drive as the source.
- Scan the DVD: Handbrake will automatically scan the DVD and display a list of titles and chapters found on the DVD. These represent different sections or content on the DVD.
- Choose the desired title and chapter: Look through the list of titles and chapters and select the appropriate one that contains the subtitles you want to extract. You can preview the content by using the “Preview” or “Play” button to ensure you’ve selected the correct title and chapter.
- Configure additional settings: If needed, you can adjust various video and audio settings in Handbrake according to your preferences. This includes options such as video quality, resolution, codec, audio tracks, and more. However, the focus here is on subtitle extraction, so make sure the subtitle settings are configured correctly.
- Specify the output destination: Choose the output folder where you want to save the extracted subtitles. Click on the “Browse” or “Destination” button in Handbrake to navigate to your desired location.
- Start the subtitle extraction process: Once you have configured all the necessary settings and specified the output destination, click on the “Start” or “Encode” button in Handbrake to initiate the subtitle extraction process. Handbrake will begin analyzing the DVD and extracting the selected subtitles.
- Wait for the process to complete: Handbrake will display a progress bar indicating the status of the subtitle extraction process. The time it takes to complete will depend on the size of the DVD and the processing power of your computer.
Once the subtitle extraction process is finished, you will have successfully ripped the subtitles from the DVD using Handbrake. You can navigate to the output folder you specified earlier to access the extracted subtitle files. These subtitle files can now be used with media players, uploaded to video sharing platforms, or utilized for various other purposes. Enjoy the flexibility and convenience of having standalone subtitle files that can enhance the viewing experience or cater to a wider audience.
Saving the ripped subtitles
After successfully extracting the subtitles from the DVD using Handbrake, you will need to save the ripped subtitles to a location of your choice. Here are the steps to follow in order to save the ripped subtitles:
- Locate the output folder: Navigate to the output destination you specified in Handbrake where the ripped subtitles are saved. This is the folder where Handbrake has saved the extracted subtitle files.
- Verify the presence of subtitle files: In the output folder, you should see the extracted subtitle files. These files will typically have extensions corresponding to the format you selected during the configuration process, such as .srt, .sub, or .pgs.
- Check the quality and accuracy: Before using the ripped subtitles, it’s a good practice to verify the quality and accuracy of the extracted files. Open the subtitle files using a compatible media player or a subtitle editor to ensure that the subtitles are synchronized with the video and that there are no transcription errors or missing dialogue.
- Rename or organize the subtitle files: If necessary, you can rename the subtitle files to something more descriptive or organize them into separate folders for easier access. This can be especially useful if you have extracted subtitles for multiple DVDs or films.
- Backup the subtitle files: It’s highly recommended to create a backup of the ripped subtitle files to avoid data loss. Copy the subtitle files to a secure location, such as an external hard drive or cloud storage, to ensure they are safely stored and readily accessible in case of any unforeseen issues.
By following these steps, you can save the ripped subtitles to a location of your choice and ensure their quality and accessibility. Remember to properly organize and backup the subtitle files, as these will be invaluable assets for future use, whether it’s for personal viewing, translations, or sharing with others. Having the extracted subtitles readily available gives you the freedom to use them in various scenarios, further enhancing your video experience.
Troubleshooting common issues
While ripping subtitles from a DVD using Handbrake is often a straightforward process, you may encounter some common issues along the way. Here are a few troubleshooting tips to help you overcome these problems:
- No subtitles appearing: If you’re not seeing any subtitles in the extracted files, ensure that you have enabled the subtitle inclusion option in Handbrake’s settings. Additionally, double-check that you have selected the correct subtitle track and language during the configuration process.
- Out of sync subtitles: If the extracted subtitles are out of sync with the video, you can use a subtitle editing tool to manually adjust the timings. Advanced media players or dedicated subtitle editors allow you to sync the subtitles by specifying the time offsets or by manually dragging the subtitle cues to align with the corresponding dialogue.
- Missing or garbled characters: If the extracted subtitles are missing or displaying garbled characters, it may be due to font compatibility issues. Try changing the font settings within Handbrake to choose a font that is more widely supported. Additionally, make sure the extracted subtitle files are saved using Unicode encoding to ensure proper character display.
- Incomplete subtitle extraction: If Handbrake stops the extraction process before completing, it may indicate an issue with the DVD or the disc drive. Make sure the DVD is clean and free from scratches or damages. If the problem persists, try using a different DVD drive or consider using a specialized DVD ripping software that may have better compatibility with the disc.
- Unrecognized DVD: If Handbrake fails to recognize the DVD or displays an error, ensure that the DVD is properly inserted into the drive and that the drive itself is functioning correctly. Additionally, check for any firmware updates for your DVD drive, as outdated firmware can sometimes cause compatibility issues.
If you encounter any other issues while ripping subtitles from a DVD using Handbrake, it’s always helpful to consult Handbrake’s official documentation or community forums for further guidance. These resources can provide detailed troubleshooting steps or insight into specific issues that you may come across.
By troubleshooting these common issues, you can overcome any hurdles and successfully extract subtitles from your DVDs using Handbrake. Remember to be patient and thorough in your approach, and don’t hesitate to seek assistance if needed. With practice and experience, you’ll become proficient in the subtitle ripping process and enjoy the benefits of having standalone subtitle files for your video collection.
Conclusion
Ripping subtitles from a DVD using Handbrake is a powerful and versatile solution that allows you to extract and save subtitles as separate files. Whether you want to enhance accessibility, facilitate language learning, or simply have more control over the subtitle presentation, Handbrake provides a user-friendly interface and robust features to fulfill your needs.
In this guide, we have covered the essential steps involved in ripping subtitles from a DVD using Handbrake. We started by introducing Handbrake as a free and open-source video transcoder. Then, we explored the various reasons why you might want to rip subtitles from a DVD, ranging from accessibility to customization.
We then provided a step-by-step guide on preparing the DVD, installing Handbrake, and configuring it for subtitle ripping. Following that, we discussed how to effectively rip the subtitles from the DVD using Handbrake and save them to your desired location. Additionally, we provided troubleshooting tips for common issues that may arise during the subtitle extraction process.
By following these guidelines and best practices, you can make the most of Handbrake’s capabilities and enjoy the flexibility of having standalone subtitle files. Whether you’re an individual looking to enhance your video viewing experience or a content creator aiming to cater to a wider audience, ripping subtitles using Handbrake opens up a world of possibilities.
Keep in mind that each DVD and subtitle extraction process may have its own unique challenges, so it’s important to remain patient and adaptable when using Handbrake. With practice and experience, you’ll gain a better understanding of the software and develop your own strategies for achieving optimal subtitle extraction results.
We hope that this guide has provided you with the knowledge and confidence to use Handbrake effectively for ripping subtitles from DVDs. Embrace the freedom of customizing subtitles, promoting accessibility, and exploring foreign languages through subtitle extraction with Handbrake. Enjoy your enhanced video viewing experience!