Introduction
Welcome to our comprehensive guide on how to replace thermal paste on your GPU! If you’re a gaming enthusiast or use your computer for graphic-intensive tasks, maintaining your GPU’s temperature is crucial. Thermal paste plays a vital role in dissipating heat effectively and ensuring optimal performance.
Over time, thermal paste can dry out, lose its effectiveness, and accumulate dust and debris, leading to increased temperatures and potential performance issues. Fortunately, replacing the thermal paste is a relatively straightforward process that can help restore your GPU’s cooling efficiency.
In this guide, we will walk you through the step-by-step process of replacing thermal paste on your GPU. Whether you’re an experienced PC builder or a first-time user, our instructions will help you tackle this task with confidence. Before we dive into the process, let’s talk about why thermal paste is so essential and when you should consider replacing it.
By the end of this guide, you’ll have a clear understanding of how to properly replace thermal paste on your GPU, ensuring that it continues to function optimally and maintains safe operating temperatures. Let’s jump right in!
Why is Thermal Paste Important?
Thermal paste, also known as thermal compound or thermal grease, is a crucial component in maintaining optimal operating temperatures for your GPU. It fills the microscopic gaps between the GPU die and the heat sink, enabling efficient heat transfer. Here’s why thermal paste is so important:
1. Heat Dissipation: The primary role of thermal paste is to improve heat conduction between the GPU die and the heat sink. Without thermal paste, air pockets would exist between these two surfaces, hindering heat transfer. The thermal paste fills these gaps, allowing heat to flow from the GPU die to the heat sink more effectively.
2. Lower Temperatures: By facilitating efficient heat dissipation, thermal paste helps lower the temperature of your GPU. Cooler temperatures are essential for preventing overheating, as excessive heat can damage the GPU and lead to performance degradation. Using high-quality thermal paste can significantly reduce the thermal resistance and ensure optimal heat dissipation.
3. Enhanced Performance: A cooler GPU performs better. High temperatures can cause thermal throttling, where the GPU reduces its clock speed to prevent overheating. By effectively dissipating heat, thermal paste helps maintain stable temperatures, allowing your GPU to operate at its maximum potential, ensuring smoother gaming experiences and faster rendering times.
4. Long-Term Reliability: Over time, thermal paste can deteriorate, dry out, or become less effective due to factors like dust accumulation or repeated temperature cycles. Regularly replacing the thermal paste can help maintain the long-term reliability of your GPU, ensuring consistent performance and preventing thermal issues that can lead to hardware failures or decreased lifespan.
Given the vital role that thermal paste plays in maintaining optimal operating temperatures and preserving the longevity of your GPU, it is crucial to understand when it is necessary to replace the thermal paste. We will discuss this in detail in the next section.
When and Why Should You Replace Thermal Paste on Your GPU?
Replacing the thermal paste on your GPU is a maintenance task that should be done periodically to ensure optimal performance and temperature management. Here are a few signs that indicate it may be time to replace the thermal paste on your GPU:
1. Increased Temperatures: If you notice that your GPU is running hotter than usual, even during idle or light usage, it could be a sign that the thermal paste has degraded. Over time, thermal paste can dry out, lose its effectiveness, and become less capable of transferring heat. Replacing the old thermal paste with fresh, high-quality paste can significantly reduce temperatures and restore optimal cooling.
2. Performance Issues: If you experience frequent frame drops, crashes, or decreased performance during graphics-intensive tasks, it might be worth considering replacing the thermal paste. Higher temperatures can lead to thermal throttling, where the GPU reduces its clock speed to prevent overheating. By replacing the thermal paste and improving heat dissipation, you can potentially resolve these performance issues.
3. Age and Maintenance: Over time, the thermal paste on your GPU can degrade due to factors like dust accumulation, repeated heating and cooling cycles, or improper application. If it has been a few years since the last thermal paste application, it’s a good idea to check the condition and consider replacing it to ensure optimal performance and temperature management.
4. Upgrading Hardware: If you are planning to upgrade your GPU or change the cooling solution, it is recommended to replace the thermal paste as part of the process. This ensures that you start with a clean and fresh application of thermal paste on your new hardware, maximizing its cooling efficiency from the start.
5. DIY Enthusiasts: For DIY enthusiasts who enjoy maintaining and optimizing their PC components, replacing the thermal paste on your GPU can be a regular part of your maintenance routine. By doing so, you can ensure that your GPU is operating at its best and minimize the risk of heat-related issues in the long run.
By staying vigilant for these signs and proactively replacing the thermal paste, you can maintain optimal performance, lower temperatures, and prolong the lifespan of your GPU. In the next section, we will discuss the tools you’ll need to successfully replace the thermal paste on your GPU.
What You’ll Need
Before you begin the process of replacing thermal paste on your GPU, it’s important to gather the necessary tools and materials. Here’s a list of what you’ll need:
1. Thermal Paste: Obtain a high-quality thermal paste from a reputable brand. There are various options available, such as ceramic-based or metal-based thermal compounds. Research and choose a thermal paste that suits your needs and has positive reviews regarding performance and longevity.
2. Isopropyl Alcohol (99% purity): Isopropyl Alcohol (also known as rubbing alcohol) is used to clean the old thermal paste from the GPU die and the heat sink. It helps remove any residue, dirt, or grease, ensuring a clean surface for reapplication of thermal paste.
3. Lint-Free Cloth or Coffee Filters: Use lint-free cloths or coffee filters to apply the isopropyl alcohol and wipe away the old thermal paste. Avoid using paper towels or tissue, as they can leave behind lint or fibers that may interfere with the thermal paste application.
4. Latex Gloves: Wearing latex gloves can help prevent oils from your hands transferring onto the GPU die or thermal paste. This ensures a clean application and helps avoid any potential damage caused by oils or contaminants.
5. Screwdriver Set: Depending on your specific GPU model, you may need a screwdriver set to remove the screws securing the GPU’s cooling solution. Make sure you have the appropriate screwdriver sizes to avoid damaging the screws.
6. Thermal Paste Spreader or Applicator: While not necessary, having a thermal paste spreader or applicator can help ensure even distribution of the thermal paste onto the GPU die. Some thermal paste products come with applicators included.
7. Non-Conductive Mat or Anti-Static Wrist Strap: To prevent electrostatic discharge (ESD) from damaging your GPU, it’s recommended to use a non-conductive mat or an anti-static wrist strap. This helps to discharge any static electricity buildup in your body, protecting sensitive electronic components.
By ensuring you have these tools and materials ready, you’ll be well-prepared to successfully replace the thermal paste on your GPU. In the next section, we will provide a detailed step-by-step guide to help you through the process smoothly.
Step-by-Step Guide to Replacing Thermal Paste on Your GPU
Now that you have gathered all the necessary tools and materials, it’s time to dive into the step-by-step process of replacing thermal paste on your GPU. Follow these instructions carefully to ensure a successful application:
Step 1: Prepare your workspace: Clear a clean and well-lit workspace with ample room to lay out your GPU and tools. Work on a non-conductive mat or use an anti-static wrist strap to prevent any static electricity from damaging your GPU.
Step 2: Power off and disconnect your GPU: Shut down your computer and unplug it from the power source. Carefully remove your GPU from its slot by releasing any securing mechanisms and gently pulling it out. Place it on your workspace in a static-safe manner.
Step 3: Disassemble the GPU cooling solution: Depending on your GPU model, you may need to remove screws or clips to detach the cooling solution from the GPU PCB. Use the appropriate screwdriver or tool to carefully undo any fasteners and separate the cooling solution from the GPU.
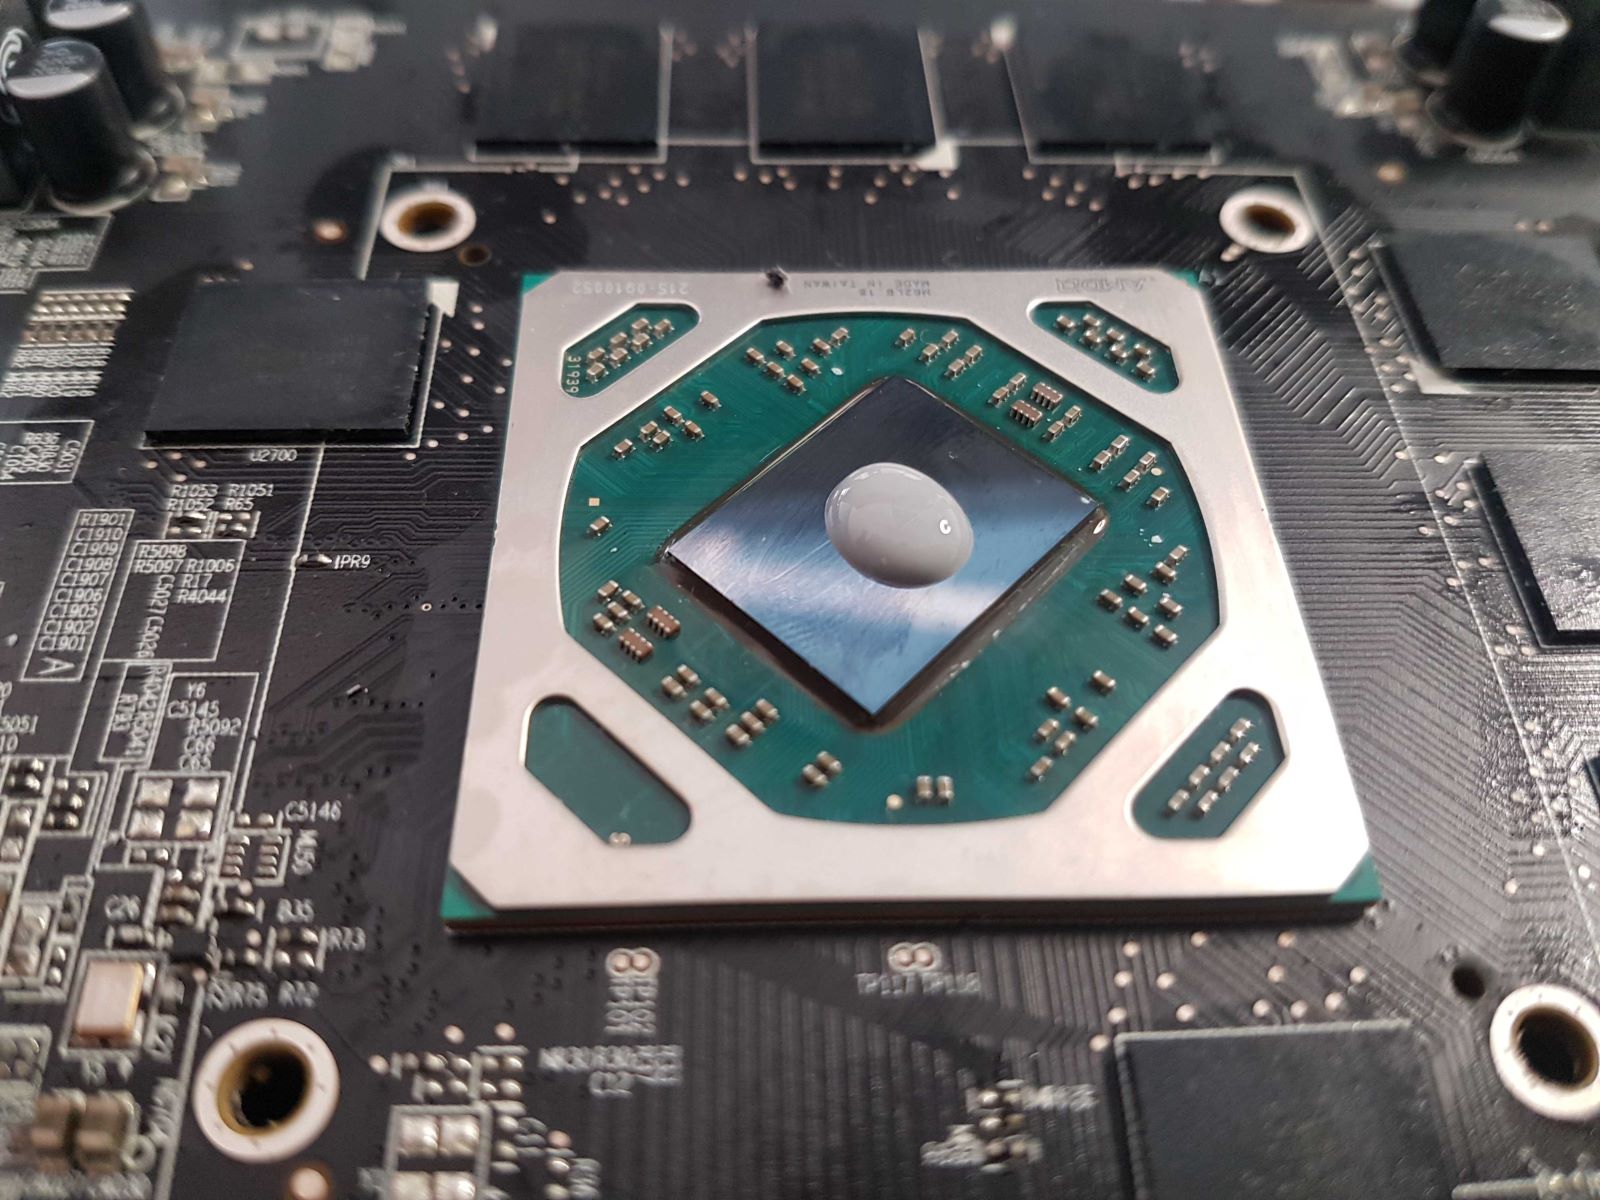
Step 4: Clean the GPU die and heat sink: Dampen your lint-free cloth or coffee filter with isopropyl alcohol. Gently wipe the GPU die and the corresponding area on the heat sink to remove any residue, old thermal paste, or dust. Allow them to dry completely before proceeding.
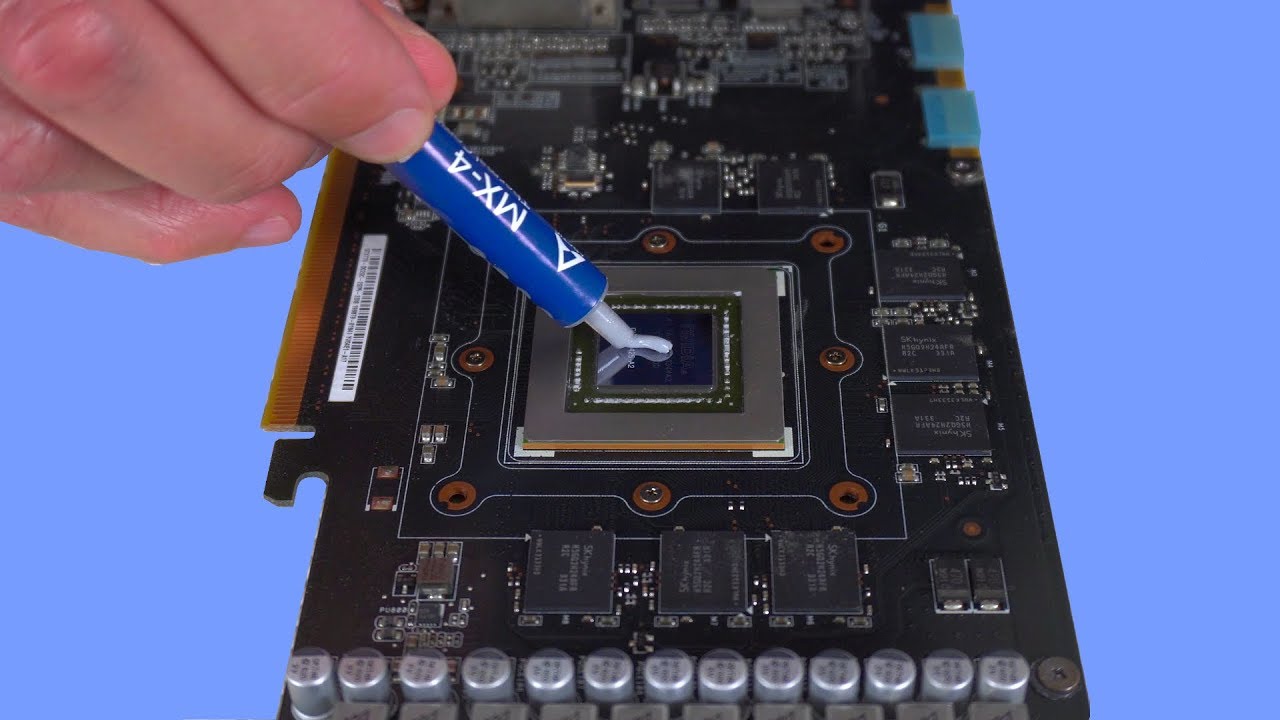
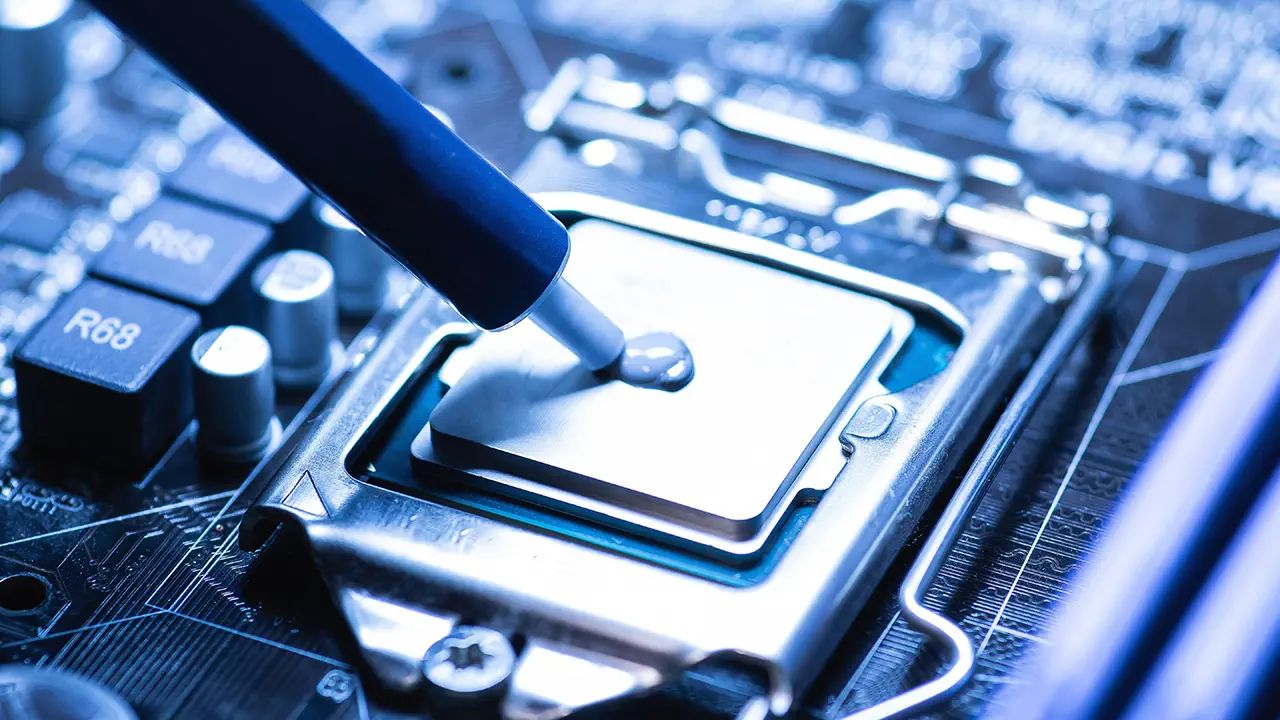
Step 5: Apply the new thermal paste: Take a small amount of thermal paste, roughly the size of a grain of rice or a small pea, on the GPU die. Use a thermal paste spreader or applicator (if available) or a clean, gloved finger to spread the paste thinly and evenly across the GPU die. Avoid applying too much paste, as it can lead to poor heat transfer.
Step 6: Reassemble the cooling solution: Carefully reattach the cooling solution back onto the GPU, aligning it properly with any screw holes or clips. Secure it in place using the appropriate screws or fasteners. Double-check that the cooling solution sits flush and evenly on the GPU.
Step 7: Reinstall the GPU: Insert the GPU back into its slot on the motherboard, ensuring a proper connection. Secure the GPU in place using any securing mechanisms provided. Reconnect any necessary power cables or connectors to the GPU.
Step 8: Power on and test: Plug your computer back into the power source and power it on. Monitor the GPU temperature and performance to ensure that the thermal paste replacement has been successful. You should notice lower temperatures and potentially improved performance.
With these step-by-step instructions, you’ll be able to confidently replace the thermal paste on your GPU. Remember to take your time, read through the instructions thoroughly, and exercise caution during the process. Now, let’s wrap up this guide.
Conclusion
Congratulations! You have successfully learned how to replace thermal paste on your GPU. By following the step-by-step guide, you can ensure optimal heat dissipation, lower temperatures, and improved performance for your graphics card.
Regularly replacing thermal paste is a crucial maintenance task for any PC enthusiast or gamer. Over time, thermal paste can dry out, lose its effectiveness, and lead to increased temperatures and potential performance issues. By taking the time to replace the thermal paste, you can prolong the lifespan of your GPU and enhance its overall performance.
Remember to choose a high-quality thermal paste from a reputable brand and follow the manufacturer’s guidelines for application. Take precautions to work in a static-safe environment and use the proper tools to disassemble and reassemble your GPU.
It’s essential to keep in mind that the process of replacing thermal paste may vary slightly depending on your specific GPU model. Always refer to the manufacturer’s documentation or online resources for any specific instructions related to your GPU.
We hope that this guide has provided you with the knowledge and confidence to tackle the task of replacing thermal paste on your GPU. Enjoy cooler temperatures, optimized performance, and a smoother gaming experience!
Happy computing!