Introduction
Are you experiencing slow performance or frequent crashes on your iBook G4? One possible solution to improve its speed and performance is to upgrade the RAM (Random Access Memory). Adding or replacing the RAM can significantly increase the system’s multitasking capability and responsiveness.
The iBook G4, released by Apple in the early 2000s, is a compact and portable laptop that has gained popularity among users seeking a balance between functionality and versatility. Although the iBook G4 comes with a limited amount of RAM, it can be upgraded to provide a boost in performance.
In this guide, we will take you through the step-by-step process of removing the existing RAM modules from your iBook G4. We will also discuss the optional step of installing new RAM modules to enhance your system’s capabilities. Before we delve into the process, please ensure that you have the necessary tools and follow the instructions carefully to avoid any damage to your device.
Upgrading the RAM in your iBook G4 can be a relatively simple task, even for users with limited technical knowledge. By the end of this guide, you will have the knowledge and confidence to successfully remove and replace the RAM modules in your iBook G4, allowing you to enjoy smoother performance and better productivity.
Before we proceed, it’s important to note that opening your iBook G4 may void any existing warranty or support services. If your device is still under warranty or if you are uncertain about performing the RAM upgrade yourself, it is recommended to seek assistance from a trained technician or authorized service center.
Now, let’s dive into the steps required to remove the RAM modules from your iBook G4 and improve its performance!
Step 1: Shut down your iBook G4
The first step before beginning any hardware-related task is to ensure that your iBook G4 is properly shut down. This will minimize the risk of any accidental damage during the process. Follow these simple steps to shut down your iBook G4:
- Save your work: Before shutting down your iBook G4, be sure to save any open documents or programs to avoid losing any important data.
- Close all applications: Close any open applications or windows that you are currently using.
- Click on the Apple menu: Located in the top-left corner of the screen, click on the Apple menu.
- Select “Shut Down”: From the dropdown menu, select the “Shut Down” option.
- Confirm the shut down: A confirmation window will appear asking if you are sure you want to shut down. Click on “Shut Down” to proceed.
- Wait for the iBook G4 to power off: Allow your iBook G4 a few moments to complete the shut down process. You will notice that the screen turns off, indicating that the device is powered off.
Once your iBook G4 is properly shut down, you are ready to move on to the next step of removing the RAM modules. Making sure your device is shut down ensures a safe and uninterrupted process, reducing the risk of any damage to your iBook G4 or the components being worked on.
Remember, patience is essential throughout this process to ensure the proper removal of the RAM modules. It’s always a good idea to review the steps and gather any necessary tools before proceeding to the next step.
Step 2: Remove the battery
Before you can access the RAM modules in your iBook G4, you need to remove the battery. Removing the battery is a crucial step to ensure your safety and to prevent any accidental electrical discharge. Follow these steps to safely remove the battery from your iBook G4:
- Ensure your iBook G4 is powered off: Confirm that your iBook G4 is fully shut down before attempting to remove the battery. Refer to Step 1 if you need a reminder on how to properly shut down your device.
- Locate the battery release latch: Flip your iBook G4 upside down and look for the battery release latch. It is usually located near the center of the bottom panel.
- Slide the battery release latch: Use your fingers or a small tool to slide the battery release latch to the unlocked position. This may require a gentle push or slide.
- Lift the battery out: Once the battery release latch is unlocked, gently lift the battery out of its compartment using your fingers or by pulling on the provided tab, if available.
It’s important to handle the battery with care during removal. Be mindful of any connectors or cables attached to the battery and ensure a smooth and gradual removal. Avoid using excessive force, as this may result in damage to the battery or your iBook G4.
With the battery removed, you have successfully completed the second step in preparing your iBook G4 for RAM removal. The next step will involve locating the RAM cover, allowing you to access the RAM modules inside your iBook G4 for removal or replacement.
Stay tuned for Step 3, where we will guide you through locating the RAM cover in your iBook G4.
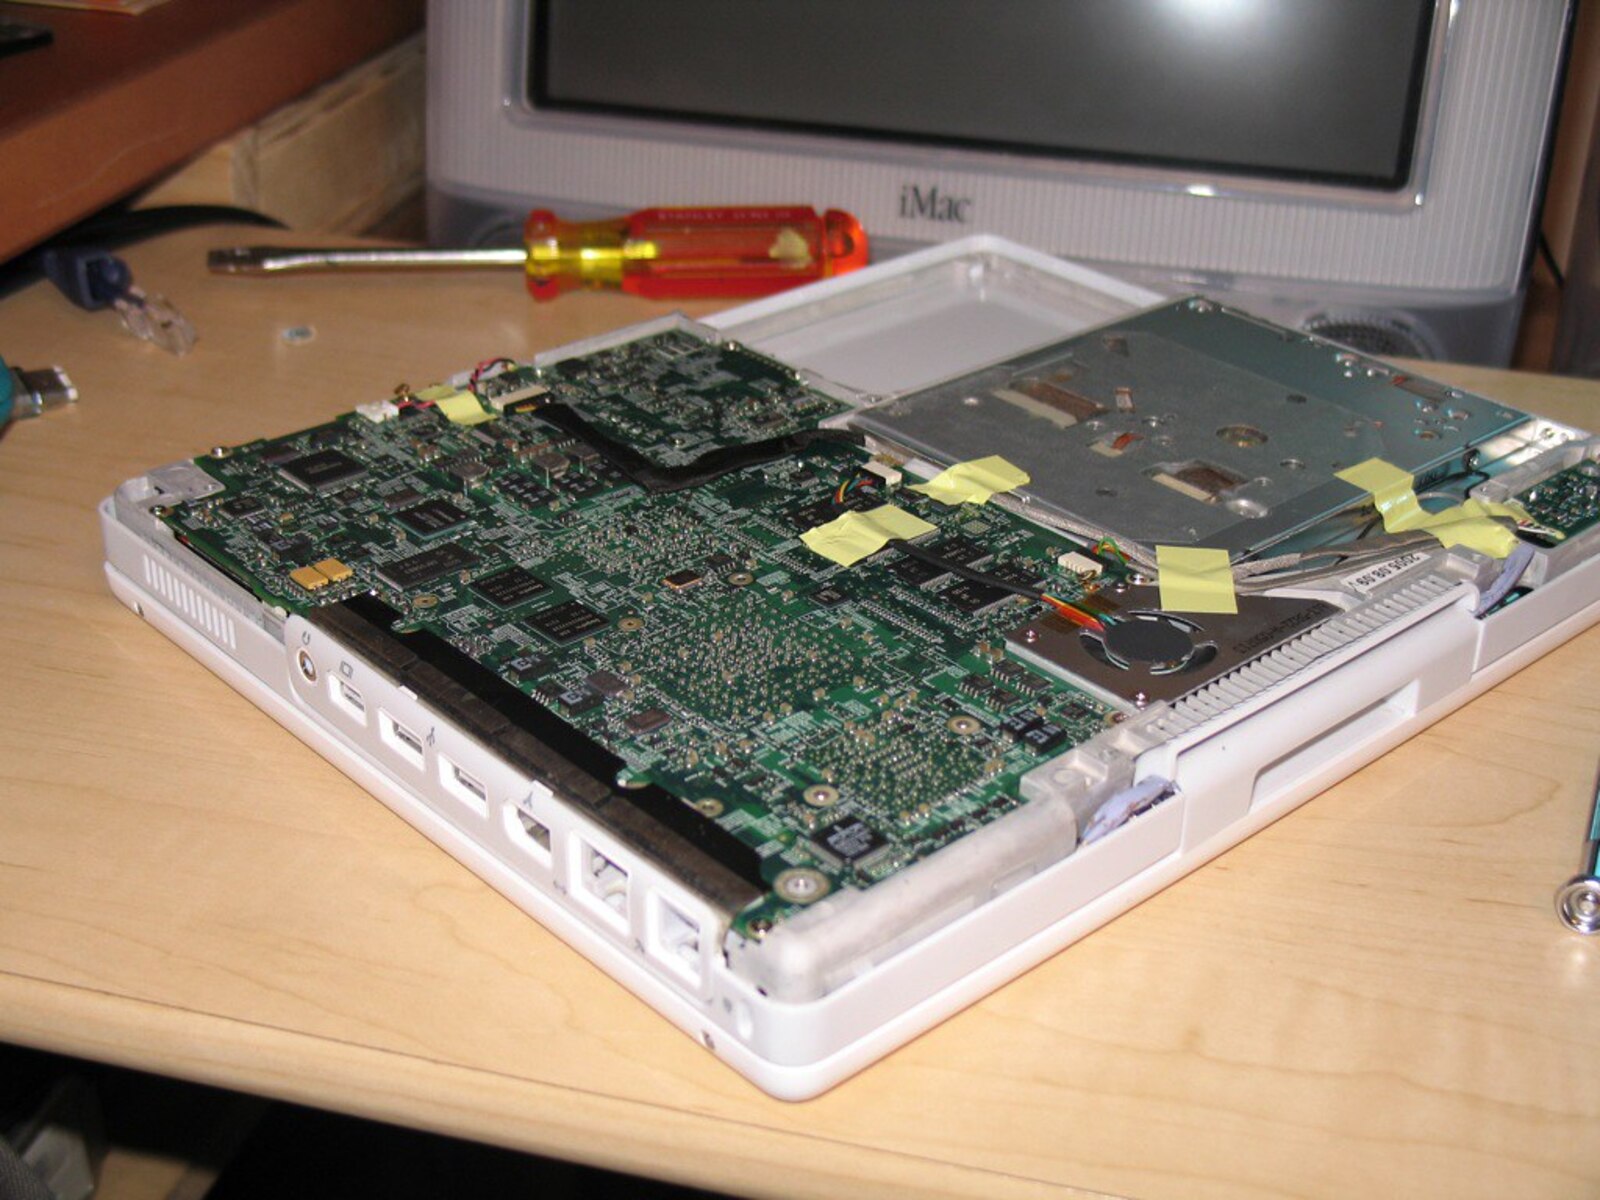
Step 3: Locate the RAM cover
Once you have successfully removed the battery from your iBook G4, the next step is to locate the RAM cover. The RAM cover provides access to the RAM modules, allowing you to remove or replace them. Follow these steps to locate the RAM cover on your iBook G4:
- Flip your iBook G4 back to its normal position: Turn your iBook G4 right side up, ensuring that the screen is facing you.
- Locate the RAM slot compartment: The RAM slot compartment is usually located on the bottom side of your iBook G4, near the center or towards one side.
- Look for the RAM cover: The RAM cover is a removable panel that protects the RAM modules. It is typically a small rectangular or square-shaped cover with one or more screws holding it in place.
- Identify any labels or icons: Some iBook G4 models may have labels or icons on the RAM cover to indicate the location of the RAM modules. These labels can be helpful in identifying the correct cover.
It’s important to note that the placement and appearance of the RAM cover may vary slightly depending on your specific iBook G4 model. If you are having trouble locating the RAM cover, referring to the user manual or online resources specific to your iBook G4 model may provide additional guidance.
Once you have located the RAM cover, you are ready to proceed to the next step of removing the cover. Removing the RAM cover will grant access to the RAM modules, allowing you to remove or replace them to enhance your iBook G4’s performance. We will cover this process in detail in the next step.
Stay tuned for Step 4, where we will guide you through the process of unscrewing the RAM cover and accessing the RAM modules in your iBook G4.
Step 4: Unscrew the RAM cover
Now that you have located the RAM cover on your iBook G4, it’s time to unscrew it to gain access to the RAM modules. Removing the RAM cover will allow you to remove or replace the RAM, improving the performance of your iBook G4. Follow these steps to unscrew the RAM cover:
- Gather the necessary tools: Before proceeding, ensure you have a small Phillips-head screwdriver that matches the size of the screws on the RAM cover.
- Position your iBook G4: Place your iBook G4 on a flat and sturdy surface, ensuring that the bottom side is facing up, with the exposed RAM cover in front of you.
- Identify the screws on the RAM cover: Look for the screws holding the RAM cover in place. Typically, there are two or more screws securing the cover. They may be located on one side or at each corner of the cover.
- Use the screwdriver to unscrew the screws: Insert the screwdriver into the grooves of the screws on the RAM cover. Rotate the screwdriver counterclockwise to loosen and unscrew each screw. Be careful not to strip the screws or apply excessive force, as this may damage the threads.
- Set aside the screws: Once the screws are fully loosened, carefully remove each screw and set them aside in a safe place. It’s a good practice to keep the screws together to avoid misplacing any of them.
- Remove the RAM cover: With the screws removed, gently lift the RAM cover from its position. The cover should come off easily, revealing the RAM modules underneath.
Now that you have successfully unscrewed the RAM cover, you are one step closer to removing or replacing the RAM modules in your iBook G4. In the next step, we will guide you through the process of removing the RAM modules safely and properly.
Stay tuned for Step 5, where we will discuss how to remove the RAM modules from your iBook G4.
Step 5: Remove the RAM
Now that you have successfully removed the RAM cover from your iBook G4, it’s time to remove the RAM modules. Carefully following these steps will ensure a safe and proper removal of the RAM:
- Identify the RAM modules: The RAM modules are small rectangular cards located beneath the RAM cover. They are usually held in place by metal clips or brackets on each side.
- Release the side clips: Gently push the metal clips or brackets away from the RAM module on each side. This will release the module from its secured position.
- Slide out the RAM module: Once the side clips are released, use your fingers to gently grasp the sides of the RAM module. Carefully slide it outwards and towards you at a slight angle.
- Repeat for additional RAM modules (if applicable): If your iBook G4 has multiple RAM modules, repeat the above steps for each module you wish to remove. Take note of the order in which the modules are installed, as you will need to reinstall them in the correct slots later.
It’s important to handle the RAM modules with care to avoid any damage, such as bending the connectors or touching the gold contacts. Be cautious not to exert excessive force or use any sharp objects during the removal process, as this may result in permanent damage to the RAM or your iBook G4.
With the RAM modules removed, you have successfully completed the process of removing the RAM from your iBook G4. If you plan on upgrading the RAM by installing new modules, continue onto Step 6. Otherwise, if you are only removing the RAM for cleaning or troubleshooting purposes, proceed to Step 7 to replace the RAM cover.
Stay tuned for Step 6, where we will guide you through the optional process of installing new RAM modules in your iBook G4 to enhance its performance.
Step 6: Install new RAM (optional)
If you have decided to upgrade your iBook G4’s RAM for improved performance, this optional step will guide you through the process of installing new RAM modules. Follow these steps to properly install new RAM in your iBook G4:
- Choose compatible RAM modules: Before purchasing new RAM, make sure to check your iBook G4’s specifications for the supported type and maximum capacity of RAM. It’s important to choose RAM modules that are compatible with your device to ensure optimal performance.
- Handle the RAM modules with care: Hold the RAM modules by their edges, avoiding direct contact with the gold contacts or circuitry. Static electricity can damage sensitive components, so it’s essential to ground yourself by touching a grounded object before handling the RAM.
- Identify the RAM slots: Locate the RAM slots on your iBook G4. These slots are usually adjacent to each other and aligned with the metal clips or brackets that secure the RAM. Take note of the order of the slots or refer to your iBook G4’s documentation for specific instructions.
- Align the RAM module: Align the notch or cutout on the bottom edge of the RAM module with the corresponding tab inside the RAM slot. Ensure that the golden contacts on the module are facing downward toward the slot.
- Insert the RAM module: Insert the RAM module into the slot at a slight angle, with the gold contacts going in first. Apply gentle and even pressure to push the module down into the slot until it is fully seated. The clips or brackets on each side will automatically snap into place, securing the RAM module.
- Repeat for additional RAM modules (if applicable): If you are installing multiple RAM modules, repeat the above steps for each module in the corresponding slots. Make sure to install them in the correct order and alignment.
Once you have successfully installed the new RAM modules, you have completed the optional step of upgrading your iBook G4’s RAM. The additional RAM will provide a significant boost to your device’s multitasking capability and overall performance.
If you’ve chosen not to install new RAM and are only replacing or cleaning the existing modules, you can proceed to Step 7 to learn how to replace the RAM cover.
Stay tuned for Step 7, where we will discuss the process of replacing the RAM cover on your iBook G4.
Step 7: Replace the RAM cover
Now that you have either upgraded the RAM or completed the maintenance on your iBook G4, it’s time to replace the RAM cover. The RAM cover protects the RAM modules and ensures they remain securely in place. Follow these steps to properly replace the RAM cover:
- Take the RAM cover: Retrieve the RAM cover you removed earlier and ensure it is clean and free from any dust or debris.
- Position the RAM cover: Position the RAM cover over the now-installed RAM modules, aligning it with the screw holes and ensuring it is properly aligned with the overall shape of the iBook G4.
- Insert the screws: Insert the screws back into their respective holes on the RAM cover. Use your fingers or a small Phillips-head screwdriver to gently tighten the screws, but avoid overtightening, as this may strip the threads or damage the cover.
- Tighten the screws: Use your screwdriver to firmly tighten the screws, being careful not to overtighten. Ensure that all screws are secured snugly to keep the RAM cover in place and properly protect the RAM modules.
By following these steps, you have successfully replaced the RAM cover on your iBook G4. The RAM cover will ensure the RAM modules are secured and protected while preserving the overall integrity of your device.
Now that you have completed this step, you’re almost ready to power on your iBook G4. However, before you do, make sure to complete the remaining steps to ensure a smooth and successful process.
Stay tuned for Step 8, where we will guide you through replacing the battery in your iBook G4.
Step 8: Replace the battery
Now that you have successfully replaced the RAM cover on your iBook G4, it’s time to reinsert the battery. The battery is essential for powering your device and ensuring uninterrupted usage. Follow these steps to properly replace the battery in your iBook G4:
- Take the battery: Retrieve the battery you removed earlier and ensure it is clean and free from any dust or debris.
- Align the battery: Align the battery with the battery compartment, making sure the connectors on the battery match the connectors in the compartment. Ensure that the battery is positioned in the correct orientation.
- Insert the battery: Gently slide the battery into the battery compartment, ensuring a smooth and secure fit. Make sure it is properly seated and fully inserted.
- Lock the battery: Once the battery is inserted, use your fingers to slide the battery release latch back to the locked position. This will secure the battery in place.
It’s important to ensure that the battery is securely inserted and locked in place to avoid any disruptions or power-related issues when using your iBook G4.
With the battery successfully replaced, you are one step away from powering on your iBook G4 and enjoying its improved performance. However, before you proceed, make sure to complete the final step to ensure a successful boot-up.
Stay tuned for Step 9, where we will guide you through powering on your iBook G4 and verifying that the RAM upgrade or maintenance was successful.
Step 9: Power on your iBook G4
With the RAM and battery successfully replaced, it’s time to power on your iBook G4 and ensure that the RAM upgrade or maintenance was successful. Follow these steps to power on your iBook G4:
- Ensure the battery is properly inserted: Double-check that the battery is securely inserted, and the battery release latch is in the locked position.
- Connect the power adapter (if needed): If your iBook G4 requires external power, connect the power adapter to an electrical outlet and then connect it to your iBook G4’s power port. Ensure the connection is secure.
- Press the power button: Locate the power button, usually located near the keyboard or on the top panel of your iBook G4. Press and hold the power button for a few seconds to turn on the device.
- Watch for the startup sequence: As your iBook G4 powers on, pay attention to the startup sequence. You should see the Apple logo appear on the screen, indicating that the device is booting up.
- Check for successful boot-up: Once the startup sequence completes, your iBook G4 should proceed to the login screen or desktop. If you reach this stage without any errors or issues, it indicates a successful boot-up.
- Test the system: To ensure that the RAM upgrade or maintenance was successful, you can test your iBook G4’s performance by opening multiple applications or running resource-intensive tasks. Monitor the system’s performance and check for any improvements in speed, responsiveness, and multitasking capabilities.
If your iBook G4 powers on and operates smoothly without any difficulties, congratulations! You have successfully completed the RAM upgrade or maintenance. Enjoy the improved performance of your iBook G4 and take advantage of its newfound capabilities.
However, if you experience any issues such as boot failures, error messages, or system instability, it is recommended to double-check the RAM installation, ensure compatibility with your iBook G4, or consult with a professional for further assistance.
Remember, proper maintenance and regular cleaning of your iBook G4, including the RAM modules, can help extend its lifespan and enhance its overall performance.
Thank you for following this guide to remove and replace the RAM in your iBook G4. We hope this process has been informative and helpful in improving your device’s performance.
Conclusion
Congratulations on successfully removing and replacing the RAM modules in your iBook G4! Whether you were upgrading the RAM for improved performance or performing maintenance, this guide has provided you with step-by-step instructions to safely and effectively complete the process.
By upgrading the RAM in your iBook G4, you have unlocked its true potential for enhanced multitasking capabilities, improved responsiveness, and smoother performance. With the increased memory, you can now tackle more demanding tasks, run resource-intensive applications, and enjoy a more efficient computing experience.
Remember, when working with hardware components, it is crucial to follow the steps carefully and handle the components with care. Take your time, use the appropriate tools, and ensure that your iBook G4 is fully powered off before starting any maintenance or upgrade process.
If you encountered any difficulties during the process or if you have any further questions, don’t hesitate to consult the user manual for your iBook G4 or seek assistance from a trained technician or authorized service center.
Lastly, regular maintenance and cleaning of your iBook G4, including the RAM modules, can help prolong its lifespan and maximize its performance. Regularly check for dust or debris buildup, ensure proper ventilation, and keep the RAM modules and other components free from dirt and grime.
We hope that this guide has been helpful in improving your iBook G4’s performance. Enjoy the benefits of upgraded RAM and make the most out of your iBook G4’s capabilities.
Thank you for following this guide, and we wish you continued success and satisfaction with your iBook G4!