Introduction
Welcome to our guide on how to remove a profile from your Amazon Fire Tablet. Amazon Fire Tablets offer a convenient and personalized experience for users by allowing multiple profiles to be set up on the device. Profiles can be useful for different family members, allowing each person to have their own customized settings, apps, and content. However, there may come a time when you need to remove a profile, whether it’s because someone no longer uses the tablet or you simply want to tidy up the device.
Removing a profile from your Amazon Fire Tablet is a straightforward process that can be done in a few simple steps. In this guide, we will walk you through the process, ensuring that you can easily remove unwanted profiles without any hassle. We will also provide handy tips to help you backup your data and stay connected to the internet throughout the process.
Whether you are decluttering your device, managing user profiles, or handing down your Fire Tablet to someone else, our step-by-step instructions will ensure that you can remove profiles with ease. So, without further ado, let’s dive into the process of removing a profile from your Amazon Fire Tablet.
Step 1: Backup your data
Before you proceed with removing a profile from your Amazon Fire Tablet, it is important to backup any data that you want to keep. By doing this, you can ensure that you don’t lose any important files, photos, or settings.
To start the backup process, you can either connect your Fire Tablet to a computer using a USB cable or use a cloud storage service, such as Amazon Drive or Google Drive. If you choose to connect your tablet to a computer, simply navigate to the device folder and copy the desired files onto your computer’s hard drive.
If you prefer to use a cloud storage service, you will need to download the corresponding app from the Amazon Appstore and sign in with your account. Once you have installed the app, you can easily upload your files to the cloud, ensuring that they are safely stored and accessible from any device.
It’s also a good idea to double-check that your contacts, calendars, and any other important data are synced with your Amazon account or an external service. This will guarantee that you can easily restore your data when setting up a new profile or if you decide to factory reset your device in the future.
Remember, taking the time to backup your data will provide peace of mind and ensure that you don’t lose any valuable information during the profile removal process. Once you have successfully backed up your data, you can proceed with the next steps to remove the profile from your Amazon Fire Tablet.
Step 2: Disconnect from the internet
Before you can remove a profile from your Amazon Fire Tablet, it’s important to disconnect from the internet. This step is crucial to ensure a smooth and uninterrupted removal process.
To disconnect from the internet, simply swipe down from the top of your tablet’s screen to open the notification panel. Look for the Wi-Fi icon and tap on it to disable the internet connection. Alternatively, you can go to Settings and toggle the Wi-Fi switch to ‘Off’.
Why is it necessary to disconnect from the internet? Well, when you remove a profile from the Amazon Fire Tablet, the device may need to sync and update certain settings and configurations. By disconnecting from the internet, you can avoid any potential interruptions and ensure a seamless removal process.
Furthermore, disconnecting from the internet can prevent any new data from being synced to the profile you wish to remove. This means that when you delete the profile, you won’t accidentally lose any recent changes or updates that may not have been backed up yet.
It’s worth noting that once you have successfully removed the profile and completed the process, you can reconnect to the internet to ensure that all remaining profiles on your Fire Tablet can function normally and sync any necessary updates.
Now that you have disconnected from the internet, you are ready to proceed to the next step and navigate to the appropriate settings on your Fire Tablet to remove the desired profile.
Step 3: Go to Settings
In order to remove a profile from your Amazon Fire Tablet, you will need to access the device’s settings. The Settings menu is where you can manage various aspects of your tablet, including user profiles, display settings, and app preferences.
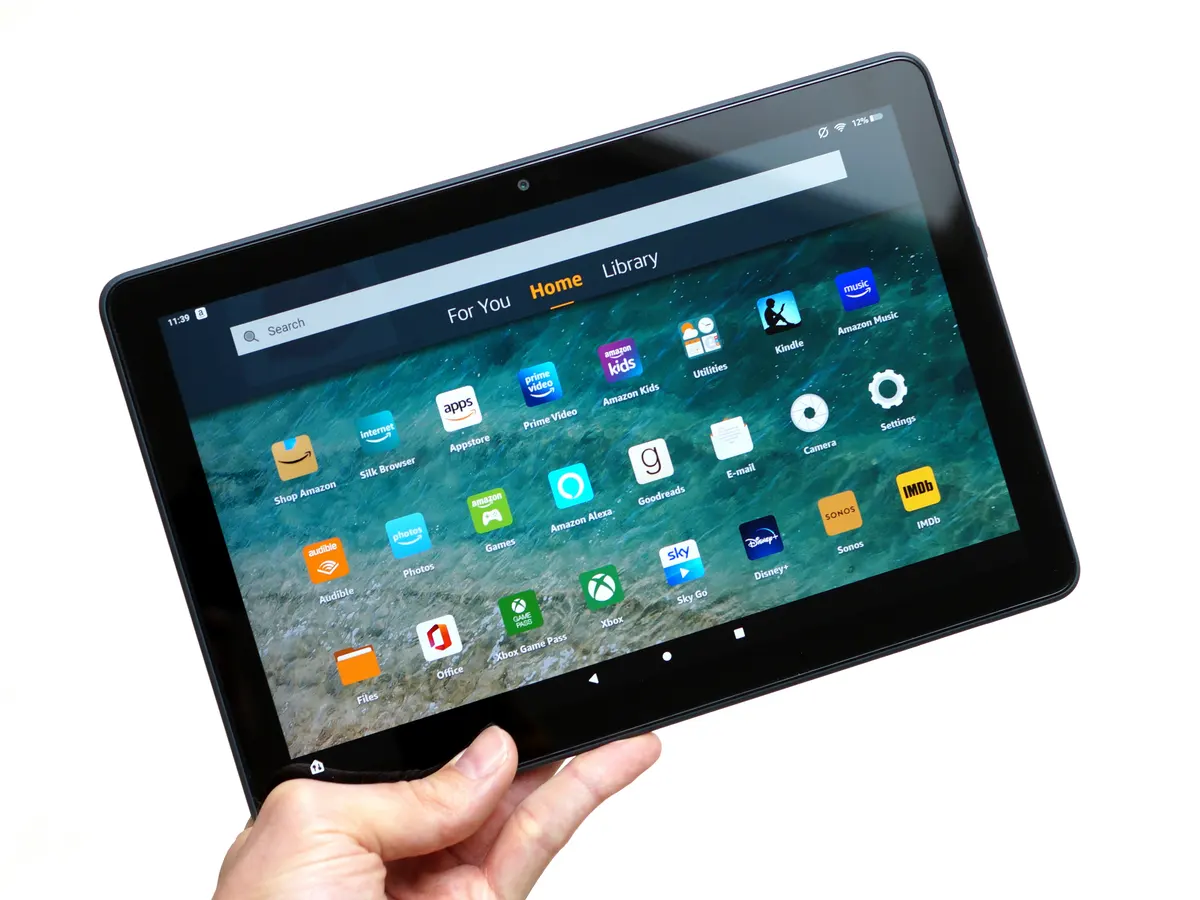
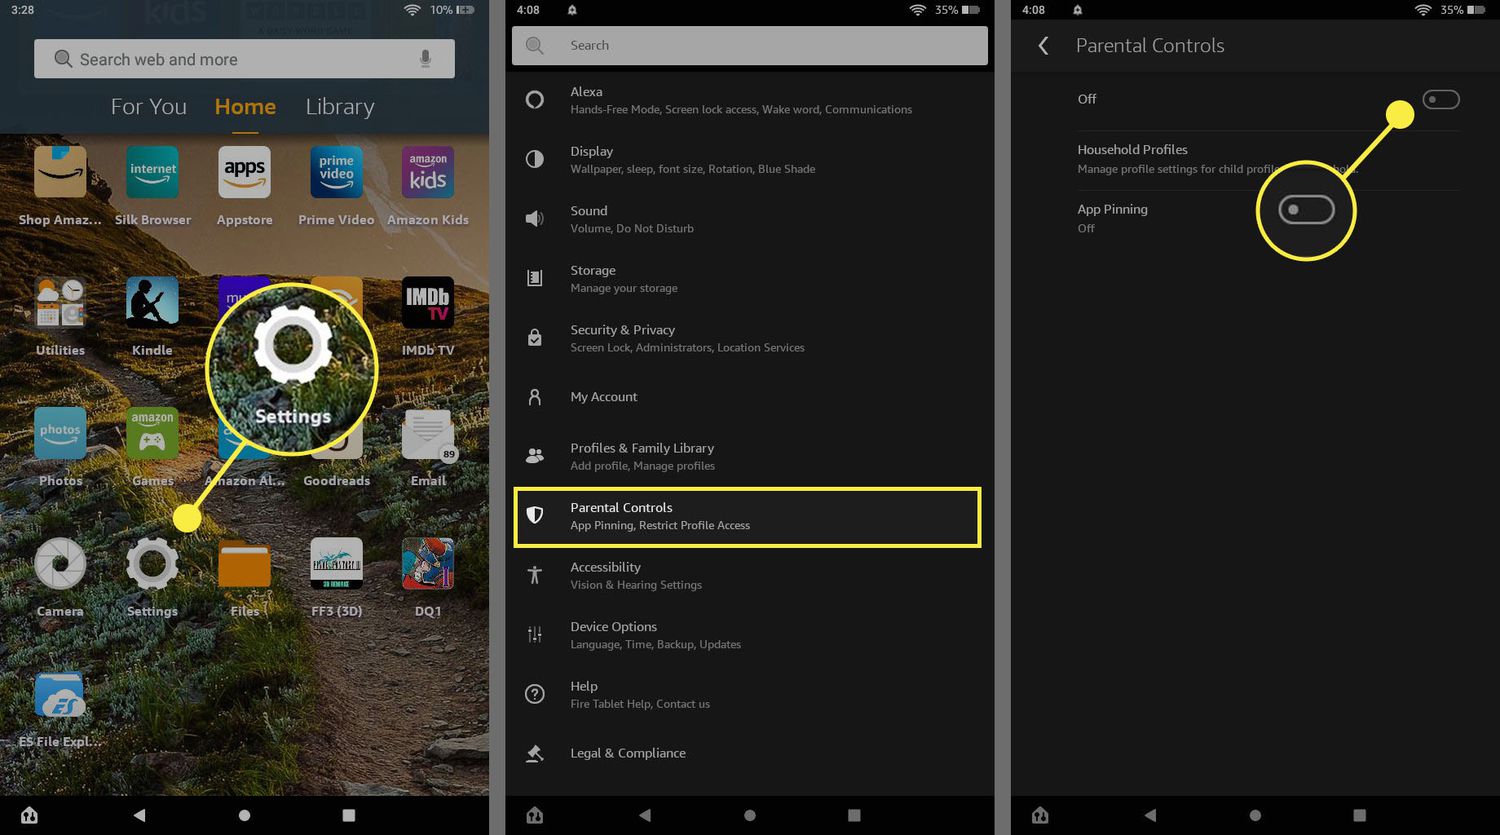
To begin, unlock your tablet and swipe down from the top of the screen to open the notification panel. From there, tap on the gear-shaped ‘Settings’ icon. Alternatively, you can locate the ‘Settings’ app on your tablet’s home screen and tap on it to open.
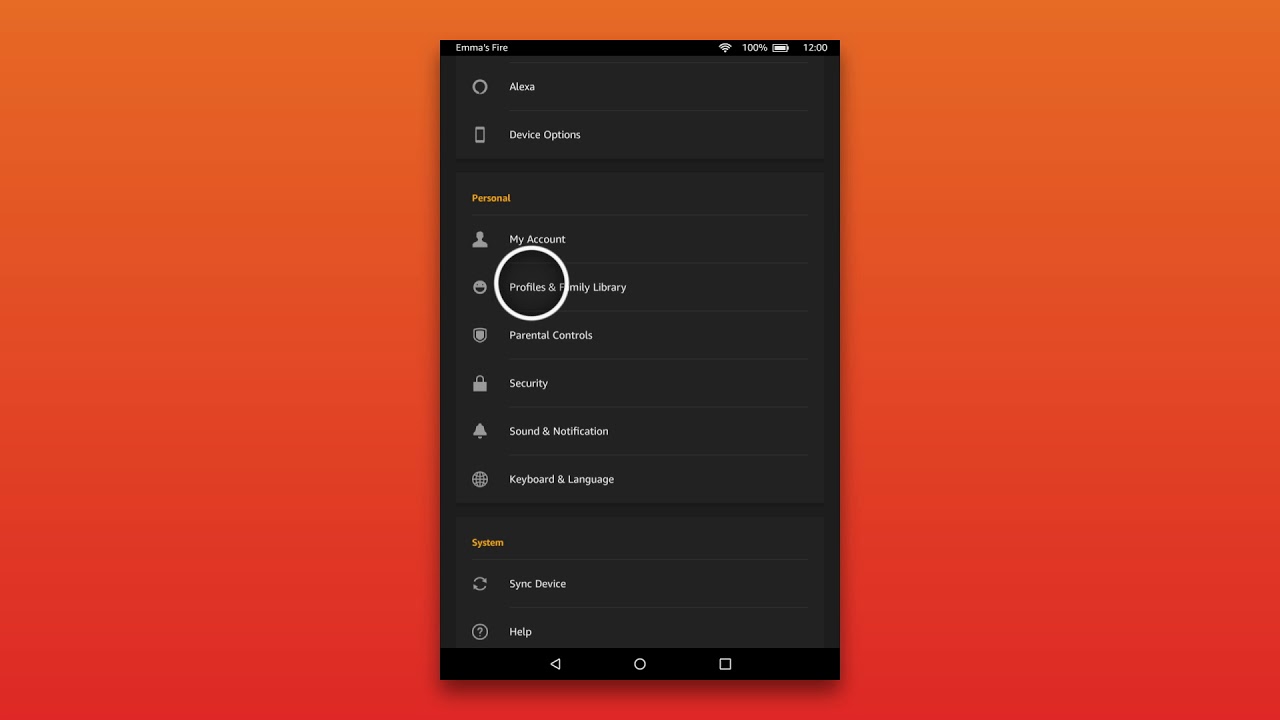
Once you are in the Settings menu, you will see a list of different options and categories. Scroll down until you find the section labeled ‘Profiles & Family Library’. This is where you can manage all the profiles that are currently set up on your Fire Tablet.
Tap on the ‘Profiles & Family Library’ option to access the profile management settings. Here, you will find a list of all the profiles that are currently registered on your tablet. From this menu, you will be able to delete any unwanted or unnecessary profiles, ensuring that your Fire Tablet remains organized and tailored to your needs.
Keep in mind that some devices may have a slightly different settings layout or a different name for the profile management section. However, the general process remains the same – navigate to the device’s settings and look for the option that allows you to manage profiles.
Now that you’ve successfully accessed the Settings menu, it’s time to move on to the next step and remove the desired profile from your Amazon Fire Tablet.
Step 4: Select “Profiles & Family Library”
After accessing the Settings menu on your Amazon Fire Tablet, it’s time to navigate to the “Profiles & Family Library” section. This is where you can manage all the profiles that are currently set up on your device, including the one you want to remove.
In the Settings menu, scroll down until you find the “Profiles & Family Library” option. Depending on your Fire Tablet model and software version, this section may be labeled slightly differently, but it typically contains the word “Profiles” or “Users”. Tap on this option to proceed.
Once you enter the “Profiles & Family Library” section, you will see a list of profiles that are registered on your Fire Tablet. Each profile will have a name and possibly an associated profile picture or icon. Simply scroll through the list and locate the profile that you wish to remove.
Take a moment to double-check the profile you have selected to ensure that you don’t accidentally delete the wrong one. Removing a profile will permanently delete all the personalized settings, apps, and data associated with that profile, so be certain that you no longer need the profile before proceeding.
If you have a long list of profiles and it’s difficult to find the one you want to remove, you can look for specific identifiers such as profile pictures, icons, or the name of the individual using the profile. Once you have identified the correct profile, you can proceed to the next step to remove it from your device.
Now that you have selected the “Profiles & Family Library” option and located the profile you want to remove, let’s move on to the next step and delete the profile from your Amazon Fire Tablet.
Step 5: Remove the desired profile
Once you have accessed the “Profiles & Family Library” section in the Settings menu of your Amazon Fire Tablet, it is time to remove the profile you no longer need. Removing a profile will permanently delete all the personalized settings, apps, and data associated with that profile, so ensure that you have selected the correct one.
To remove a profile, simply tap on the profile you want to delete. This will open up the profile settings, where you can manage various aspects of the selected profile.
Within the profile settings, you will find an option that allows you to delete, remove, or disable the profile. The wording may vary slightly depending on your Fire Tablet model and software version, but it is typically labeled as “Remove” or “Delete”. Tap on this option to proceed with the removal process.
Before the profile is permanently deleted, you may be prompted to confirm the action. This is an additional step to ensure that you do not accidentally delete the profile. Take a moment to review the confirmation message and ensure that you want to proceed with the removal. If you are certain, tap on the confirmation option to delete the profile.
The removal process may take a few moments, during which the Fire Tablet will update its settings and configurations accordingly. Once the profile has been successfully removed, you will be directed back to the “Profiles & Family Library” section of the Settings menu.
Keep in mind that if the profile is the primary profile on the device, the Fire Tablet may prompt you to choose a new primary profile or switch to another existing profile. This ensures that the device remains usable even after the removal of the primary profile.
Now that you have successfully removed the desired profile, you can proceed with the final steps to complete the profile removal process on your Amazon Fire Tablet.
Step 6: Confirm deletion
After selecting the profile you want to remove from your Amazon Fire Tablet and initiating the removal process, you will be prompted to confirm the deletion. This step is an important safeguard to ensure that you do not accidentally delete the wrong profile.
When prompted to confirm the deletion, carefully review the information provided on the screen. This may include a warning that all data associated with the profile will be permanently deleted and cannot be recovered.
Take a moment to double-check that you have selected the correct profile for deletion. If you are certain that you want to proceed, tap on the confirmation button to confirm the deletion.
It is essential to note that once the profile is deleted, all personalized settings, apps, and data associated with that profile will be lost. Any downloaded apps, saved documents, and customized preferences on that profile will no longer be accessible.
If you have any doubts or want to save any important data from the profile before deletion, now is the time to go back and retrieve that information.
Once you confirm the deletion, the Fire Tablet will initiate the removal process. This may take a moment as the device updates its settings and configurations to reflect the removal of the profile.
After a successful deletion, you will be returned to the “Profiles & Family Library” section in the Settings menu, with the removed profile no longer listed.
Now that you have confirmed the deletion of the profile, we can move on to the final step to complete the profile removal process on your Amazon Fire Tablet.
Step 7: Reconnect to the internet
Once you have successfully removed the desired profile from your Amazon Fire Tablet, it’s time to reconnect to the internet. Reestablishing an internet connection is essential to ensure that all remaining profiles on your device can function properly and sync any necessary updates.
To reconnect to the internet, swipe down from the top of your tablet’s screen to open the notification panel. Look for the Wi-Fi icon and tap on it to enable the internet connection. Alternatively, you can go to Settings and toggle the Wi-Fi switch to ‘On’.
Once you are reconnected to the internet, your tablet will start syncing any updates and configurations that may be necessary for the remaining profiles. This ensures that all profiles have access to the latest software versions, app updates, and other online services.
If you are using a password-protected Wi-Fi network, you may need to re-enter the network credentials to establish the connection. Simply tap on your network’s name, enter the password, and your Fire Tablet will connect to the network.
Keep in mind that a stable internet connection is crucial for accessing online features, downloading new apps, and enjoying a seamless user experience on your Fire Tablet. Therefore, ensure that you have a reliable internet connection before proceeding with any tasks, including accessing your remaining profiles and downloading new content.
Now that you have reconnected to the internet, you have completed all the necessary steps to remove a profile from your Amazon Fire Tablet. Congratulations!
By following this guide, you have successfully removed an unwanted profile and organized your Fire Tablet according to your preferences. Remember, if you ever need to add a new profile or make changes to existing profiles, you can always refer back to this guide for assistance.
Conclusion
Congratulations on successfully removing a profile from your Amazon Fire Tablet! By following the steps outlined in this guide, you have taken control of your device and organized it according to your preferences.
We began by emphasizing the importance of backing up your data before proceeding with the profile removal process. This ensures that you don’t lose any valuable files, photos, or settings that are associated with the profile.
Next, we walked you through the process of disconnecting from the internet to ensure a smooth and uninterrupted removal process. By doing so, you prevent any new data from being synced to the profile and avoid potential interruptions.
We then guided you through accessing the Settings menu and finding the “Profiles & Family Library” section, where you can manage all the profiles on your Fire Tablet.
Once you located the profile you wanted to remove, we explained the steps to remove it, including confirming the deletion to ensure that you don’t accidentally delete the wrong profile.
Finally, we encouraged you to reconnect to the internet to allow the remaining profiles on your device to function properly and sync any necessary updates.
Removing a profile from your Amazon Fire Tablet can help keep your device organized, free up storage space, and ensure a personalized user experience. Whether you are streamlining your device, managing user profiles, or passing it on to someone else, this guide has provided you with the knowledge to successfully remove a profile with ease.
Remember, if you ever need to manage or remove profiles in the future, you can refer back to this guide as a handy reference. Enjoy exploring and customizing your Amazon Fire Tablet to suit your needs!


