Introduction
Samsung Smart TVs are known for their wide range of entertainment options, including multiple channels that cater to various interests and preferences. However, there may come a time when you want to remove certain channels from your Samsung Smart TV. Whether it’s outdated channels, channels you won’t use, or simply to declutter your channel list, there are several ways you can do this.
In this article, we will explore various methods to help you remove channels from your Samsung Smart TV. These methods include manual channel editing, traditional channel editing, hiding channels, and resetting the channel list. By following these step-by-step instructions, you can customize your TV viewing experience and ensure that you only have access to the channels that matter to you.
We understand that everyone has their own unique preferences when it comes to TV channels, and it’s important to be able to control the content you see on your screen. Whether you want to streamline your channel lineup, remove channels that are no longer relevant, or hide channels that you don’t want to see, the methods we will discuss in this article will give you the flexibility to tailor your Samsung Smart TV to your liking.
So, if you’re ready to take control of your channel list and create a personalized TV experience on your Samsung Smart TV, let’s dive into the various methods you can use to remove channels. Whether you’re a tech-savvy enthusiast or a casual user, we’ve got you covered with these easy-to-follow instructions.
Reasons to Remove Channels from Samsung Smart TV
There are several reasons why you might want to remove channels from your Samsung Smart TV. Let’s explore some of the common reasons below:
- Cluttered Channel List: Over time, your channel list can become cluttered with channels that you no longer watch or find relevant. Removing these channels can help you declutter your TV interface and make it easier to navigate and find the channels you enjoy.
- Personalized Viewing Experience: By removing channels that you don’t watch, you can create a more personalized viewing experience. Customizing your channel list ensures that you only see the channels that interest you, making it easier to find and enjoy your favorite programs.
- Parental Control: If you have children at home, you may want to remove certain channels that are not suitable for their age group. By removing these channels, you can control the content that your children have access to and ensure a safe and appropriate viewing experience.
- Reducing Channel Surfing: Having too many channels on your TV can lead to endless channel surfing and spending more time searching for something to watch. By removing unnecessary channels, you can narrow down your options and spend less time scrolling through channels.
- Updating Channel Lineup: TV providers often introduce new channels or make changes to their channel lineup. If you want to keep your channel list up to date and remove outdated channels, regularly removing unwanted channels is essential.
Each person has their own preferences and reasons for removing channels from their Samsung Smart TV. Whether it’s for decluttering, personalization, parental control, convenience, or staying up to date with current channels, removing channels can enhance your TV viewing experience and make it more tailored to your liking.
Now that we’ve explored the reasons why you might want to remove channels from your Samsung Smart TV, let’s move on to the various methods you can use to accomplish this.
Method 1: Manual Channel Edit
One of the ways to remove channels from your Samsung Smart TV is through manual channel editing. This method allows you to individually select and remove specific channels from your channel list. Here’s how you can do it:
- Start by turning on your Samsung Smart TV and accessing the main menu.
- Navigate to the “Channel List” or “Channel Manager” option. The location of this option may vary depending on the model of your TV.
- Select the “Edit Channels” or “Edit Channel List” option. This will open the channel editing interface.
- Scroll through the list of channels and locate the channel you want to remove.
- Once you’ve found the channel you want to remove, select it using your remote control. Typically, you can select a channel by pressing the enter or OK button.
- A menu or options panel will appear. Look for the option to delete or remove the channel.
- Select the delete or remove option to remove the channel from your list.
- Repeat the above steps for any additional channels you want to remove.
- After removing all the desired channels, exit the channel editing interface and return to the TV’s main menu.
It’s important to note that the exact steps and options may vary depending on the model of your Samsung Smart TV. Some models may have additional features or a different user interface. Refer to the user manual or online documentation specific to your TV model for more precise instructions.
By using manual channel editing, you have the flexibility to remove specific channels that you no longer want or need. This method allows you to have full control over your channel list, ensuring that you only see the channels that align with your preferences.
Now that you’re familiar with the manual channel editing method, let’s explore another option for removing channels from your Samsung Smart TV.
Method 2: Traditional Channel Edit
Another method you can use to remove channels from your Samsung Smart TV is through the traditional channel edit feature. This method allows you to customize your channel list by selecting and deselecting channels. Here’s how you can do it:
- Turn on your Samsung Smart TV and access the main menu.
- Find the “Channel List” or “Channel Manager” option. Depending on your TV model, this option may be located under the “Settings” or “Options” menu.
- Open the “Channel List” or “Channel Manager” to view your current channel lineup.
- Using your remote control, navigate through the channel list to find the channels you want to remove.
- Once you locate a channel you want to remove, select it by pressing the enter or OK button on your remote control.
- A checkmark or a symbol indicating the selected channel should appear next to it.
- To remove the selected channel, press the menu or options button on your remote control.
- From the options menu, look for the option to delete or remove the selected channel.
- Select the delete or remove option to remove the channel from your list.
- Repeat the above steps for each additional channel you want to remove.
- Once you have finished removing channels, exit the channel editing interface and return to the TV’s main menu.
It’s worth noting that different Samsung Smart TV models may have slightly different names or locations for their channel edit features. If you’re having trouble finding the channel edit feature on your TV, refer to the user manual or online documentation specific to your model for detailed instructions.
With the traditional channel edit method, you can selectively remove channels from your Samsung Smart TV’s channel list, giving you more control over the channels you see and making it easier to navigate through your favorite content.
Now that you’re familiar with the traditional channel edit method, let’s move on to explore another option for removing channels from your Samsung Smart TV.
Method 3: Hiding Channels
If you prefer to keep certain channels on your Samsung Smart TV but want them to be hidden from your channel list, you can use the hiding channels method. This allows you to maintain access to channels while keeping them out of sight. Here’s how you can hide channels:
- Begin by turning on your Samsung Smart TV and accessing the main menu.
- Locate the “Channel List” or “Channel Manager” option. The location of this option may vary depending on your TV model.
- Open the “Channel List” or “Channel Manager” to view your current channel lineup.
- Navigate through the channel list and find the specific channels you want to hide.
- Select the channel you want to hide by highlighting it with your remote control and pressing the enter or OK button.
- A menu or options panel will appear. Look for the option to hide the channel.
- Select the hide option to conceal the channel from your regular channel list.
- Repeat the above steps to hide any additional channels you want to keep out of sight.
- Once you have hidden the desired channels, exit the channel editing interface and return to the TV’s main menu.
By hiding channels, you can effectively remove them from your visible channel list while still having the ability to access them when needed. This method gives you the flexibility to keep a wider range of channels without cluttering your TV interface.
It’s important to remember that the hidden channels will still be accessible through alternative methods, such as entering the channel number directly on your remote control or using the program guide. However, they will be excluded from your regular channel list view.
Now that you’re familiar with the hiding channels method, let’s explore another option for removing channels from your Samsung Smart TV.
Method 4: Resetting Channel List
If you want to start fresh with your Samsung Smart TV and remove all channels from the current channel list, you can use the method of resetting the channel list. This method allows you to clear your existing channel lineup and create a brand new channel list. Here’s how you can do it:
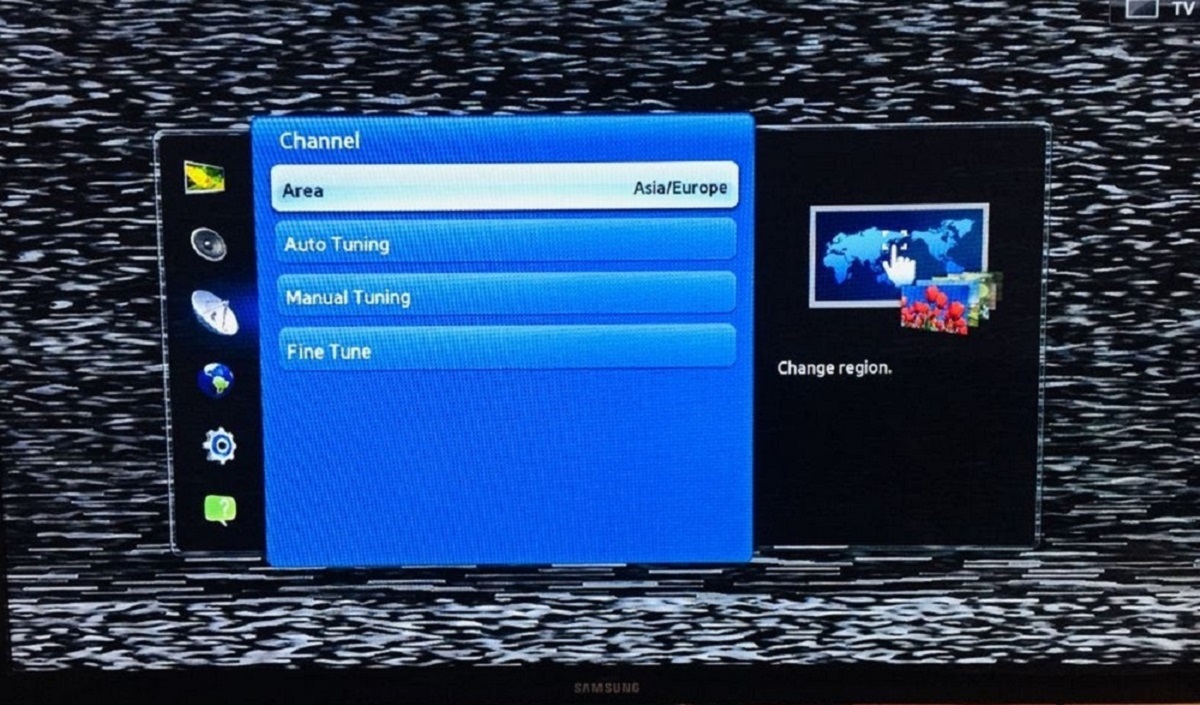
- Turn on your Samsung Smart TV and access the main menu.
- Find the “Channel List” or “Channel Manager” option. The location of this option may differ based on your TV model.
- Open the “Channel List” or “Channel Manager” to access your current channel list.
- Look for the option to edit or manage channels, often indicated by an icon or text associated with editing.
- Within the channel options menu, locate the option to reset or initialize the channel list.
- Select the reset or initialize option to proceed with resetting your channel list.
- You will receive a prompt asking for confirmation. Confirm that you want to reset the channel list.
- After confirming, your Samsung Smart TV will reset the channel list, removing all channels from the existing lineup.
- Once the resetting process is complete, you can begin adding channels back to your TV by performing a channel scan or manual tuning.
It’s important to note that resetting your channel list will erase all previously stored channels and configurations. You will need to go through the setup process again to scan for channels and add them back to your TV.
The method of resetting the channel list is useful if you want to start from scratch or if you’re experiencing issues with your current channel setup. It provides a fresh slate for you to customize your TV’s channel lineup according to your preferences.
Now that you’re familiar with the method of resetting the channel list, you have a variety of options for removing channels from your Samsung Smart TV. Choose the method that suits your needs and enjoy a tailored TV viewing experience.
Conclusion
Removing channels from your Samsung Smart TV is a great way to personalize your viewing experience and ensure that you only have access to the content that matters to you. Whether you want to declutter your channel list, create a customized lineup, or restrict certain channels for parental control, there are various methods you can use.
In this article, we explored four methods for removing channels from your Samsung Smart TV:
- Manual Channel Edit: This method allows you to individually select and remove specific channels from your channel list.
- Traditional Channel Edit: With this method, you can customize your channel list by selecting and deselecting channels.
- Hiding Channels: This method enables you to keep certain channels on your TV while hiding them from your main channel list.
- Resetting Channel List: If you want to start fresh, this method allows you to clear your existing channel lineup and create a new one.
Each method offers its own benefits and flexibility, allowing you to tailor your Samsung Smart TV to suit your preferences. You can choose the method that best aligns with your needs and make adjustments as needed over time.
Remember to refer to your TV’s user manual or online documentation for specific instructions based on your Samsung Smart TV model. The exact steps and options may vary slightly between different models.
By removing unnecessary channels and customizing your channel lineup, you can create a more streamlined and enjoyable TV viewing experience. Whether you’re watching your favorite shows, exploring new content, or keeping your TV family-friendly, these methods provide the tools you need to take control over your channel list.
So go ahead, give these methods a try and start enjoying a personalized TV experience on your Samsung Smart TV!