Introduction
Welcome to this helpful guide on how to remove a Bluetooth device from your device. Bluetooth technology has made it incredibly convenient to connect various devices wirelessly, from headphones to speakers, keyboards to smartphones. However, there are times when you may need to disconnect or remove a Bluetooth device from your device for various reasons, such as troubleshooting issues, upgrading to a new device, or simply tidying up your list of paired devices.
In this article, we will provide you with a step-by-step guide on how to remove a Bluetooth device from your device. Whether you’re using a computer, smartphone, or tablet, the process is generally similar, although there may be slight variations depending on your specific operating system and device.
By following these steps, you can easily remove any unwanted or malfunctioning Bluetooth devices and ensure a seamless Bluetooth experience. We’ll also provide some troubleshooting tips to help you overcome any potential challenges you might face during the removal process.
So, if you’re ready to free up some space or troubleshoot your Bluetooth connectivity, let’s dive into the steps necessary to remove a Bluetooth device from your device.
Step 1: Access Bluetooth Settings
The first step in removing a Bluetooth device from your device is to access the Bluetooth settings. The specific method to access these settings may vary slightly depending on the operating system you are using, but the overall process is similar.
Here are some common methods to access Bluetooth settings:
- On Android: Swipe down from the top of your screen to open the notifications shade, then locate and tap on the Bluetooth icon or long-press on it to access the Bluetooth settings.
- On iOS: Go to the home screen and open the “Settings” app. In the Settings menu, tap on “Bluetooth” to access the Bluetooth settings.
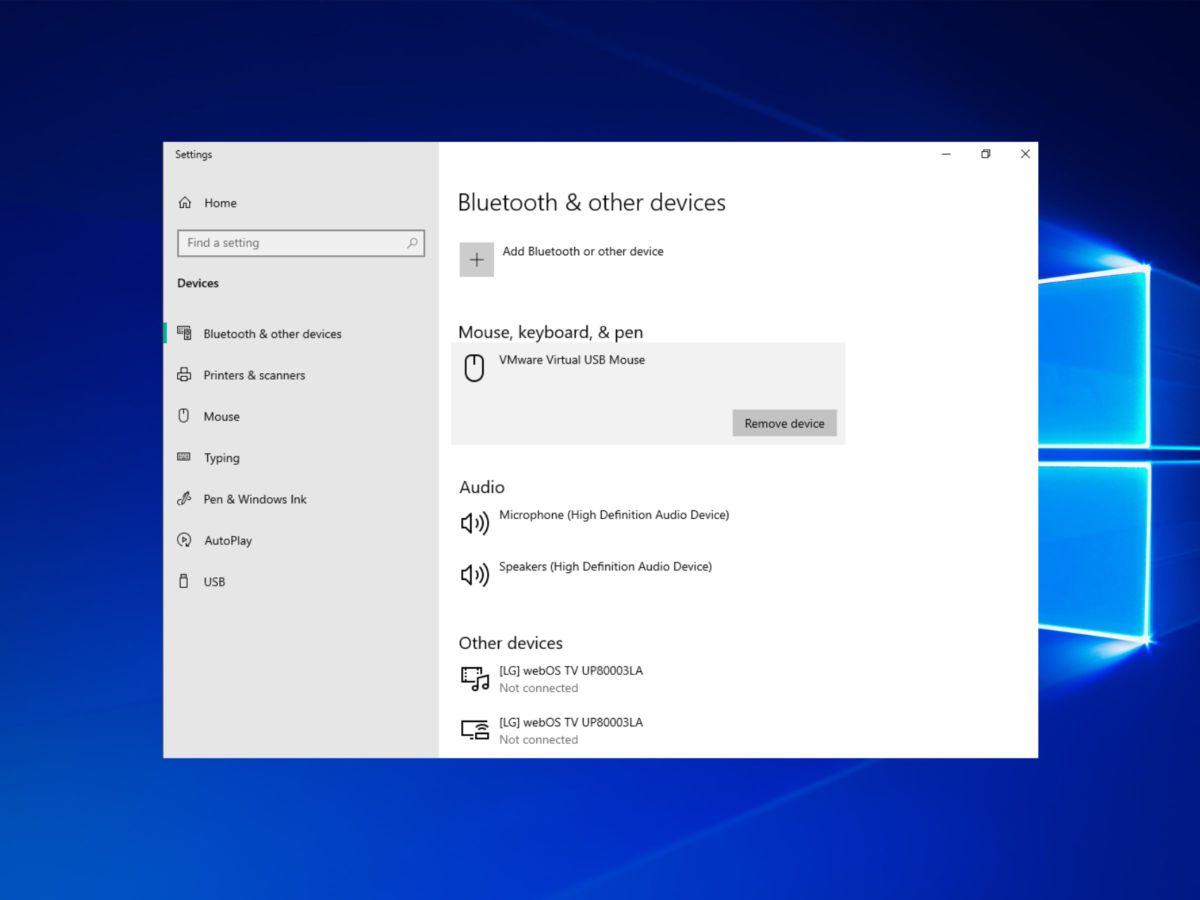
- On Windows: Click on the Start menu and type “Bluetooth” in the search bar. Select “Bluetooth and other devices settings” from the search results to open the Bluetooth settings.
- On macOS: Click on the Apple menu and select “System Preferences.” In the System Preferences window, click on “Bluetooth” to access the Bluetooth settings.
Once you’ve accessed the Bluetooth settings, you’ll see a list of all the devices currently paired with your device. This list may include devices such as headphones, speakers, keyboards, mice, or any other Bluetooth peripherals you have previously connected to your device.
Now that you’re in the Bluetooth settings and can see the list of paired devices, you’re ready to move on to the next step and locate the specific device you want to remove.
Step 2: Locate the Device to Remove
After accessing the Bluetooth settings on your device, the next step is to locate the specific device that you want to remove from the list of paired devices.
Scan through the list of paired devices and look for the device name or icon that corresponds to the one you want to remove. Typically, the device name will be displayed along with an icon or image that represents the device type (e.g., headphones or speakers).
If you’re having trouble finding the device, you can use the search or filter option available in some Bluetooth settings menus. This can help you narrow down the list and quickly locate the device you want to remove.
It’s worth noting that devices that are currently connected or actively in use may be indicated differently in the Bluetooth settings. For example, they may have a “Connected” or “Active” label next to the device name or an icon that indicates it’s currently in use.
Take your time to locate the device you wish to remove to ensure that you don’t accidentally remove the wrong device. Double-check the device name and icon to confirm that you’ve identified the correct device before proceeding to the next step.
Once you’ve successfully located the device, you’re ready to move on to the next step and remove it from your device.
Step 3: Remove the Device
Now that you’ve identified the device you want to remove from your device’s Bluetooth settings, it’s time to proceed with the removal process. The steps to remove a device may vary slightly depending on the operating system you’re using, but the overall process is similar.
Here’s how to remove a Bluetooth device:
- Find the device in the list of paired devices.
- On most operating systems, you will find an “i” or information icon next to the device name. Click or tap on this icon to access the device details.
- In the device details screen, you should see an option that allows you to “Forget,” “Remove,” or “Disconnect” the device. Click or tap on this option.
- A confirmation prompt may appear, asking you to confirm the removal of the device. Review the prompt to ensure you’re removing the correct device, and then click or tap “Yes,” “OK,” or a similar confirmation button to proceed with the removal.
After confirming the removal, your device will disconnect from the Bluetooth device, and the device will be unpaired or removed from your device’s Bluetooth settings.
It’s important to note that removing a device from your Bluetooth settings will not affect the device itself, nor will it delete any pairing information stored on the device. It simply removes the connection between your device and the Bluetooth device, allowing you to free up space or troubleshoot any issues.
Now that you’ve successfully removed the device from your device’s Bluetooth settings, let’s move on to the next step to confirm the removal.
Step 4: Confirm Removal
After removing a Bluetooth device from your device’s settings, it’s important to confirm that the device has been successfully removed. This step will ensure that the device is no longer paired with your device and that you can proceed with any necessary troubleshooting or re-pairing if needed.
To confirm the removal of a Bluetooth device, follow these steps:
- Return to the list of paired devices in your device’s Bluetooth settings.
- Scan the list to ensure that the device you’ve removed is no longer present. You should no longer see the device’s name or icon in the list.
- If the device is still visible in the list, double-check the removal steps and repeat the process to ensure thorough removal.
Confirming the removal of the device is crucial to ensure that you have successfully disconnected and unpaired it from your device. If the device is still present in the list, you may need to troubleshoot further or repeat the removal process.
Upon confirming the removal and verifying that the device is no longer in the list, you can proceed with any additional steps, such as connecting a new Bluetooth device or troubleshooting any connectivity issues that you were experiencing with the removed device.
By confirming the removal, you can have peace of mind that the Bluetooth device has been successfully disconnected from your device, allowing you to proceed with your desired actions.
Now that you’ve confirmed the removal, let’s move on to the next step where we’ll provide some troubleshooting tips to help you overcome potential challenges during the removal process.
Step 5: Troubleshooting Tips
While removing a Bluetooth device is generally a straightforward process, there may be instances where you encounter difficulties or face troubleshooting challenges. In this step, we’ll provide you with some troubleshooting tips to help you overcome potential issues during the removal process.
Here are some troubleshooting tips to consider:
- Restart your device: Sometimes, a simple restart can resolve minor Bluetooth issues. Restart your device and then attempt to remove the Bluetooth device again.
- Ensure device compatibility: Double-check that the device you’re trying to remove is compatible with your device’s Bluetooth version. Incompatibility could cause issues with the removal process.
- Check for firmware updates: Visit the manufacturer’s website for your device and check if there are any available firmware updates. Updating the firmware can potentially resolve compatibility or connectivity issues.
- Reset Bluetooth settings: If you’re experiencing persistent issues with Bluetooth devices, you can try resetting your device’s Bluetooth settings. This action will remove all paired devices and restore the Bluetooth settings to the default configuration. Keep in mind that this will also remove any other paired devices, so make sure to re-pair them as needed.
- Consult device documentation or support: If troubleshooting tips don’t resolve the issues you’re facing, consult the documentation or contact the support team for your device or the Bluetooth device you’re trying to remove. They may provide specific instructions or solutions tailored to your device.
By following these troubleshooting tips, you can increase the chances of successfully removing a Bluetooth device from your device’s settings, even when facing challenges or difficulties.
If you have gone through the troubleshooting tips and still cannot remove the Bluetooth device, it is recommended to reach out to the manufacturer’s support for further assistance. They will be able to provide you with more specific guidance or solutions depending on your device and the Bluetooth device you’re trying to remove.
Now that you’re equipped with troubleshooting tips, you can confidently tackle any potential issues during the removal process.
Conclusion
Removing a Bluetooth device from your device can be a simple and straightforward process that allows you to disconnect unwanted devices, troubleshoot connectivity issues, or free up space in your Bluetooth settings. By following the step-by-step guide outlined in this article, you can easily remove a Bluetooth device from your device’s settings.
We started by accessing the Bluetooth settings on various operating systems, such as Android, iOS, Windows, and macOS. Then, we learned how to locate the specific device we wanted to remove from the list of paired devices. Once identified, we covered the process of removing the device, including accessing the device details and confirming the removal through a confirmation prompt.
In addition, we provided some troubleshooting tips to help overcome any challenges you may encounter during the removal process. These tips included restarting your device, ensuring device compatibility, checking for firmware updates, resetting Bluetooth settings, and seeking support from device documentation or customer support.
Remember, after removing a Bluetooth device, it’s important to confirm that the removal was successful by checking that the device is no longer listed in your Bluetooth settings. This confirmation ensures that the device is truly disconnected and unpaired from your device.
We hope this guide has been helpful in guiding you through the process of removing a Bluetooth device. By following these steps, you can enjoy a seamless Bluetooth experience and easily manage your paired devices.
Happy Bluetooth device removal!