Why Print the Check Register in QuickBooks?
The check register is an essential tool in QuickBooks that helps you track and manage your business’s financial transactions. It is a record of all the checks you have written, deposits made, and any other activity related to your bank accounts. While QuickBooks provides an easy way to access and view your check register digitally, there are several reasons why you may want to consider printing it:
- Physical record keeping: Printing the check register allows you to have a physical copy of your financial transactions. This can be beneficial for record-keeping purposes and providing documentation in case of any discrepancies or audits.
- Easy reference: Having a printed copy of the check register makes it convenient to quickly refer to specific transactions without having to access QuickBooks. This can be useful when discussing financial matters with others or for reviewing your financial history.
- Collaboration: Printing the check register allows you to share financial information with others who may not have access to your QuickBooks account. This can be particularly helpful when working with accountants, auditors, or business partners.
- Budgeting and analysis: By having a printed copy of your check register, you can more easily analyze your spending habits, identify patterns, and make informed decisions about your budget. It provides a tangible representation of your financial data that can aid in financial planning and forecasting.
- Backup: While QuickBooks provides data backup options, having a printed copy of your check register serves as an additional backup in case of any technical issues or data loss. It ensures that you always have a physical copy of your financial records.
Printing the check register from QuickBooks gives you added flexibility and accessibility to your financial data. It provides a tangible form that can be easily shared, referenced, and analyzed. Additionally, having a physical copy offers peace of mind knowing that you have a backup of your financial records.
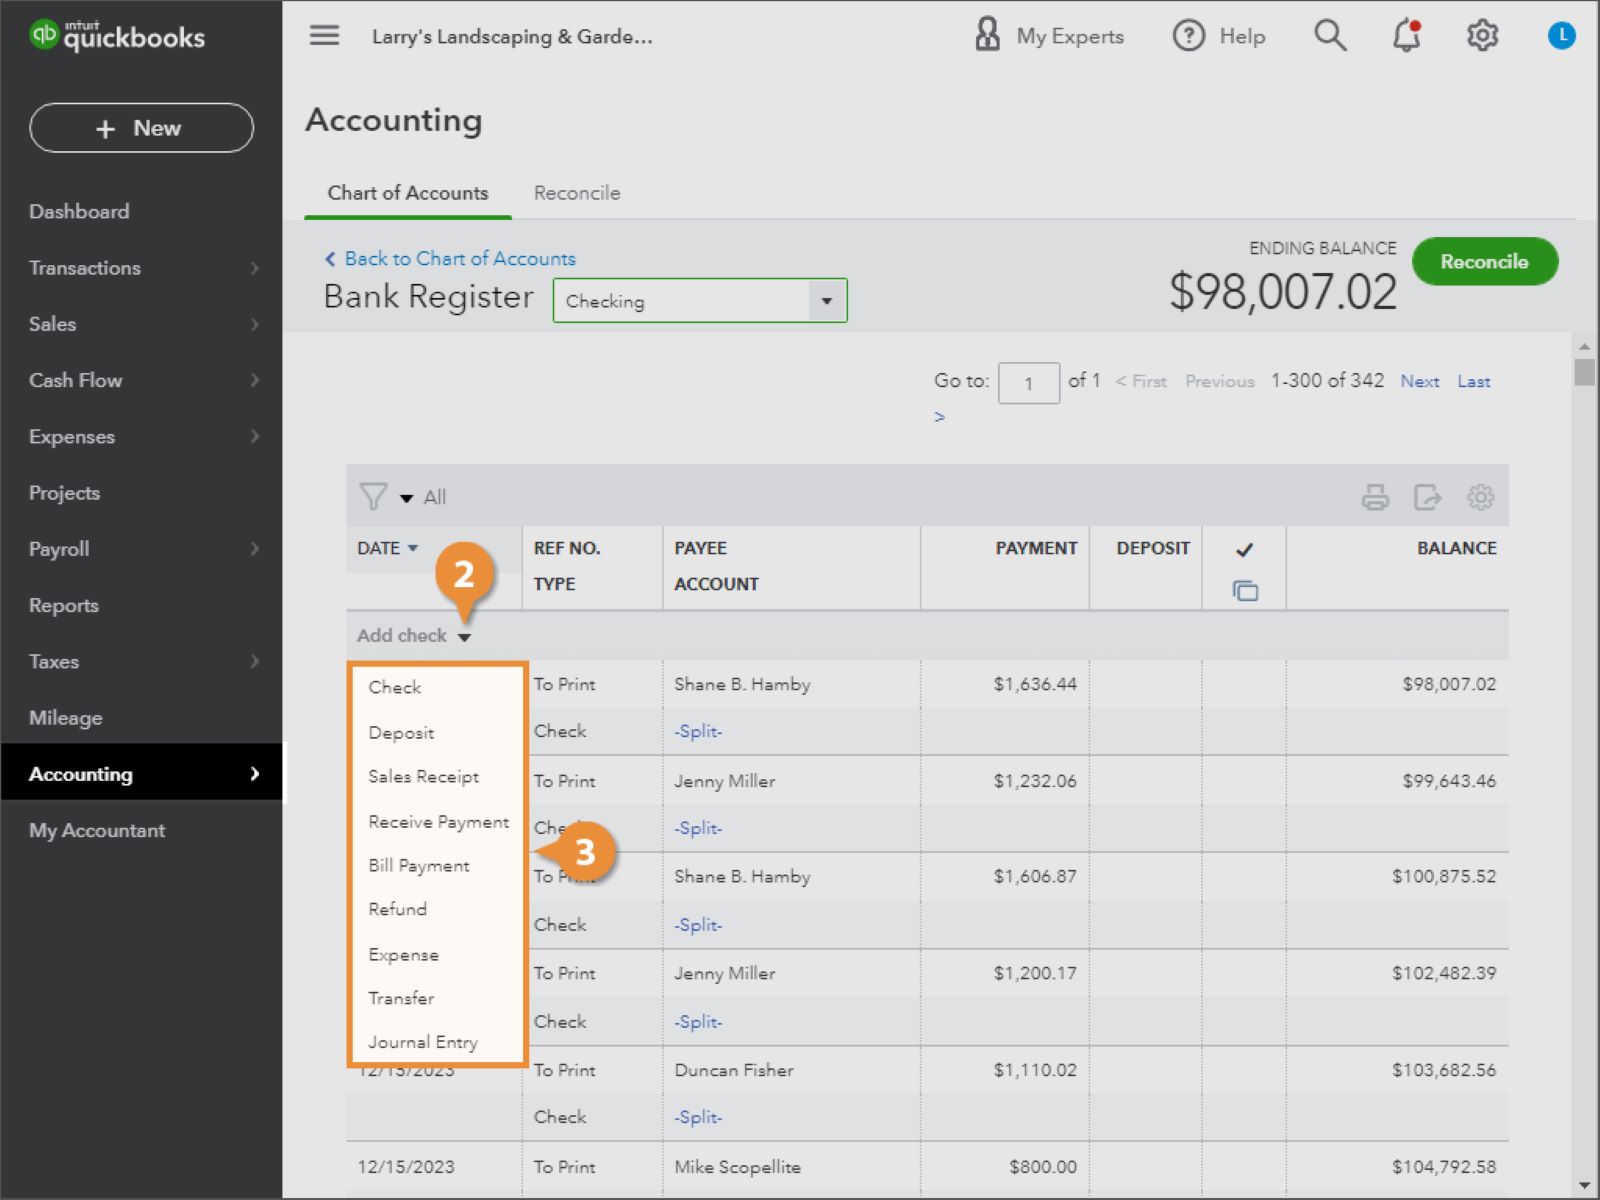
Step 1: Navigate to the Check Register
To begin printing the check register in QuickBooks, you first need to navigate to the check register section. Follow these steps:
- Open QuickBooks on your computer and log in to your account using your username and password.
- Once logged in, click on the “Banking” tab located at the top of the screen.
- In the drop-down menu, select “Use Register” from the options.
- Choose the bank account for which you want to print the check register. QuickBooks will display a list of all your bank accounts.
- Select the desired bank account by clicking on it.
By following these steps, you will successfully navigate to the check register section in QuickBooks. Now, you are ready to proceed with the next steps to customize and print your check register.
Step 2: Select the Date Range
After navigating to the check register section in QuickBooks, the next step is to select the date range for which you want to print the check register. Follow these simple steps:
- Look for the date range field located at the top of the check register page. It is usually labeled “From” and “To”.
- Click on the “From” field, and a calendar will appear.
- Select the starting date from which you want to print the check register.
- Repeat the same process for the “To” field and choose the ending date for the desired date range.
- Once you have selected the appropriate date range, click on the “OK” or “Apply” button to save the changes.
By following these steps, you can effectively select the date range for the check register you want to print in QuickBooks. This allows you to focus on a specific period and obtain the relevant financial information for that time frame.
Step 3: Customize the Columns
Customizing the columns in the check register allows you to choose which information you want to include when printing it. Follow these steps to customize the columns in QuickBooks:
- On the check register page, look for the “Customize” or “Settings” button. It is usually located near the top-right corner of the screen.
- Click on the “Customize” or “Settings” button to access the customization options.
- A pop-up window or drop-down menu will appear, displaying various column options.
- Review the available column options and select the ones you want to include in the printed check register. You can choose from options such as date, check number, payee, memo, amount, and more.
- Drag and drop the selected columns to arrange them in the desired order.
- Click on the “OK” or “Apply” button to save the changes and update the check register view with the customized columns.
By customizing the columns, you can tailor the information displayed on the check register to suit your specific needs. This allows you to focus on the most relevant details when printing the check register.
Step 4: Filter the Check Register
Filtering the check register in QuickBooks allows you to narrow down the displayed transactions based on specific criteria. Follow these steps to filter the check register:
- On the check register page, locate the filter or search field. It is typically positioned near the top of the screen.
- Click on the filter or search field, and a drop-down menu will appear with various filtering options.
- Select the desired filter option based on your requirements. You can filter by date, amount, payee, check number, and other criteria.
- Set the filter conditions by entering the necessary information, such as the date range or specific payee name.
- Click on the “Apply” or “OK” button to apply the filter.
Filtering the check register allows you to focus on specific transactions that meet your specified criteria. This can be useful when you want to print a subset of transactions or analyze specific information within the register.
Step 5: Sort the Check Register
Sorting the check register in QuickBooks allows you to arrange the transactions in a specific order, making it easier to analyze and print. Follow these steps to sort the check register:
- On the check register page, locate the sort button or drop-down menu. It is typically located near the column headers.
- Click on the sort button or dropdown menu to view the available sorting options.
- Select the desired sorting option based on your preference. You can sort by date, check number, payee, amount, and other criteria.
- Choose whether you want to sort the transactions in ascending or descending order.
- Click on the “Apply” or “OK” button to apply the sorting to the check register.
Sorting the check register helps you arrange the transactions in a logical order that suits your needs. Whether you want to view the transactions in chronological order or sort them by specific criteria, it provides a customized view that enhances clarity and organization.
Step 6: Review and Adjust Columns
After customizing and sorting the columns in your check register, it’s important to review and adjust them to ensure the information is accurately represented. Follow these steps to review and adjust columns in QuickBooks:
- Take a moment to review the column headers to ensure they accurately represent the information you want to include in your printed check register.
- Check that the columns are in the desired order. If necessary, click and drag the column headers to rearrange them.
- Scan through the transactions in the check register to verify that the data in each column is correct and aligned with your expectations.
- If any adjustments are needed, click on the column header and select the appropriate option to modify the data.
- Ensure that any custom calculations or formulas in the columns are accurately reflecting the desired results.
- Make any necessary modifications or corrections to the columns and data within the check register.
Reviewing and adjusting the columns in your check register allows you to double-check the accuracy and relevance of the information before printing. It helps ensure that the printed check register contains the correct data and is tailored to your specific needs.
Step 7: Set Printer Settings
Before printing the check register in QuickBooks, it’s important to configure the printer settings to ensure optimal results. Follow these steps to set the printer settings:
- Click on the “File” menu located at the top-left corner of the QuickBooks window.
- Select the “Print” option from the drop-down menu.
- In the print settings dialog box, choose the appropriate printer from the available options. Ensure that your printer is connected and properly configured.
- Review the print settings, such as the paper size, orientation, and print quality. Make any necessary adjustments to match your printing preferences.
- Consider selecting the “Print Preview” option to get a preview of how the check register will appear when printed.
- Take note of any additional settings, such as scaling, margins, or headers/footers, that may need to be adjusted based on your specific requirements.
- Once you are satisfied with the printer settings, click on the “Print” button to begin printing the check register.
Setting the printer settings correctly ensures that the printed check register is aligned with your preferences. It helps avoid any unwanted surprises and allows you to customize the output to meet your specific printing needs.
Step 8: Preview the Check Register
Before finalizing the printing of the check register in QuickBooks, it’s recommended to preview the document to ensure it appears as intended. Follow these steps to preview the check register:
- Once you have set the printer settings, click on the “Print Preview” or “Preview” option in the print settings dialog box.
- A preview window will open, displaying a preview of how the check register will look when printed.
- Take a moment to review the preview and check for any formatting issues, alignment problems, or missing information.
- If necessary, use the scroll bars or navigation buttons to navigate through the pages of the check register preview.
- Pay attention to the page breaks and ensure that each page of the check register appears clear and organized.
- Make note of any adjustments or modifications that may need to be made before proceeding with the printing.
- Once you have reviewed and are satisfied with the check register preview, close the preview window.
Previewing the check register gives you the opportunity to catch any potential errors or formatting issues before printing. It allows you to make necessary adjustments, ensuring that the final printed document looks professional and accurately represents your financial transactions.
Step 9: Print the Check Register
After reviewing the check register preview and ensuring everything is correctly set up, you are ready to print the check register in QuickBooks. Follow these steps to complete the printing process:
- Ensure that your printer is properly connected and turned on.
- Click on the “Print” button in the print settings dialog box.
- Wait for your printer to receive and process the printing command.
- As the check register is being printed, make sure to monitor the print job to ensure there are no paper jams or other printing issues.
- Once the printing process is complete, collect the printed check register from the printer tray.
- Review the printed check register to verify its accuracy and quality.
- Consider keeping a digital or physical copy of the printed check register for your records.
By following these steps, you can successfully print the check register in QuickBooks. It’s important to take a moment to review the printed document and confirm that it meets your expectations in terms of accuracy and presentation.
Conclusion
Printing the check register in QuickBooks can be a valuable step in managing and organizing your business’s financial transactions. By following the steps outlined in this guide, you can easily navigate to the check register, select the desired date range, customize the columns, and filter and sort the transactions as needed.
Reviewing and adjusting the columns ensures that the check register accurately reflects the information you want to include when printing it. Setting the printer settings and previewing the check register allow you to fine-tune the output and verify its appearance before the final printing.
Printing the check register provides multiple benefits, including having a physical record for easy reference, collaboration with others, and backup purposes. It allows for convenient budgeting and analysis, helps with record-keeping, and can be shared with accountants or business partners.
Remember to take the time to review the printed check register and confirm its accuracy and quality. By following these steps, you can efficiently print the check register in QuickBooks, facilitating better financial management for your business.