Introduction
Welcome to the world of Instagram, where captivating visuals reign supreme. With over one billion active users, Instagram has become a hub for sharing photos and videos. If you’re looking to make an impact on this social media platform, it’s crucial to understand how to post high-quality videos that will engage your audience.
Posting high-quality videos on Instagram is essential for standing out from the crowd and grabbing the attention of your followers. Whether you’re a professional content creator or an individual looking to share memorable moments with friends and family, this guide will equip you with the knowledge and tools needed to post visually stunning videos on Instagram.
This article will take you through the entire process, from selecting the right equipment and filming techniques to editing and optimizing your videos for Instagram. We’ll also cover the different formats and resolutions suitable for Instagram, as well as the best ways to compress and upload your videos. By the end of this guide, you’ll have the confidence to post high-quality videos that will leave a lasting impression on your viewers.
So, whether you’re a seasoned videographer or just starting out, get ready to take your Instagram game to the next level. Let’s dive in and discover how to post videos that will make your content shine on this popular platform.
Equipment and Tools Needed
Before you start filming your high-quality videos for Instagram, it’s essential to have the right equipment and tools at your disposal. While professional-grade gear can certainly enhance the overall quality, you don’t necessarily need to break the bank to create stunning videos. Here are the essential items you’ll need:
- Camera: A smartphone with a high-resolution camera can work wonders for capturing Instagram videos. However, if you want to take your video quality to the next level, consider investing in a DSLR camera or a mirrorless camera with advanced video capabilities.
- Stabilization: To avoid shaky footage, a tripod or gimbal is a must-have for keeping your videos steady. These tools will ensure a professional-looking result and make your content more enjoyable to watch.
- Lighting: Good lighting is key to producing high-quality videos. Utilize natural light as much as possible, but if you’re filming indoors or in low-light conditions, consider investing in a basic lighting setup to ensure your videos are well-lit and visually appealing.
- Microphone: While smartphones and cameras have built-in microphones, investing in an external microphone can significantly improve the audio quality of your videos. Clear and crisp audio will enhance the overall viewing experience.
- Editing Software: Once you’ve filmed your videos, you’ll need reliable editing software to make necessary adjustments and add finishing touches. There are plenty of free and paid options available, catering to various skill levels and budgets.
Remember, the key is to work with what you have and gradually upgrade your equipment as you gain experience and confidence. Focus on honing your skills and utilizing the tools at your disposal to create visually compelling videos that captivate your audience on Instagram.
Filming Techniques for Instagram
Great videos on Instagram not only rely on high-quality equipment but also on utilizing effective filming techniques. Here are some techniques to help you capture visually appealing videos:
- Composition: Pay attention to the composition of your shots. Use the rule of thirds to create a balanced and visually pleasing frame. Experiment with different angles and perspectives to add depth and interest to your videos.
- Focus: Ensure your subject is in sharp focus by tapping on the screen of your smartphone or using the autofocus feature on your camera. A well-focused video will immediately draw the viewer’s attention.
- Movement: Incorporate movement into your videos to make them more dynamic. Consider using techniques such as panning, tilting, and tracking shots to add visual interest and create a sense of immersion.
- Use of Light: Take advantage of natural light whenever possible. Shoot during the golden hours (the hour after sunrise and before sunset) for soft, warm lighting. Avoid shooting in harsh midday sunlight, as it can result in unflattering shadows and blown-out highlights.
- Storytelling: Create a narrative or convey a message through your videos. Think about the story you want to tell and plan your shots accordingly. Use visual cues, transitions, and overlays to engage your audience and evoke emotions.
- Multiple Takes: Don’t be afraid to shoot multiple takes of a scene or action. This allows you to choose the best footage during the editing process and ensures you capture all the necessary shots for a compelling video.
Remember, practice makes perfect. Experiment with different techniques and find your own style. As you become more comfortable with filming, you’ll develop a better understanding of what works best for your content and audience on Instagram.
Editing Your Video for Instagram
Once you have captured your footage, it’s time to bring your video to life through the editing process. Editing allows you to refine your content and add creative elements. Here are some tips for editing your video for Instagram:
- Trimming and Cutting: Begin by trimming and cutting your footage to remove any unwanted sections or moments of downtime. Keep your video concise and engaging by focusing on the most essential parts.
- Transitions: Smoothly transition between shots to maintain a seamless flow. Experiment with different types of transitions, such as cuts, fades, or creative effects, to add visual interest and enhance the overall production value.
- Adding Text and Graphics: Consider including captions, titles, and graphics to convey information or enhance storytelling. Use eye-catching fonts and animations to make your text visually appealing and easy to read on mobile devices.
- Color Correction and Filters: Adjust the color and tone of your video to create a cohesive and polished look. Use color correction tools or apply filters to enhance the visual mood and style of your content. However, be careful not to overdo it and maintain a natural appearance.
- Background Music and Audio: Select suitable background music or sound effects to enhance the mood and ambiance of your video. Ensure that the audio is balanced and clear, making it enjoyable for viewers without overpowering the visuals.
- Speed Control: Experiment with changing the speed of certain clips to create dramatic or dynamic effects. Slow-motion or time-lapse footage can provide a unique perspective and elevate the impact of your video.
Remember, the key to successful editing is to maintain a balance between simplicity and creativity. Avoid overwhelming your video with excessive effects or transitions. Keep your edits clean, cohesive, and aligned with the tone and message you want to convey.
Once you have edited your video to perfection, it’s time to prepare it for Instagram by choosing the right format and resolution.
Choosing the Right Format and Resolution
When it comes to posting videos on Instagram, choosing the right format and resolution is crucial to ensure optimal playback and visual quality. Here are some guidelines to help you make the right choices:
- Format: Instagram supports various video formats, including MP4 and MOV. It’s recommended to use these formats to ensure compatibility with the platform.
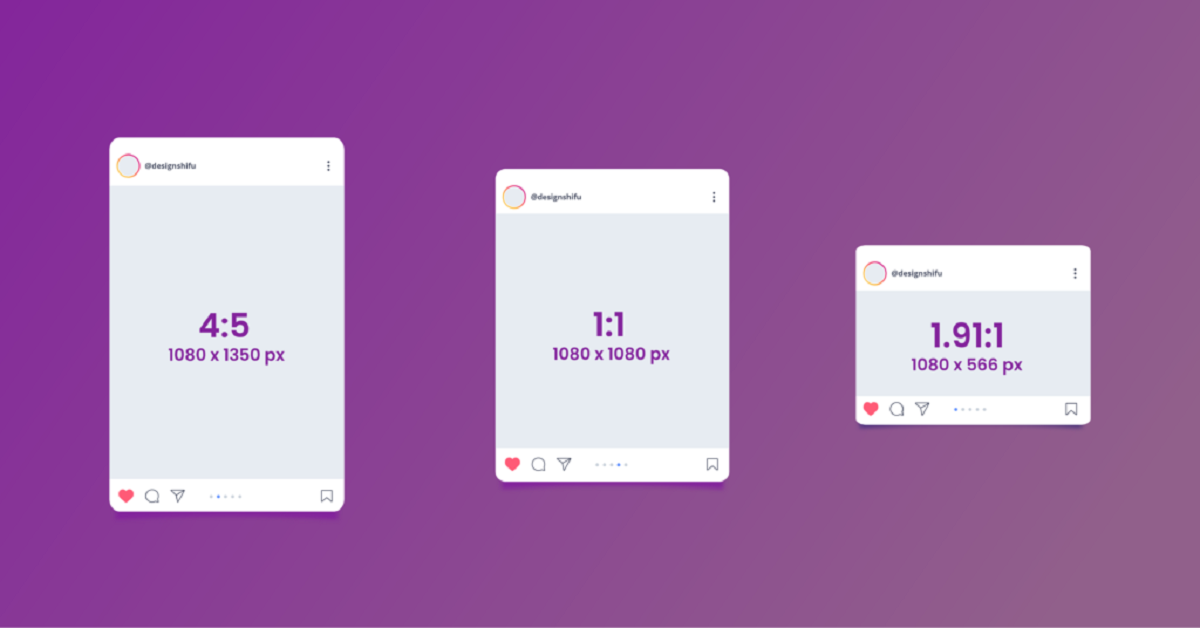
- Aspect Ratio: Instagram allows for both horizontal (16:9), square (1:1), and vertical (9:16) videos. Consider the content and the way you want it to be displayed to determine the most appropriate aspect ratio. For example, square videos tend to work well for Instagram feeds, while vertical videos are better suited for stories.
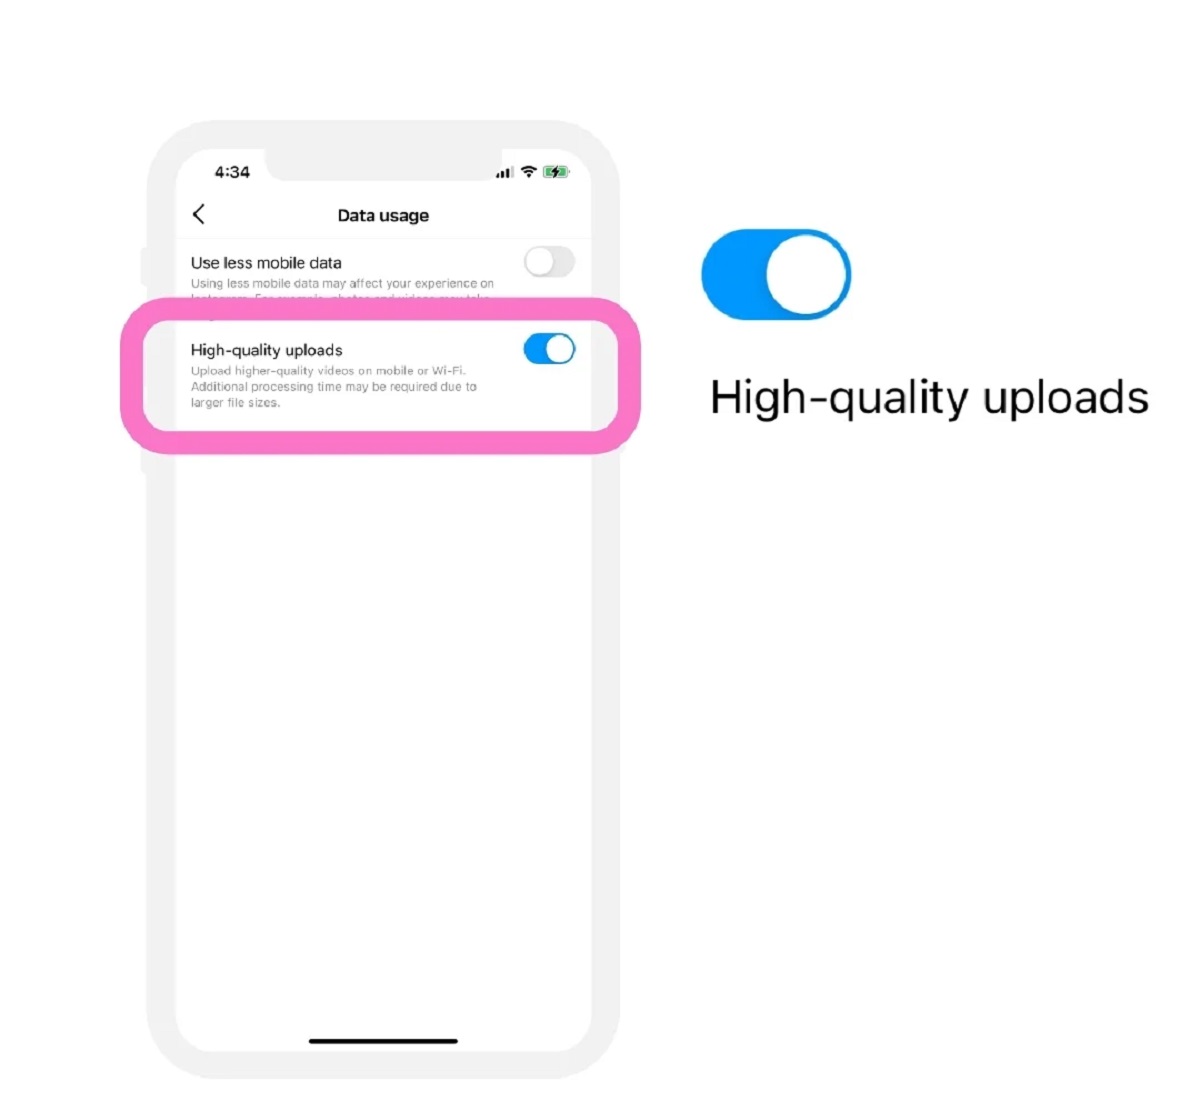
- Resolution: For optimal visual quality, aim for a higher resolution when filming and editing your video. Instagram supports resolutions up to 4K (2160 x 3840 pixels). However, keep in mind that larger files may take longer to upload and may be subject to quality compression during the uploading process.
It’s important to note that Instagram may automatically compress your video, regardless of its resolution. This compression is to optimize the file size and ensure smooth playback on mobile devices. While some loss in quality is inevitable, you can minimize the impact by starting with a high-resolution video and following the compression tips discussed in the next section.
Before exporting and uploading your video to Instagram, it’s recommended to preview it on different devices and platforms to ensure it looks as intended. Pay attention to any cropping or formatting issues that may arise due to different aspect ratios or screen sizes.
Once you’ve chosen the right format and resolution for your video, it’s time to compress it effectively for Instagram.
Compressing Your Video for Instagram
Compressing your video before uploading it to Instagram is essential to ensure faster uploads, reduce bandwidth usage, and maintain a good balance between file size and visual quality. Here are some tips for effectively compressing your video:
- Use Video Editing Software: Most video editing software allows you to export your video with specific compression settings. Look for the option to export your video for web or social media, which often includes pre-set compression settings optimized for platforms like Instagram.
- Adjust Bitrate and Codec: Reduce the bitrate of your video to lower the file size. Experiment with different bitrates to find the balance between file size and video quality that works best for your content. Additionally, using efficient video codecs such as H.264 or HEVC (H.265) can help maintain quality while reducing file size.
- Trimming and Removing Unnecessary Footage: Trim your video and remove unnecessary clips or sections. By reducing the overall duration of your video, you can significantly decrease the file size without compromising the visual quality of the essential content.
- Scale Down Resolution: If your video exceeds the recommended resolution for Instagram, consider scaling it down. Reducing the resolution can drastically reduce the file size while still maintaining a visually pleasing video, especially when viewed on mobile devices.
- Consider Video Length: Longer videos tend to have larger file sizes. If possible, try to keep your video within Instagram’s recommended time limits (up to 60 seconds for feed posts and up to 15 seconds for stories), as shorter videos generally result in smaller file sizes.
Remember to strike a balance between file size and visual quality. While compression is necessary, ensure that your video still maintains a satisfactory level of clarity, color accuracy, and detail to engage your viewers effectively.
Once you have compressed your video, it’s time to upload and share it on Instagram.
Uploading and Sharing Your High-Quality Video on Instagram
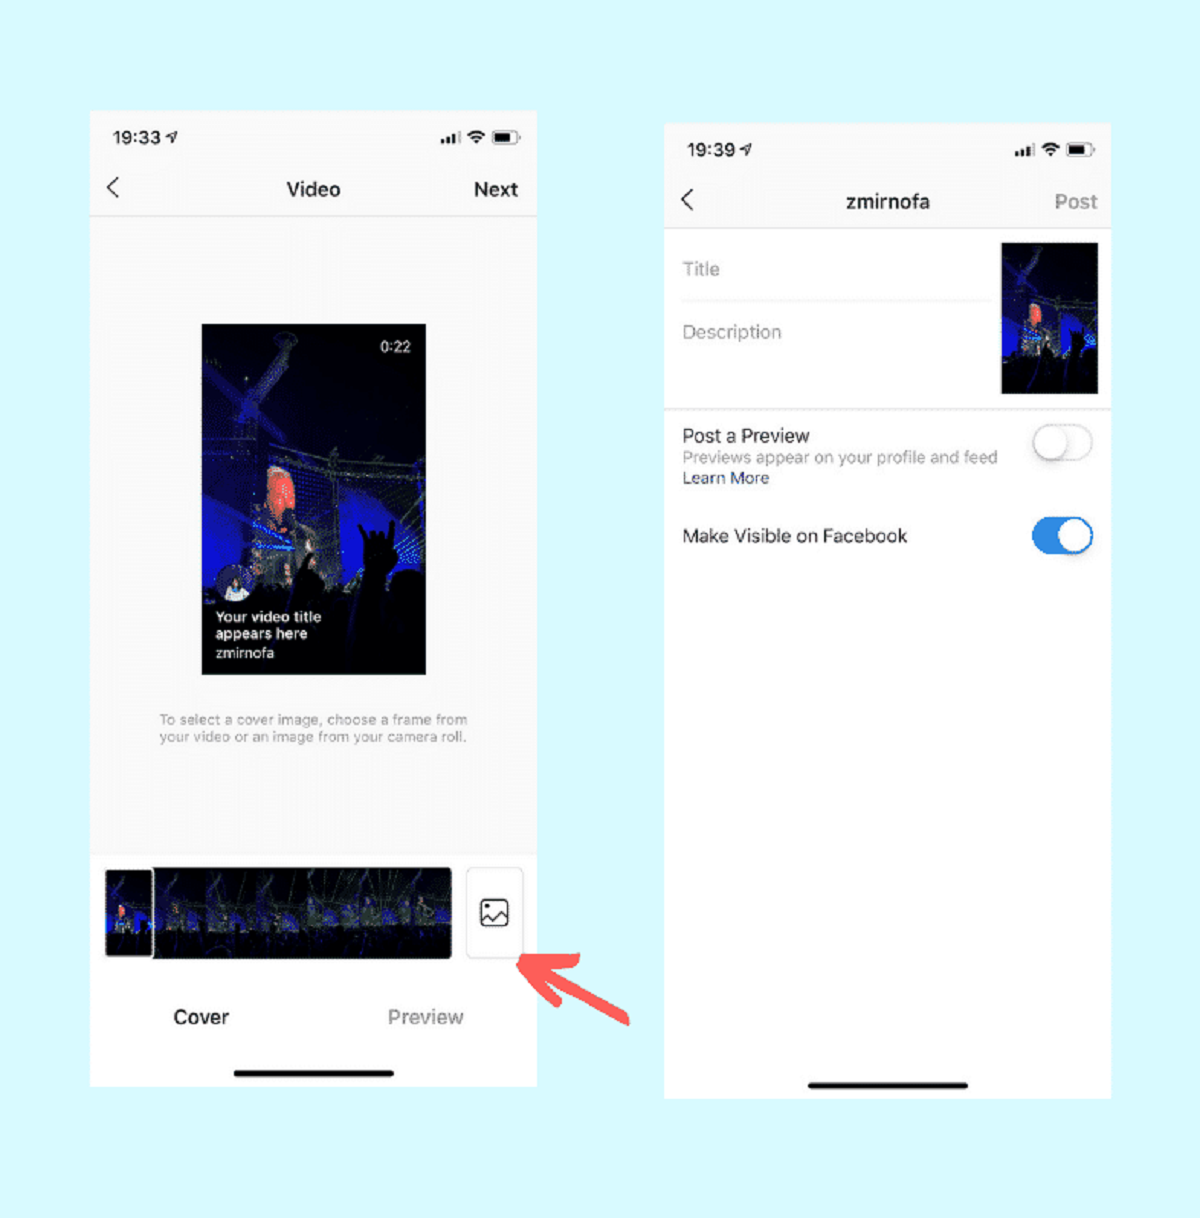
After putting in the effort to capture, edit, and compress your high-quality video, it’s time to upload and share it on Instagram. Here’s an easy step-by-step guide to get your video out to the world:
- Open the Instagram App: Launch the Instagram app on your smartphone or tablet. If you don’t have the app, download it from the App Store (iOS) or Google Play Store (Android).
- Tap the Plus Icon: In the Instagram app, tap the plus icon (+) at the bottom center of the screen to start creating a new post.
- Select Your Video: Choose the high-quality video that you want to upload from your device’s gallery.
- Apply Filters and Adjustments (Optional): Instagram offers various filters and editing tools to enhance your video further. You can experiment with different filters and make adjustments to brightness, contrast, and saturation if desired.
- Add a Captivating Caption: Craft a compelling caption that complements your video and encourages engagement from your audience. You can also add relevant hashtags to expand your reach and attract more viewers.
- Tag People and Add Location (Optional): If applicable, tag other Instagram users in your video and add your location to increase discoverability and engagement.
- Choose Your Sharing Options: Decide whether you want to share your video on your Instagram feed, your story, or both. You can also choose to share it on other connected social media platforms like Facebook and Twitter if desired.
- Post Your Video: Once you’ve finalized your settings and captions, tap the “Share” button to post your high-quality video on Instagram.
After uploading, your video will be visible to your followers and potentially reach a wider audience through engagement, shares, and hashtags. Monitor the comments and engagement on your video, and don’t forget to interact and respond to your viewers to nurture and grow your audience on Instagram.
Congratulations! You have successfully uploaded and shared your high-quality video on Instagram. Keep creating captivating content and continue to optimize your video creation and sharing process.
Frequently Asked Questions about Posting Videos on Instagram
Posting videos on Instagram can sometimes raise questions and uncertainties. Here are some frequently asked questions to help address common concerns:
1. What is the maximum video length allowed on Instagram?
Instagram allows videos up to 60 seconds in length for feed posts and up to 15 seconds for stories. For longer videos, you can utilize IGTV, which supports videos up to 10 minutes (or up to 60 minutes for verified accounts or accounts with large followings).
2. Can I edit my video after uploading it to Instagram?
No, you cannot edit your video directly on Instagram. It’s recommended to edit your video before uploading using video editing software. Once uploaded, you can only add captions, tags, and make minor adjustments to settings like privacy.
3. Why is my video quality reduced after uploading it on Instagram?
Instagram automatically compresses videos to reduce file size, optimize upload time, and maintain smooth playback on mobile devices. This compression can result in a slight reduction in video quality. To minimize the impact, start with a high-resolution video and follow compression best practices mentioned earlier.
4. Can I schedule my video posts on Instagram?
Currently, Instagram does not offer the ability to schedule video posts directly within the app. However, you can use third-party social media management tools that provide scheduling features to plan and automate your video posts.
5. Can I see insights and analytics for my videos on Instagram?
Yes, Instagram offers insights and analytics for business and creator accounts. You can access valuable data such as video views, engagement metrics, and audience demographics to gain insights into the performance of your videos and refine your content strategy accordingly.
6. Can I save drafts of my video posts on Instagram?
Yes, you can save drafts of your video posts on Instagram. If you don’t want to publish your video immediately, you can save it as a draft and come back to it later. Simply exit the post creation process without sharing, and Instagram will prompt you to save a draft.
Remember, Instagram’s features and policies may change over time, so it’s always a good idea to stay updated with the latest information and announcements from the official Instagram website or app.
Conclusion
Congratulations! You’ve now learned essential techniques for posting high-quality videos on Instagram. From understanding the necessary equipment and tools to capturing captivating footage, editing, compressing, and finally sharing your video, you’re equipped to take your Instagram presence to new heights.
By investing in the right equipment, such as a quality camera, stabilization tools, and proper lighting, you can elevate the visual appeal of your videos. Mastering filming techniques like composition, focus, movement, and storytelling will ensure your videos stand out from the crowd.
Editing your videos with precision, balancing every element from transitions to color correction, can transform raw footage into a polished final product. Compressing your video effectively will help maintain quality while minimizing file size for speedy uploads on Instagram.
Remember, each step of the process is crucial, from choosing the right format and resolution to crafting an engaging caption and sharing your video on Instagram. Don’t forget to leverage the analytics and insights available to refine your video strategy, gain valuable feedback, and engage with your audience.
Now it’s time to unleash your creativity and start sharing your high-quality videos on Instagram. Whether you’re a content creator, a business owner, or simply someone who wants to share their memorable moments, these techniques will help you make a lasting impact.
So go ahead, grab your equipment, start filming, and let your videos shine on the captivating platform that is Instagram!