Introduction
Welcome to this guide on how to password protect a Windows folder. If you have sensitive or confidential files on your computer that you want to keep secure from prying eyes, it’s important to add an extra layer of protection. Microsoft Windows doesn’t provide a built-in feature to password protect individual folders, but with the help of third-party software, command prompt, encryption software, or file compression software, you can secure your folders and ensure only authorized users have access to them.
Adding a password to your folders can safeguard your personal information, sensitive work documents, or any other confidential files that you want to keep private. By password protecting a folder, you can prevent unauthorized access and maintain the privacy and integrity of your data. It’s crucial to take these precautions, especially if you share your computer with others, work in a shared environment, or simply desire an extra layer of security.
In this article, we will explore various methods and tools that you can utilize to add password protection to your Windows folders. We will start by discussing third-party software solutions that offer user-friendly interfaces and convenient features. We will then delve into using the command prompt, which offers a powerful and lightweight approach. Additionally, we will explore utilizing BitLocker, a built-in feature for certain editions of Windows, encryption software, and file compression software.
Whether you’re a computer novice or an experienced user, this guide will provide you with the necessary steps and options to secure your folders effectively. Let’s dive into the different methods and see which one suits your needs best.
Method 1: Using Third-Party Software
If you prefer a user-friendly and intuitive solution, third-party software can come to your rescue. There are several reliable applications available that can password protect your Windows folders with just a few clicks. These software solutions offer a range of features, including encryption algorithms, folder locking, and secure file transfer.
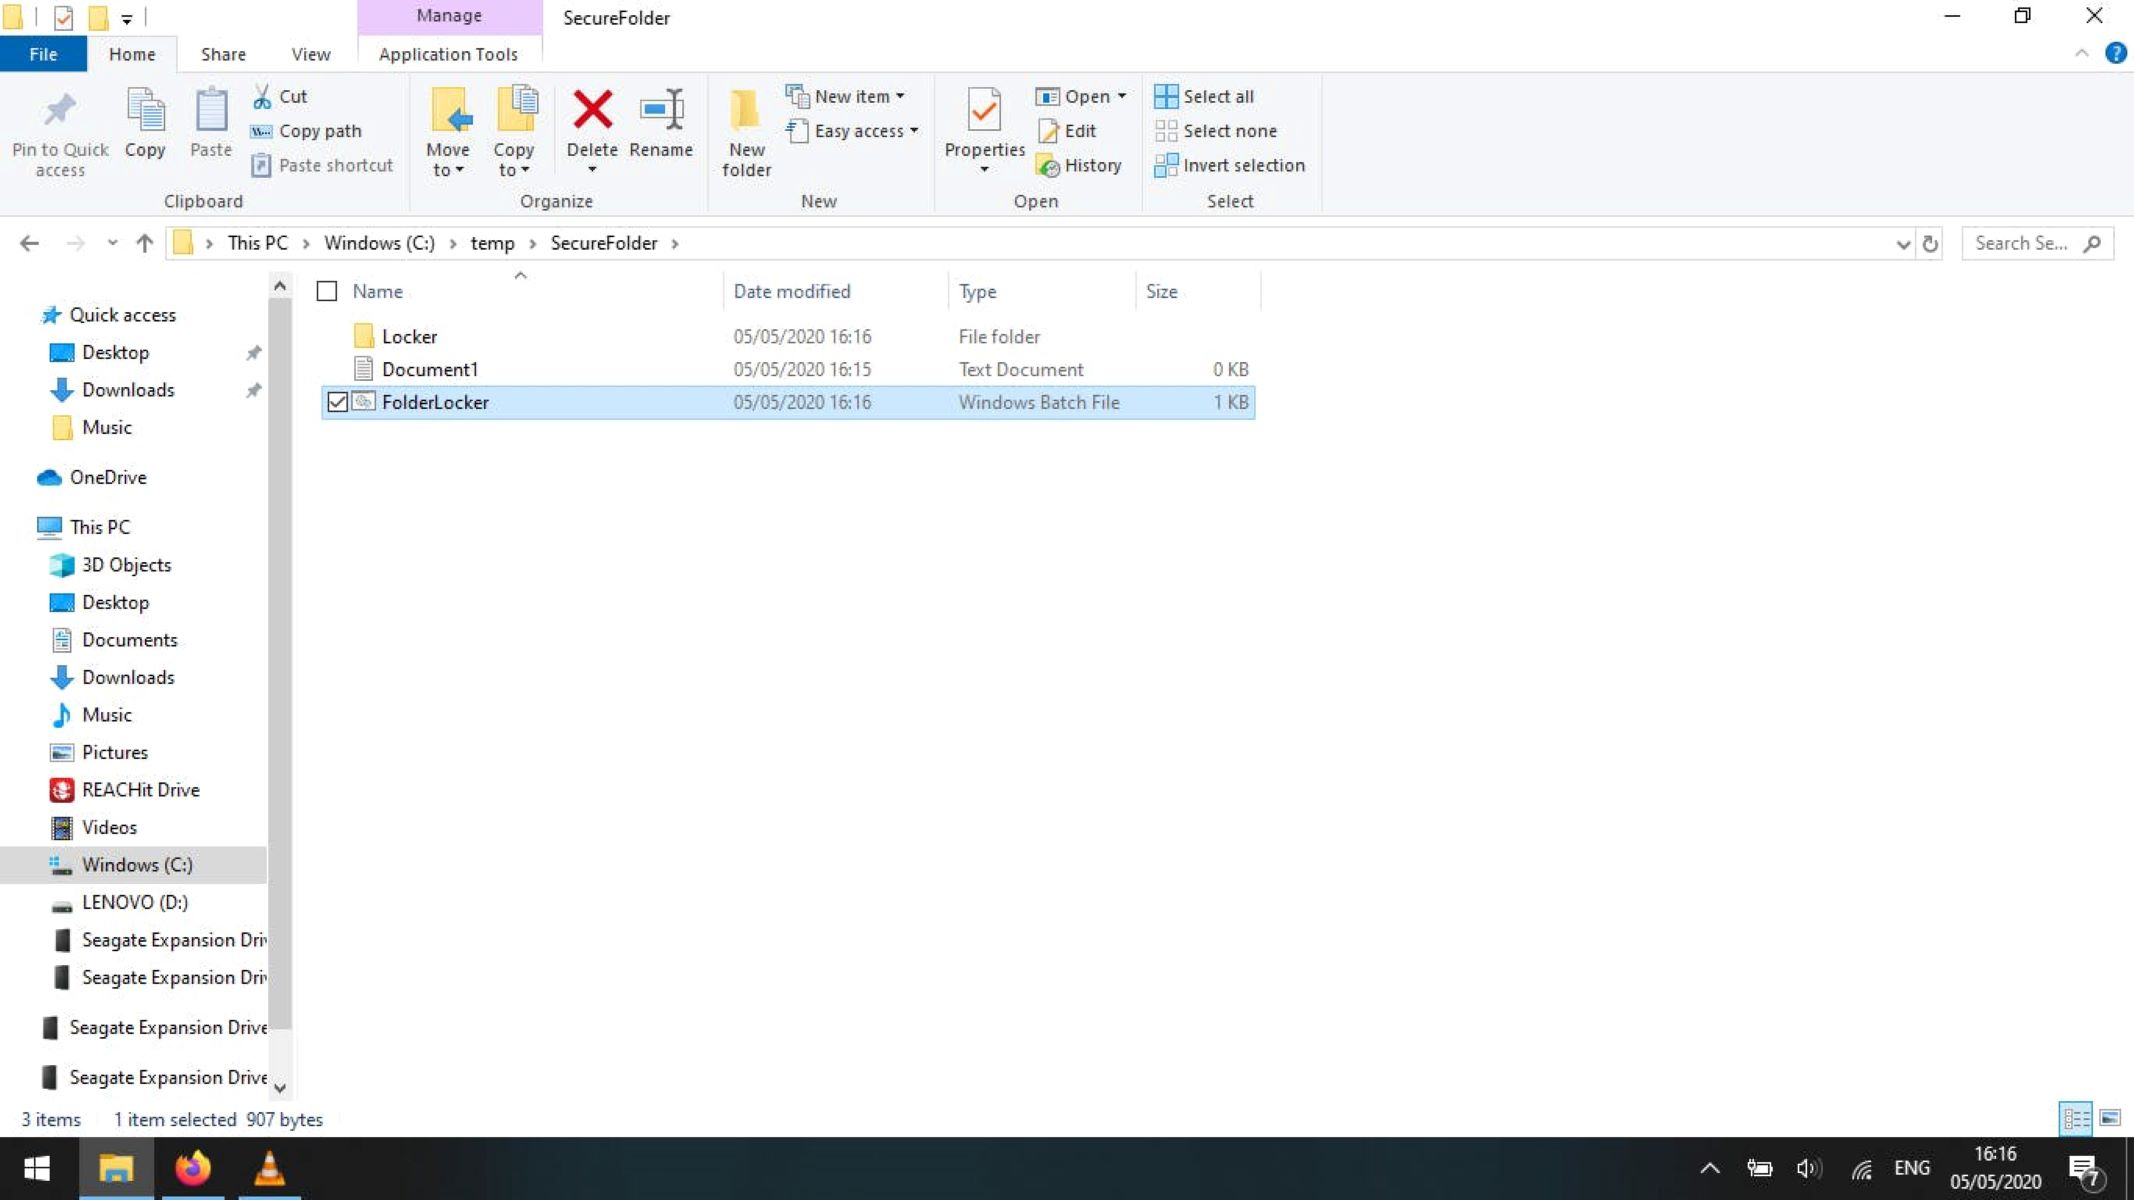
One popular choice is Folder Lock, a comprehensive software that allows you to lock and encrypt your folders and files quickly. The program offers a simple interface, making it easy for even inexperienced users to protect their data. To password protect a folder using Folder Lock, follow these steps:
- Download and install Folder Lock from the official website.
- Launch the application and set a master password.
- Click on the “Lock Files” option.
- Navigate to the folder you want to protect and select it.
- Click the “Lock” button to password protect the folder.
Once you’ve completed these steps, the folder will be locked, and it will be inaccessible without entering the password set in Folder Lock. This method ensures that your files are securely stored and protected from unauthorized access.
Another notable software solution is Wise Folder Hider, which provides a straightforward approach to password protecting your folders. Here’s how you can use Wise Folder Hider:
- Download and install Wise Folder Hider from the official website.
- Launch the program and set a master password.
- Click on the “Add” button to select the folder you want to hide and protect.
- Click “OK” to confirm the selection.
- Your folder will now be hidden and password protected.
Using third-party software simplifies the process of password protecting your Windows folders, allowing you to secure your sensitive data without advanced technical knowledge. It’s important to choose a reputable software from a trusted source and follow the instructions provided by the application to ensure optimal security.
Now that we’ve explored the option of using third-party software, let’s move on to the next method: using the command prompt to password protect your folders.
Method 2: Using the Command Prompt
If you prefer a more hands-on approach and are comfortable with using the command line, you can password protect your Windows folders using the Command Prompt. This method is straightforward and doesn’t require any additional software.
Here’s a step-by-step guide on how to use the Command Prompt to add password protection to a folder:
- Open the Command Prompt by pressing “Win + R” on your keyboard, typing “CMD,” and pressing Enter.
- Navigate to the location of the folder you want to protect by using the “CD” command followed by the path to the folder. For example, if your folder is located on the desktop, you would enter “CD C:\Users\YourUsername\Desktop”.
- Type the following command: “cacls FolderName /E /P UserName:R”, replacing “FolderName” with the name of your folder and “UserName” with the username of the user you want to grant access to.
- Press Enter to execute the command.
- You will be prompted to enter the password for the specified user. Enter the password and press Enter.
- Confirm the password by entering it again and pressing Enter.
Once you’ve completed these steps, only the specified user will be able to access the folder. Any other user who attempts to open the folder will be prompted for a password that they do not have.
Using the Command Prompt to password protect your folders provides a no-frills method for securing your data. It’s important to remember the username and password you set, as you will need them to access the folder. Keep in mind that this method only grants access to individual users, so if multiple users need access, you will need to repeat the process for each user.
Now that you’re familiar with using the Command Prompt for password protection, let’s move on to the next method: utilizing BitLocker.
Method 3: Using BitLocker
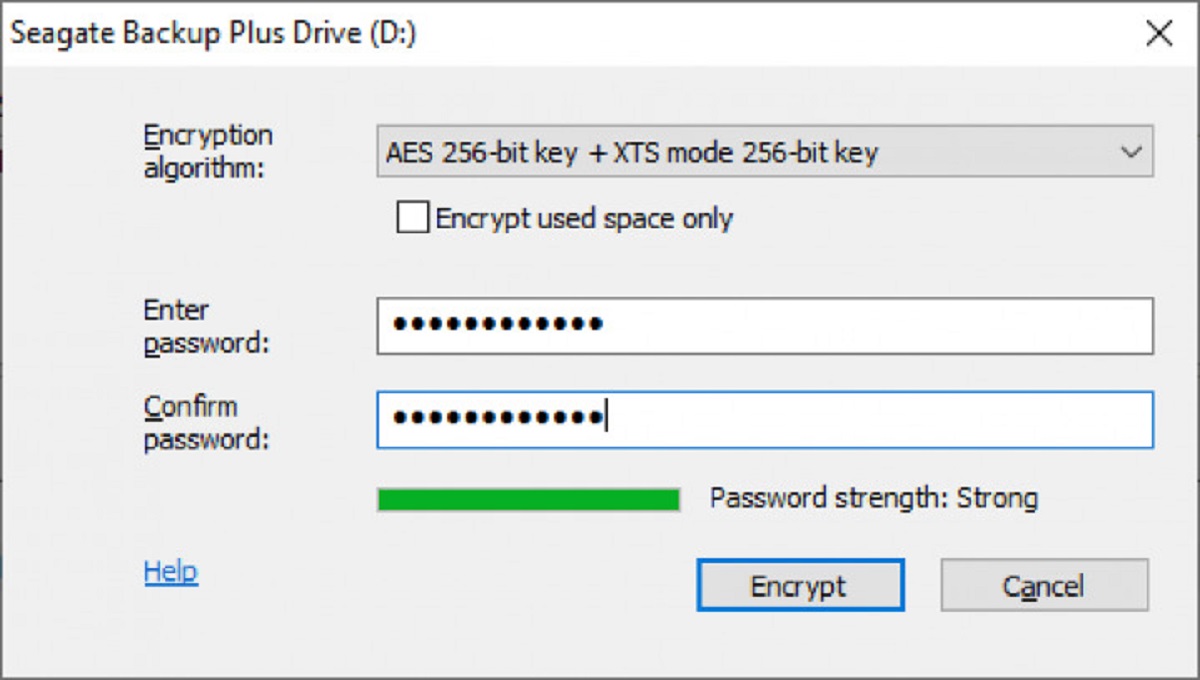
If you’re using a Windows edition that includes BitLocker, you can take advantage of this built-in feature to password protect your folders. BitLocker is a disk encryption tool provided by Microsoft that offers robust security for your data.
Follow these steps to use BitLocker to password protect a folder:
- Right-click on the folder you want to protect and select “Turn on BitLocker”.
- Choose how you want to unlock the drive, either by entering a password or by using a smart card.
- Enter a secure password in the “Enter your password” field. Make sure to choose a strong password that is difficult to guess.
- Click “Next” to proceed.
- Choose whether to store a recovery key for the drive. This recovery key can be used to unlock the drive if you forget your password.
- Select the location to save the recovery key, such as a USB drive or a file on your computer.
- Click “Next” to continue.
- Choose whether to encrypt the entire drive or only the used disk space. Select the desired option and click “Next”.
- Click “Start Encrypting” to begin the encryption process. This might take some time depending on the size of the folder.
Once the encryption process is complete, your folder will be password protected using BitLocker. Whenever you want to access the folder, you will be prompted to enter the password you set during the encryption process.
Using BitLocker provides a secure and convenient method for protecting your folders, especially if you have a Windows edition that supports this feature. Keep in mind that the encryption process might take some time, so it’s recommended to do this when you have sufficient time available.
Now that you’ve learned how to utilize BitLocker, let’s move on to the next method: using encryption software for password protection.
Method 4: Using Encryption Software
If you’re looking for more advanced encryption options and additional security features, using encryption software can be a viable option. Encryption software provides robust encryption algorithms and a wide range of features to enhance the security of your folders.
Here’s a step-by-step guide on how to password protect a folder using encryption software:
- Choose a reputable encryption software program that suits your needs. Some popular options include VeraCrypt, AxCrypt, and 7-Zip.
- Download and install the chosen encryption software from the official website.
- Launch the software and create a new encrypted container or volume.
- Specify the location and size of the container.
- Set a strong password for the container. Make sure to choose a password that is unique and difficult to guess.
- Once the container is created, open it with the software.
- Drag and drop the folder you want to protect into the opened container.
- Close the container, and the folder will be encrypted and password protected.
Encryption software adds an extra layer of security by encrypting the entire folder and its contents. It ensures that even if someone gains unauthorized access to the files, they won’t be able to view or modify the information without the correct password.
One advantage of using encryption software is the ability to create portable encrypted containers that can be accessed on different computers, provided you have the encryption software installed. This allows you to securely access your password-protected folder even when you’re away from your personal computer.
Remember to choose a reliable and trustworthy encryption software program from a reputable source. Additionally, make sure to keep a backup of your encrypted container and remember the password, as losing it can result in permanent data loss.
Now that you’re familiar with using encryption software for folder protection, let’s explore the next method: using file compression software.
Method 5: Using File Compression Software
Another method to password protect your Windows folders is by using file compression software. File compression tools, such as WinRAR, 7-Zip, and WinZip, offer the option to password protect compressed folders, providing an additional layer of security to your files.
Below are the steps to password protect a folder using file compression software:
- Download and install the file compression software of your choice from the official website.
- Locate the folder you want to protect.
- Right-click on the folder and select the option to compress it using the file compression software.
- In the compression settings or options, look for the password or encryption feature.
- Enter a strong and unique password in the password field.
- Confirm the password by entering it again.
- Click on the “OK” or “Create” button to compress the folder and apply the password protection.
Once the compression process is complete, you’ll have a compressed file or folder that is password protected. To access the contents of the folder, you will need to enter the correct password when prompted by the file compression software.
The advantage of using file compression software is that it’s widely available and often comes pre-installed on many computers. Additionally, it allows you to compress multiple files and folders together, making it convenient for organizing and protecting data.
It’s recommended to use a strong password consisting of a combination of uppercase and lowercase letters, numbers, and special characters. This will significantly enhance the security of your files and make it more challenging for unauthorized users to crack the password.
Remember to keep a backup of the password-protected compressed file and ensure you remember the password, as forgetting it may result in permanent data loss.
Now that you’re familiar with using file compression software for password protection, let’s summarize what we’ve learned in this article so far.
Conclusion
Password protecting your Windows folders is essential to safeguard your sensitive and confidential files from unauthorized access. While Windows doesn’t provide a built-in feature for folder-level password protection, there are various methods and tools available to achieve this.
In this guide, we explored five different methods:
- Using third-party software, such as Folder Lock and Wise Folder Hider, for a user-friendly approach.
- Utilizing the Command Prompt for a more hands-on approach.
- Employing BitLocker, a built-in feature for certain Windows editions.
- Utilizing encryption software like VeraCrypt, AxCrypt, or 7-Zip.
- Using file compression software like WinRAR, 7-Zip, or WinZip.
Each of these methods offers its own advantages and suits different user preferences and requirements. The choice ultimately depends on your comfort level with technology, the level of encryption and security needed, and the desired ease of use.
Regardless of the method you choose, it’s important to select a strong and unique password when setting up folder protection. This will significantly enhance the security of your files and make it more challenging for unauthorized users to gain access.
Keep in mind that it’s crucial to understand the limitations and potential risks associated with each method. Some methods may have limitations on the number of users or devices that can access the protected folders, while others may require additional software installations.
We hope that this guide has provided you with valuable insights and knowledge on how to password protect your Windows folders effectively. By implementing these security measures, you can have peace of mind knowing that your sensitive information is protected from prying eyes.
Remember to stay vigilant and regularly update your passwords to maintain optimal security. With the right tools and precautions in place, you can securely protect your folders and keep your data safe.