Introduction
Partitioning an SSD (Solid State Drive) on your Windows 10 system can provide several benefits, including improved organization, enhanced data management, and increased performance. By dividing your SSD into multiple partitions, you can segregate different types of data, such as operating system files, applications, personal files, and backups. This separation allows for better data management and makes it easier to locate and access specific files.
Partitioning an SSD also enables you to perform various tasks more efficiently, such as system backups, upgrades, and reinstallations. It allows you to allocate storage space for specific purposes, such as creating a separate partition for your virtual machines or allocating space for a dual-boot setup with another operating system.
In this article, we will guide you through the process of partitioning an SSD on a Windows 10 system. We will provide step-by-step instructions that will help you ensure a smooth and hassle-free partitioning experience.
Before we dive into the details, it’s important to note that partitioning an SSD involves modifying the disk’s structure. While the process is generally safe, there is always a potential risk of data loss if not executed properly. Therefore, it is crucial to back up your important files and data prior to performing any partitioning tasks.
Now, let’s explore the reasons why partitioning an SSD can be beneficial and the factors you should consider before proceeding.
Why Partition an SSD
Partitioning an SSD offers a range of advantages that can greatly improve your overall computer experience. Here are some key reasons why you might consider partitioning your SSD:
1. Efficient Data Organization: Partitioning allows you to divide your SSD into separate sections, each dedicated to specific types of files or data. This separation makes it easier to locate and manage your files, improving overall data organization and efficiency.
2. Enhanced Performance: SSDs are known for their blazing-fast read and write speeds. By partitioning your SSD and allocating specific partitions for certain tasks, such as storing frequently accessed files or running resource-intensive applications, you can optimize performance and reduce potential bottlenecks.
3. Simplified Data Management: When you have multiple partitions on your SSD, you can manage your data more effectively. For example, you can easily back up specific partitions without having to copy the entire SSD, saving time and storage space.
4. Increased System Stability: By separating system files and applications from personal data, you create a more stable environment. If you encounter issues with one partition, it is less likely to affect the other partitions. This can be especially useful when troubleshooting or performing system maintenance tasks.
5. Flexibility for Dual Boot Setups: If you want to run multiple operating systems on your computer, partitioning your SSD is essential. By creating separate partitions for each operating system, you can have a smooth and reliable dual boot setup, allowing you to switch between different operating systems easily.
6. Simplified Upgrades and Reinstallations: With partitioning, it becomes easier to perform system upgrades or reinstallations. For example, you can keep your files and personal data on one partition while reinstalling the operating system on another partition, eliminating the need to back up and restore everything.
7. Effective Space Management: When you partition your SSD, you have more control over how you allocate and utilize storage space. You can allocate more space to frequently used partitions and shrink partitions with less critical data to optimize space utilization.
Considering these benefits, it is clear that partitioning an SSD can greatly enhance your computer’s performance, data management, and overall efficiency. However, before you proceed with the partitioning process, there are a few important factors to consider, which we will discuss in the next section.
Things to Consider Before Partitioning an SSD
Before you start partitioning your SSD, there are a few important factors that you should consider to ensure a smooth and successful partitioning process. Let’s explore these considerations:
1. Backup Your Data: Partitioning involves altering the structure of your SSD, which inherently carries some risk of data loss. Therefore, it is crucial to back up all your important data before proceeding with any partitioning tasks. This way, if anything goes wrong during the process, you can restore your data without any hassle.
2. Determine the Number of Partitions: Think about how many partitions you need and what you plan to use them for. Consider factors such as the type of data you want to store, the need for separate operating systems, and the balance between system performance and storage space. Assessing this beforehand will help you decide the appropriate number and size of partitions.
3. Partition Size: Determine the sizes of the partitions based on your specific requirements. Allocate more space to partitions that will store large files, such as multimedia files or virtual machine images. When planning the partition sizes, also consider the recommended space for your operating system and applications.
4. Available Free Space: Ensure that you have enough free space on your SSD to create the desired partitions. If your SSD is already nearly full, you may need to free up space by deleting unnecessary files or transferring data to an external storage device.
5. Compatibility with Operating System: Check the compatibility of your operating system with the partitioning process. Some older operating systems may have limitations or require specific software to partition an SSD. Ensure that your operating system supports SSD partitioning natively or explore third-party partitioning tools if needed.
6. Consider Future Needs: Anticipate your future needs and how they may affect your partitions. Will you require additional space for new software installations or data storage? Thinking ahead can save you from the hassle of adjusting partitions and potentially losing data in the future.
7. Understand the Risks: While partitioning an SSD is generally safe, there is always a risk of data loss or system instability if not done correctly. It is important to understand the potential risks involved and the possible consequences. Following proper guidelines and backing up your data will minimize these risks.
By considering these factors before partitioning your SSD, you can ensure a well-planned and successful partitioning process that meets your specific needs. Now that you are aware of the important considerations, let’s dive into the step-by-step process of partitioning an SSD on your Windows 10 system.
Step 1: Prepare for Partitioning
Before you begin the partitioning process, it’s essential to prepare your SSD and your system to ensure a smooth and hassle-free experience. Here are the key steps to prepare for partitioning:
1. Understand Your Current Partition Structure: Take some time to familiarize yourself with the current partition structure on your SSD. This will help you determine how much free space you have available and how you want to redistribute it.
2. Clean Up Unnecessary Files: To optimize the partitioning process and ensure ample free space, clean up your SSD by removing unnecessary files and folders. Delete temporary files, outdated backups, and any other data that you no longer need.
3. Uninstall Unnecessary Applications: Review the applications installed on your system and uninstall any that are no longer necessary. This will help free up additional space on your SSD and make the partitioning process more efficient.
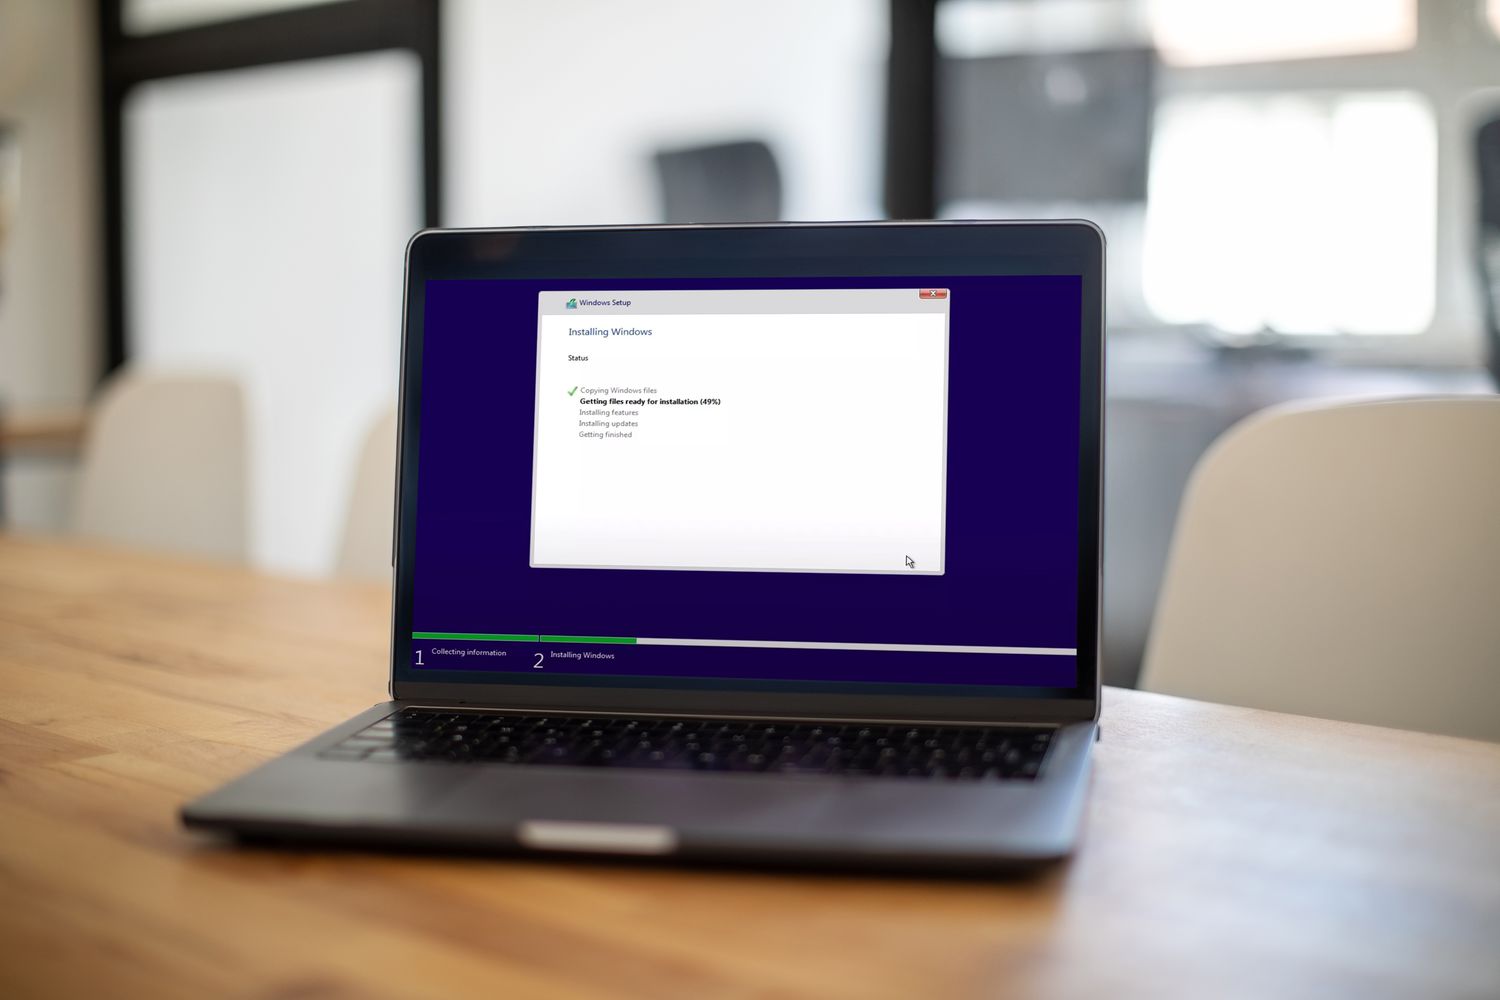
4. Update Your System: Before proceeding with partitioning, make sure your Windows 10 operating system is up to date. Install any pending system updates to ensure that you have the latest stability and compatibility improvements.
5. Disable Antivirus Software: Temporarily disable any antivirus or security software running on your system. Some security applications can interfere with the partitioning process, so it’s best to disable them temporarily to avoid any potential conflicts.
6. Check for Disk Errors: Run a disk error check on your SSD to ensure that it is in optimal condition. Right-click on the SSD drive in Windows Explorer, select “Properties,” go to the “Tools” tab, and click on “Check” under the Error Checking section. This will scan for any errors and fix them if necessary.
7. Gather Partitioning Software: While Windows 10 has built-in partition management tools, you may also consider using third-party partitioning software for more advanced features and flexibility. Research and choose a reliable partitioning software that suits your needs, if applicable.
By completing these preparation steps, you’ll have a clean, optimized system ready for the partitioning process. Once you’ve completed the preparation, you can move on to the next steps to partition your SSD successfully.
Step 2: Backup Your Data
Before proceeding with any partitioning tasks, it is crucial to back up all your important data to ensure its safety. While partitioning an SSD is generally safe, there is always a potential risk of data loss if something goes wrong during the process. Follow these steps to create a comprehensive backup of your data:
1. Identify Critical Data: Determine which data on your SSD is critical and needs to be backed up. This includes personal files, important documents, photos, videos, and any other data that you cannot afford to lose.
2. Choose a Backup Method: Select a backup method that best suits your needs. You can use external storage devices, such as external hard drives or USB flash drives, or utilize cloud storage services to store your data securely offsite.
3. Use Built-in Backup Tools: Windows 10 provides built-in backup tools that you can use to create a full backup of your system. The “File History” feature allows you to automatically back up your personal files, while the “Backup and Restore (Windows 7)” feature enables you to create a system image backup.
4. Consider Third-party Backup Software: If you prefer more advanced backup options, consider using third-party backup software that provides additional features and flexibility. Research and choose a reliable backup software that suits your requirements.
5. Perform the Backup: Follow the instructions provided by the backup method or software of your choice to create a full backup of your data. Make sure to select the appropriate files and folders to include in the backup, and verify that the backup process completes successfully.
6. Verify the Backup: After the backup process is complete, verify the integrity of the backup by accessing and checking a few files. It is essential to ensure that all your critical data is intact and accessible before proceeding with the partitioning process.
7. Keep the Backup Secure: Store your backup in a safe and secure location, such as a locked drawer or a cloud storage service with encryption. It is recommended to keep multiple copies of your backup in different locations to protect against data loss in case of unforeseen events.
By following these steps, you can create a comprehensive backup of your data, minimizing the risk of any potential data loss during the partitioning process. Once you have successfully backed up your data and verified its integrity, you can proceed to the next step of partitioning your SSD.
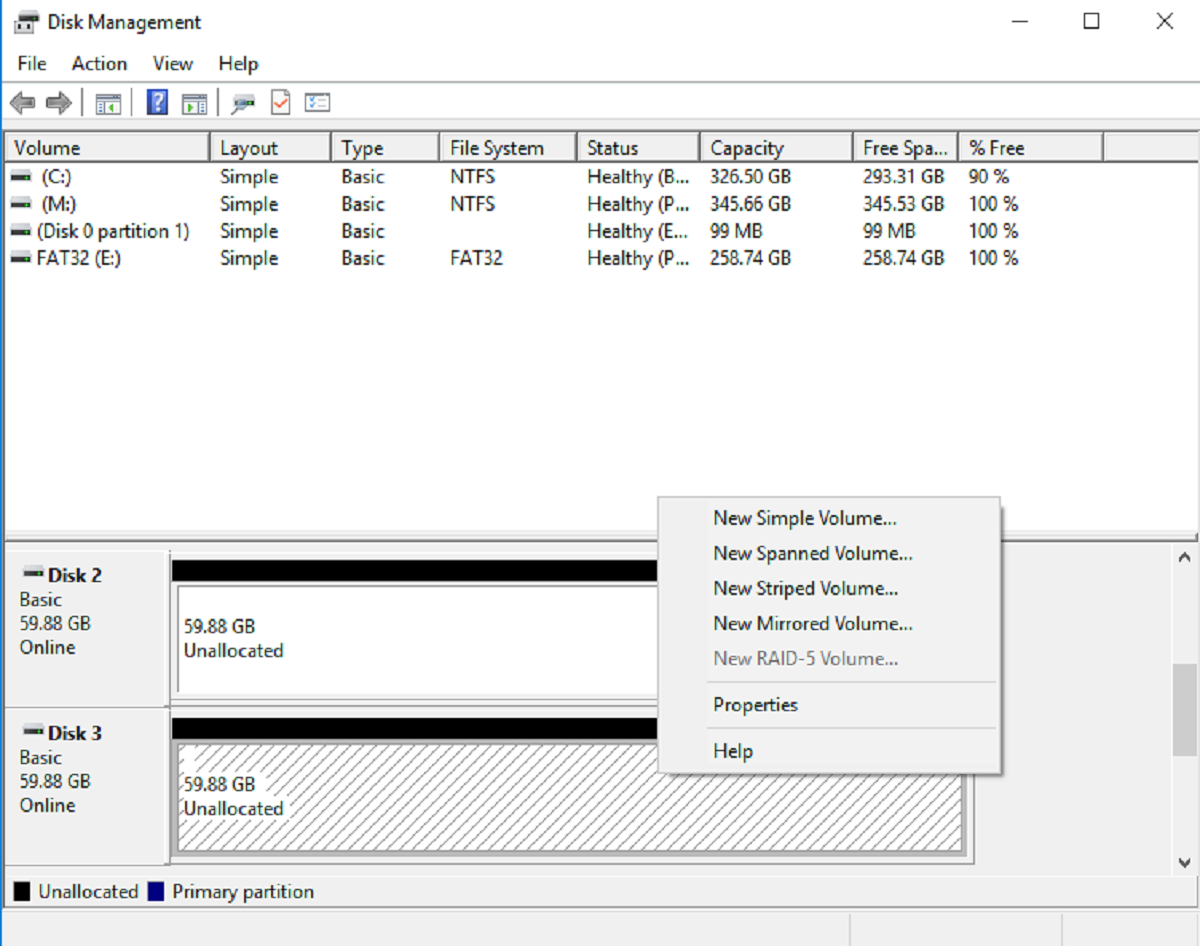
Step 3: Open Disk Management
To begin the process of partitioning your SSD on a Windows 10 system, you need to access the Disk Management tool. Disk Management is a built-in utility that allows you to manage disk drives, including creating and modifying partitions. Follow these steps to open Disk Management:
1. Open the Run Dialog: Press the Windows key + R on your keyboard to open the Run dialog box. Alternatively, you can right-click the Start button and select “Run” from the menu.
2. Enter ‘diskmgmt.msc’: In the Run dialog box, type ‘diskmgmt.msc’ and click ‘OK’ or press Enter. This command will open Disk Management, which displays a graphical representation of your disk drives.
3. Locate Your SSD: In the Disk Management window, locate your SSD drive. It will be listed as a disk with its corresponding drive letter (e.g., Disk 0, Disk 1, etc.). Take note of which disk represents your SSD.
4. Understand Disk Layout: Familiarize yourself with the layout of the Disk Management window. You will see a visual representation of your disks and their partitions. The partitions will be represented as horizontal bars within the disks, indicating their size and file system.
5. Access Partitioning Options: Right-click on the SSD disk that you want to partition, and a context menu will appear. From this menu, select “Shrink Volume” to create unallocated space that can be used to create new partitions.
6. Optional: Initialize Unallocated Disk Space: If your SSD shows as “Not Initialized,” right-click on it and select “Initialize Disk.” Choose the appropriate disk initialization method (MBR or GPT) and proceed. Note that this step is only necessary if your SSD is brand new or hasn’t been initialized previously.
7. Confirm Disk Management: Double-check that you have selected the correct SSD disk and that you understand the consequences of partitioning. Modifying disk partitions can lead to data loss if not done correctly, so it’s important to proceed with caution.
By following these steps, you can easily access the Disk Management tool on your Windows 10 system and prepare to partition your SSD in the next steps. Opening Disk Management is the first crucial step in the partitioning process, so ensure that you are familiar with this utility before proceeding.
Step 4: Select and Shrink Volume
Once you have opened Disk Management in Windows 10, you are ready to select the volume on your SSD that you want to shrink. Shrinking a volume creates unallocated space that can be used to create new partitions. Follow these steps to select and shrink a volume:
1. Identify the Volume: In the Disk Management window, locate the volume on your SSD that you want to shrink. The volumes are represented as horizontal bars within the disk, displaying their size and file system.
2. Right-click on the Volume: Right-click on the volume that you want to shrink, and a context menu will appear. Select the “Shrink Volume” option from the menu. This will open the “Shrink” window.
3. Shrink Volume Size: In the “Shrink” window, you will see the size of the volume and the maximum amount of space that can be shrunk. Enter the desired amount of space to shrink in megabytes (MB) in the “Enter the amount of space to shrink in MB” field. You can also use the slider to adjust the size.
4. Verify Shrink Details: Verify the details provided in the “Total size before shrink” and “Size of available shrink space” sections. Ensure that you are allocating the desired amount of space for the new partition and that it does not exceed the available shrink space.
5. Shrink the Volume: Once you are satisfied with the shrink size and details, click on the “Shrink” button to initiate the shrinking process. Windows will start resizing the volume and create unallocated space on your SSD.
6. Wait for the Shrink Process: The shrinking process may take some time, depending on the size of the volume and the performance of your SSD. Be patient and avoid interrupting the process while it is in progress.
7. Verify the Shrink Results: After the shrink process is complete, verify that the volume has been successfully shrunk and that unallocated space has been created. You can see the unallocated space as a black bar within the disk representation in the Disk Management window.
By following these steps, you can easily select and shrink a volume on your SSD using the Disk Management tool in Windows 10. Once you have shrunk the volume and created unallocated space, you are ready to proceed to the next step of creating a new partition.
Step 5: Create New Partition
After shrinking a volume and creating unallocated space on your SSD in Disk Management, the next step is to create a new partition using that available space. Follow these steps to create a new partition:
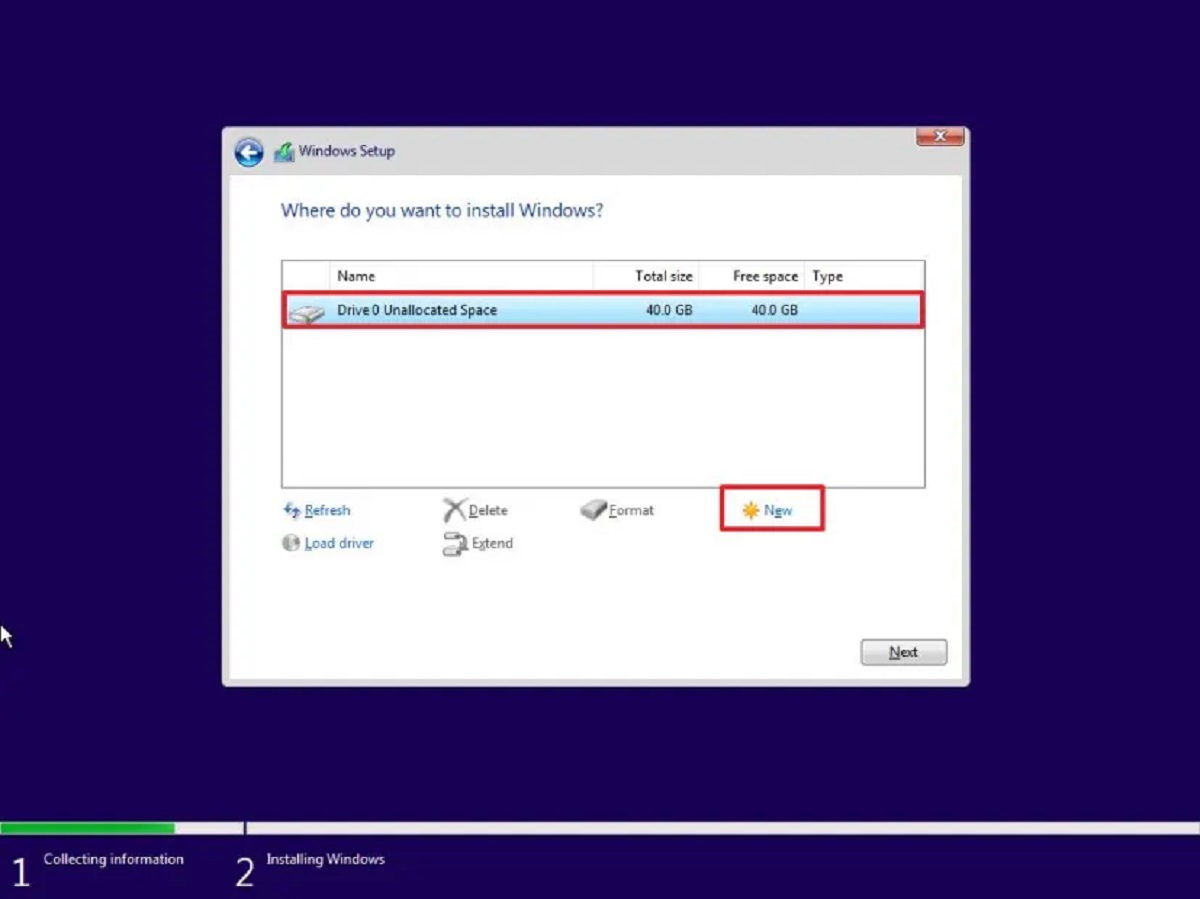
1. Right-click on the Unallocated Space: In the Disk Management window, right-click on the unallocated space that you want to create a partition on. A context menu will appear with several options.
2. Select “New Simple Volume”: From the context menu, select the “New Simple Volume” option. This will open the “New Simple Volume Wizard” to guide you through the partition creation process.
3. Click “Next”: In the first window of the wizard, click on the “Next” button to proceed.
4. Specify Partition Size: In the next window, enter the desired partition size. By default, the wizard suggests using the maximum available space. Adjust the size if you want a custom size for the new partition.
5. Assign Drive Letter or Path: Choose a drive letter or path to assign to the new partition. You can also choose to mount the partition to an empty NTFS folder on an existing volume.
6. Format Partition: Select the file system type for the new partition. The recommended file system for most Windows users is NTFS. You can also choose to customize the allocation unit size and add a volume label.
7. Enable File and Folder Compression: If desired, you can enable file and folder compression for the new partition. This option can help save disk space, but it may slightly impact performance.
8. Review and Finish: Review the summary of the new partition’s settings. If everything looks correct, click on the “Finish” button to create the new partition.
9. Wait for the Partition Creation: The process of creating the new partition may take some time, depending on the size of the partition and the performance of your SSD. Be patient and avoid interrupting the process while it is in progress.
Once the partition creation process is complete, you will see the new partition listed in the Disk Management window, with the assigned drive letter or path. You can now begin utilizing the new partition for your desired purposes.
By following these steps, you can easily create a new partition on your SSD using the Disk Management tool in Windows 10. Creating partitions allows you to segregate your data and optimize storage space allocation, enhancing the efficiency and organization of your SSD.
Step 6: Choose Partition Size and Drive Letter
After creating unallocated space and initiating the partitioning process in Disk Management, the next step is to determine the size of the new partition and assign a drive letter. Follow these steps to choose the partition size and drive letter:
1. Right-click on the Unallocated Space: In the Disk Management window, right-click on the unallocated space you intend to create a partition on. A context menu will appear with various options.
2. Select “New Simple Volume”: From the context menu, select the “New Simple Volume” option. This will start the “New Simple Volume Wizard,” which will guide you through the partitioning process.
3. Click “Next”: In the first window of the wizard, click on the “Next” button to proceed to the next step.
4. Specify Partition Size: In the following window, enter the desired size for the new partition. The wizard suggests using the maximum available space by default. Adjust the partition size if you prefer a custom size.
5. Assign Drive Letter or Path: Select a drive letter to assign to the new partition from the available options. Alternatively, you can choose to mount the partition as an empty NTFS folder on an existing volume. Select a meaningful and easily recognizable drive letter or path that best suits your preferences.
6. Format Partition: Choose the file system type for the new partition. Normally, NTFS is the recommended file system for Windows users. You may also customize the allocation unit size, which affects how data is stored on the partition. Adding a volume label to the partition is optional but can be helpful for easy identification.
7. Enable File and Folder Compression: If desired, you can enable file and folder compression for the new partition. This reduces the disk space used by files and folders but may slightly affect performance. Evaluate whether the trade-off between storage space saved and potential impact on performance aligns with your needs.
8. Review and Finish: Review the summary of the new partition’s settings. If everything is as desired, click on the “Finish” button to create the new partition.
9. Wait for the Partition Creation: The time required to create the new partition will vary depending on the size and performance of your SSD. It’s important to be patient and refrain from interrupting the process while it’s in progress.
Once the partition creation process is complete, you will see the new partition listed in the Disk Management window, alongside the assigned drive letter or path. At this point, you can proceed with formatting the partition and assigning a label to it.
By following these steps, you can easily determine the size of the new partition and assign a drive letter to it using the Disk Management tool in Windows 10. Customizing the size and drive letter allows you to tailor the partition to your specific requirements and efficiently manage your SSD’s storage space.
Step 7: Format the New Partition
After creating a new partition on your SSD and assigning a drive letter, the next step is to format the partition. Formatting prepares the partition to store data and establishes the file system for it. Follow these steps to format the new partition:
1. Locate the New Partition: In the Disk Management window, locate the newly created partition. It will be listed as a separate block with the assigned drive letter or path.
2. Right-click on the Partition: Right-click on the new partition, and a context menu will appear with different options.
3. Select “Format”: From the context menu, select the “Format” option. This will open the “Format” window, where you can specify the settings for formatting the partition.
4. Choose File System: In the “Format” window, choose the desired file system for the partition. Typically, NTFS is the recommended file system for Windows users due to its stability, security, and advanced features. However, you may opt for a different file system if required.
5. Allocation Unit Size (Optional): Specify the allocation unit size for the new partition. The default allocation unit size is typically the most appropriate choice for most users. If you have specific needs or are an advanced user, you can choose a different allocation unit size.
6. Enable Quick Format (Recommended): Check the “Perform a quick format” option. This option allows for a faster formatting process by skipping the complete disk scan, which is usually unnecessary for newly created partitions. However, if you suspect any issues with the SSD, you may choose to perform a full format instead.
7. Provide a Volume Label: Enter a meaningful name for the new partition in the “Volume label” field. This label helps identify the partition easily and sets a name that will be displayed when you access the partition in File Explorer.
8. Confirm and Start Formatting: Review the formatting settings and ensure they match your requirements. If everything is correct, click on the “Start” button to initiate the formatting process.
9. Wait for Formatting to Complete: The time required to format the new partition depends on its size and the performance of your SSD. Be patient and allow the process to complete without interruption.
Once the formatting process is finished, the new partition will be ready for use. You can start storing files and data on the freshly formatted partition, utilizing its allocated space according to your needs.
By following these steps, you can easily format the new partition on your SSD using the Disk Management tool in Windows 10. Formatting ensures the partition is correctly configured and ready to store data, allowing you to take full advantage of its capacity.
Step 8: Assign a Label or Name to the Partition
After formatting the new partition on your SSD, the next step is to assign a label or name to the partition. Assigning a label helps you easily identify and distinguish the partition from others on your system. Follow these steps to assign a label or name to the partition:
1. Locate the Formatted Partition: In the Disk Management window, locate the new partition that you have just formatted. It will be listed as a separate block with the assigned drive letter or path.
2. Right-click on the Partition: Right-click on the formatted partition, and a context menu will appear with various options.
3. Select “Change Drive Letter and Paths”: From the context menu, select the “Change Drive Letter and Paths” option. This will open the “Change Drive Letter and Paths for [partition name]” window.
4. Click “Add”: In the “Change Drive Letter and Paths” window, click on the “Add” button. This will open the “Add Drive Letter or Path” window.
5. Assign a Drive Letter or Path: In the “Add Drive Letter or Path” window, select the option to assign a drive letter and choose a vacant drive letter from the available options. Alternatively, you can choose the option to “Mount in the following empty NTFS folder” and browse to select an empty folder on an existing volume.
6. Provide a Volume Label: Enter a descriptive and meaningful label or name for the partition in the “Volume label” field. This label will help you easily identify the partition in File Explorer and other file management tools.
7. Click “OK”: Once you have assigned the drive letter or path and provided the volume label, click on the “OK” button to save the changes and close the windows.
After completing these steps, the partition will be assigned the specified label or name. You can now easily recognize and refer to the partition by its assigned label or name when managing your files and data.
By following these steps, you can conveniently assign a label or name to the newly formatted partition on your SSD using the Disk Management tool in Windows 10. Assigning a label enhances the organization and accessibility of your partitions, making it easier to manage your data effectively.
Step 9: Completion and Final Thoughts
Congratulations! You have successfully completed the process of partitioning an SSD on your Windows 10 system. By following the steps outlined in this guide, you have organized your SSD, optimized performance, and improved data management. Let’s recap the key points and provide some final thoughts:
1. Verify Your Partitions: After creating and formatting the new partition, take a moment to check the Disk Management window and ensure that all the partitions are correctly set up and allocated.
2. Test Your New Partition: Access the new partition through File Explorer and verify that you can write and read files on it without any issues. This will confirm that the partition is functioning properly.
3. Regularly Back Up Your Data: With your SSD partitioned, it’s essential to maintain regular backups of your data. This ensures that your files are protected in case of unforeseen problems such as hardware failure or software issues.
4. Optimize Partition Sizes: As your needs change over time, you may find it necessary to adjust the sizes of your partitions. You can use the Disk Management tool to shrink, extend, or create new partitions as needed.
5. Explore Advanced Partitioning Features: While the Disk Management tool provides basic partitioning functionalities, consider exploring third-party software for more advanced features, such as merging partitions, converting disk types, or managing dynamic disks.
6. Understand the Risks: Always remember that partitioning an SSD involves modifying the disk’s structure, which carries a risk of data loss if not executed properly. It is important to follow best practices, back up your data, and proceed with caution when making any changes to your partitions.
7. Seek Professional Assistance if Necessary: If you are unsure about the partitioning process or encounter any difficulties along the way, it’s recommended to seek assistance from a knowledgeable professional or consult relevant online resources.
By following these suggestions and keeping these points in mind, you can maintain a well-organized SSD and optimize its performance for your specific needs. Remember to regularly review and adapt your partition setup to accommodate any changes in your data storage requirements.
Partitioning an SSD can greatly enhance your computer experience by allowing you to efficiently manage data, increase performance, and customize your system setup. With careful planning, proper execution, and regular maintenance, you can enjoy the benefits of a well-organized and optimized SSD.