Introduction
Welcome to this guide on how to pair a new PS5 controller! Whether you’ve just purchased a brand new PlayStation 5 console or you’re replacing your old controller, setting up a new controller is a simple process. By following a few steps, you’ll be ready to jump right into your favorite games with your newly paired controller.
The PlayStation 5 controller, also known as the DualSense controller, offers innovative features that enhance your gaming experience. With its haptic feedback and adaptive triggers, you can feel the impact of every action and immerse yourself in the game like never before. But before you can enjoy these features, you need to pair the controller with your console.
In this guide, we will walk you through the step-by-step process of pairing a new PS5 controller. Whether you’re a seasoned gamer or a beginner, you’ll find the instructions easy to follow. So, let’s get started and pair your new PS5 controller!
Step 1: Turn on the PlayStation 5
The first step in pairing a new PS5 controller is to turn on your PlayStation 5 console. Make sure it is plugged into a power source and the HDMI cable is connected to your TV or monitor. Press the power button on the front of the console or use the power button on the DualSense controller to turn on the PS5.
Once the console is powered on, you will see the PlayStation logo appear on your screen. Wait for the console to fully boot up and reach the main menu. This may take a few seconds, so be patient.
If this is the first time you’re setting up your PlayStation 5, you will need to go through the initial setup process, including language selection, network setup, and signing in with your PlayStation Network account. Follow the on-screen instructions to complete the setup.
Now that your PlayStation 5 is turned on and ready, it’s time to move on to the next step and start pairing your new controller.
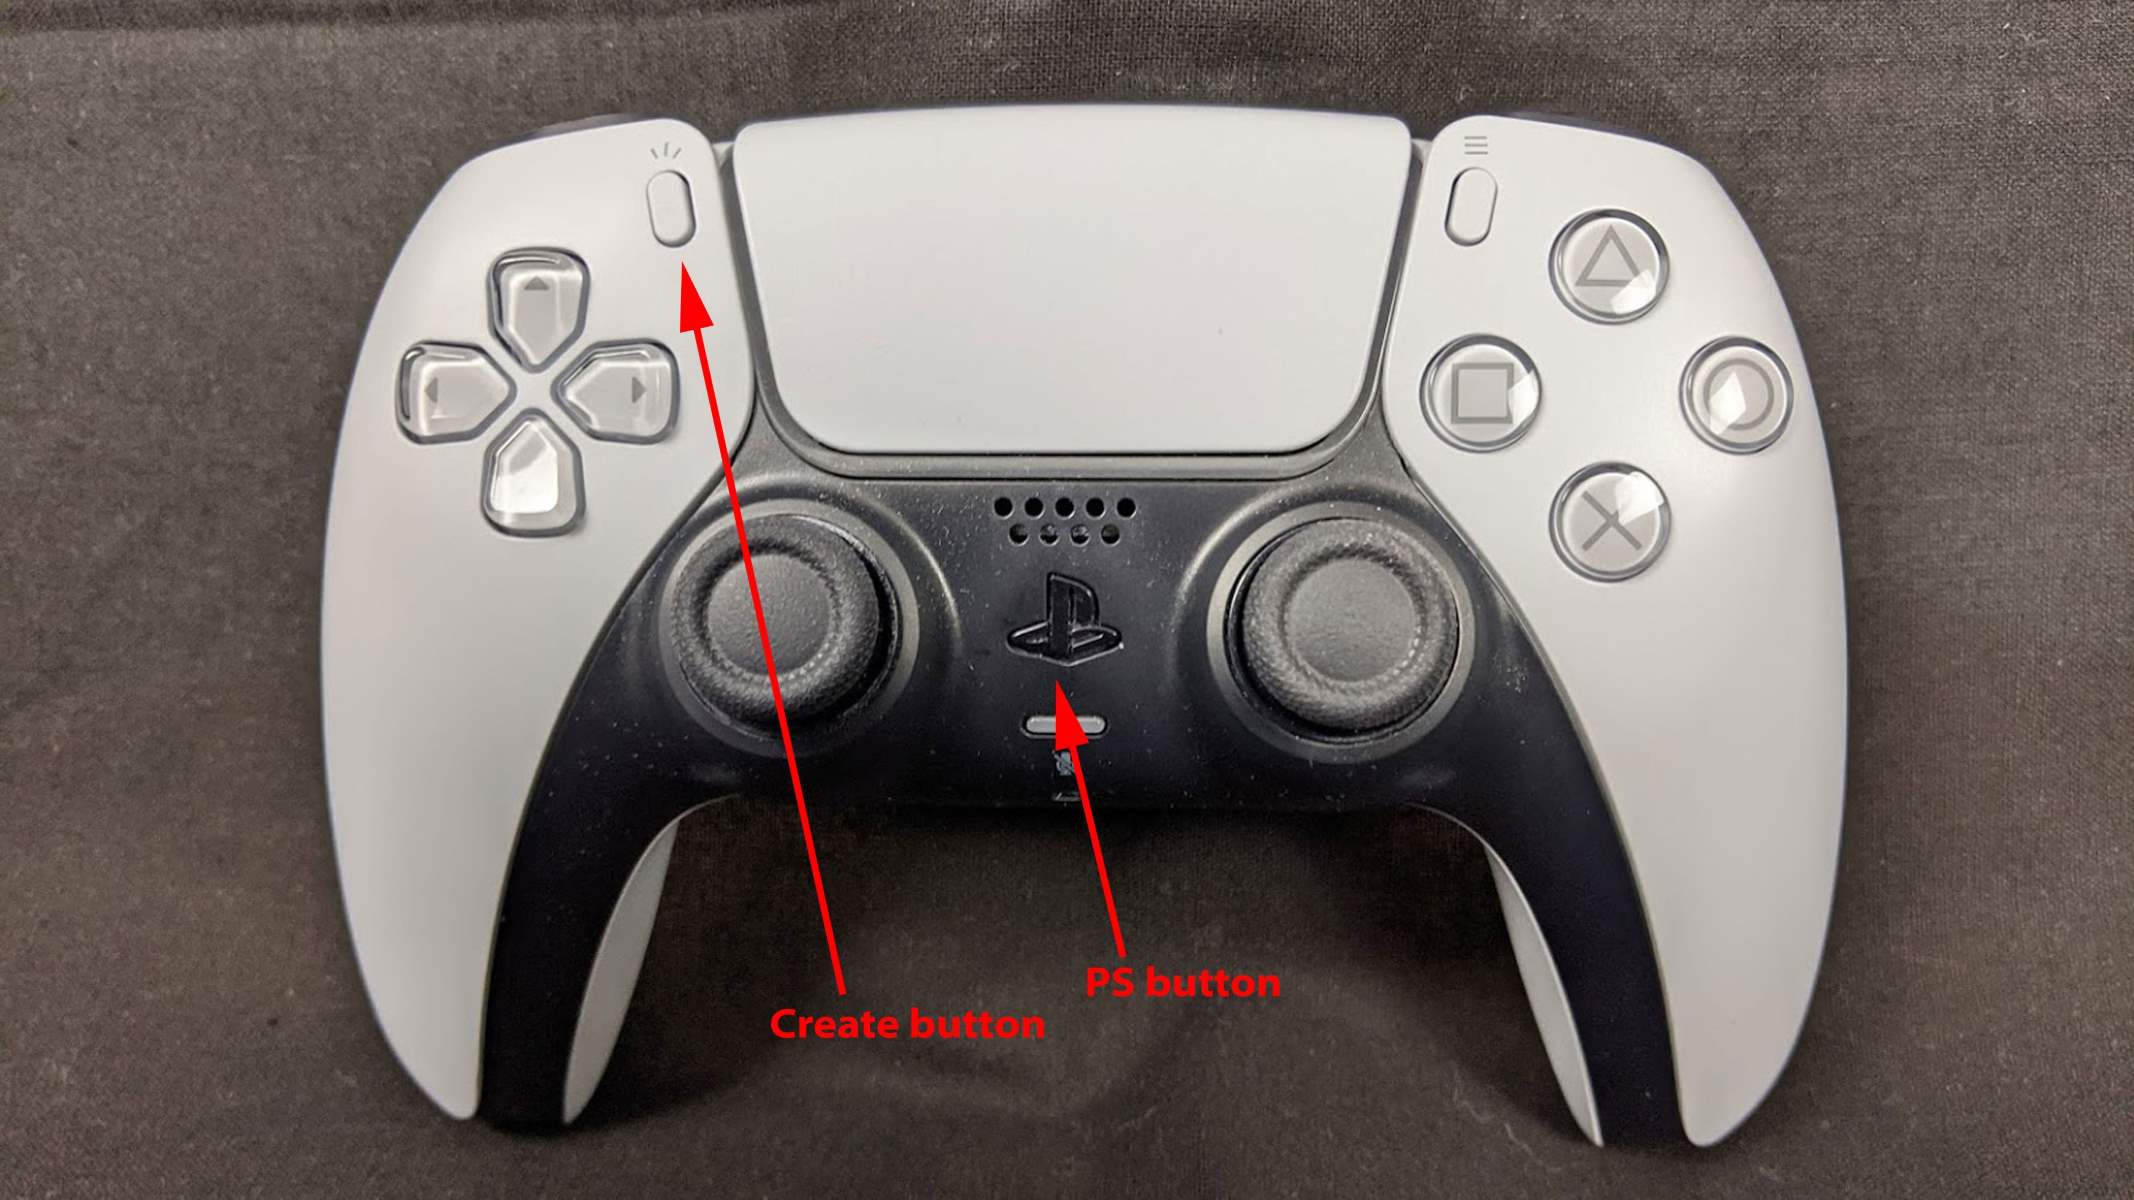
Step 2: Press the PlayStation Button on the Controller
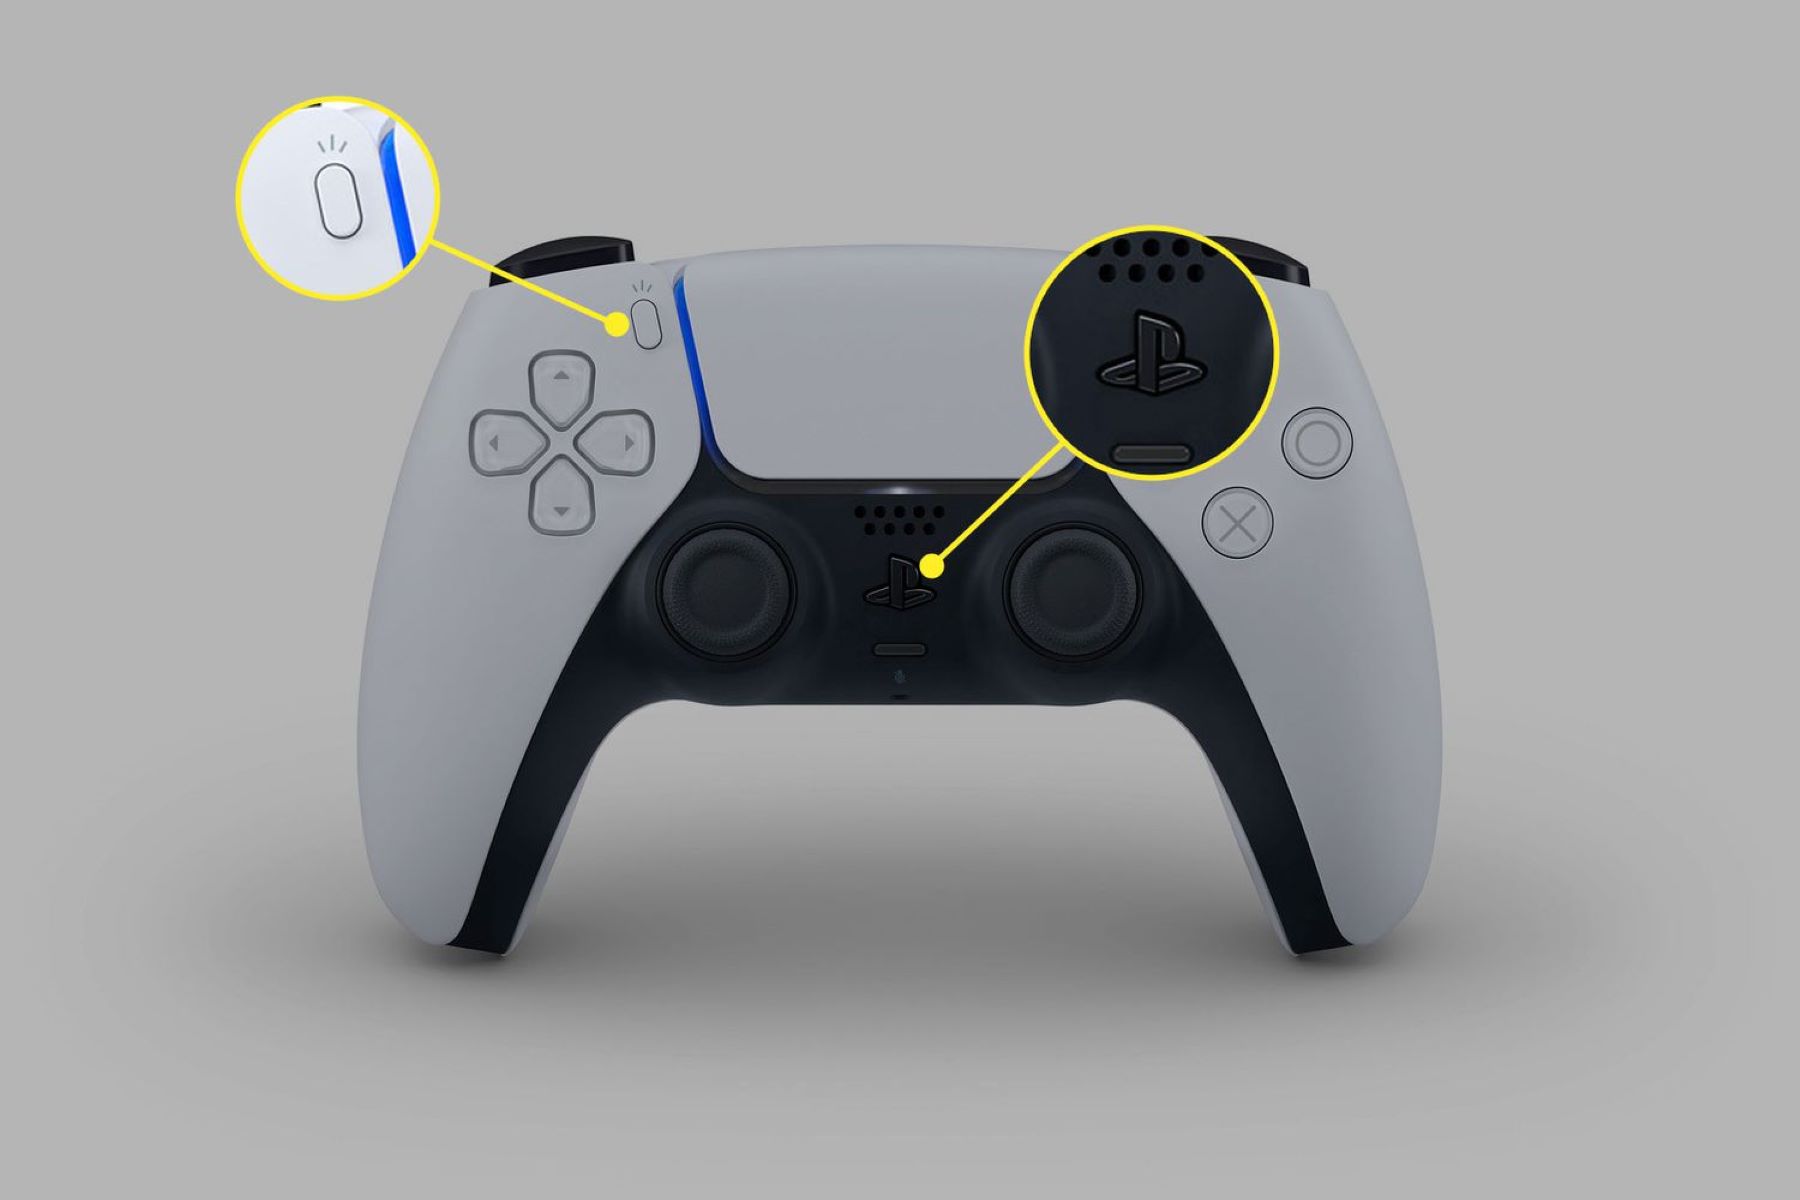
With your PlayStation 5 console turned on and at the main menu, it’s time to start the pairing process for your new controller. Take your new PS5 controller and locate the PlayStation button in the center of the controller, just below the touchpad.
Press and hold the PlayStation button for a few seconds. You will see the light bar on the controller start to flash. This indicates that the controller is entering pairing mode and is ready to connect to your PlayStation 5.
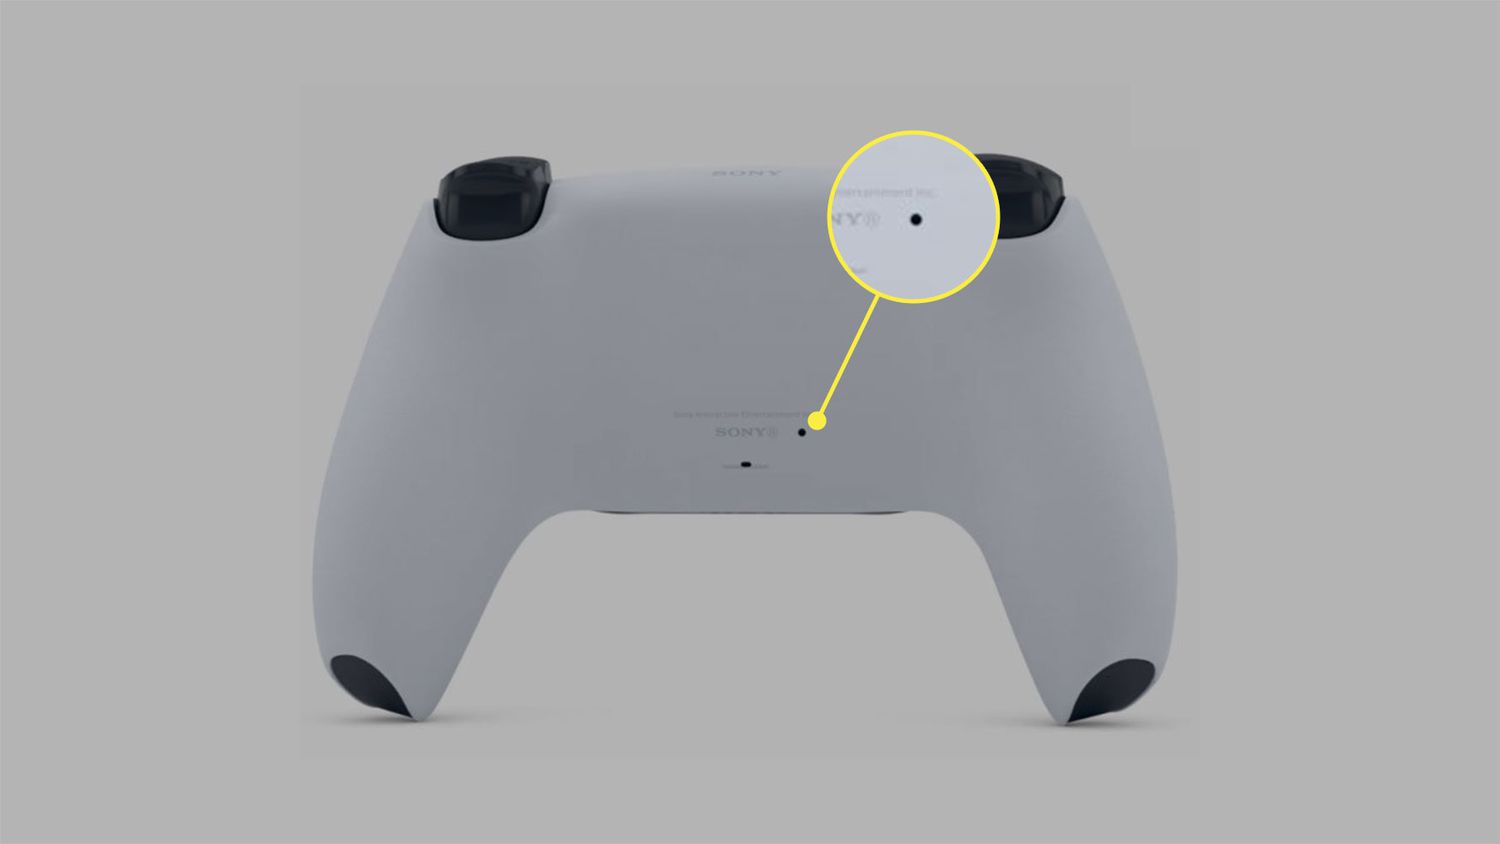
It’s important to note that if you’re replacing an existing controller, you may need to reset that controller first. To do this, locate the small reset button on the back of the controller near the L2 button. Use a small tool, such as a paperclip, to press and hold the reset button for a few seconds. Once the controller resets, you can proceed with pairing the new controller.
Now that you have pressed the PlayStation button and the controller is in pairing mode, it’s time to move on to the next step and prepare the controller for pairing.
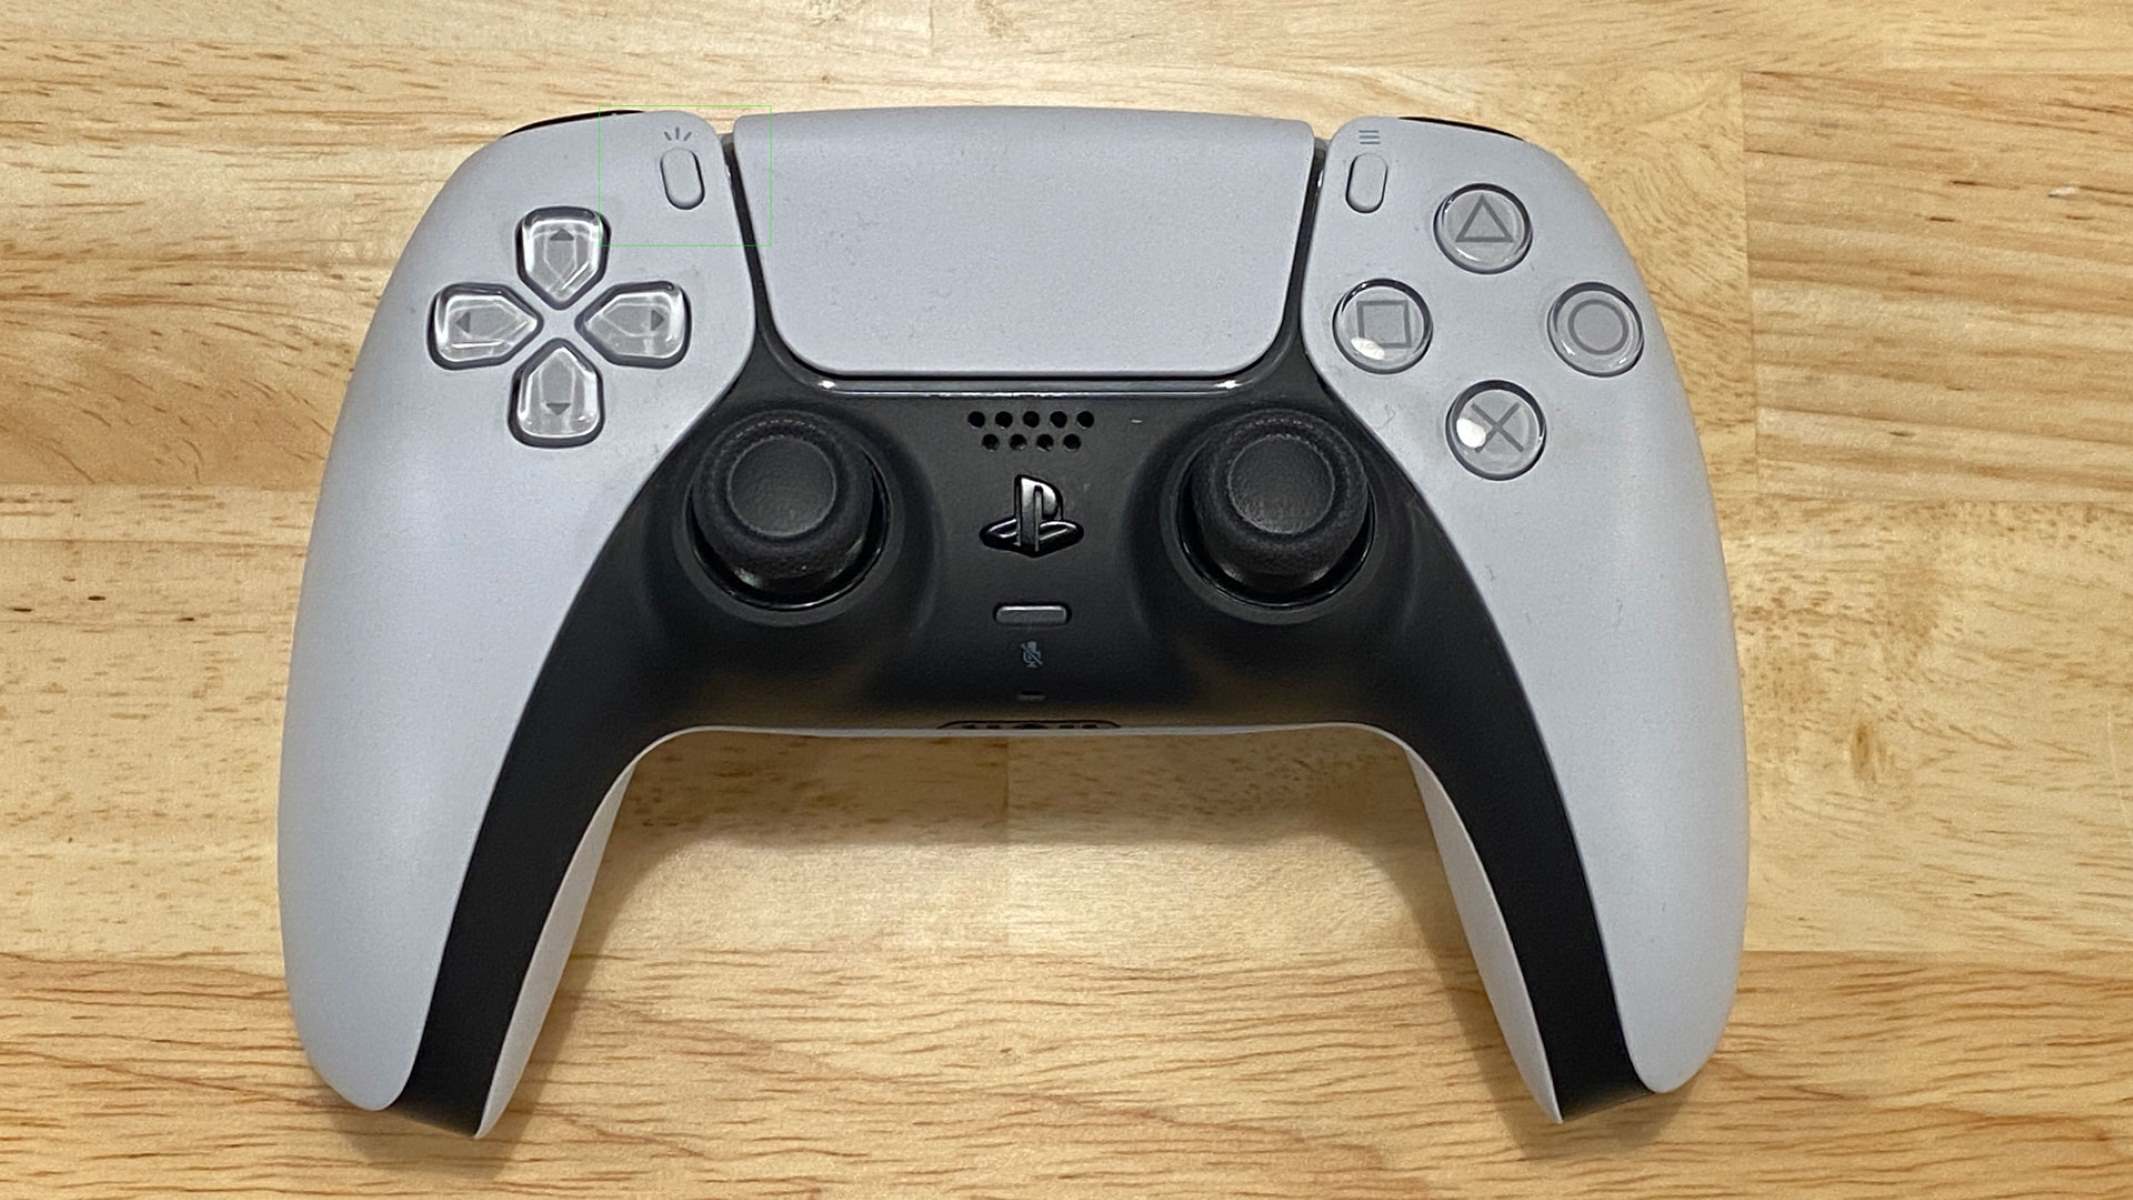
Step 3: Locate the Create Button
As you continue with the pairing process for your new PS5 controller, the next step is to locate the Create button. The Create button is a new addition to the DualSense controller and replaces the Share button found on the PlayStation 4 controller.
The Create button is located on the left side of the touchpad, towards the top. It is marked with a distinctive icon that resembles a pencil or paintbrush. When you find the Create button, you’re ready to move on to the next step.
The Create button is not only used for capturing and sharing gameplay moments, but it also serves an important function during the pairing process. It allows you to access specific options and settings that are necessary to establish a connection between the controller and the PlayStation 5.
Now that you’ve located the Create button, it’s time to proceed to the next step and prepare the controller for pairing.
Step 4: Prepare the Controller for Pairing
Before you can connect your new PS5 controller to the PlayStation 5, you need to prepare the controller for pairing. This involves accessing the pairing options on the console and ensuring that the controller is in the correct mode to establish a connection.
To prepare the controller for pairing, first, make sure the controller is powered off. You can do this by holding down the PlayStation button until the controller turns off completely. Once the controller is powered off, you’re ready to proceed.
Next, press and hold the Create button and the PlayStation button simultaneously. Hold them down for a few seconds until the light bar on the controller starts to flash rapidly. This indicates that the controller is now in pairing mode and is actively searching for a device to connect to.
At this point, leave the controller in pairing mode and move on to the next step, which involves connecting the controller to the PlayStation 5.
Note: If you’re experiencing any issues with the pairing process, make sure that your PlayStation 5 console is updated to the latest firmware version. Firmware updates often include improvements and bug fixes that can help resolve any compatibility issues.
Step 5: Connect the Controller to the PlayStation 5
Now that your PS5 controller is in pairing mode, it’s time to connect it to your PlayStation 5 console. Follow these steps to establish a connection between the controller and the console:
- On your PlayStation 5 console, navigate to the settings menu. You can do this by selecting the gear icon in the top-right corner of the home screen.
- In the settings menu, select the “Accessories” option.
- Under the “Accessories” menu, select “Controllers”.
- On the “Controllers” screen, choose the “Bluetooth Accessories” option.
- The PlayStation 5 will start searching for available Bluetooth devices. After a few seconds, you should see your controller listed. It will be identified as “Wireless Controller”.
- Select your controller from the list to start the pairing process.
- Wait for the console to establish a connection with the controller. This may take a few seconds.
- Once the connection is successfully established, you will see a notification on the screen indicating that the controller is paired and ready to use.
Now that your new PS5 controller is connected to your PlayStation 5, you can proceed to the next step and follow the on-screen instructions to complete the setup.
Step 6: Follow the On-Screen Instructions
Once your new PS5 controller is paired and connected to your PlayStation 5 console, the next step is to follow the on-screen instructions to complete the controller setup. These instructions will guide you through a series of settings and options to ensure that your controller is calibrated correctly and ready for gaming.
The on-screen instructions may include prompts to adjust the controller settings, such as control sensitivity, button mapping, or audio settings. This is your opportunity to personalize your gaming experience and tailor the controller settings to your preferences.
Pay close attention to the instructions on the screen and carefully make the desired adjustments as prompted. The on-screen instructions will guide you through each step, and you can always refer back to them if you need clarification on any settings or options.
Once you’ve completed the on-screen instructions and made any necessary adjustments, you’re all set to start using your new PS5 controller with your PlayStation 5 console.
Remember to keep the controller charged by connecting it to the console using a USB cable or using a separate charging dock. This will ensure that you have a fully powered and ready-to-use controller for your gaming sessions.
Now that you’ve followed the on-screen instructions and completed the controller setup, it’s time to move on to the final step and test your new PS5 controller.
Step 7: Test the Controller
After pairing and setting up your new PS5 controller, it’s essential to test its functionality to ensure that everything is working properly. Testing the controller will not only verify that it is connected correctly but also allow you to experience the unique features of the DualSense controller.
Here are a few steps to help you test your new PS5 controller:
- Launch a game or navigate to the PlayStation 5 home screen.
- Move the analog sticks to check if they are responsive and register your inputs accurately.
- Press the buttons on the controller to verify that they are working correctly. Pay attention to the touchpad, face buttons, trigger buttons, and shoulder buttons.
- Experience the haptic feedback and adaptive triggers by playing a game that supports these features. Notice how the controller provides realistic vibrations and resistance based on in-game actions.
- Test the audio by plugging your headphones into the controller’s headphone jack. Ensure that you can hear the game audio clearly.
- Use the controller’s built-in microphone to chat with friends or interact with in-game voice commands. Check if the microphone captures your voice accurately and without any issues.
If you encounter any problems during the testing process, you may need to troubleshoot the controller or consult the PlayStation support resources for further assistance. It’s always a good idea to ensure that your PlayStation 5 is updated with the latest firmware to access any necessary controller firmware updates.
By testing your new PS5 controller thoroughly, you can confidently enjoy your gaming sessions knowing that your controller is functioning as intended.
Congratulations! You have successfully paired, set up, and tested your new PS5 controller. Now you’re ready to dive into your favorite games and embark on exciting gaming adventures!
Conclusion
Pairing a new PS5 controller with your PlayStation 5 console is a straightforward process that allows you to enjoy the innovative features and immersive gameplay that the DualSense controller offers. By following the steps outlined in this guide, you can quickly and easily set up your new controller and start gaming in no time.
From turning on the PlayStation 5 to pressing the PlayStation button on the controller, locating the Create button, preparing the controller for pairing, connecting it to the console, following the on-screen instructions, and testing the controller’s functionality, each step contributes to a seamless and enjoyable gaming experience.
Remember to keep your controller charged and updated to ensure optimal performance. Regularly check for firmware updates for both your console and controller to access any new features or improvements.
Whether you’re a casual gamer or a hardcore enthusiast, having a properly paired and functional PS5 controller enhances your gaming sessions, immersing you in the action and adding a new level of realism to your gameplay experience.
So, grab your new PS5 controller, follow the steps in this guide, and embark on thrilling adventures in the world of gaming. Have fun!