Introduction
Wireless headphones have become increasingly popular in recent years, and Apple’s AirPods are leading the pack. With their sleek design and seamless functionality, AirPods have become the go-to option for many music lovers. While most people associate AirPods with Apple devices, they can actually be paired with a PC as well. This opens up a whole new world of possibilities, allowing you to enjoy high-quality audio without the hassle of wires.
In this article, we will guide you through the process of pairing your AirPods with a PC. Whether you want to listen to music, watch movies, or attend online meetings, connecting your AirPods to your PC will enhance your audio experience and give you more freedom of movement.
Before we delve into the step-by-step process of pairing AirPods with a PC, it’s important to note that this guide is applicable to Windows PCs. If you own a Mac, the process may differ slightly but is generally similar. Make sure you have your AirPods and PC ready, and let’s get started!
Requirements for Pairing AirPods with PC
Before you begin pairing your AirPods with your PC, there are a few requirements that you should be aware of. Ensuring that you meet these requirements will make the pairing process much smoother. Here’s what you’ll need:
- AirPods: Of course, you’ll need a pair of AirPods for this process. Make sure they are fully charged and in good working condition.
- A PC with Bluetooth: Your PC must have built-in Bluetooth functionality. Most modern laptops and desktops come with Bluetooth capabilities, but if your PC doesn’t have it, you can purchase a USB Bluetooth adapter.
- Windows 10 or Windows 11: The steps outlined in this guide focus on Windows 10 and Windows 11. If you have an older version of Windows, the process may vary.
- Latest Windows Updates: It’s a good practice to ensure that your PC is up to date with the latest Windows updates. This helps in resolving any Bluetooth-related issues and ensures compatibility with your AirPods.
By meeting these requirements, you can proceed with confidence, knowing that you have everything you need for a successful pairing process. Now that you know what you need let’s move on to the step-by-step instructions for pairing your AirPods with your PC.
Step 1: Enable Bluetooth on your PC
Before you can pair your AirPods with your PC, you need to make sure that Bluetooth is enabled on your computer. Follow these steps to enable Bluetooth:
- Click on the Start menu and select the Settings icon (usually represented by a gear symbol). Alternatively, you can press the Windows key + I key simultaneously to open the Settings.
- In the Settings window, click on the “Devices” option.
- From the left-hand menu, select “Bluetooth & devices.”
- Make sure the toggle switch under “Bluetooth” is set to “On.” If it’s disabled, click on the toggle switch to turn it on.
Once you have enabled Bluetooth on your PC, you are ready to proceed to the next step of the pairing process. Keep in mind that the exact steps might vary slightly depending on your Windows version. The above instructions are based on Windows 10 and Windows 11.
Enabling Bluetooth on your PC allows it to communicate with your AirPods wirelessly. This is a crucial step in the pairing process as it establishes the connection between the two devices. Now that Bluetooth is enabled, let’s move on to the next step: putting your AirPods in pairing mode.
Step 2: Place AirPods in Pairing Mode
To pair your AirPods with your PC, you need to put them in pairing mode. The pairing mode allows your AirPods to be discoverable by other devices, including your PC. Follow these steps to enter pairing mode on your AirPods:
- Open the AirPods case. Ensure that both AirPods are placed in the case.
- Press and hold the button on the back of the AirPods case until the LED light on the front starts flashing white. This indicates that your AirPods are now in pairing mode.
It’s important to note that your AirPods will remain in pairing mode for a brief period of time, usually around 30 seconds. If you don’t connect them to your PC within this timeframe, they will exit pairing mode. In that case, you can put them back in pairing mode by following the same steps again.
Putting your AirPods in pairing mode allows your PC to detect and establish a connection with them. The flashing white LED light indicates that your AirPods are ready to be paired. With your AirPods in pairing mode, let’s move on to the next step: connecting your AirPods to your PC.
Step 3: Connect AirPods to your PC
Now that your AirPods are in pairing mode, it’s time to connect them to your PC. Follow these steps to establish a connection between your AirPods and your PC:
- On your PC, click on the Start menu and open the Settings app.
- In the Settings window, select the “Devices” option.
- From the left-hand menu, choose “Bluetooth & devices.”
- Click on the “Add Bluetooth or other device” option.
- In the Add a device window, select the “Bluetooth” option.
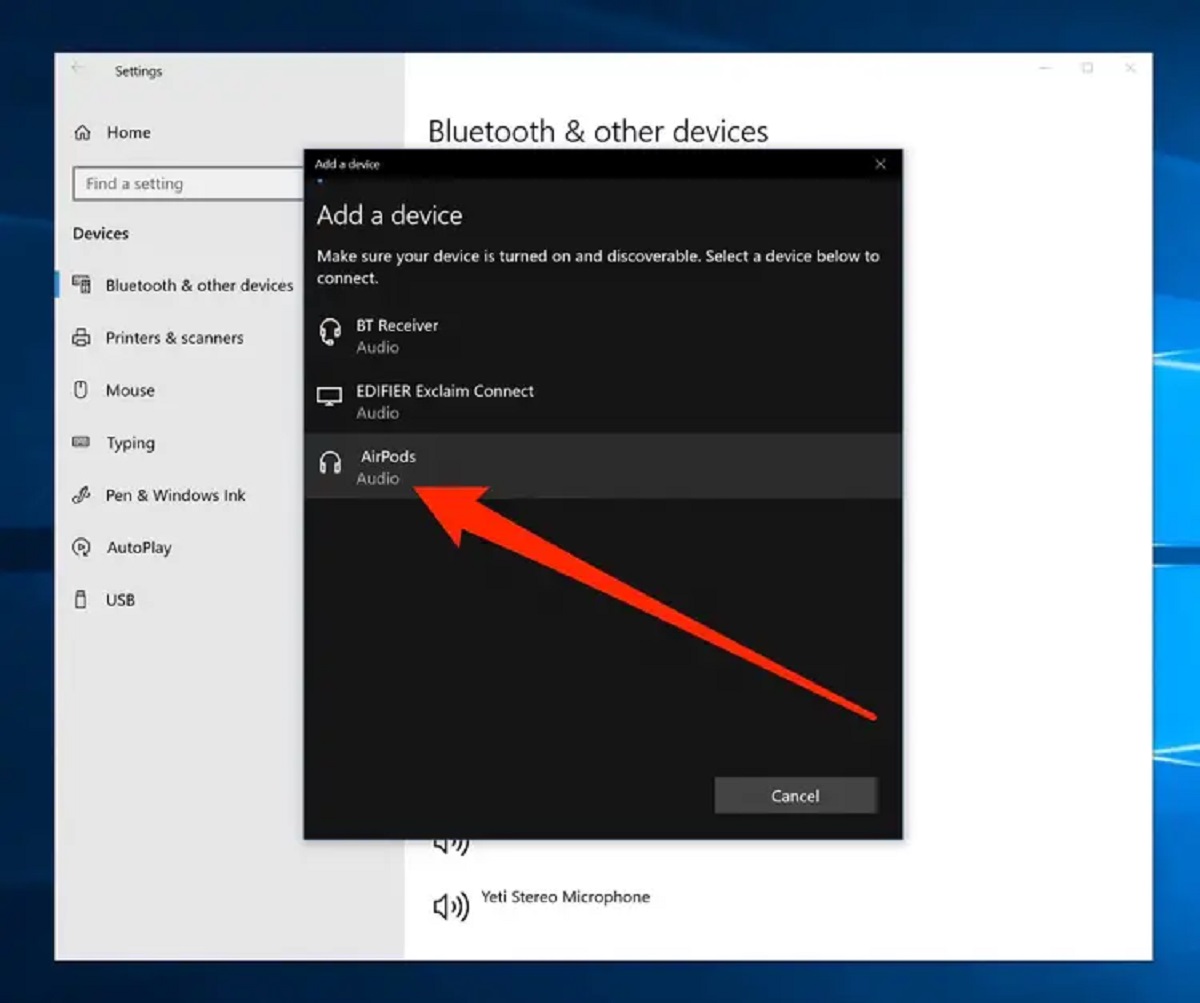
- Your PC will start scanning for nearby Bluetooth devices. Wait for your AirPods to appear on the list of available devices.
- Click on your AirPods when they appear in the list. Your PC will begin the pairing process.
- Follow any additional prompts or instructions displayed on your screen to complete the pairing process.
After completing these steps, your AirPods should be successfully connected to your PC. You will be able to enjoy the audio output from your PC through your AirPods, providing you with a wireless listening experience.
It’s important to note that once your AirPods are paired and connected to your PC, they will automatically connect to your PC whenever they are in range and Bluetooth is enabled on both devices. This means you won’t need to repeat the pairing process each time you want to use your AirPods with your PC. They will seamlessly connect and deliver high-quality sound.
Now that you’ve successfully connected your AirPods to your PC, let’s move on to the next step: adjusting AirPods settings on your PC.
Step 4: Adjust AirPods settings on your PC
After connecting your AirPods to your PC, you may want to customize and adjust some settings to optimize your listening experience. Here are some settings you can explore:
- Sound Output: By default, your PC’s sound output is routed through your AirPods once they are connected. However, if you want to switch the sound output back to your PC’s built-in speakers or any other audio device, you can do so by adjusting the sound settings on your PC. Simply click on the volume icon in the taskbar and select the desired output device.
- Microphone Input: If your AirPods have a built-in microphone, you can use it for online meetings, voice chats, and other audio recording purposes. To ensure that your AirPods’ microphone is being used as the input device, click on the volume icon and select the AirPods as the default recording device.
- Audio Enhancements: Some PCs offer audio enhancement features that can further enhance the sound quality of your AirPods. These enhancements may include equalizers, spatial sound, and audio presets. Explore the sound settings on your PC to access and adjust these features according to your personal preference.
By adjusting these settings, you can personalize your listening experience and make sure your AirPods are optimized for your PC usage. Experiment with different configurations to find the settings that suit your needs and preferences the best.
It’s worth noting that the availability and specificity of these settings may vary depending on your PC and Windows version. Take some time to explore the sound and audio settings on your PC to discover the full range of options available.
Congratulations! You have successfully paired your AirPods with your PC and learned how to adjust their settings. Enjoy the wireless freedom and immersive audio experience that your AirPods bring to your PC usage.
Troubleshooting Pairing Issues
While pairing your AirPods with your PC is generally a straightforward process, you may encounter occasional issues. Here are some common troubleshooting steps you can take if you experience difficulties pairing your AirPods with your PC:
- Restart Devices: Sometimes, a simple restart can resolve any temporary connectivity issues. Restart both your AirPods and your PC, then attempt the pairing process again.
- Update Bluetooth Drivers: Outdated or incompatible Bluetooth drivers can cause pairing problems. Check for driver updates for your Bluetooth hardware by visiting the manufacturer’s website or scanning for updates in the Device Manager on your PC.
- Reset AirPods: If your AirPods are still not pairing, you can try resetting them. Place your AirPods in the charging case, open the case lid, and press and hold the setup button on the back until the LED light flashes amber. Then, try the pairing process again.
- Forget and Re-pair: If your AirPods were previously paired with another device, ensure that they are disconnected from that device. On your PC, go to the Bluetooth settings, find your AirPods, and click on the “Remove device” or “Forget” option. Then, follow the pairing process outlined earlier to connect them to your PC.
- Check Range and Interference: Ensure that your AirPods and PC are within the recommended Bluetooth range. Also, be aware of any potential sources of interference, such as other Bluetooth devices or Wi-Fi routers, which can impact the pairing process.
If you have exhausted these troubleshooting steps and are still unable to pair your AirPods with your PC, it may be beneficial to seek further assistance from Apple support or your PC manufacturer’s support team. They can provide specialized guidance and address any specific issues that you may be facing.
Remember, patience and persistence are key when troubleshooting pairing issues. With the right approach and troubleshooting steps, you’ll be able to successfully connect your AirPods to your PC and enjoy their wireless convenience.
Conclusion
Pairing your AirPods with your PC allows you to enjoy the convenience of wireless audio while working, listening to music, or watching videos. By following the step-by-step instructions outlined in this guide, you can successfully connect your AirPods to your Windows PC and enhance your audio experience.
We started by outlining the requirements for pairing AirPods with a PC, including having AirPods, a PC with Bluetooth functionality, and the latest version of Windows. Then, we walked through each step of the pairing process, from enabling Bluetooth on your PC to putting your AirPods in pairing mode and connecting them to your PC. We also discussed how to adjust AirPods settings on your PC to personalize your listening experience.
If you encounter any issues during the pairing process, we provided troubleshooting tips to help you resolve common problems. Restarting devices, updating Bluetooth drivers, resetting AirPods, and checking for interference are some of the troubleshooting steps you can take to overcome pairing issues.
Remember, the instructions provided in this guide are specifically for Windows 10 and Windows 11 PCs. If you have a different operating system, the steps may vary slightly. Additionally, it’s important to keep your AirPods and PC software up to date to ensure the best compatibility and performance.
Now that you have successfully paired your AirPods with your PC, you can enjoy a wireless and immersive audio experience. Whether you’re multitasking, participating in virtual meetings, or simply listening to your favorite music, your AirPods will provide you with high-quality sound and the freedom to move around.
We hope this guide has been helpful in assisting you with pairing your AirPods to your PC. Enjoy the seamless connectivity and audio excellence that your AirPods bring to your PC usage!