Introduction
Are you tired of cluttered photo storage on your Google Drive? Do you want to streamline your photo organization and take advantage of Google Photos’ amazing features? Moving photos from Google Drive to Google Photos is a simple and effective solution! In this guide, we will walk you through the step-by-step process, ensuring a seamless transition while preserving the quality and organization of your precious memories.
Google Drive and Google Photos are both popular cloud storage platforms offered by Google. While Google Drive is primarily used for file storage and sharing, Google Photos specializes in managing and organizing your digital photo collection. By migrating your photos to Google Photos, you can take advantage of its advanced search capabilities, automatic categorization, and easy sharing options.
Whether you have a few photos or hundreds of them stored on Google Drive, this guide will assist you in efficiently transferring them to Google Photos. We will provide clear instructions, tips, and tricks to ensure a smooth and hassle-free experience. So, grab your favorite beverage, put on some relaxing music, and let’s get started on organizing and cherishing your photo memories with Google Photos!
Step 1: Sign in to Google Drive
The first step in the process of moving your photos from Google Drive to Google Photos is to sign in to your Google Drive account. If you don’t have one, you can easily create a free account by visiting the Google Drive website and clicking on the “Create account” option.
Once you have signed in to your Google Drive account, you will be greeted with the familiar interface. Take a moment to familiarize yourself with the various features and options available, as it will help you navigate through the process seamlessly.
On the left-hand side of the screen, you will see a menu with different options. Locate and click on the “My Drive” option. This will open up a list of all the files and folders stored in your Google Drive.
Now that you are in your Google Drive, it’s essential to ensure that you have all the necessary permissions and access rights to perform the photo transfer. If the photos you want to move are stored in a shared folder, make sure you have the required access level.
If you are not the owner of the photos, you may need to request access or contact the owner to grant you the necessary permissions. It’s crucial to have the appropriate access to avoid any issues during the transfer process.
With your Google Drive account signed in and the necessary permissions in place, you are now ready to move on to the next step of selecting the photos you want to transfer to Google Photos.
Step 2: Select the photos you want to move
Now that you are signed in to your Google Drive account, it’s time to select the photos you want to move to Google Photos. This step will ensure that you only transfer the desired photos and avoid any unnecessary clutter in your Google Photos library.
Navigate through the folders in your Google Drive and locate the specific folder or album that contains the photos you wish to move. If the photos are scattered throughout different folders, you may need to go through each folder individually.
To select multiple photos, hold down the “Ctrl” key (or “Command” key on Mac) while clicking on each photo. If you want to select all the photos in a folder, you can use the “Select all” option by right-clicking and choosing it from the context menu.
Ensure that you review your selection before moving on to the next step. This will allow you to make any necessary adjustments or additions before proceeding. Double-check that you haven’t missed any photos that you want to transfer.
If you have a large number of photos to select, you may find it helpful to create a temporary folder specifically for the photos you want to move. This will make it easier to keep track of your selection and avoid any confusion or mix-ups.
By selecting only the photos you want to move, you can keep your Google Photos library organized and clutter-free. It also allows you to have better control over which photos are transferred and ensures that you don’t exceed any storage limits on your Google Photos account.
Once you have carefully selected the photos you wish to move, it’s time to download them from your Google Drive to your computer.
Step 3: Download photos from Google Drive to your computer
After selecting the photos you want to move from Google Drive to Google Photos, the next step is to download these photos from your Google Drive to your computer. This process ensures that you have a local copy of the photos before uploading them to Google Photos.
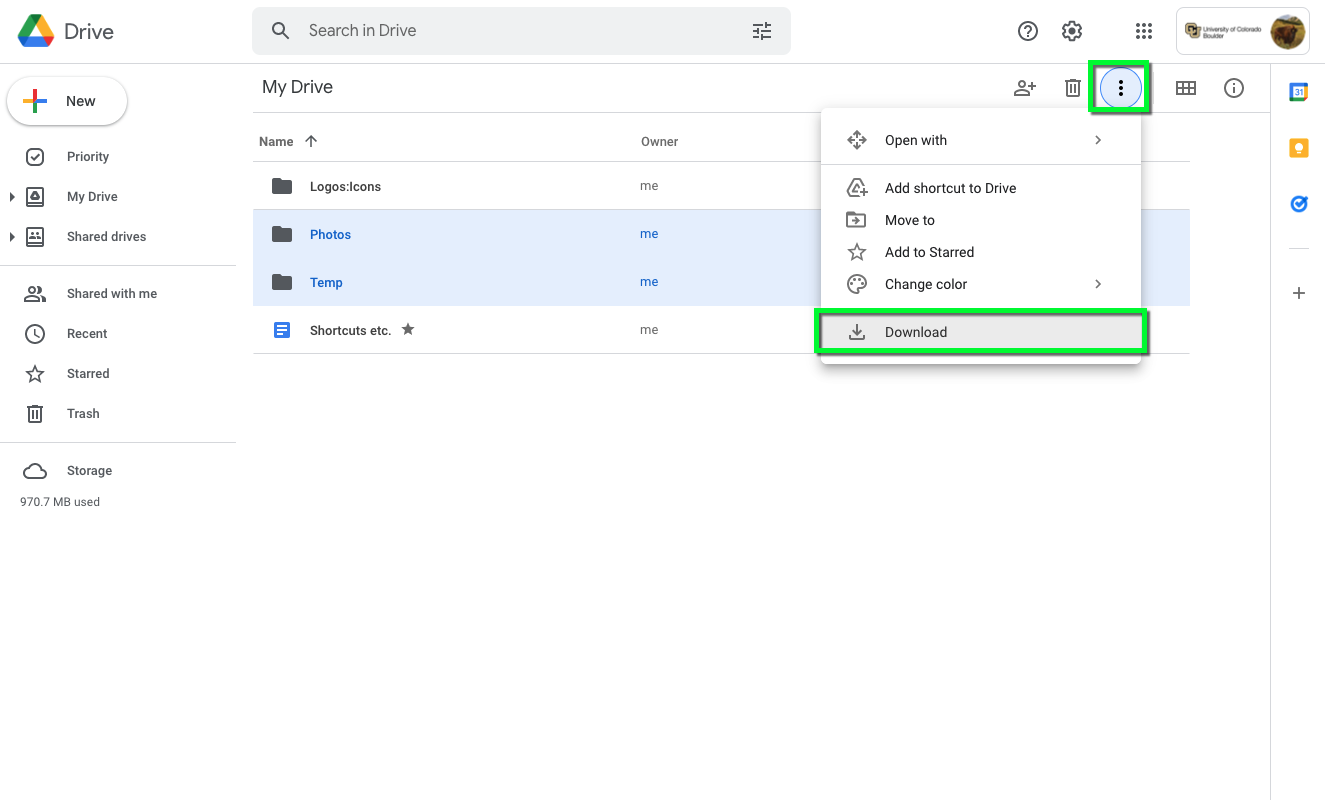
To start, right-click on the selected photos and choose the “Download” option from the contextual menu. If you have a large number of photos, it is advisable to create a new folder on your computer to store the downloaded photos. This will help you keep them organized and easily accessible.
Once you have selected the download option, Google Drive will begin preparing the files for download. The time it takes to download the files will depend on the size of the photos and the speed of your internet connection. Be patient during this process.
Once the download is complete, navigate to the folder on your computer where you saved the photos. Double-check that all the selected photos have been successfully downloaded. It’s a good practice to open a few photos to ensure they are intact and of the highest quality.
Now that you have a local copy of the selected photos on your computer, you are one step closer to uploading them to Google Photos. But before we proceed, it’s important to organize and prepare the photos for a smooth transfer.
If you want to maintain a similar folder structure in Google Photos, create folders on your computer and organize the downloaded photos accordingly. Consider creating new folders or using the existing folder structure that makes the most sense to you.
Renaming the photos or adding descriptions can also be helpful for easy identification and searchability within Google Photos. Having well-organized and labeled photos will make it easier to find specific ones in the future.
With your downloaded photos organized and ready for the next step, it’s time to proceed to the final step of the process – uploading them to Google Photos.
Step 4: Upload photos from your computer to Google Photos
With the photos downloaded from your Google Drive and organized on your computer, it’s time to upload them to Google Photos. This step will transfer the photos from your local storage to your Google account, where they will be accessible through the Google Photos platform and its various features.
To begin, open your web browser and navigate to the Google Photos website. Sign in to your Google account if you haven’t already done so. Once signed in, you will be greeted with the Google Photos interface, ready to receive your precious memories.
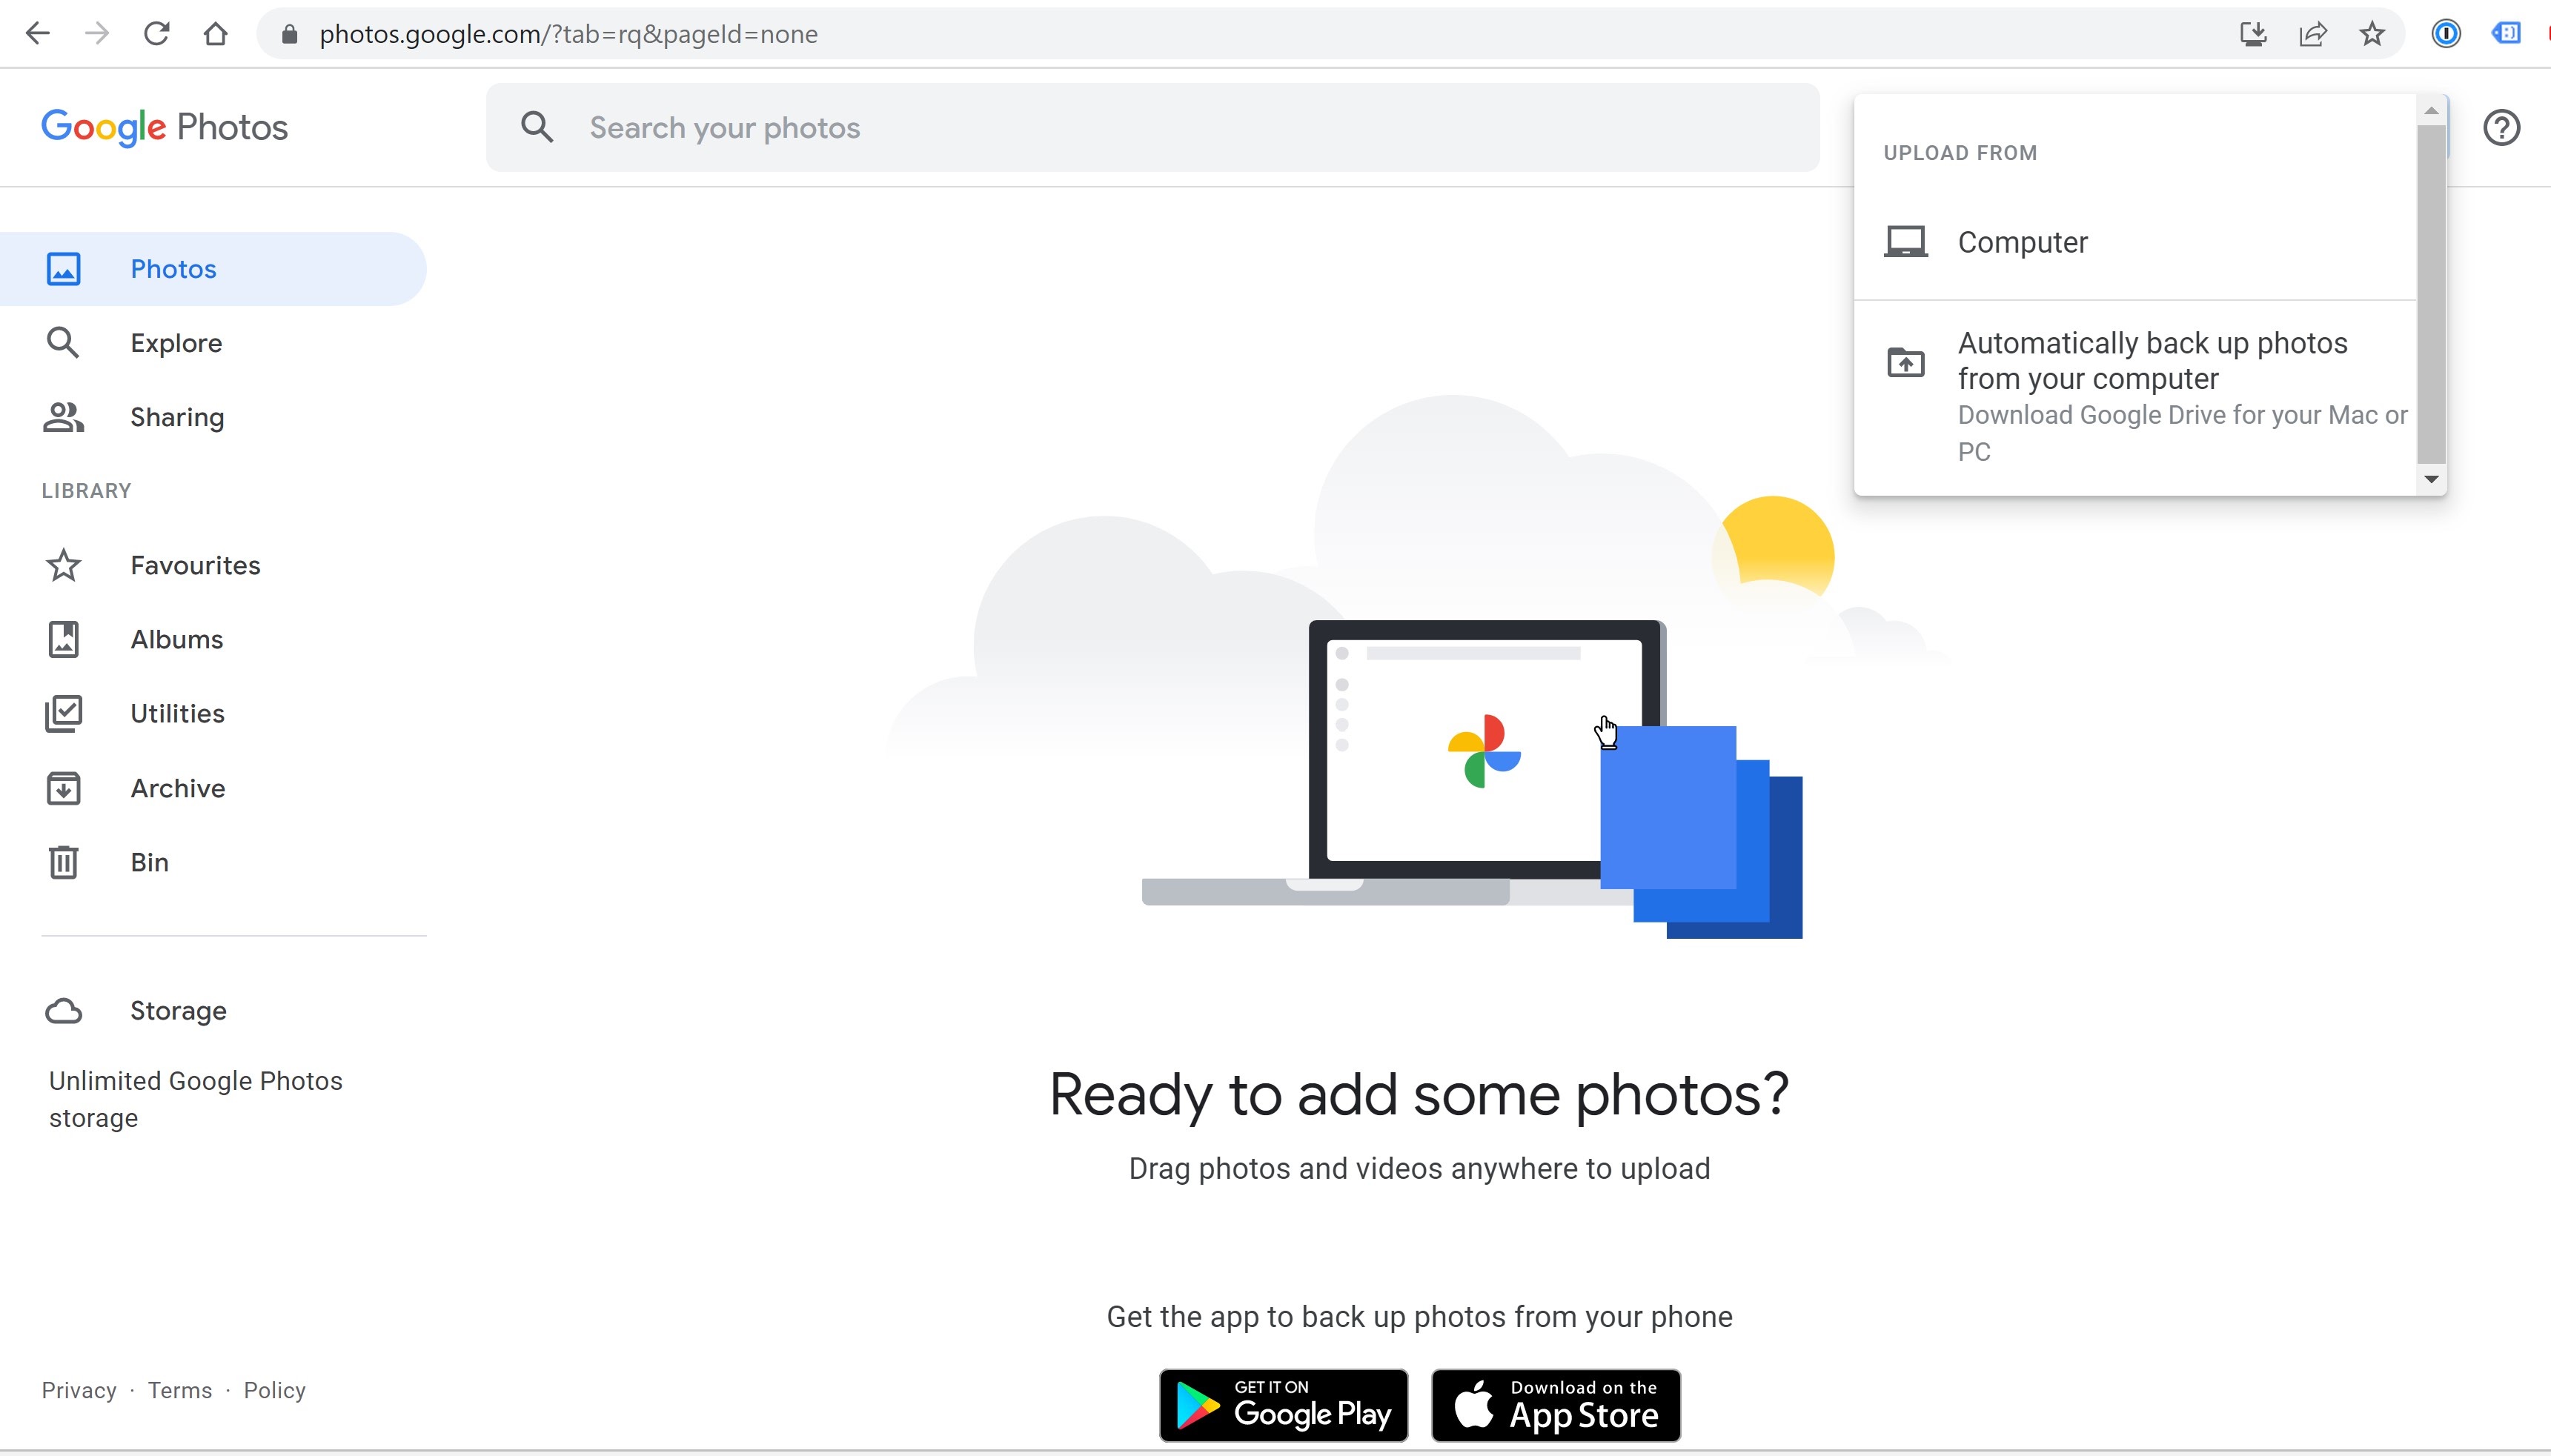
In the Google Photos interface, look for the “+” icon or the “Upload” option, both usually located in the top-right corner of the screen. Click on it to open the upload menu.
In the upload menu, locate and click on the “Computer” option. This will open a file explorer window, allowing you to navigate to the folder where you saved the downloaded photos. Select the desired photos or the entire folder to initiate the upload process.
Google Photos will now start uploading the selected photos to your account. The duration of the upload will depend on the number of photos and the speed of your internet connection. Larger files or a slower connection may require more time, so be patient during this process.
While the photos are being uploaded, you can take advantage of various options available in Google Photos, such as adding descriptions, creating albums, or applying filters. These options can help you enhance the organization and visual appeal of your photo collection.
Once the upload is complete, you can access your photos through the Google Photos interface. You will find them in the “Library” section or in the specific albums or folders you have created. From here, you can further organize, edit, or share your photos with friends and family.
It’s important to note that the photos uploaded to Google Photos will no longer take up space on your computer’s hard drive. They will be stored in the cloud, accessible from any device with an internet connection.
Congratulations! You have successfully transferred your photos from Google Drive to Google Photos. Take some time to explore the various features and options available in Google Photos, and enjoy the benefits of a well-organized and easily accessible photo collection.
Conclusion
Moving your photos from Google Drive to Google Photos is a straightforward process that allows you to take advantage of the advanced features and functionalities offered by Google Photos. By following the steps outlined in this guide, you can ensure a seamless transition while preserving the quality and organization of your precious memories.
Google Drive may be a great tool for file storage and sharing, but Google Photos specializes in managing and organizing your digital photo collection. With its advanced search capabilities, automatic categorization, and easy sharing options, Google Photos offers an enhanced photo management experience.
In this guide, we covered the step-by-step process of moving your photos from Google Drive to Google Photos. We started by signing in to your Google Drive account and ensuring the necessary permissions and access rights. Then, we selected the photos you wanted to move and downloaded them to your computer. Finally, we uploaded the photos from your computer to Google Photos.
Throughout this process, it’s crucial to stay organized and maintain clear control over which photos are being transferred. By selecting only the desired photos, downloading them to your computer, and then uploading them to Google Photos, you can keep your photo library organized and clutter-free.
Once your photos are uploaded to Google Photos, you can enjoy the benefits of easy searchability and seamless sharing. Explore Google Photos’ features, such as creating albums, adding descriptions, or applying filters to further enhance the visual appeal and organization of your photo collection.
Remember, moving your photos from Google Drive to Google Photos not only helps free up space on your Google Drive but also allows you to have a dedicated platform for managing and showcasing your cherished memories.
So, don’t hesitate! Follow the steps outlined in this guide and start enjoying the benefits of a well-organized and easily accessible photo collection with Google Photos.