Introduction
Welcome to the delightful world of homemade ice cream! If you’re a fan of Nutella, you’re in for a treat with this easy and delicious Nutella ice cream recipe. The best part? You don’t even need an ice cream maker to whip up this creamy and irresistible dessert.
Whether you’re a novice in the kitchen or a seasoned pro, this recipe is perfect for anyone who wants to satisfy their sweet tooth with a homemade frozen treat. With just a few simple steps and minimal ingredients, you’ll have a batch of creamy Nutella ice cream that will rival any store-bought variety.
The secret to the lusciousness of this ice cream lies in the combination of rich cream, sweetened condensed milk, and, of course, the star ingredient – Nutella. The creamy hazelnut spread not only adds a decadent flavor but also helps to create a smooth and velvety texture that will leave you craving for more.
While traditional ice cream makers can be quite expensive and take up a lot of space in the kitchen, this recipe allows you to skip the hassle and still achieve the same creamy results. All you need is a mixing bowl, a whisk, and a suitable container for freezing. It’s a simple and fuss-free way to indulge in homemade ice cream whenever you desire.
So, without further ado, let’s dive into the steps of making your very own Nutella ice cream without an ice cream maker. Get ready to scoop up spoonfuls of pure bliss!
Ingredients
To make this delightful Nutella ice cream, you will need the following ingredients:
- 2 cups heavy cream
- 1 can (14 ounces) sweetened condensed milk
- 1 cup Nutella
- 1 teaspoon vanilla extract
- Optional toppings: chopped hazelnuts, chocolate sauce, whipped cream
These are the key components that will transform ordinary ingredients into a creamy and dreamy frozen dessert. You can easily find these items at your local grocery store or in your pantry. The heavy cream provides the rich and silky base, while the sweetened condensed milk adds sweetness and helps achieve a smooth texture.
The star of the show is, of course, Nutella. This decadent hazelnut spread adds a deliciously nutty and chocolatey flavor that pairs perfectly with the creaminess of the ice cream. Feel free to adjust the amount of Nutella based on your personal preference – more Nutella means a stronger flavor, while less will result in a milder taste.
Lastly, a dash of vanilla extract enhances the overall flavor and adds a delicate aroma to the ice cream. It’s a simple ingredient that elevates the taste and takes this homemade treat to the next level.
As for the optional toppings, you can let your creativity run wild. Sprinkle some chopped hazelnuts for a crunchy element, drizzle chocolate sauce for extra decadence, or dollop some whipped cream for an airy and light touch. The choice is yours!
Now that you have all the ingredients ready, it’s time to learn how to transform them into a delectable batch of Nutella ice cream without an ice cream maker.
Step 1: Whisk the cream
The first step in creating your Nutella ice cream is to whisk the cream until it reaches a thick and fluffy consistency. This will help create a smooth and creamy base for your ice cream.
In a mixing bowl, pour in the 2 cups of heavy cream. Using a handheld whisk or an electric mixer, beat the cream on medium-high speed until soft peaks start to form. Soft peaks are achieved when the cream holds its shape but still has a slight droop when the whisk is lifted.
Whisking the cream may take a few minutes, so be patient and keep an eye on its progress. Avoid overwhipping the cream, as it can lead to a grainy texture rather than the desired smoothness.
As you whisk, you’ll begin to notice the cream becoming thicker and gaining volume. This is the perfect time to move on to the next step – folding in the sweetened condensed milk.
By whisking the cream to the right consistency, you’re ensuring that your Nutella ice cream will have a light and airy texture that melts gently on your tongue. It’s an important step in the process, so take the time to whisk the cream until it reaches the desired texture.
Once you’ve achieved soft peaks, it’s time to move on to the next step: folding in the condensed milk to create a luscious base for your Nutella ice cream.
Step 2: Fold in the condensed milk
After whisking the cream to the perfect consistency, it’s time to incorporate the sweetened condensed milk into the mixture. This ingredient adds sweetness and helps to achieve a creamy and velvety texture in your Nutella ice cream.
Start by opening a can of sweetened condensed milk (14 ounces) and pour it into the bowl with the whipped cream. Using a spatula or a large spoon, gently fold the condensed milk into the cream. The folding technique helps to maintain the airiness of the whipped cream while evenly distributing the sweetness.
As you fold, make sure to scrape the sides and bottom of the bowl to ensure that all the cream and condensed milk are well combined. The goal is to create a smooth and homogeneous mixture with no streaks or lumps.
Take your time and be gentle while folding to avoid deflating the whipped cream. The gentle folding motion helps to preserve the volume and fluffiness that you achieved in the previous step.
Once the condensed milk is fully incorporated, you’ll notice the mixture becoming thicker and creamier. This is a good sign that your Nutella ice cream base is coming together. Now it’s time to add the star ingredient – Nutella!
With the cream and condensed milk mixture ready, let’s move on to the next step and infuse your ice cream with the irresistible flavor of Nutella.
Step 3: Add Nutella and mix well
Now that you have whisked the cream and folded in the sweetened condensed milk, it’s time to introduce the star ingredient of this Nutella ice cream recipe – Nutella itself! This creamy hazelnut spread will infuse your ice cream with a rich and indulgent flavor.
Measure out 1 cup of Nutella and add it to the bowl containing the cream and condensed milk mixture. Using a spatula or a whisk, thoroughly mix the Nutella into the base until it is well incorporated. Make sure to scrape the sides and bottom of the bowl to ensure all the Nutella is blended in.
The Nutella will not only add a delectable taste to your ice cream but also contribute to its smooth and velvety texture. As you mix, you’ll see the Nutella beautifully swirl into the cream, creating a luscious mixture that’s hard to resist!
Don’t be tempted to overmix the ice cream at this stage. While it’s important to ensure the Nutella is thoroughly distributed, excessive mixing can cause the cream to lose its airiness and result in a denser texture. Aim for a gentle but thorough mixing process.
Once the Nutella is fully incorporated, you’ll have a creamy base with a heavenly chocolate-hazelnut flavor that is sure to tantalize your taste buds. Now it’s time to move on to the next step and prepare the ice cream for freezing.
Step 4: Pour into a container
With your Nutella ice cream mixture ready and well-mixed, it’s time to transfer it into a suitable container for freezing. Choosing the right container is important to ensure that your ice cream freezes evenly and maintains its creamy texture.
First, select a container that is freezer-safe and has a tight-fitting lid. This will help prevent any freezer burn or ice crystals from forming on the surface of your ice cream. It’s best to use a container with a capacity of at least 1 quart (4 cups) or larger to accommodate the entire batch of ice cream.
Pour the Nutella ice cream mixture into the container, making sure to leave a small gap at the top to account for expansion as it freezes. Smooth out the surface with a spatula or the back of a spoon to create an even layer.
If desired, you can swirl in additional Nutella or any other toppings of your choice at this stage. Simply dollop small amounts of Nutella onto the surface of the ice cream and use a toothpick or skewer to create swirls. This will result in beautiful rippled patterns once the ice cream is frozen.
Ensure that the lid is securely sealed to prevent any air from entering and to maintain the freshness of the ice cream. If your container does not have a lid, you can cover it tightly with plastic wrap or aluminum foil.
Now that your Nutella ice cream mixture is safely nestled in its container, it’s time to move on to the last step – freezing the ice cream overnight.
Step 5: Freeze overnight
After pouring your Nutella ice cream mixture into a container, it’s time to let it freeze and transform into a creamy and delicious frozen treat. Proper freezing is crucial to achieve the perfect texture and consistency, so patience is key!
Place the container with the Nutella ice cream mixture in the freezer and allow it to freeze for a minimum of 6 hours, but preferably overnight. Freezing the ice cream overnight ensures that it reaches the ideal firmness and allows the flavors to meld together beautifully.
It’s important to resist the temptation to open the freezer and check on the ice cream too frequently. Opening the freezer door frequently can cause temperature fluctuations, which can negatively affect the texture and quality of your ice cream. Trust the process and give it time to freeze undisturbed.
It’s worth noting that the exact freezing time may vary depending on your freezer temperature and the size of your container. If you’re eager to enjoy your Nutella ice cream sooner, you can check the consistency after 6 hours. The ice cream should be firm but still scoopable.
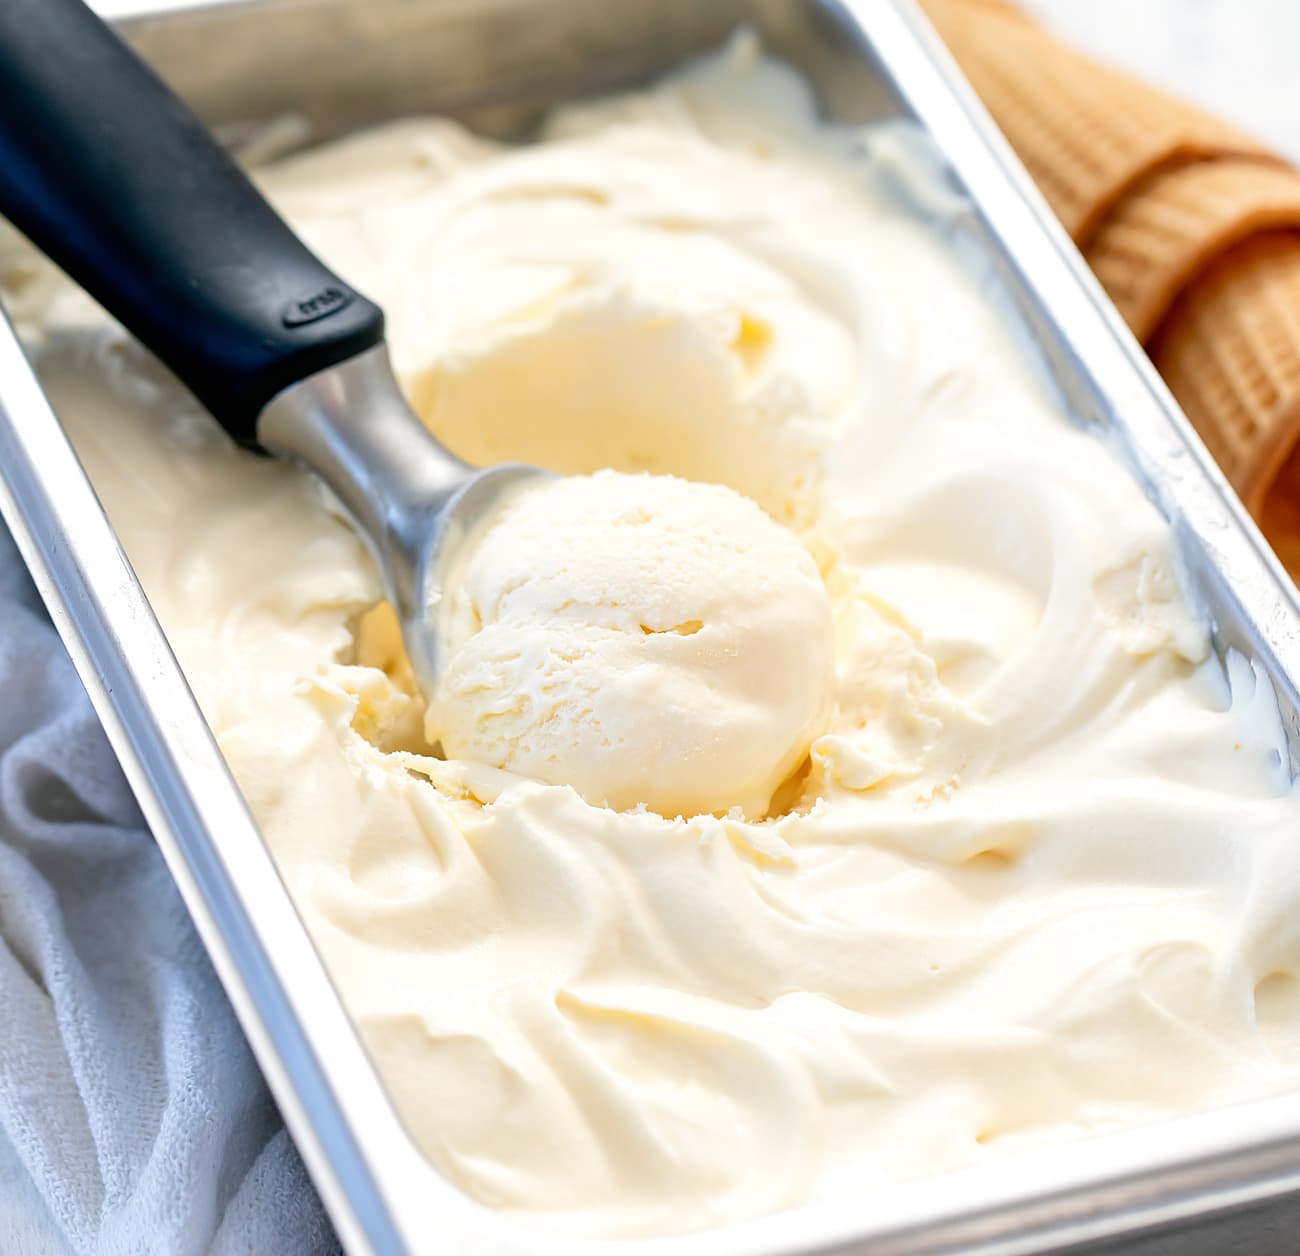
Once the ice cream is frozen, remove it from the freezer and let it sit at room temperature for a few minutes to slightly soften before scooping. This will make it easier to get perfect little mounds of creamy Nutella ice cream.
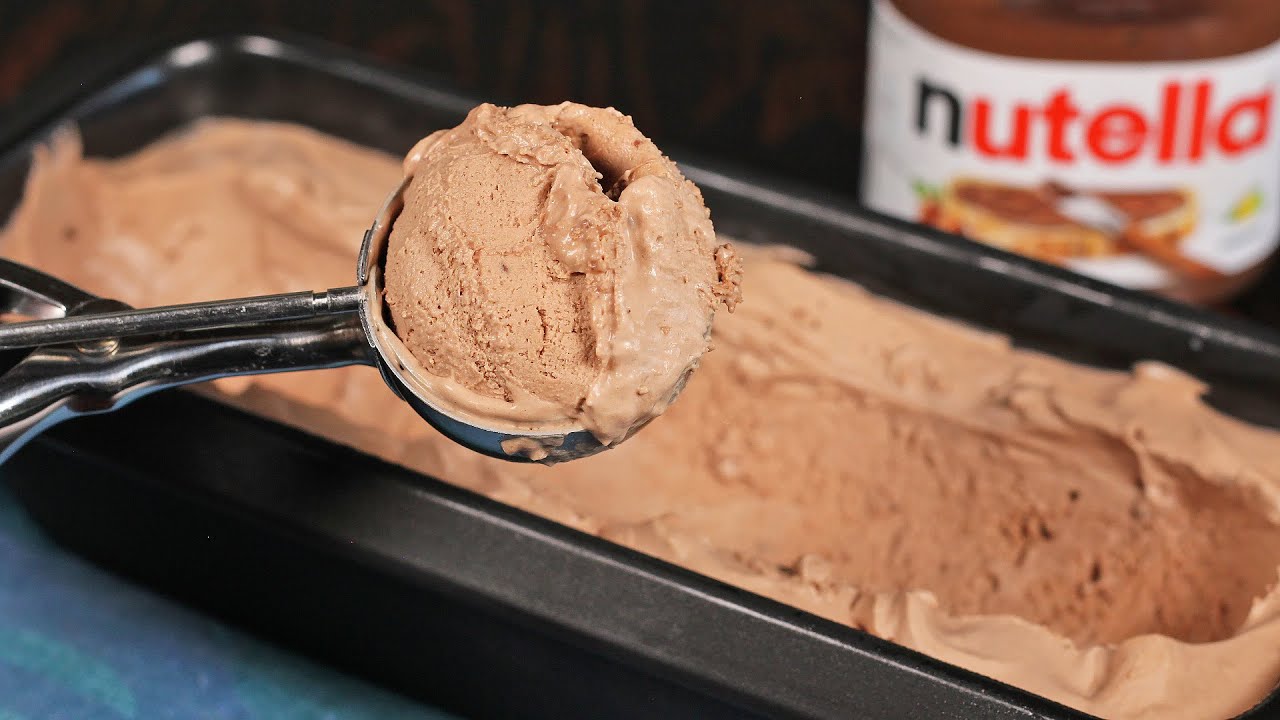
Grab an ice cream scoop, dig in, and savor the creamy goodness of your homemade Nutella ice cream. It’s ready to be enjoyed as is or can be adorned with your favorite toppings for an extra touch of indulgence.
Now that your ice cream is ready and waiting, it’s time to gather your loved ones and treat yourselves to a delightful frozen dessert!
Step 6: Serve and enjoy!
The time has finally come to indulge in your homemade Nutella ice cream! This final step is all about serving and savoring the fruits of your labor.
Retrieve your frozen container of Nutella ice cream from the freezer. Allow it to sit at room temperature for a few minutes to soften slightly, making scooping easier. The ideal consistency should be creamy and smooth, perfect for creating beautiful, rounded scoops.
Using an ice cream scoop, portion out generous scoops of Nutella ice cream into bowls or cones. You can get creative and serve it in dessert dishes, waffle cones, or even between freshly baked cookies for an irresistible ice cream sandwich.
If you’d like to elevate the presentation, feel free to garnish your Nutella ice cream with additional toppings. Sprinkle some chopped hazelnuts to add a delightful crunch, drizzle chocolate sauce over the top for extra decadence, or add a dollop of whipped cream for an airy and light touch. Let your creativity soar!
Once you’ve garnished your ice cream, it’s time to grab a spoon and dig in. Close your eyes and savor the creamy, chocolate-hazelnut goodness melting on your tongue. The Nutella flavor will shine through, delighting your taste buds and leaving you craving more.
Share this delectable dessert with family and friends, or simply treat yourself to a moment of self-indulgence. Whether enjoyed on a sunny day or as a cozy treat during colder months, Nutella ice cream is a crowd-pleaser that never fails to bring joy.
Remember to return any leftovers to the freezer promptly and store them in an airtight container. Your homemade Nutella ice cream will keep well in the freezer for up to two weeks, although it’s highly likely that it won’t last that long!
Now that you know how to make Nutella ice cream without an ice cream maker, you’ll have a go-to recipe for a frozen dessert that can be enjoyed year-round. So gather your loved ones, enjoy your homemade creation, and embark on a delightful journey of pure frozen bliss!
Conclusion
Congratulations! You have successfully learned how to make Nutella ice cream without an ice cream maker. With just a few simple steps and minimal ingredients, you can whip up a batch of creamy, homemade frozen goodness that will leave your taste buds craving more.
By whisking the cream to a fluffy consistency, folding in the condensed milk, adding Nutella, and freezing the mixture overnight, you have created a delectable treat with a rich chocolate-hazelnut flavor. The result is a velvety-smooth and indulgent Nutella ice cream that rivals any store-bought variety.
This homemade Nutella ice cream recipe offers the perfect balance of sweetness, creaminess, and that distinct Nutella taste. The simplicity of the process allows anyone, regardless of their cooking skills, to create this frozen dessert with ease.
Enjoy your Nutella ice cream as is or get creative with toppings and serving options. Whether it’s a scoop in a bowl, a cone at a summer picnic, or a sandwiched treat between freshly baked cookies, the possibilities are endless.
Remember to share this delightful dessert with your loved ones and delight in the joy it brings. Nutella ice cream is a crowd-pleaser that can be enjoyed year-round, no matter the occasion. It’s perfect for cooling down on hot summer days or for indulging in a cozy treat during colder months.
So, don’t wait any longer. Embrace your inner ice cream connoisseur and give this homemade Nutella ice cream recipe a try. Treat yourself to the creamy, dreamy delight that is Nutella ice cream without the need for an ice cream maker. Get ready to create memories and moments of sheer bliss with each spoonful.
Now it’s time to gather your ingredients, get whisking, and embark on a journey of homemade frozen dessert perfection. Enjoy the process, savor the outcome, and revel in the sweetness that Nutella ice cream brings.