Introduction
Welcome to our guide on how to make a Flex PSU modular! If you’re tired of dealing with a mess of tangled cables inside your computer case or if you’re looking to upgrade your power supply unit (PSU) for better cable management, this tutorial is for you. By making your Flex PSU modular, you can easily remove and replace cables as needed, resulting in a cleaner and more organized build.
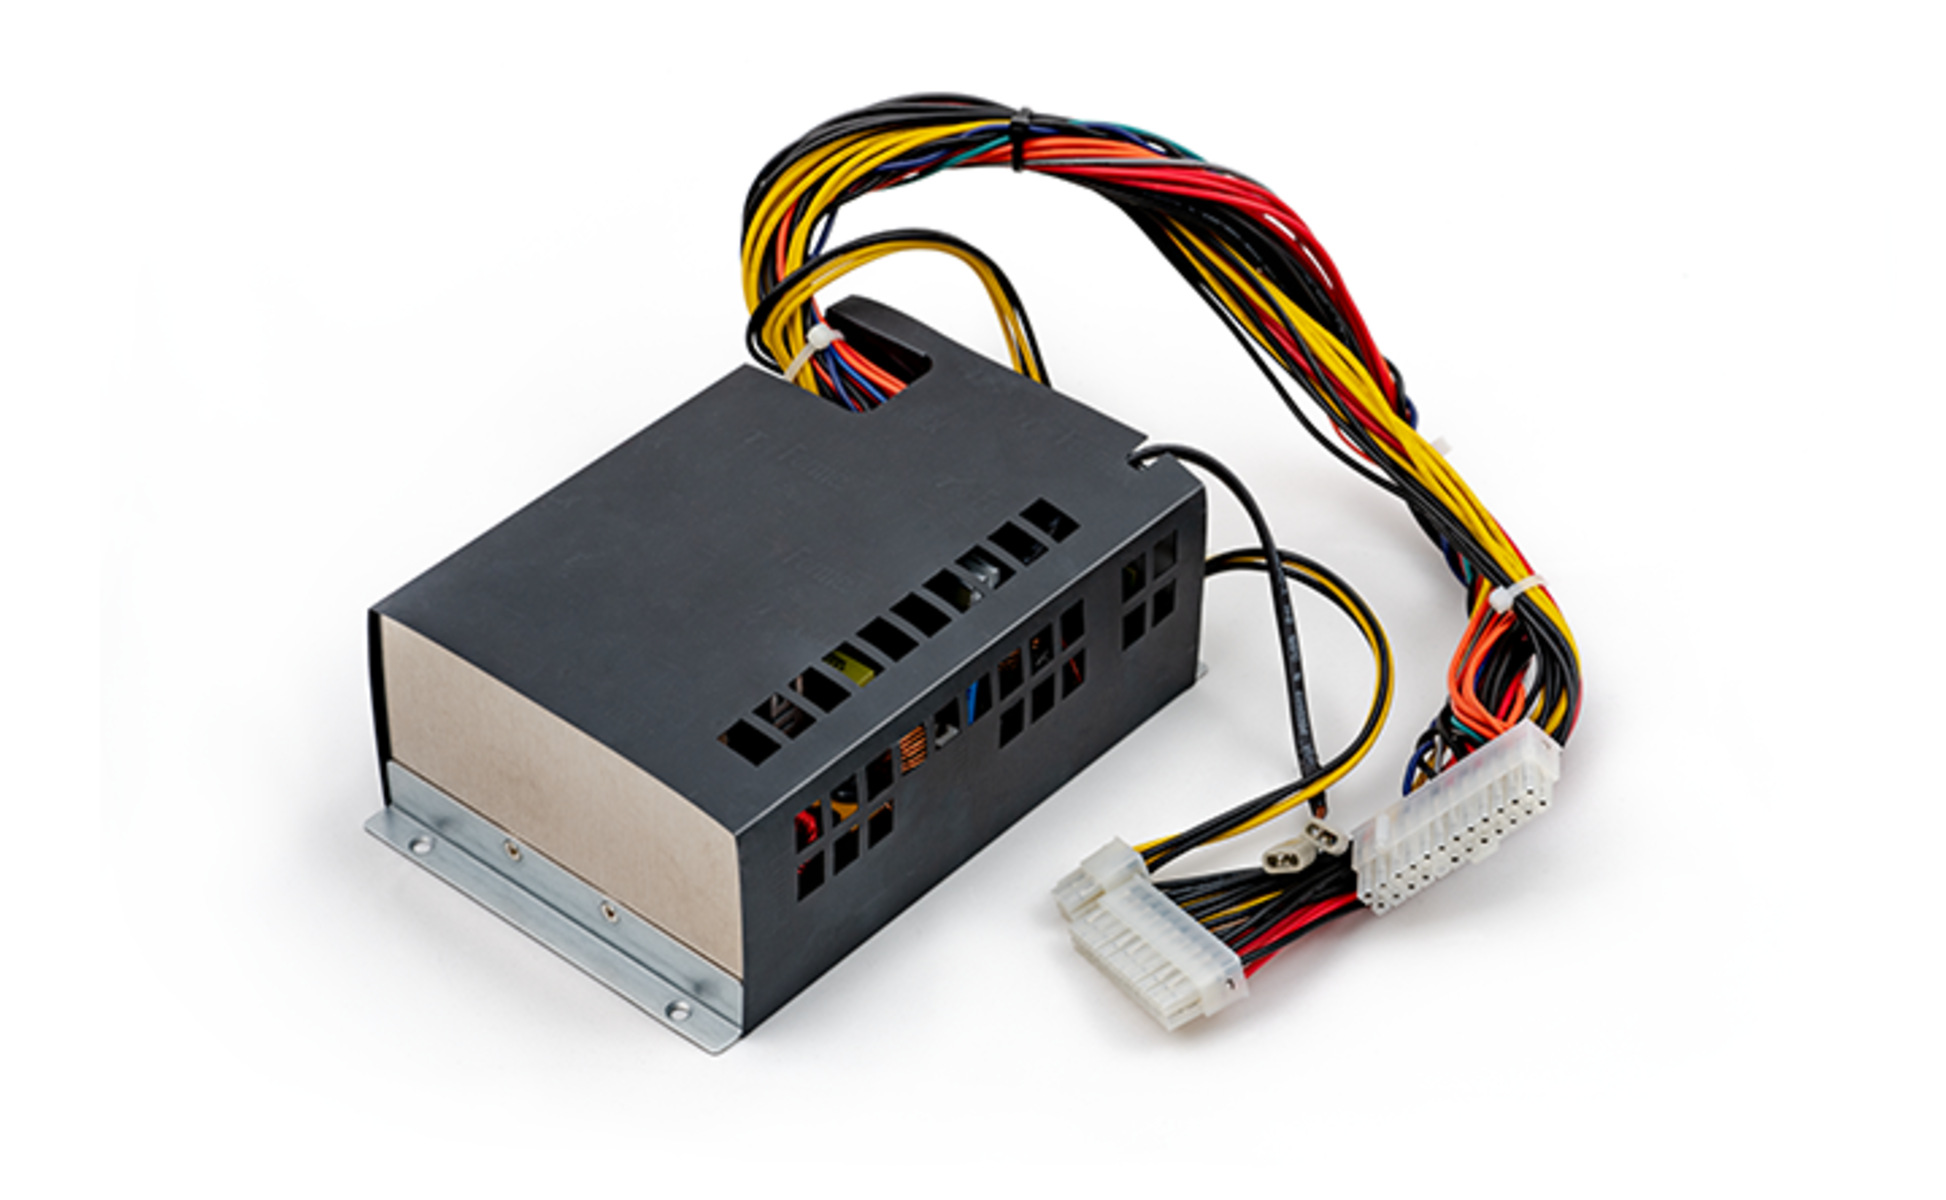
A Flex PSU, also known as a FlexATX PSU, is a compact and versatile power supply unit specifically designed for small form factor (SFF) and slimline computer cases. These PSUs are commonly found in mini-ITX and HTPC builds, where space and cable management are crucial. While Flex PSUs are efficient and reliable, they often come with non-modular cables, which can be a challenge when it comes to cable management.
The process of making a Flex PSU modular involves removing the non-modular cables and replacing them with modular connectors. This allows you to connect only the cables you need, reducing clutter and improving airflow within your computer case. Additionally, making a Flex PSU modular gives you the flexibility to upgrade or change components without having to deal with a bundle of cables.
Before we dive into the step-by-step process, let’s take a look at the benefits of making a Flex PSU modular.
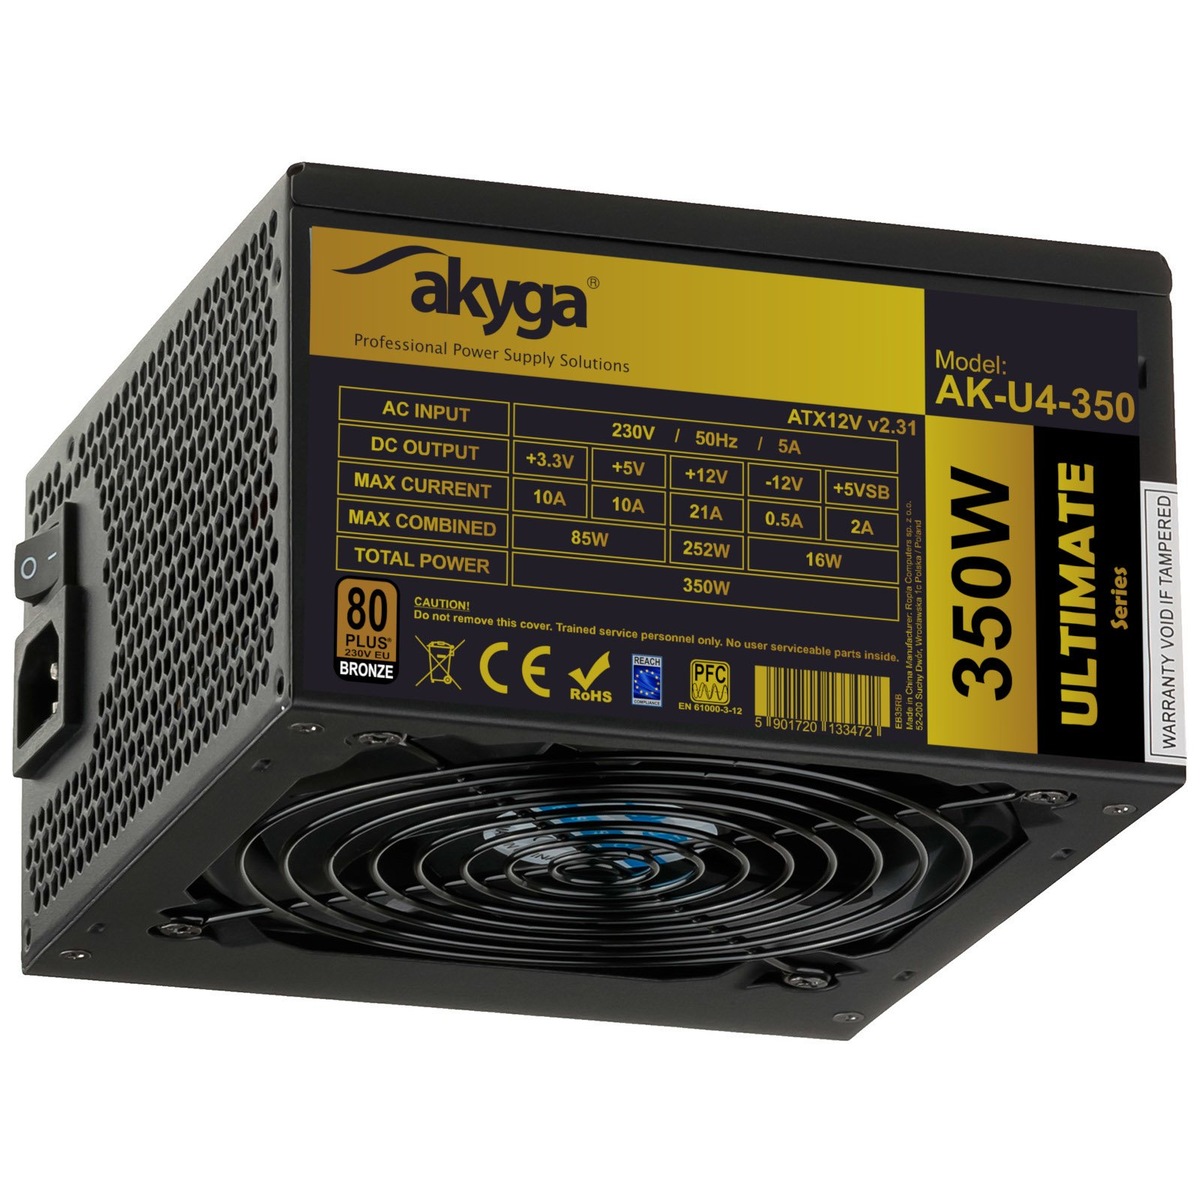
What is a Flex PSU?
A Flex PSU, short for FlexATX PSU, is a type of power supply unit designed for small form factor (SFF) and slimline computer cases. These compact PSUs are specifically engineered to fit into tight spaces, making them ideal for mini-ITX builds and HTPC (Home Theater PC) setups.
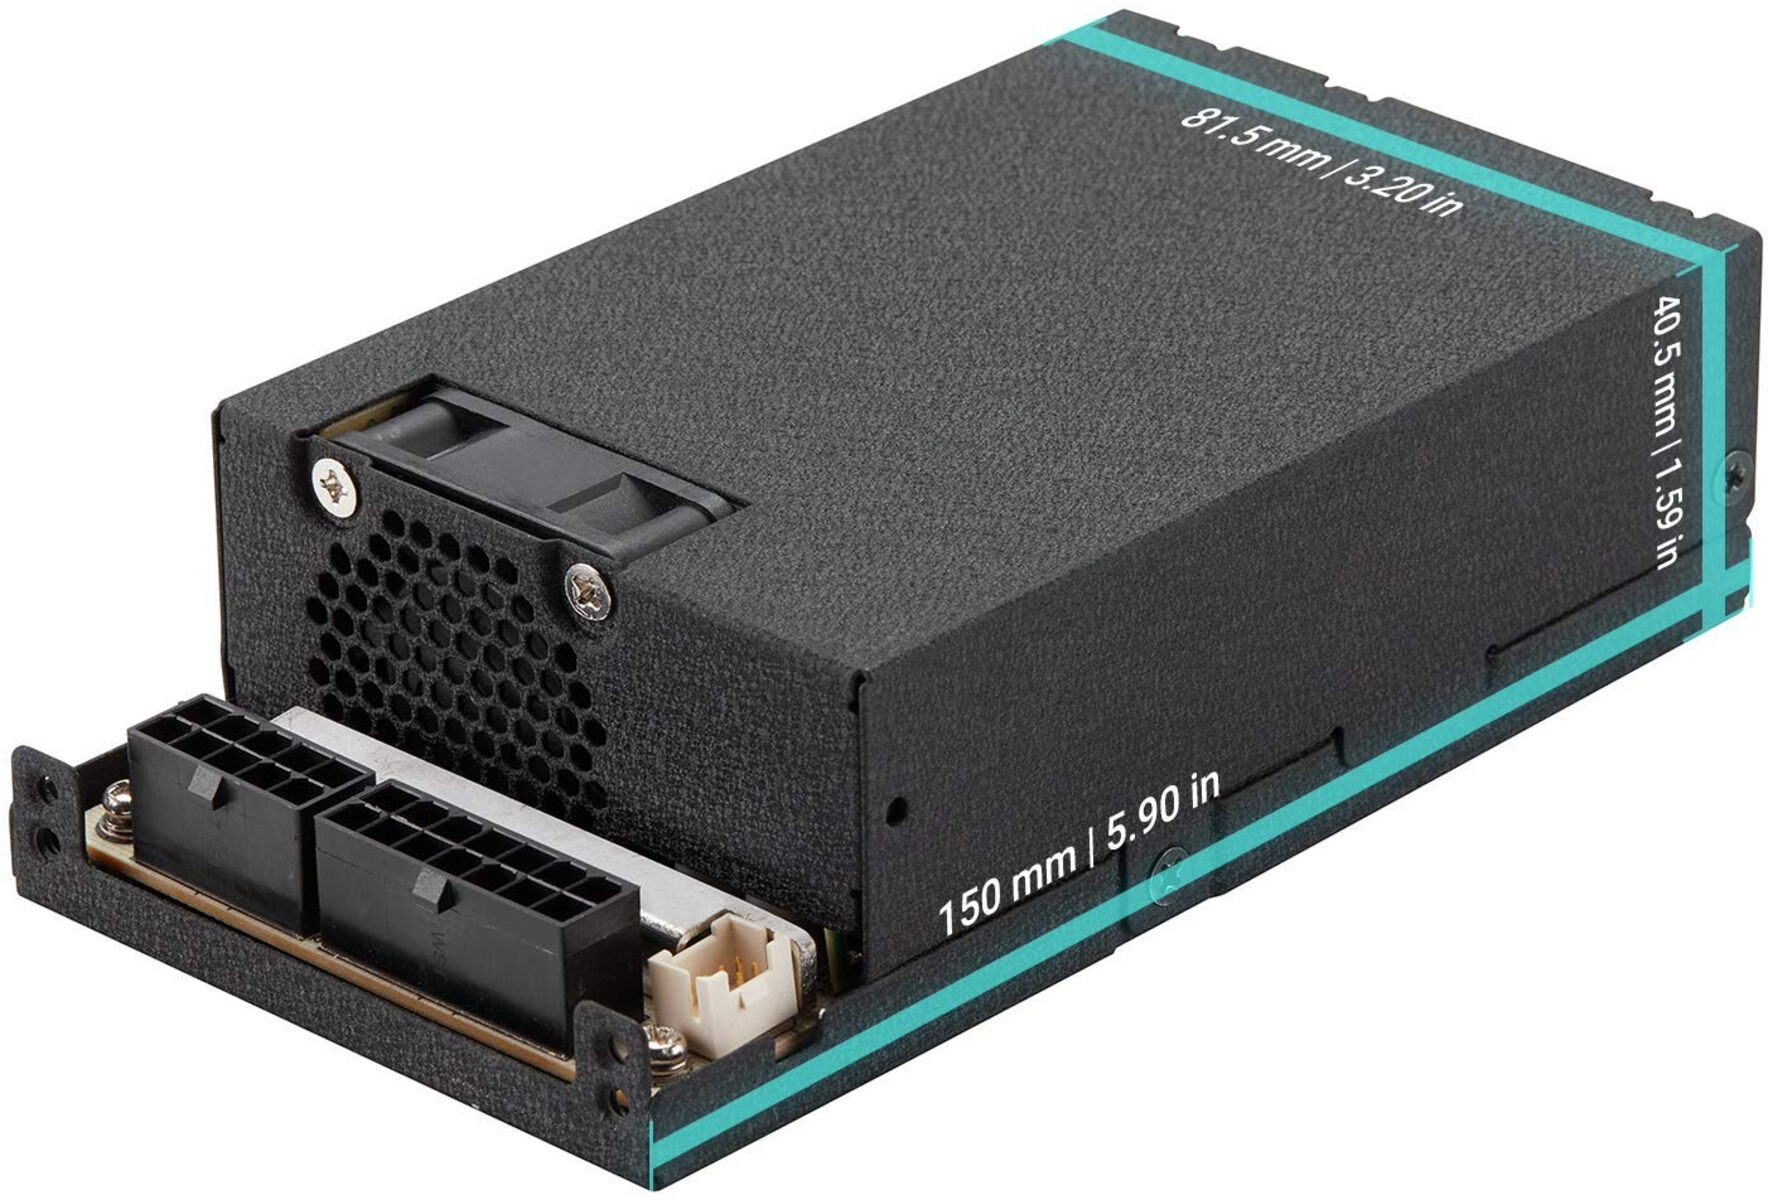
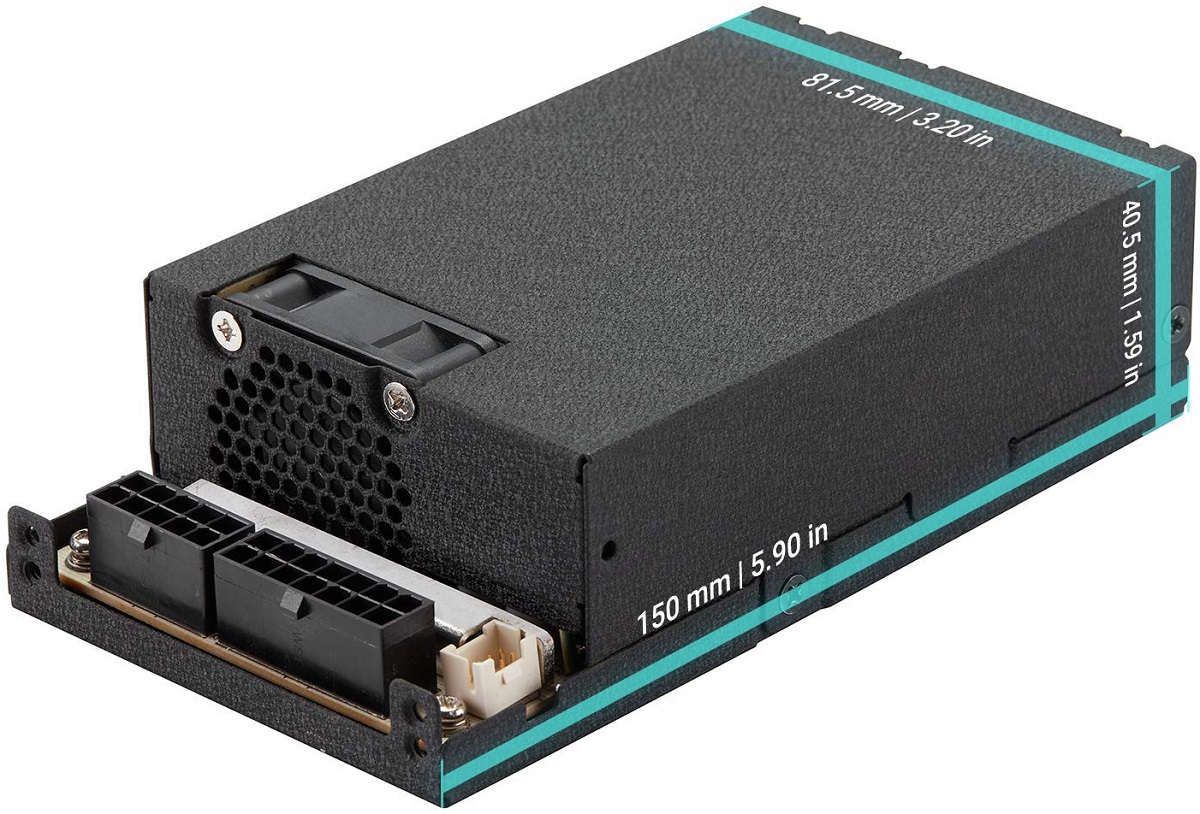
Flex PSUs typically feature a smaller form factor compared to standard ATX power supplies. While ATX PSUs measure 150mm in width, Flex PSUs are usually 81.5mm wide, allowing them to fit comfortably in compact cases where space is limited. Despite their reduced size, Flex PSUs are capable of delivering sufficient power to support a variety of components, including CPUs, GPUs, and storage drives.
The dimensions of a Flex PSU can vary, but they commonly adhere to the FlexATX standard, which sets guidelines for the size and mounting hole positioning. This standard ensures compatibility with a wide range of SFF cases that support Flex PSUs.
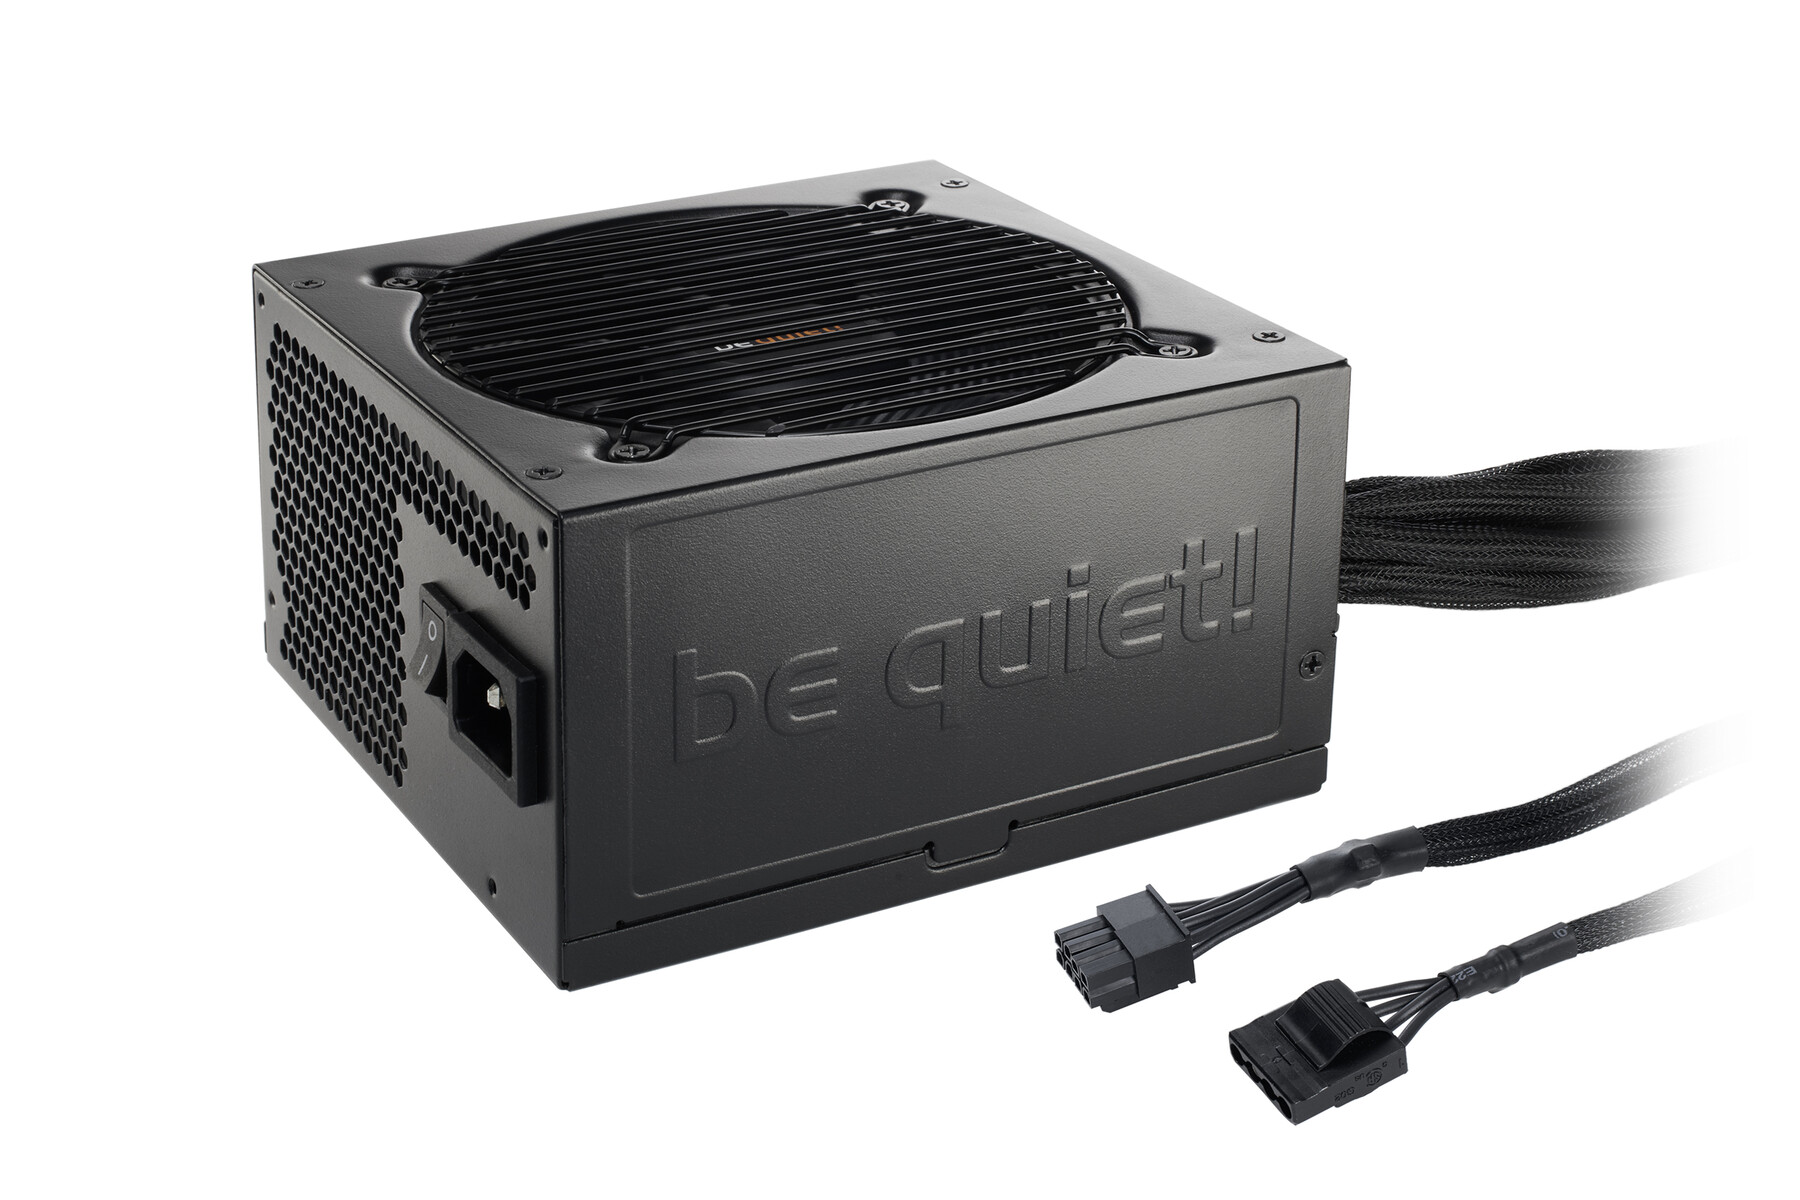
In addition to their smaller size, Flex PSUs often come with unique features to accommodate their form factor. For instance, some models have a modular design, allowing for easier cable management and customization. However, many Flex PSUs come with non-modular cables by default, which can lead to cable clutter and hinder airflow within the computer case.
While Flex PSUs are primarily used in SFF builds, they can also be utilized in other scenarios where space is a concern. For example, they are commonly found in small office/home office (SOHO) setups and media centers where a compact footprint is desired.
Now that we have a better understanding of what a Flex PSU is, let’s explore the benefits of making it modular in the next section.
Benefits of Making a Flex PSU Modular
There are several advantages to making a Flex PSU modular. Let’s take a closer look at the benefits:
- Improved Cable Management: One of the main advantages of making a Flex PSU modular is the ability to achieve better cable management. Non-modular PSUs often come with a fixed set of cables, which can result in a tangled mess inside the computer case. By making the PSU modular, you can remove unnecessary cables and connect only the ones you need, resulting in a cleaner and more organized build.
- Enhanced Airflow: The cable clutter caused by non-modular PSUs can obstruct the airflow within the computer case, leading to higher temperatures and potential performance issues. With a modular Flex PSU, you can eliminate excess cables, allowing for improved airflow and better cooling for your components. This can help maintain optimal operating temperatures and reduce the risk of overheating.
- Easier Maintenance and Upgrades: Making a Flex PSU modular simplifies the process of maintaining and upgrading your system. With non-modular PSUs, replacing or adding components can be a time-consuming task, as you have to navigate through a bundle of cables. By using a modular PSU, you can easily detach and reattach cables as needed, making upgrades and maintenance tasks much more efficient and hassle-free.
- Customizability: Modular Flex PSUs give you the freedom to customize your cable setup according to your specific needs and preferences. You can choose the length and type of cables required for your build, ensuring a clean and tailored cable management solution. Furthermore, if you decide to change your components or upgrade your system, you can easily replace the modular cables without having to replace the entire PSU.
- Future-Proofing: As technology advances and new components are introduced, the cable requirements for a computer system may change. By making your Flex PSU modular, you future-proof your build, since you can easily adapt to new cable standards without having to invest in a new PSU. This flexibility allows you to stay updated with the latest hardware trends and ensures that your system remains compatible with future upgrades.
Now that we’ve explored the benefits of making a Flex PSU modular, let’s dive into the step-by-step process of achieving this in the next section.
Tools and Materials Needed
Before you begin the process of making your Flex PSU modular, it’s important to gather the necessary tools and materials. Here’s a list of what you’ll need:
- Screwdriver Set: A set of screwdrivers will be essential for opening up your Flex PSU and making any necessary adjustments or installations.
- Wire Cutters and Strippers: These tools will be used to cut and strip the existing PSU cables and prepare them for the installation of modular connectors.
- Modular Connectors: You’ll need a set of modular connectors that are compatible with your Flex PSU. These connectors will replace the non-modular cables and allow for easy connection and disconnection.
- Heat Shrink Tubing: Heat shrink tubing will be used to insulate and protect the connections between the modular connectors and the PSU cables. Make sure to choose tubing that is the appropriate size for your cables.
- Soldering Iron and Solder: If you decide to solder the connections between the modular connectors and the PSU cables, a soldering iron and solder will be necessary. However, it’s worth noting that soldering is optional, and you can use other methods such as crimping or using connector pins, depending on your preference.
- Electrical Tape: Electrical tape can be used as an alternative to heat shrink tubing for insulation purposes. It can help secure and protect the connections.
- Zip Ties or Cable Ties: These will come in handy for managing and organizing the cables once the modular connectors are installed. They will help keep the cables neat and prevent them from getting tangled inside the computer case.
- Anti-Static Wrist Strap: While not mandatory, using an anti-static wrist strap can prevent accidental damage to your components during the assembly process. It helps discharge static electricity and ensures a safe working environment.
- Work Area with Good Lighting: Ensure you have a clean and well-lit area to work in. This will make the process easier and safer, allowing you to see the details clearly and avoid any mishaps.
With these tools and materials ready, you’re all set to begin the process of making your Flex PSU modular. Let’s move on to the next section, where we’ll guide you through disassembling the Flex PSU.
Step 1: Disassembling the Flex PSU
The first step in making your Flex PSU modular is to disassemble it. Before you begin, ensure that your computer is turned off and disconnected from the power source. Follow these steps to disassemble the Flex PSU:
- Remove the PSU from the Computer Case: Depending on your computer case, you may need to remove any side panels or covers to access the PSU. Once the case is open, locate the PSU and unscrew any screws or fasteners holding it in place. Gently slide the PSU out of the case.
- Identify the Non-Modular Cables: Take a look at the cables connected to your Flex PSU. The non-modular cables are typically hardwired and cannot be detached from the PSU. These are the cables we will be replacing with modular connectors.
- Unplug the Non-Modular Cables: Carefully unplug each non-modular cable from the PSU, ensuring that you do not damage any connectors or cables. Take note of the locations from which you removed the cables, as this will help when it comes time to install the modular connectors.
- Inspect and Set Aside the Non-Modular Cables: After unplugging the non-modular cables, examine them for any signs of damage or wear. It’s a good idea to set these cables aside in case you need to revert to the original configuration in the future.
- Open the PSU Enclosure: Using the appropriate screwdriver, remove the screws that secure the PSU enclosure. Once the screws are removed, carefully open the enclosure, taking note of any internal components or cables.
- Inspect the PSU PCB: Inside the PSU enclosure, you will find the printed circuit board (PCB) that houses the components and connections. Take a moment to familiarize yourself with the layout and identify the areas where the non-modular cables were connected.
- Disconnect the Non-Modular Cables from the PCB: Gently unplug the non-modular cables from the PCB, making sure not to pull on the wires excessively. Take your time and ensure that all the cables are disconnected properly.
With the Flex PSU disassembled, you’re ready to move on to the next step: identifying and removing the non-modular cables. This process will allow you to make space for the installation of modular connectors, bringing you one step closer to achieving a modular Flex PSU.
Step 2: Identifying and Removing the Non-Modular Cables
Now that you have disassembled your Flex PSU, it’s time to identify and remove the non-modular cables. This step is crucial in preparing the PSU for the installation of modular connectors. Follow these steps:
- Inspect the Non-Modular Cables: Take a close look at the non-modular cables that were originally connected to your Flex PSU. Identify the different types of cables, such as the 24-pin ATX cable, CPU power cable, PCIe cables, and SATA power cables. Each cable has a specific function in providing power to different components of your computer.
- Bundle and Organize the Non-Modular Cables: To make the identification process easier, gather all the non-modular cables and organize them into groups based on their type. This will help you keep track of which cables will be replaced with modular connectors.
- Mark the Non-Modular Cables: It’s a good idea to mark the non-modular cables in some way to differentiate them from the modular cables you will be installing. You can use colored tape or labels to further distinguish them. This will prevent any confusion and make it easier to identify which cables need to be replaced in case you need to revert to the original setup.
- Unplug and Remove the Non-Modular Cables: One by one, unplug the non-modular cables from their respective connectors on the PSU PCB. Take care not to apply excessive force or pull on the cables. Gently wiggle the connectors back and forth as you detach them to avoid damaging any components.
- Set Aside the Non-Modular Cables: Once a non-modular cable is disconnected, set it aside in a safe place. Consider using cable ties or a small container to keep the cables organized and prevent them from tangling. These cables may come in handy if you ever need to revert to the original configuration or if you encounter any issues during the installation process.
- Verify all Non-Modular Cables are Removed: Double-check to ensure that all the non-modular cables have been unplugged and removed from the PSU PCB. Take a moment to examine the connectors on the PCB to make sure that there are no loose or damaged pins.
With the non-modular cables successfully identified and removed from your Flex PSU, you are ready to proceed to the next step: cutting and prepping the wires for the installation of modular connectors.
Step 3: Cutting and Prepping the Wires
In this step, we will focus on cutting and prepping the wires of your Flex PSU to prepare them for the installation of modular connectors. This process will ensure clean and secure connections. Follow these steps:
- Gather the Necessary Tools: Before you begin, gather wire cutters, wire strippers, and any other tools you may need for this step.
- Determine the Length of the Wires: Decide on the desired length for each cable. Consider the routing and cable management within your computer case, ensuring that the cables will reach their respective components without any strain or tension.
- Measure and Cut the Wires: Measure the required length on each wire and mark it using a marker or a piece of tape. Use the wire cutters to carefully cut the wires at the marked points. Ensure a clean and straight cut to facilitate the next steps.
- Remove the Insulation: Use the wire strippers to remove the insulation from the cut ends of the wires. The wire strippers should be adjusted to the appropriate gauge of the wire for a precise cut without damaging the conductive material underneath. Be cautious and avoid stripping too much insulation.
- Expose the Conductors: After removing the insulation, you will notice individual conductors within each wire. Carefully separate the conductors from each other and expose enough length to fit securely into the modular connectors.
- Solder or Crimp the Connectors: Depending on the type of modular connectors you have, follow the instructions provided by the manufacturer to connect the exposed conductors to the connectors. This may involve soldering the wires to the connectors or using crimping tools to secure them in place. Ensure a strong and reliable connection to avoid any future issues.
- Insulate the Connections: To protect the connections and prevent any shorts or damage, use heat shrink tubing or electrical tape to insulate each individual connection. Slide the tubing or wrap the tape around the exposed conductors, ensuring that there is enough coverage to provide insulation and strain relief.
- Apply Heat to the Heat Shrink Tubing: If you are using heat shrink tubing, use a heat gun or a lighter to apply heat evenly to the tubing. This will cause it to shrink tightly around the connection, providing a secure and insulated finish. Be cautious not to overheat or melt the tubing.
- Double-Check the Connections: After completing the cutting and prepping process for all the wires, double-check each connection to ensure they are secure and properly insulated. Verify that there are no exposed conductors or loose connections that could cause issues later on.
With the wires cut and properly prepped, you are now ready for the next step: installing the modular connectors to make your Flex PSU truly modular.
Step 4: Installing the Modular Connectors
In this step, we will guide you through the process of installing the modular connectors onto the prepped wires of your Flex PSU. This will allow you to connect and disconnect the cables as needed, making your PSU truly modular. Follow these steps:
- Gather the Modular Connectors: Ensure you have the appropriate modular connectors that are compatible with your Flex PSU. Refer to the instructions provided by the manufacturer for any specific guidelines.
- Identify the Connectors and Pinouts: Examine the modular connectors to identify the different types and pinouts. Common connectors include the 24-pin ATX connector, CPU power connectors (4+4-pin or 8-pin), PCIe connectors (6-pin or 8-pin), and SATA/Molex connectors. Familiarize yourself with their corresponding pin layouts to ensure correct installation.
- Plug in the Modular Connectors: Starting with one wire at a time, carefully insert the exposed conductors into the corresponding pins of the modular connectors. Ensure that each wire is connected to the appropriate pin according to the function of the cable it represents.
- Secure the Connectors: Once the conductors are inserted, secure the modular connectors in place. Depending on the design of the connectors, this may involve latching them or using screws to fasten them to the PSU PCB.
- Ensure Proper Alignment and Fitment: Double-check that the connectors are correctly aligned and fully inserted into the modular interface. This will ensure a proper electrical connection and prevent any potential issues in the future.
- Test the Connections: With the connectors installed, perform a quick test to ensure that the connections are secure and working correctly. Carefully turn on your computer and check if all components are receiving power as expected. Verify that there are no loose connections or signs of instability.
- Make Adjustments if Necessary: If any issues are detected during the testing phase, double-check the connections and address any loose or faulty ones. It’s crucial to have reliable connections to guarantee the stability and performance of your system.
Once you have installed the modular connectors onto the wires of your Flex PSU, you are one step closer to achieving a modular power supply unit. Next, we will move on to the process of wiring and connecting the cables, which will help you organize and manage your system’s power distribution effectively.
Step 5: Wiring and Connecting the Cables
In this step, we will guide you through the process of wiring and connecting the cables of your Flex PSU. Proper cable management is essential for maintaining an organized and efficient system. Follow these steps to effectively wire and connect the cables:
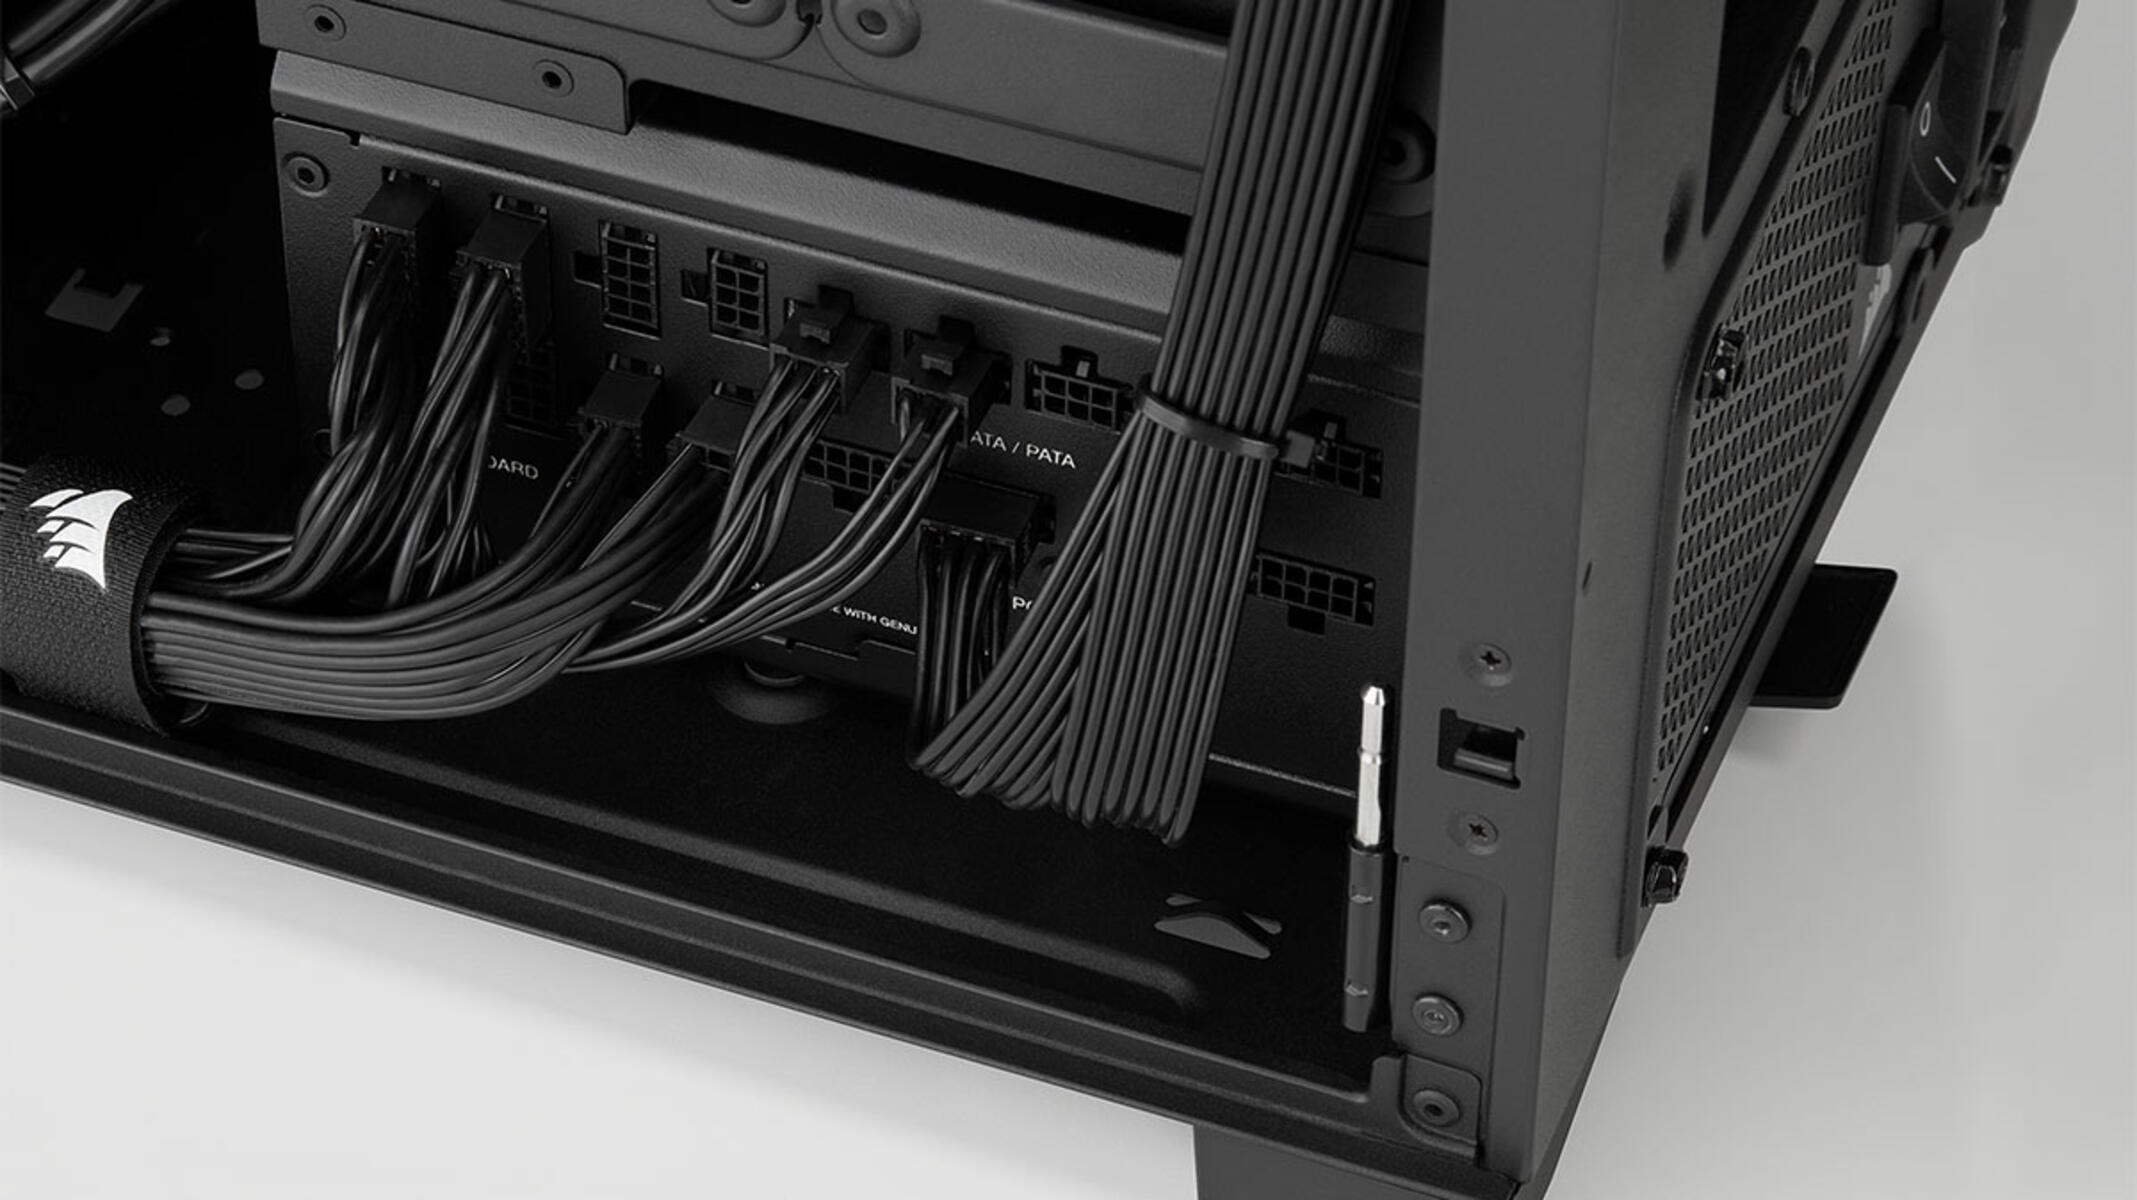
- Plan the Cable Routing: Before connecting the cables, plan the routing within your computer case. Consider the length and placement of each cable to ensure a clean and tidy setup. Route the cables in a way that allows for optimal airflow and avoids any obstructions.
- Connect the 24-pin ATX Cable: Begin by connecting the 24-pin ATX cable to the motherboard. Insert the modular connector into the corresponding socket, ensuring a secure fit. The connector is designed to prevent incorrect insertion, so be mindful of the alignment.
- Attach the CPU Power Cable: Connect the 4+4-pin or 8-pin CPU power cable to the appropriate socket on the motherboard. Align the modular connector with the socket and push it in until it clicks into place.
- Connect the GPU and Peripheral Cables: Attach the GPU power cables (6-pin or 8-pin) and the peripheral cables (SATA/Molex) to the respective components within your system. Connect the modular connectors to the appropriate sockets on the GPU, hard drives, and other peripherals.
- Ensure Proper Cable Management: As you connect each cable, manage and organize them within your computer case. Use cable ties or zip ties to secure the cables together and keep them neat. Route the cables in a way that avoids blocking airflow and reduces any excess slack.
- Verify the Connections: Double-check that all cables are securely connected to the components and modular connectors. Ensure that the connectors are fully inserted, and there are no loose connections. Take extra care with any connectors that require additional latching or locking mechanisms.
- Test the System: Once all the cables are connected and managed, power on your computer and test the system. Check that all components are receiving power, and there are no unexpected issues. Monitor the temperatures and ensure proper airflow for optimal performance.
By following these steps, you will have successfully wired and connected the cables of your Flex PSU. This ensures a clean and organized power distribution within your system, contributing to better airflow, improved aesthetics, and overall system stability.
Now that you have completed the wiring and connection process, we will move on to the final step: testing and reassembling your modular Flex PSU.
Step 6: Final Testing and Reassembly
In this final step, we will guide you through the process of testing and reassembling your modular Flex PSU. It’s crucial to ensure that everything is functioning properly before closing up your computer case. Follow these steps to complete the process successfully:
- Perform a System Test: After connecting all the cables and tidying up the wiring, power on your computer and perform a comprehensive system test. Check that all components are receiving power, including the CPU, GPU, and peripherals. Monitor the system’s performance and temperatures to ensure everything is functioning correctly.
- Check for Loose Connections: While testing the system, inspect the connections and make sure that there are no loose or unstable connections. Pay attention to the modular connectors, ensuring that they are securely plugged in and latched properly.
- Monitor System Temperatures: Keep an eye on the temperatures of your components, especially the CPU and GPU, during the testing phase. Ensure that the system maintains acceptable temperature levels and that airflow is not obstructed by any cables or components.
- Reassemble the PSU Enclosure: If everything is functioning as expected, reassemble the PSU enclosure by aligning the cover with the appropriate screw holes and fastening it securely. Make sure all the screws are tightened adequately, but be cautious not to overtighten and risk damaging the enclosure or the PSU components.
- Route Cables Appropriately: Before closing up your computer case, double-check the cable routing to ensure that they are neatly organized and free from any obstructions. Ensure that the cables are not strained or pinched when closing the case.
- Secure the Side Panels: Place the side panels back onto your computer case and fasten them securely using the appropriate screws or latches. Pay attention to any cable management features or holes in the case that can help you keep the cables organized and out of the way.
- Perform a Final System Test: Once your computer case is fully reassembled, power on your system and perform another round of testing to ensure that everything is functioning correctly. Monitor for any unusual behavior or issues that may have arisen during the reassembly process.
- Enjoy Your Modular Flex PSU: With the final testing complete, you can now enjoy the benefits of your newly upgraded modular Flex PSU. Experience improved cable management, enhanced airflow, and the flexibility to easily upgrade or replace components in the future.
Congratulations! You have successfully completed the final testing and reassembly of your modular Flex PSU. Your computer system is now equipped with a clean and organized power supply solution that can adapt to your needs. Enjoy the enhanced performance and aesthetics that come with a modular power supply!
Conclusion
Congratulations on successfully making your Flex PSU modular! By following the step-by-step process outlined in this guide, you have transformed your power supply unit into a more versatile and efficient component within your computer system.
Making a Flex PSU modular offers several benefits, including improved cable management, enhanced airflow, easier maintenance and upgrades, customizability, and future-proofing. With the ability to connect and disconnect cables as needed, you can create a cleaner and more organized build, optimize airflow, and ensure optimal operating temperatures for your components.
Throughout the process, we explained the importance of proper planning, cutting, and prepping the wires, installing modular connectors, wiring and connecting the cables, and performing thorough testing and reassembly. These steps are crucial for a successful and functional modular Flex PSU.
Remember, as you work with your Flex PSU, always prioritize safety by disconnecting and powering off your computer before making any adjustments. Take your time and follow the instructions carefully to avoid any potential damage to yourself or your components.
By successfully completing these steps, you have achieved a cleaner and more streamlined power supply solution for your computer system. Enjoy the benefits of a modular Flex PSU, including improved aesthetics, better cable management, and enhanced airflow. You now have the flexibility to easily upgrade or replace components, ensuring that your system remains up to date with future advancements.
Thank you for following our guide on how to make a Flex PSU modular. We hope you found this information helpful and that it has empowered you to create a more efficient and organized computer build. Happy computing!