Introduction
Welcome to this step-by-step guide on how to make an external hard drive bootable for Windows 7. If you’ve been looking for a way to carry your Windows 7 operating system with you and have it ready to boot on any computer, this tutorial is for you.
Creating a bootable external hard drive allows you to have a portable version of Windows 7 that you can use to troubleshoot problems or perform installations on different computers without the need for a Windows installation disc. It is especially useful if you work with multiple computers or if you are a system administrator.
In this guide, I will walk you through the process of making your external hard drive bootable for Windows 7. Before we begin, however, it is important to note that this process will erase all the data on your external hard drive, so make sure to back up any important files before proceeding.
To make an external hard drive bootable for Windows 7, you will need to follow several steps. First, you will need to connect the external hard drive to your computer. Then, you will need to prepare, format, and mark the hard drive as active. After that, you will need to copy the Windows 7 files to the hard drive. Finally, you will need to configure the BIOS and install Windows 7 from the external hard drive. Let’s get started!
Requirements
Before you begin the process of making your external hard drive bootable for Windows 7, there are a few things you will need:
- A working computer with Windows 7 already installed
- An external hard drive with sufficient storage capacity
- A Windows 7 installation disc or ISO file
- A USB flash drive with a capacity of at least 4GB
- A reliable internet connection (optional, but recommended for downloading the necessary tools and updates)
It is important to ensure that your working computer meets the minimum system requirements for Windows 7. These requirements include a 1GHz or faster processor, 1GB of RAM for the 32-bit version or 2GB of RAM for the 64-bit version, 16GB of available hard disk space for the 32-bit version or 20GB for the 64-bit version, and a DirectX 9 graphics device with WDDM 1.0 or higher driver.
In addition, make sure that your external hard drive is empty or contains data that you are willing to erase, as the process of making it bootable will involve formatting and erasing all existing data on the drive.
If you don’t have a Windows 7 installation disc, you can create a bootable USB drive using an ISO file. An ISO file is a digital replica of a physical disc that contains all the files and folders needed to install an operating system. You can download a Windows 7 ISO file from the official Microsoft website or use a third-party tool to create one.
Once you have gathered all the necessary requirements, you can proceed to the next steps of making your external hard drive bootable for Windows 7.
Step 1: Connect the External Hard Drive
The first step in making your external hard drive bootable for Windows 7 is to connect it to your computer. Here’s what you need to do:
- Make sure your computer is powered on and running Windows 7.
- Locate an available USB port on your computer.
- Take the USB cable that came with your external hard drive and connect one end to the hard drive itself.
- Connect the other end of the USB cable to the available USB port on your computer.
- Wait a few moments for your computer to recognize the external hard drive. You may hear a sound or see a notification confirming that a new device has been detected.
Once the external hard drive is connected, you should see it appear as a new drive in Windows Explorer or My Computer. Note the drive letter assigned to the external hard drive, as you will need this information for the later steps.
It is important to ensure that the external hard drive is properly connected and recognized by your computer before proceeding to the next steps. If the drive is not detected, try disconnecting and reconnecting it, or try using a different USB port. If the issue persists, there may be a problem with the external hard drive itself, and you may need to seek technical assistance or use a different hard drive.
With the external hard drive successfully connected, you are now ready to move on to the next step and prepare the hard drive for the bootable installation of Windows 7.
Step 2: Prepare the Hard Drive
Once you have connected the external hard drive to your computer, the next step is to prepare the hard drive for the bootable installation of Windows 7. Here’s what you need to do:
- Open Windows Explorer or My Computer to view the connected drives.
- Locate the drive letter assigned to the external hard drive that you connected in the previous step.
- Right-click on the drive letter and select “Format” from the context menu.
- In the Format dialog box, ensure that the File system is set to “NTFS”. This file system is recommended for Windows installations as it supports larger file sizes and provides better security and reliability.
- Enter a name for the external hard drive in the “Volume label” field. This name will be used to identify the hard drive when it is displayed in Windows Explorer or My Computer.
- Make sure that the “Quick Format” option is checked to speed up the formatting process.
- Click on the “Start” button to begin formatting the hard drive. This process will erase all existing data on the external hard drive, so make sure you have backed up any important files.
- Wait for the formatting process to complete. The time it takes will depend on the size of the hard drive.
Once the formatting process is complete, you will have a clean and empty hard drive ready to be made bootable for Windows 7. Take note of the drive letter assigned to the newly formatted external hard drive as you will need it for the subsequent steps.
Now that the hard drive is prepared, you can move on to the next step, which is to format the hard drive in a way that it can be recognized as a bootable device by the computer.
Step 3: Format the Hard Drive
After preparing the hard drive in the previous step, the next step is to format it in a specific way that allows it to be recognized as a bootable device by the computer. Here’s how to format the hard drive:
- Open the Command Prompt by pressing the Windows key and typing “cmd”. Right-click on “Command Prompt” and select “Run as administrator”.
- In the Command Prompt window, type “diskpart” and press Enter. This will open the DiskPart utility, which allows you to manage disks, partitions, and volumes on your computer.
- Once you are inside DiskPart, type “list disk” and press Enter. This will display a list of all the disks connected to your computer.
- Identify the disk number that corresponds to your external hard drive. Take note of the disk number, as you will need it for the subsequent steps. Make sure to choose the correct disk to avoid accidentally formatting the wrong disk.
- Type “select disk X” and press Enter, replacing “X” with the disk number of your external hard drive.
- Type “clean” and press Enter. This command will remove all partition or volume formatting from the disk, effectively wiping it clean.
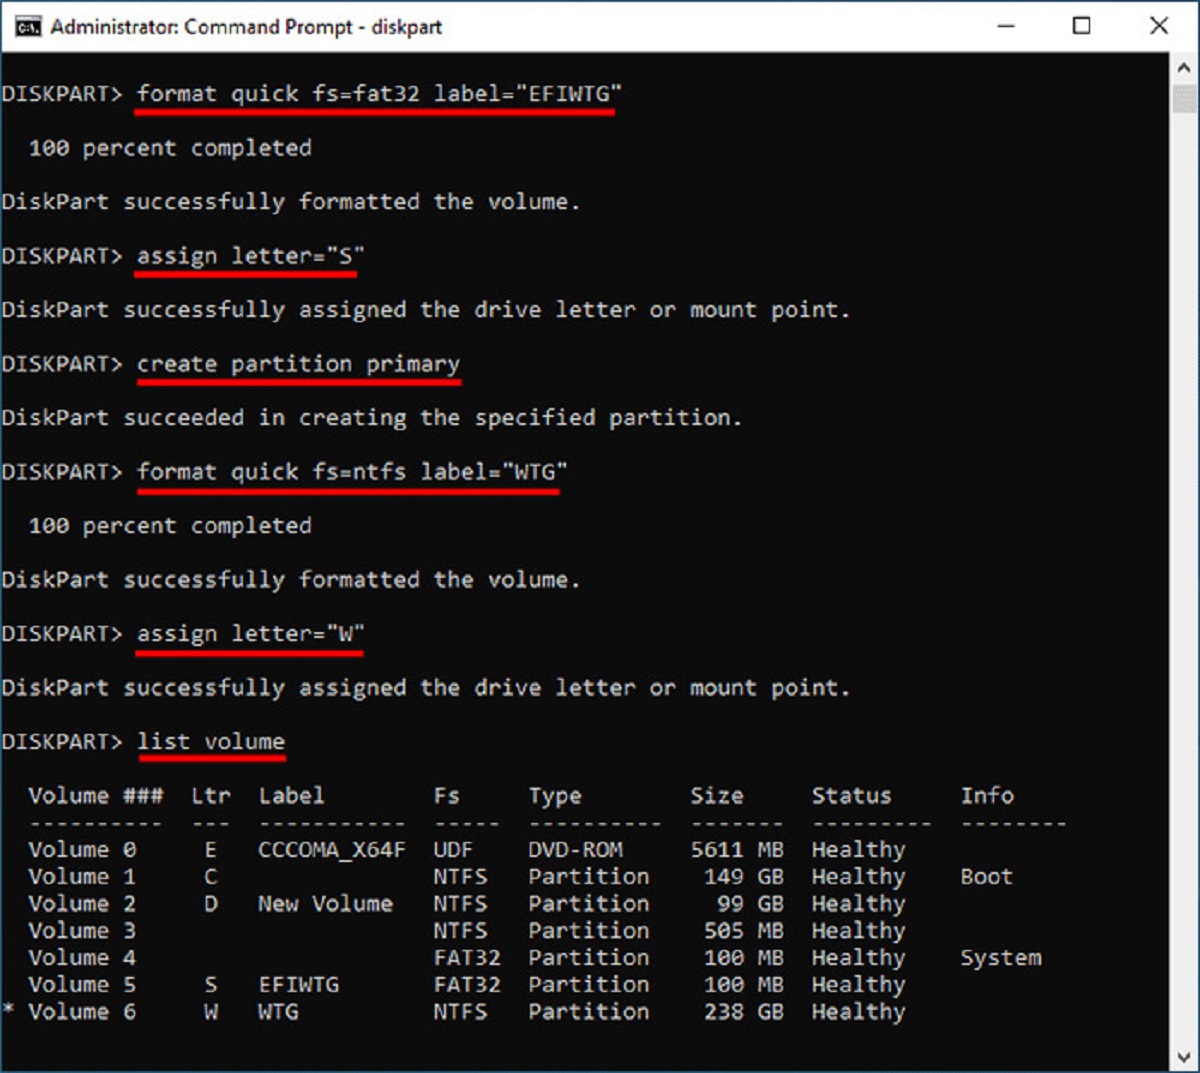
- Type “create partition primary” and press Enter. This command will create a new primary partition on the disk.
- Type “select partition 1” and press Enter. This will select the newly created partition.
- Type “format fs=ntfs quick” and press Enter. This will format the partition with the NTFS file system, making it compatible with Windows 7.
- Wait for the formatting process to complete. The time it takes will depend on the size of the partition.
Once the hard drive partition is successfully formatted, it will be ready to receive the Windows 7 files and become a bootable device. Remember the drive letter assigned to the partition, as you will need it for the following steps.
With the hard drive now formatted, you can proceed to the next step, which is to mark the hard drive as active.
Step 4: Mark the Hard Drive as Active
After formatting the hard drive in the previous step, the next step is to mark it as active. This step is important to ensure that the computer recognizes the hard drive as a bootable device. Here’s how to mark the hard drive as active:
- Open the Command Prompt as an administrator by pressing the Windows key and typing “cmd”. Right-click on “Command Prompt” and select “Run as administrator”.
- In the Command Prompt window, type “diskpart” and press Enter. This will open the DiskPart utility.
- Once inside DiskPart, type “list disk” and press Enter. This will display a list of all the disks connected to your computer.
- Identify the disk number that corresponds to your external hard drive. Make sure to choose the correct disk.
- Type “select disk X” and press Enter, replacing “X” with the disk number of your external hard drive.
- Type “list partition” and press Enter. This will display a list of all the partitions on the selected disk.
- Identify the partition number that corresponds to the partition you formatted in the previous step. Make note of the partition number.
- Type “select partition X” and press Enter, replacing “X” with the partition number of the formatted partition.
- Type “active” and press Enter. This command will mark the selected partition as active.
- Exit the DiskPart utility by typing “exit” and pressing Enter.
By marking the hard drive as active, you are indicating to the computer that it should use this partition for booting purposes. This step is crucial to ensure that the computer recognizes the external hard drive as a bootable device when you install Windows 7.
With the hard drive now marked as active, you are ready to proceed to the next step, which involves copying the Windows 7 files to the hard drive.
Step 5: Copy Windows 7 Files to the Hard Drive
With the hard drive properly formatted and marked as active, the next step is to copy the Windows 7 files to the hard drive. This will make the hard drive bootable with the Windows 7 operating system. Here’s how to copy the Windows 7 files:
- Obtain a Windows 7 installation disc or ISO file. If you have a physical disc, insert it into your computer’s DVD drive. If you have an ISO file, you can mount it using a virtual drive or extract its contents using file-extraction software.
- Open Windows Explorer or File Explorer and navigate to the Windows 7 installation media (either the DVD drive or the extracted files from the ISO file).
- Select all the files and folders in the Windows 7 installation media. You can do this by pressing Ctrl+A or by clicking and dragging the mouse to select everything.
- Right-click on the selected files and folders, and click on “Copy” from the context menu.
- Go back to Windows Explorer or File Explorer and navigate to the root directory of the formatted and marked hard drive. This is the drive letter you noted in previous steps.
- Right-click on an empty space in the root directory of the hard drive, and click on “Paste” from the context menu.
- Wait for the copying process to complete. This may take some time, depending on the size of the Windows 7 installation files and the speed of your computer.
- Once the copying process is finished, you will have successfully copied the Windows 7 files to the hard drive.
By copying the Windows 7 files to the hard drive, you have made the hard drive bootable with the necessary installation files. This allows you to install Windows 7 on a computer directly from the external hard drive.
Now that the Windows 7 files are on the hard drive, you can proceed to the next step, which involves configuring the BIOS to boot from the external hard drive.
Step 6: Configure the BIOS
Configuring the BIOS is an essential step in making sure that your computer recognizes and boots from the external hard drive. Here’s how to configure the BIOS settings:
- Restart your computer.
- As the computer starts up, look for a prompt that says something like “Press [key] to enter Setup” or “Press [key] to enter BIOS.”
- Quickly press the indicated key (often Esc, F2, F10, or Delete) to enter the BIOS or Setup menu. The specific key may vary depending on your computer’s manufacturer.
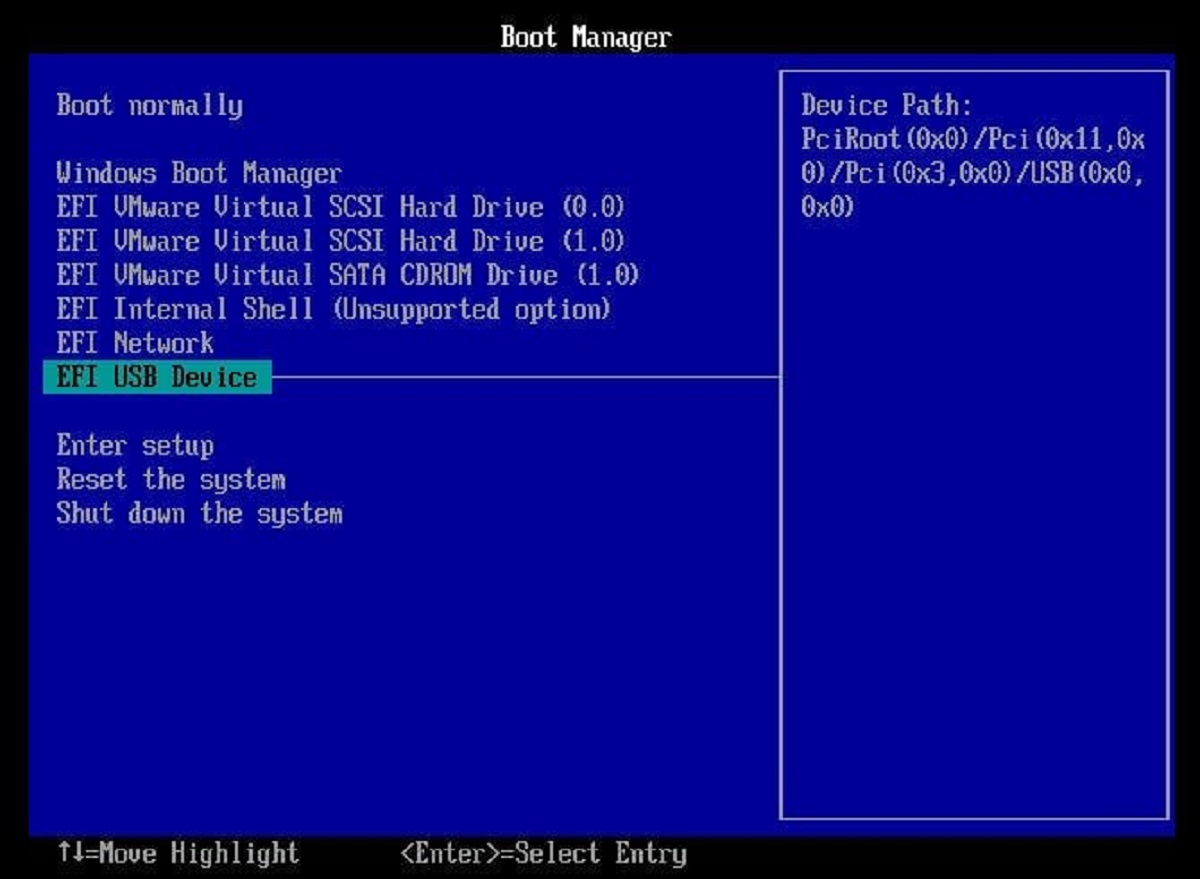
- Once inside the BIOS or Setup menu, navigate to the “Boot” or “Boot Order” section. This section may be named differently depending on your BIOS version.
- Set the external hard drive as the first boot device. To do this, select the option that corresponds to the external hard drive, usually listed as “USB,” “USB-HDD,” or the specific brand/model of the hard drive.
- Move the selected boot device to the top of the boot order list. This ensures that the computer will attempt to boot from the external hard drive before trying other devices.
- Save the changes to the BIOS settings and exit the BIOS or Setup menu. This may be done by pressing a key like F10 or by navigating to the “Exit” section and selecting the “Save and Exit” option.
- Restart your computer once again.
After configuring the BIOS, your computer will prioritize booting from the external hard drive. This means that when you start your computer, it will look for the Windows 7 installation on the external hard drive first. If the installation files are detected, the Windows 7 setup process will begin.
If the computer fails to boot from the external hard drive, double-check the BIOS settings to ensure that the external hard drive is correctly set as the first boot device. Additionally, make sure that the Windows 7 files are properly copied to the hard drive.
With the BIOS settings configured, you are now ready to proceed to the final step of installing Windows 7 from the external hard drive.
Step 7: Install Windows 7 from the External Hard Drive
Now that you have configured the BIOS to boot from the external hard drive, you can proceed with installing Windows 7. Here’s how to do it:
- Ensure that the external hard drive is connected to your computer.
- Restart your computer once again.
- As your computer starts up, it will now boot from the external hard drive.
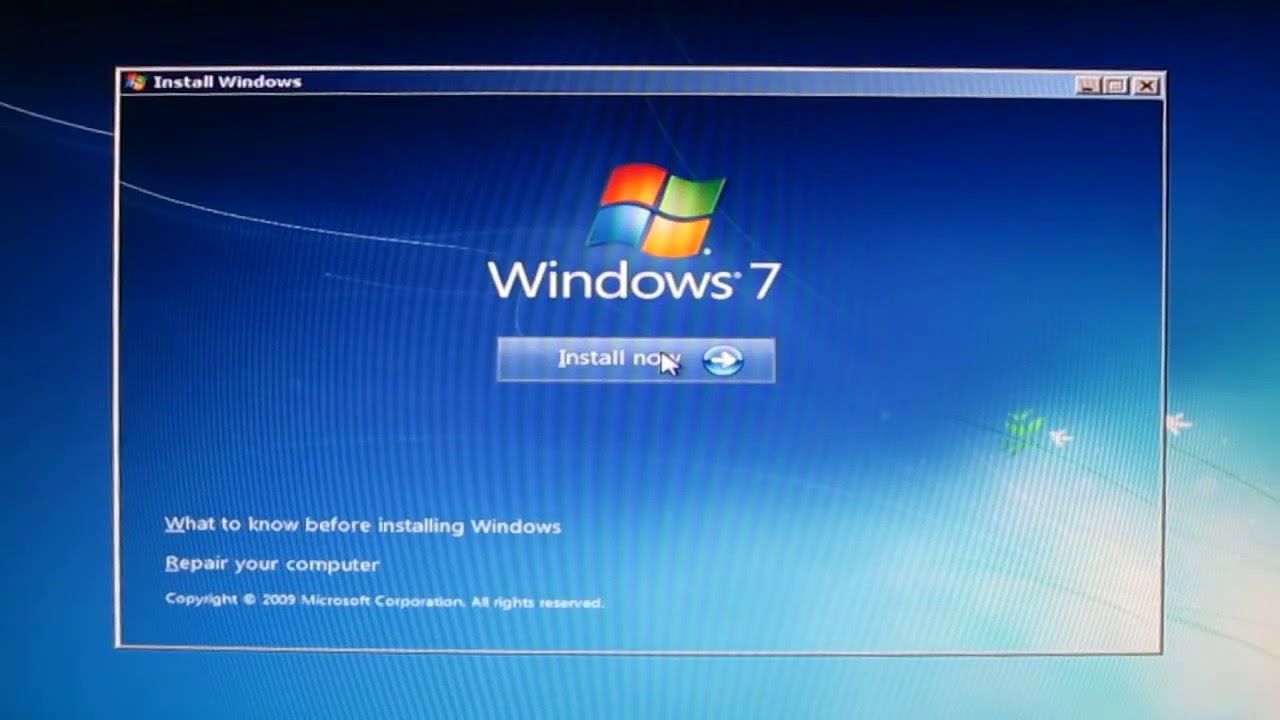
- The Windows 7 setup screen will appear. Select your language preferences and click “Next”.
- Click on the “Install Now” button to begin the installation process.
- Read and accept the license terms, then click “Next”.
- Choose the “Custom (advanced)” option as the installation type.
- Select the partition on the external hard drive where you copied the Windows 7 files. This should be the partition marked as active.
- Click on the “Next” button to start the installation process. Windows 7 will begin installing on the external hard drive.
- Follow the on-screen instructions to complete the installation. This may include choosing your computer’s time and date settings, creating a username and password, and customizing other settings.
- Wait for the installation process to finish. Your computer will restart multiple times during the installation.
- Once the installation is complete, you will be greeted with the Windows 7 welcome screen.
Congratulations! You have successfully installed Windows 7 from the external hard drive. You can now use your external hard drive as a bootable Windows 7 installation, allowing you to troubleshoot problems or perform installations on different computers.
Remember to safely eject the external hard drive before disconnecting it from your computer to avoid data loss or corruption. You can now enjoy the convenience of having your portable Windows 7 operating system wherever you go.
Thank you for following this step-by-step guide! If you have any questions or difficulties, feel free to seek further assistance. Happy computing!
Conclusion
Congratulations on successfully making your external hard drive bootable for Windows 7! By following the steps outlined in this guide, you have created a portable Windows 7 operating system that you can take with you and use on any compatible computer.
Being able to boot from an external hard drive can be extremely useful, especially when troubleshooting computer issues or performing installations. It provides flexibility and convenience, allowing you to work with Windows 7 without the need for a physical installation disc.
Throughout this guide, you have learned how to connect the external hard drive, prepare and format it, mark it as active, copy the Windows 7 files, configure the BIOS, and install Windows 7 from the external hard drive.
It is important to remember that the process of making an external hard drive bootable for Windows 7 involves formatting and erasing all existing data on the hard drive. Therefore, it is essential to back up any important files before proceeding.
I hope this guide has been informative and has helped you successfully create a bootable Windows 7 external hard drive. Having a portable operating system can save you time and effort, and provide you with a reliable and familiar Windows environment wherever you go.
Thank you for following along, and if you have any questions or need further assistance, feel free to seek help. Enjoy your bootable Windows 7 external hard drive and happy computing!