Introduction
Welcome to the world of Asana, a powerful project management tool designed to help teams stay organized and productive. One of the key features of Asana is the ability to mark tasks as completed, allowing you to track progress and keep your project on track. However, you may have noticed that even after marking a task as completed, it still continues to appear in your task list. This can be frustrating and clutter your workspace, leading to confusion and decreased efficiency.
In this article, we will explore the reasons why completed tasks might still be visible in Asana and provide you with practical solutions to make them disappear. Whether you prefer to archive completed tasks, filter them from view, or utilize other advanced features, we have got you covered. By implementing these techniques, you can maintain a clean and streamlined task list, ensuring that only relevant and active tasks remain visible.
So, if you are tired of scrolling through a sea of completed tasks in Asana, read on to discover the best methods to make them disappear and regain control of your workspace. Let’s dive in!
Understanding Completed Tasks in Asana
Before we delve into how to make completed tasks disappear in Asana, it’s important to understand why they continue to be visible in the first place. Asana is designed with a collaborative approach in mind, where team members can view the progress and history of a project. This means that completed tasks are not automatically removed from your task list to ensure transparency and provide a record of the work that has been done.
Completed tasks are indicated by a checkmark symbol or a struck-through text, making it easy to differentiate them from active tasks. This allows project members to review completed tasks, track milestones, and ensure that everything has been completed as planned. Additionally, leaving completed tasks visible can help in identifying patterns, learning from past experiences, and improving future project management.
Furthermore, keeping completed tasks visible allows for better collaboration within your team. It enables individuals to see how their work aligns with others and understand the dependencies between tasks. This visibility can also contribute to a sense of accomplishment and motivation as team members observe their progress and contributions to the project.
However, we understand that seeing a long list of completed tasks in your workspace can be overwhelming and hinder productivity. That’s why Asana provides several methods to manage and control the visibility of completed tasks. In the following sections, we will explore various options and guide you on how to make these completed tasks disappear, so you can focus on what’s essential and stay organized.
Why Completed Tasks Still Appear in Asana
You may be wondering why completed tasks still seem to linger in your Asana workspace, even after you’ve marked them as complete. There are a few reasons why this happens, and understanding them can help you navigate the issue more effectively.
One reason is that Asana is designed to promote transparency and collaboration within teams. By keeping completed tasks visible, everyone involved in the project can have a clear view of the progress made and the tasks completed. This visibility encourages communication, alignment, and accountability among team members.
Another reason is that Asana allows you to build a project’s timeline by tracking completed tasks. When tasks are completed, they form a historical record that can be reviewed for future projects or as a reference. This feature is particularly useful if you’re managing recurring tasks or ongoing projects where past performance can inform future decisions.
Additionally, completed tasks can act as a checkpoint for quality control purposes. By keeping them visible, you and your team can review and assess the quality of work that has been done. This can help identify any issues, discrepancies, or improvements that need to be made for future tasks or projects.
While these reasons explain why Asana retains completed tasks by default, we understand that an excessive number of completed tasks can clutter your workspace and hinder your productivity. Thankfully, Asana provides various options and settings to help you manage the visibility of completed tasks, allowing you to create a workspace that suits your needs.
In the next sections, we will explore different methods and techniques that you can use to make completed tasks disappear from your Asana workspace. By implementing these solutions, you can maintain a clean and focused task list, optimizing your project management experience and improving efficiency.
How to Make Completed Tasks Disappear
Now that we understand why completed tasks continue to appear in Asana, let’s explore various methods to make them disappear. Asana offers several options and features that allow you to customize the visibility of completed tasks, ensuring that your workspace remains clutter-free and focused on active tasks.
Here are some effective ways to make completed tasks disappear in Asana:
- Archiving Completed Tasks: Archiving completed tasks is an efficient way to remove them from your task list while still preserving their historical data. Archiving not only declutters your workspace but also ensures that completed tasks can be accessed if needed in the future.
- Filtering Completed Tasks: Asana allows you to apply filters to your task view, enabling you to hide completed tasks temporarily. By filtering out completed tasks, you can focus on current and ongoing tasks, reducing visual distractions and improving productivity. You have the flexibility to apply filters based on timeframes, assignees, and other criteria.
- Using Project Sections: Organizing your tasks into sections within a project can help you visually separate completed tasks from active ones. By using dedicated sections for completed tasks, you can collapse or hide them, allowing you to focus on tasks that require immediate attention.
- Creating a “Completed” Project: If you prefer to have a separate space for completed tasks, you can create a dedicated project specifically for tracking completed tasks. This way, you can move completed tasks to this project, keeping your primary project clean and clutter-free.
- Utilizing Custom Fields: Asana’s custom fields feature allows you to add additional metadata and tags to tasks. By utilizing custom fields, you can designate a field to mark tasks as completed, and then filter or group tasks based on this field. This provides a customizable way to manage completed tasks and make them disappear from your task list.
- Deleting Completed Tasks: If you no longer need the historical data or reference of completed tasks, you have the option to delete them. Deleting completed tasks permanently removes them from your workspace, freeing up storage space and eliminating visual distractions.
By implementing one or a combination of these methods, you can tailor Asana to suit your workflow and ensure that completed tasks no longer clutter your workspace. Choose the method that aligns with your preferences and project requirements, and regain control over your task list.
Option 1: Archiving Completed Tasks
Archiving completed tasks is a simple and effective way to remove them from your task list in Asana while still preserving their historical record. When you archive a task, it is moved to the “Archived” section, making it invisible in your active task view but still accessible if needed in the future.
Here’s how you can archive completed tasks in Asana:
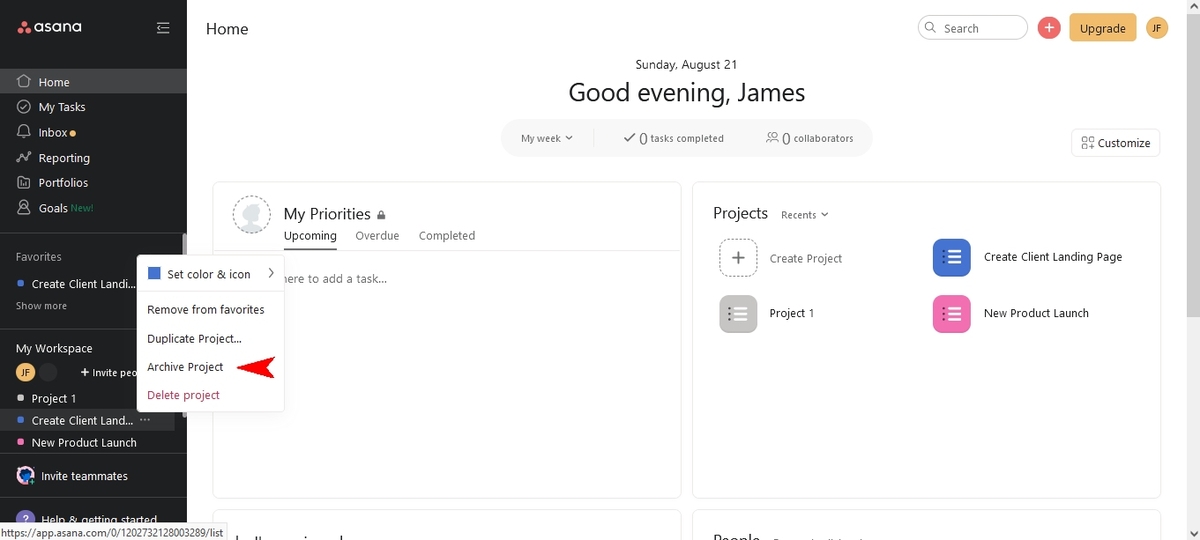
- To archive a single completed task, locate the task in your task list.
- Hover over the task and click on the three-dot menu icon that appears on the right side of the task.
- Select “Archive” from the dropdown menu.
- The task will now be moved to the “Archived” section, disappearing from your task list.
If you want to archive multiple completed tasks, you can use Asana’s multi-select feature:
- Click on the first completed task you want to archive.
- While holding down the Shift key on your keyboard, click on the last completed task in the range you want to archive.
- All the tasks between the first and last selected tasks will be highlighted.
- Hover over any of the selected tasks and click on the three-dot menu icon that appears on the right side of the task.
- Select “Archive” from the dropdown menu.
- These tasks will now be moved to the “Archived” section, disappearing from your task list.
To access archived tasks at any time:
- Scroll to the bottom of your task list and click on the three-dot menu icon next to the “Archived” section.
- Select “Show archived tasks” from the dropdown menu.
- The archived tasks will now be visible in the “Archived” section.
Archiving completed tasks keeps your task list focused on active tasks, eliminating visual clutter and improving productivity. It also ensures that you can retrieve and review completed tasks whenever necessary, without them getting in the way of your current work.
Experiment with archiving completed tasks in Asana, and discover how this simple yet powerful feature can help keep your workspace organized and streamlined.
Option 2: Filtering Completed Tasks
If you prefer to temporarily hide completed tasks in Asana without archiving them, you can use the filtering feature to customize your task view. Filtering completed tasks allows you to focus on the active tasks that require your attention, reducing visual distractions and improving productivity.
Here’s how you can filter completed tasks in Asana:
- Open your project or task list in Asana.
- Locate the filter icon, usually represented as a funnel or a filter icon, typically located at the top or right side of the task list.
- Click on the filter icon to open the filtering options.
- Look for the “Status” or “Completion” filter option.
- Select the option to filter by “Completed” or “Not Completed”.
- Apply the filter.
Once the filter is applied, Asana will update your task list, hiding the completed tasks based on your selection. Only the active, incomplete tasks will be displayed, allowing you to focus on what needs to be done without the distractions of completed tasks.
Additionally, Asana provides various other filter options that can further customize your task view. You can filter tasks by various criteria such as due date, assignee, tags, custom fields, or any other relevant project-specific filters available.
Experiment with different combinations of filters to find the configuration that works best for you and your team. You can save your filter settings for quick access in the future, making it convenient to switch between different task views based on your needs.
By filtering completed tasks, you can maintain a clean and organized workspace, focusing only on the tasks that require your attention. This allows you to stay productive, prioritize effectively, and ensure that completed tasks do not distract you from your current work.
Utilize the filtering feature in Asana to create a customized task view, tailored specifically to your workflow and project requirements.
Option 3: Using Project Sections
If you prefer to keep completed tasks visible in your Asana workspace while still organizing them separately, using project sections can be an effective solution. Project sections allow you to visually separate completed tasks from active ones, making it easier to focus on the tasks that are currently in progress.
Here’s how you can utilize project sections to manage completed tasks in Asana:
- In your project or task list, identify the completed tasks that you want to organize.
- Click on the task you want to move and drag it to the appropriate section.
- You can create new sections specifically for completed tasks or repurpose existing sections.
- Continue moving the completed tasks to their respective sections until your task list is organized as desired.
By grouping completed tasks into their own sections, they are visually separated from the active tasks. You can easily collapse or hide the sections containing completed tasks, allowing you to focus solely on the tasks that require your attention.
Sections in Asana can also be customized by adding descriptions, due dates, or other relevant information. This can further enhance the organization and clarity of your task list, making it easier for you and your team to manage and track completed tasks.
Using project sections is a flexible and intuitive method to visually distinguish completed tasks from active ones. It allows for a clear and organized workspace, preventing completed tasks from overwhelming your task list while still keeping them readily accessible for reference or review.
Experiment with project sections in Asana, and find the organizational structure that works best for your project or team. By utilizing this feature effectively, you can maintain focus and easily navigate your task list, ensuring that completed tasks do not disrupt your workflow.
Option 4: Creating a “Completed” Project
If you prefer to have a separate space dedicated solely to tracking completed tasks, creating a “Completed” project in Asana can be an effective solution. This option allows you to move completed tasks to a dedicated project, keeping your primary project clean and focused on active tasks.
Here’s how you can create a “Completed” project in Asana:
- Create a new project by clicking on the “+” button in the left sidebar of your Asana dashboard.
- Name the project “Completed Tasks” or a similar name that clearly indicates its purpose.
- Configure the project settings according to your preferences. You may choose to customize the project layout, add custom fields, or set specific access permissions.
- Once your project is set up, move the completed tasks from your primary project to the “Completed Tasks” project.
- Simply select the completed tasks and use the drag-and-drop feature to move them to the new project.
By moving completed tasks to their dedicated project, your primary project remains focused on the tasks in progress. This separation makes it easier to navigate and prioritize tasks while still having quick access to the completed tasks when needed.
Within the “Completed Tasks” project, you can further organize and categorize the completed tasks by creating sections or grouping them based on various criteria such as dates, assignees, or project milestones.
Creating a “Completed” project provides a clear separation between active and completed tasks, optimizing your workspace for ongoing work while still maintaining a comprehensive record of all completed tasks. It allows you to focus on the present while easily referencing past accomplishments and performance.
Experiment with creating a “Completed” project in Asana, and discover how this tailored space for completed tasks can enhance your project management experience. By adopting this approach, you can maintain a tidy and efficient workflow, with completed tasks conveniently accessible in their own dedicated project.
Option 5: Utilizing Custom Fields
In Asana, custom fields offer a powerful way to add additional metadata and tags to tasks. By utilizing custom fields, you can designate a field specifically for marking tasks as completed, providing a customizable solution to make completed tasks disappear from your task list.
Here’s how you can utilize custom fields in Asana to manage completed tasks:
- Open your project or task list in Asana.
- Access the project settings by clicking on the three-dot menu icon at the top right corner of your project.
- Select “Manage Custom Fields” from the dropdown menu.
- Create a new custom field specifically for marking tasks as completed. You can choose a field type that best suits your needs, such as a checkbox or a dropdown.
- Apply the custom field to your tasks by editing each task and marking it as completed using the designated field.
- Once the custom field is applied to your tasks, you can filter or group tasks based on the field to display only the active tasks.
By utilizing custom fields, you have the flexibility to customize how completed tasks are marked and visualized in your task list. You can choose to filter out tasks marked as completed or group tasks based on their completed status, allowing you to focus on the active tasks and hide the completed ones.
In addition to using custom fields for marking completion, you can also leverage other custom fields to add relevant information or categorize tasks. For example, you can create custom fields for priority, department, or any other project-specific criteria that help you optimize your workflow.
Explore the possibilities of custom fields in Asana, and discover how they can provide a tailored and customizable approach to managing completed tasks. By leveraging this functionality, you can maintain a clean and focused task list, ensuring that only relevant and active tasks are visible.
Option 6: Deleting Completed Tasks
If you no longer need the historical data or reference of completed tasks in Asana, you have the option to delete them. Deleting completed tasks permanently removes them from your workspace, freeing up storage space and eliminating visual distractions.
Here’s how you can delete completed tasks in Asana:
- Open your project or task list in Asana.
- Locate the completed tasks that you want to delete.
- Hover over a task and click on the three-dot menu icon that appears on the right side of the task.
- Select “Delete” from the dropdown menu.
- A confirmation message will appear asking if you want to permanently delete the task. Click “Delete” again to confirm.
- The completed task will be permanently deleted from your workspace.
It’s important to note that once a task is deleted, it cannot be recovered. Therefore, make sure to double-check and ensure that you do not need the task or its associated data before proceeding with deletion.
Deleting completed tasks can be a valuable option if you no longer require the information or if archiving or filtering does not suit your needs. It provides a clean and minimalistic workspace, focusing only on the current and active tasks.
However, exercise caution when using this option, especially if there is a possibility that you may need the completed task data in the future for reference, analysis, or reporting purposes. If in doubt, consider archiving or filtering the completed tasks instead of deleting them to maintain a comprehensive project history.
By selectively deleting completed tasks in Asana, you can keep your workspace clutter-free and streamlined, ensuring that only relevant and active tasks remain visible.
Recap: Choosing the Best Method for You
Asana provides several effective options for making completed tasks disappear from your workspace. Let’s recap the different methods discussed in this article:
- Archiving Completed Tasks: Archiving allows you to remove completed tasks from your task list while preserving their historical data, providing a clean and focused workspace.
- Filtering Completed Tasks: By applying filters, you can temporarily hide completed tasks, enabling you to concentrate on active tasks without visual distractions.
- Using Project Sections: Organizing your tasks into sections allows you to visually separate completed tasks from active ones, improving clarity and focus.
- Creating a “Completed” Project: By moving completed tasks to a dedicated project, you can create a clear separation between active and completed tasks, maintaining a streamlined primary project.
- Utilizing Custom Fields: Custom fields offer a customizable solution to mark tasks as completed and filter or group tasks based on their completion status.
- Deleting Completed Tasks: If you no longer need the historical data or reference of completed tasks, deleting them permanently removes them from your workspace.
When deciding which method to use, consider your specific needs, project requirements, and personal preferences. Ask yourself the following questions:
- Do you want to preserve the historical data of completed tasks?
- Do you need to access completed tasks easily for reference or review?
- Does the visual presence of completed tasks distract you?
- Would you prefer a separate space for completed tasks or a seamless integration with active tasks?
Based on your answers, choose the option that aligns most closely with your workflow and preferences. You can also combine multiple methods, such as archiving completed tasks along with utilizing custom fields or project sections, to tailor your workspace further.
Remember, the goal is to create an organized and productive workspace that supports your project management needs. Experiment with different methods, adjust as necessary, and find the best approach that works for you and your team.
Conclusion
Managing completed tasks in Asana is essential for maintaining an organized and efficient workspace. By implementing the various methods discussed in this article, you can make completed tasks disappear from your task list, allowing you to focus on the tasks that require your attention.
Whether you choose to archive completed tasks, filter them out, use project sections, create a “Completed” project, utilize custom fields, or even delete them, each method offers a unique way to optimize your task management workflow in Asana.
It’s important to consider your specific needs and preferences when selecting the best approach for managing completed tasks. You may also find that a combination of methods suits your workflow, providing a customized solution for your project requirements.
Remember, while making completed tasks disappear can improve clarity and productivity, it’s crucial to find the right balance. Retaining access to completed tasks can provide valuable historical data, encourage collaboration, and contribute to future project improvements.
Explore the options available in Asana, experiment with different methods, and find the approach that works best for you. Regularly evaluate and adjust as necessary to ensure your workspace remains organized, focused, and conducive to effective project management.
By implementing the techniques discussed in this article, you’ll be able to maintain a streamlined and efficient workflow in Asana, where active tasks take center stage, and completed tasks fade into the background, ready to be referenced if and when needed.