Choosing the Right Photos
When creating a digital photo collage, one of the first steps is to choose the right photos. Whether you are creating a collage as a gift or for personal use, selecting the right images is crucial to ensuring the final result is visually appealing and engaging. Here are some tips to help you choose the right photos for your digital collage:
- Meaningful Moments: Select photos that capture meaningful moments or tell a story. This could be a collection of family pictures, vacation memories, or a series of photos documenting a specific event. Having a theme or concept in mind while choosing the photos will give your collage a cohesive look and feel.
- Different Perspectives: Mix up your photo selection by including images taken from different angles or perspectives. This can add visual variety and make your collage more dynamic. Experiment with close-up shots, landscape photos, and candid shots to add diversity to your collage.
- Color Scheme: Consider the overall color scheme of your collage. Choose photos that complement each other in terms of color tones. For example, if you want a vibrant and energetic collage, opt for photos with bold and bright colors. If you prefer a more serene and calming look, choose photos with softer and muted hues.
- Contrast and Balance: Achieve a well-balanced collage by selecting photos that have contrasting elements. Mix photos with different sizes, orientations, and subjects to create visual interest. Balance the placement of visually heavy and visually light photos to avoid a cluttered or unbalanced composition.
- Quality and Resolution: It’s important to use high-quality images with good resolution for your collage. Blurry or pixelated photos can diminish the overall quality of your collage. Ensure that your chosen photos are clear, sharp, and of sufficient resolution to maintain quality when enlarged or printed.
- Emotional Connection: Ultimately, choose photos that evoke emotions and convey the message or sentiment you want to express through your collage. Look for pictures that make you smile, reminisce, or feel a particular emotion. By selecting photos that resonate with you, your collage will have a personal touch that truly reflects your unique vision.
With these tips in mind, take your time to curate a collection of photos that resonate with your desired theme or concept. Remember that the success of your digital photo collage relies heavily on the photos you choose, so make sure they speak to you and effectively convey your intended message.
Selecting a Theme for Your Collage
When creating a digital photo collage, selecting a theme is an important step that can bring cohesion and visual impact to your project. A theme serves as a guiding concept or idea that ties the individual photos together, creating a unified and harmonious collage. Here are some tips to help you select the perfect theme for your digital photo collage:
- Consider the Purpose: Think about the purpose of your collage. Are you creating it to showcase a memorable event, celebrate a loved one, or document your travels? Understanding the purpose will help you narrow down the theme options.
- Personal Interests: Choose a theme that aligns with your personal interests or hobbies. If you’re passionate about nature, consider creating a collage centered around landscapes, flowers, or wildlife. If you love cooking, gather photos of your favorite recipes or food creations.
- Seasons and Holidays: Incorporate the seasonal or holiday element into your collage theme. For example, if it’s autumn, you can create a collage filled with colorful foliage and cozy scenes. If it’s Christmas, focus on images of ornaments, festive decorations, and joyful moments.
- Color Palette: Select a theme based on a specific color palette that appeals to you. This can guide the photo selection process and create a visually cohesive collage. For example, you can choose a theme revolving around shades of blue, or opt for a vibrant and diverse color palette.
- Emotions and Moods: Explore themes that evoke specific emotions or moods. Whether it’s joyous, nostalgic, peaceful, or playful, incorporating emotions into your collage theme can add depth and impact to the final result.
- Storytelling: Consider creating a collage that tells a story or depicts a sequence of events. This theme can be especially powerful when documenting a journey, a relationship, or a special occasion. Arrange the photos in a way that flows logically to convey the narrative effectively.
- Combinations: Don’t be afraid to combine different themes or concepts to create a unique and interesting collage. Mix and match ideas to bring depth and variety to your project. For example, you can blend a travel theme with a vintage-inspired aesthetic for a truly captivating collage.
Remember to select a theme that resonates with you and aligns with the purpose of your collage. Choosing a theme that you are passionate about will not only make the process more enjoyable but also result in a collage that reflects your personal style and vision. So, let your creativity flow and explore the endless possibilities when selecting a theme for your digital photo collage.
Gathering High-Quality Images
When creating a digital photo collage, the quality of your images plays a crucial role in the final outcome. High-quality images not only enhance the visual appeal of your collage but also ensure that the details and clarity are preserved when enlarged or printed. Here are some tips to help you gather high-quality images for your digital photo collage:
- Choose the Right Source: Start by selecting a reliable and trustworthy source for your images. Whether you want to use your personal photo collection, explore stock photo websites, or collaborate with other photographers, make sure the source provides high-resolution images suitable for printing or enlarging.
- Resolution Matters: Opt for images with a high resolution. Higher resolution means greater detail and clarity, resulting in a sharper and more professional-looking collage. Aim for images with a resolution of 300 DPI (dots per inch) or higher to ensure optimal quality.
- Avoid Compression: Be mindful of image compression when gathering your images. Compression can degrade the quality of the image, leading to pixelation or loss of fine details. If using images from the internet, try to find sources that offer uncompressed or minimally compressed versions of the photos.
- Check for Watermarks: If using images from stock photo websites, be aware of watermarked images. Watermarks are typically used to protect copyrighted images and can be distracting or limit your usage options. Look for non-watermarked versions or consider purchasing the images for a clean and professional finish.
- Focus on Lighting and Composition: Pay attention to the lighting and composition of the images you choose. Well-lit photos with proper exposure and balanced composition will have a more pleasing aesthetic and contribute to the overall quality of your collage. Avoid using images that are poorly lit, overly dark, or poorly composed.
- Originality and Variety: Strive for a mix of original and diverse images. While using your own photos is a great way to add a personal touch to your collage, incorporating images from different sources can provide variety and depth. This can include landscapes, portraits, still lifes, or even abstract images.
- Edit and Enhance: Don’t be afraid to edit and enhance your images to improve their quality. Use photo editing software to adjust brightness, contrast, and color balance. Crop, resize, or sharpen images as needed to achieve the desired look. However, be careful not to overdo the edits or alter the essence of the original photo.
Remember, the quality of your images significantly impacts the final outcome of your digital photo collage. By selecting high-resolution images, avoiding compression, and paying attention to lighting and composition, you can gather a collection of images that bring your collage to life in stunning detail. Take your time to gather and curate a set of high-quality images that align with your vision and create an impactful collage.
Organizing and Editing Your Photos
Once you have gathered the photos for your digital photo collage, the next step is to organize and edit them to bring out their full potential. By carefully organizing your photos and making necessary edits, you can ensure that they seamlessly blend together to create a visually cohesive and compelling collage. Here are some tips to help you organize and edit your photos effectively:
- Review and Sort: Begin by reviewing all the photos you have collected. Sort them based on their relevance, quality, and how well they fit into your chosen theme. Eliminate any duplicate or unnecessary photos to streamline your selection process.
- Categorize and Group: Categorize your photos into groups based on common elements such as subject, color palette, or composition. This will help you visualize how different images can work together and make it easier to organize them on the digital canvas later.
- Trim and Crop: Use photo editing software to trim and crop your photos if needed. Adjust the framing and composition to remove any distracting elements or to create a more cohesive look. Be mindful of the aspect ratio if you plan on printing or sharing your collage in a particular format.
- Balance Exposure and Colors: Ensure that the exposure and color balance across your photos are harmonious. Use editing tools to adjust the brightness, contrast, and saturation. Aim for a consistent look and feel throughout your collage by ensuring that all the photos have a similar visual tone.
- Experiment with Filters and Effects: Explore different filters and effects to add a touch of creativity and style to your photos. However, exercise caution and use them sparingly so as not to overpower the overall composition of your collage. The goal is to enhance the images, not overshadow them.
- Consider Black and White: Experiment with converting some of your photos to black and white. This can add a timeless and artistic element to your collage. It can also help unify and balance out color variations among the photos.
- Create a Grid or Storyboard: Lay out your photos in a grid or storyboard format to get a sense of how they will look together. This will help you determine the arrangement and placement of the photos on the digital canvas. Play around with different combinations to find the most visually pleasing arrangement.
- Keep Backup Copies: It is always a good practice to keep backup copies of your original photos before making any edits. This allows you to revert to the original version if necessary and ensures that your photos are safely preserved.
By organizing your photos based on relevance, editing them for optimal visual impact, and experimenting with different arrangements, you can create a cohesive and visually engaging digital photo collage. Take your time during this process to ensure that each photo is carefully curated and edited to bring out its best qualities.
Using Online Collage-Making Tools
Creating a digital photo collage has become even more accessible and convenient with the availability of online collage-making tools. These tools offer a user-friendly interface and a wide range of features that can help you bring your vision to life. Here are some tips for using online collage-making tools effectively:
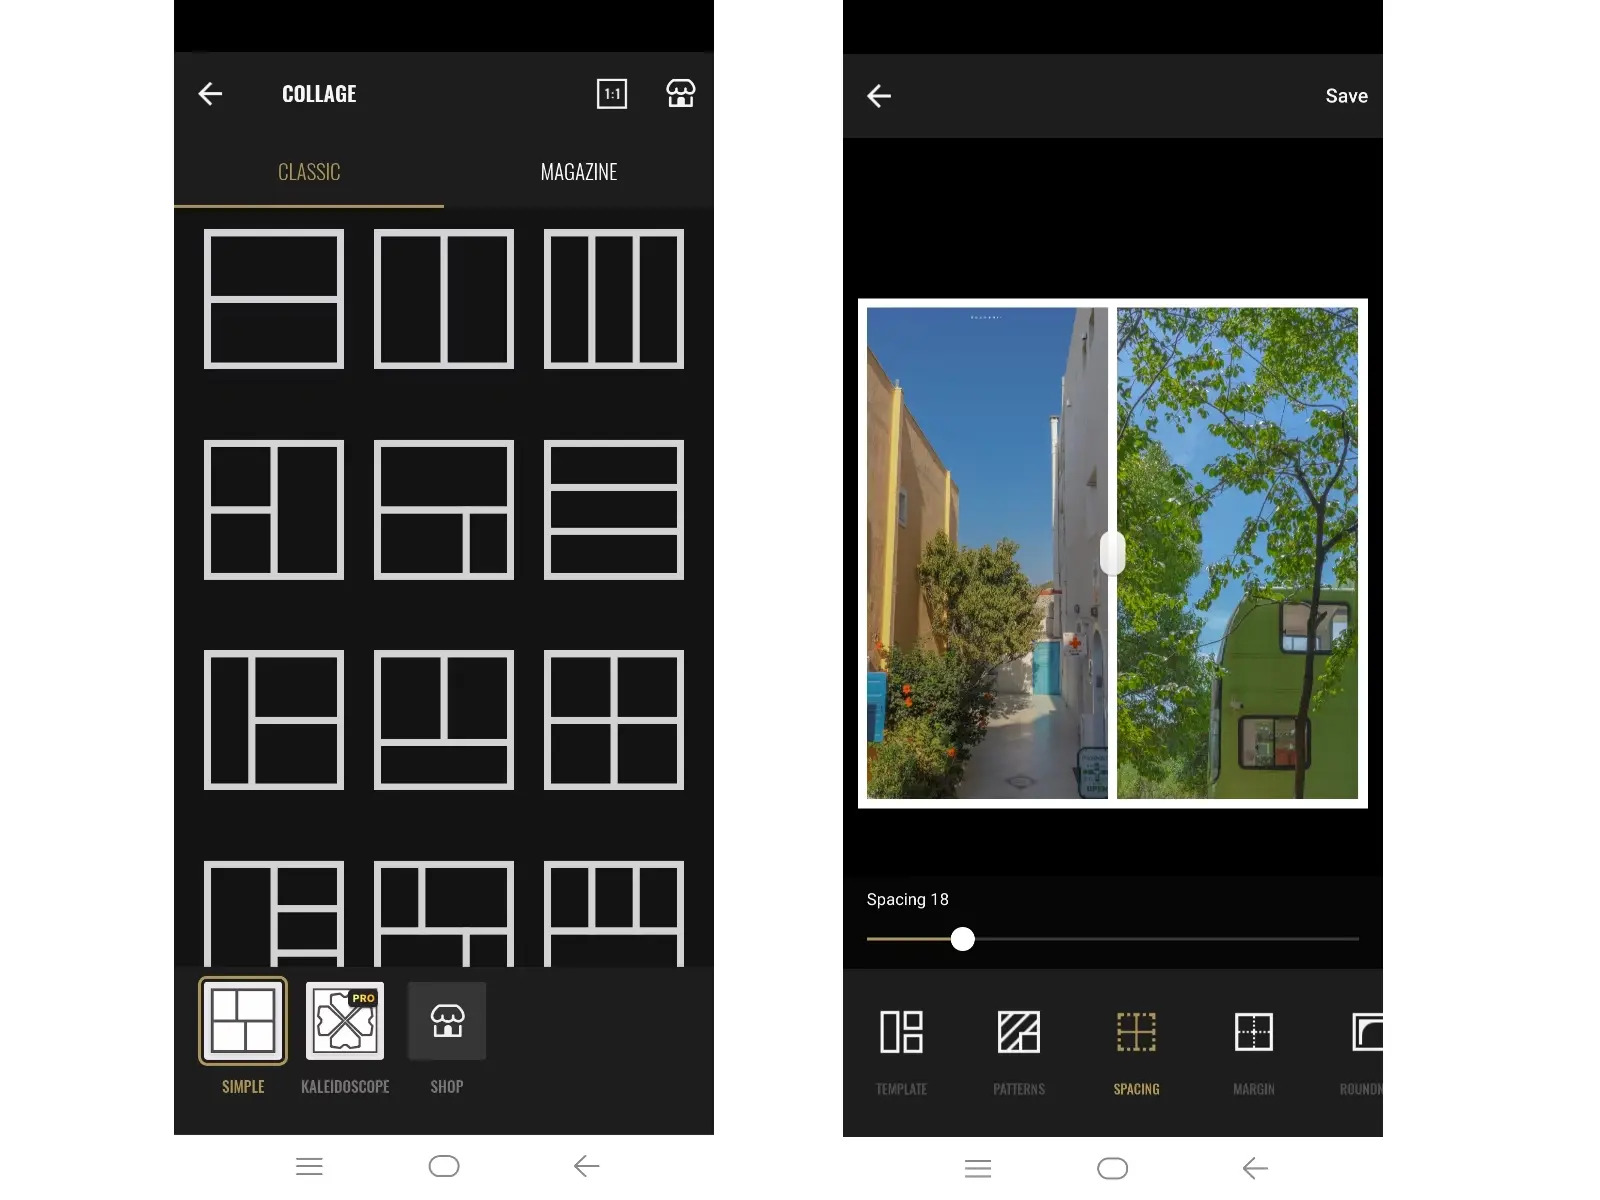
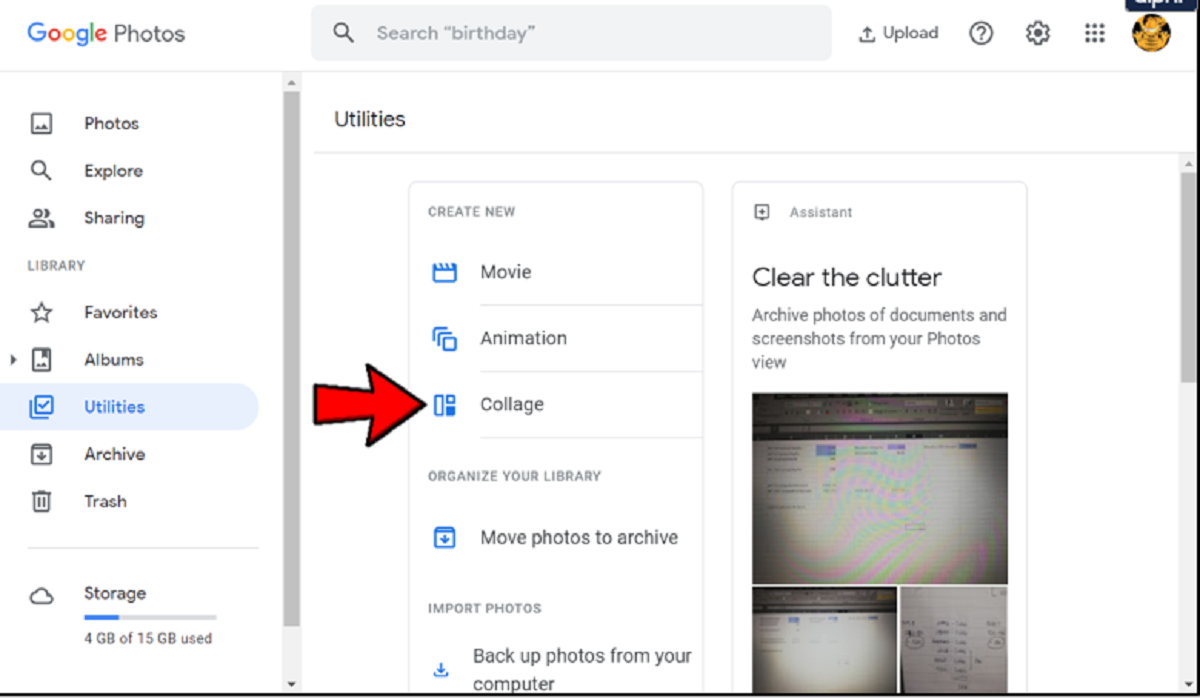
- Choose the Right Tool: Research and explore different online collage-making tools to find one that suits your needs and preferences. Look for tools that offer the features you require, such as drag-and-drop functionality, customizable templates, and the ability to export high-resolution collages.
- Import and Arrange Photos: Most online collage-making tools allow you to import photos directly from your computer or from cloud storage services. Once imported, easily arrange your photos by dragging and dropping them onto the canvas. Experiment with different placements and sizes to find the perfect arrangement.
- Explore Templates: Many online collage-making tools provide pre-designed templates that offer a stylish and professional look. Browse through the template library to find one that complements your theme or concept. Templates can greatly simplify the process of creating a collage while providing a visually appealing foundation to build upon.
- Customize the Design: Don’t be afraid to personalize the design of your collage by modifying the template or starting from scratch. Adjust the layout, spacing, and colors to fit your vision. Online tools often offer a variety of customization options, such as adding borders, adjusting opacity, or applying filters.
- Add Text and Captions: Consider adding text or captions to enhance your collage. Online collage tools usually offer text editing capabilities, allowing you to customize fonts, sizes, colors, and positioning. Text can be used to provide context, convey emotions, or simply label the photos in your collage.
- Include Overlays and Stickers: Many online collage-making tools provide a range of overlays, stickers, and graphic elements to sprinkle some creativity onto your collage. These elements can add visual interest, emphasize certain aspects of your collage, or create a whimsical touch.
- Save and Export: Once you are satisfied with your collage, save your work. Online tools typically allow you to save your collage directly to your computer or cloud storage. Make sure to choose a high-resolution option to maintain the quality of your collage. You can also find options to share your collage directly on social media or print it out for display.
- Experiment and Have Fun: Online collage-making tools offer endless possibilities, so don’t be afraid to experiment with different features and settings. Play around with different layouts, effects, and styles to find the perfect combination. Remember to have fun throughout the process and let your creativity flourish.
Using online collage-making tools can simplify the creation process and provide you with the tools necessary to bring your vision to life. Take advantage of the features offered by these tools to create a visually stunning and personalized digital photo collage.
Arranging Your Photos on a Digital Canvas
When creating a digital photo collage, arranging your photos on a digital canvas is a crucial step that determines the visual layout and composition of your collage. The way you position and organize your photos can greatly affect the overall impact and storytelling of your collage. Here are some tips to help you arrange your photos effectively on a digital canvas:
- Experiment with Placement: Begin by experimenting with different placements for your photos. Consider the size, orientation, and subject matter of each photo as you arrange them. Try different arrangements such as grids, diagonals, or asymmetrical compositions to find the most visually pleasing layout.
- Consider Visual Flow: Pay attention to the visual flow of your collage. Guide the viewer’s eye through the collage by placing photos in a way that creates a natural flow from one photo to the next. Use leading lines, diagonal angles, or the placement of focal points to guide the viewer through the collage.
- Create Balance: Strive for a sense of balance in your collage. Balance can be achieved both in terms of color and composition. Avoid clustering similar photos together or having an imbalance of visual weight in one area of the collage. Distribute photos with varying sizes, colors, and subjects throughout the canvas to create a harmonious composition.
- Overlap and Layering: Experiment with overlapping and layering your photos to add depth and dimension to your collage. Overlaying photos can create an interesting visual effect and help connect different elements within the collage. Be mindful of how the different photos interact and ensure that the overlapping enhances the overall composition.
- Create Focal Points: Determine the focal points within your collage and strategically place photos that draw attention to those points. This can be achieved through the position, size, or visual weight of the photos. Focal points help create visual interest and guide the viewer’s attention to key elements within the collage.
- Consider Background and Negative Space: Pay attention to the background and negative space surrounding your photos. The background can either be a solid color or an image itself. Leaving negative space around your photos can provide breathing room and give your collage a clean and balanced look.
- Keep Consistency: Maintain consistency in terms of photo size, lighting, and color tone within your collage. Consistency helps create cohesion and ensures that the collage feels harmonious. If needed, make adjustments to the size, brightness, or color balance of your photos to maintain a consistent look throughout the composition.
- Step Back and Review: Once you have arranged your photos, take a step back and review the overall composition. Look for any areas that may need adjustment or improvement. Consider seeking feedback from others to gain a fresh perspective on your collage.
Arranging your photos on a digital canvas is both an art and a skill. By considering visual flow, balance, focal points, and negative space, you can create a visually pleasing and engaging collage that tells a compelling story. Don’t be afraid to experiment and iterate until you achieve the desired composition.
Adding Personal Touches and Effects
Adding personal touches and effects to your digital photo collage can elevate it from a collection of images to a unique and visually captivating creation. These personal touches reflect your individuality and artistic expression, making your collage truly special. Here are some ideas for adding personal touches and effects to your collage:
- Handwritten Messages: Consider incorporating handwritten messages or quotes onto your collage. This personalizes the collage and adds a heartfelt touch. You can either write directly on the digital canvas using a graphic tablet or scan your handwritten messages and overlay them onto the photos using photo editing software.
- Custom Illustrations: If you have illustration skills or know someone who does, consider adding custom illustrations to your collage. These illustrations can be integrated into the photos or used as stand-alone elements. They add a unique artistic flair and make your collage a truly one-of-a-kind creation.
- Textures and Overlays: Experiment with adding textures and overlays to your photos. These effects can give your collage a vintage, grunge, or artistic look. Play around with different textures such as paper, fabric, or watercolor. Overlays, like light leaks or bokeh effects, can add depth and whimsy to your collage.
- Photo Borders and Frames: Enhance the appearance of your photos by adding borders or frames. Borders can be simple lines or more intricate designs that complement the theme of your collage. Frames can range from classic and elegant options to fun and playful ones, depending on the mood you want to create.
- Collage Background: Consider customizing the background of your collage. This can be a solid color that complements the photos or a more elaborate background image or pattern. The background can set the tone and mood of your collage and make it more visually appealing.
- Selective Coloring: Experiment with selective coloring to draw attention to specific elements of your photos. Convert the majority of the photo to black and white while leaving specific areas in color. This technique can highlight important details or create a dramatic effect within your collage.
- Photo Mosaics and Blends: Play with photo mosaics and blends to create interesting visual effects. Use smaller versions of your photos to form a larger image or experiment with blends to achieve a dreamy or surreal look. These techniques can add an element of surprise and intrigue to your collage.
- Digital Brushes and Stamps: Utilize digital brushes and stamps to add decorative or thematic elements. These brushes can be customized shapes, patterns, or motifs that enhance the overall aesthetic of your collage. They can be used to create a border, highlight specific areas, or add artistic details.
- Handmade Elements: Don’t limit yourself to digital effects only; consider incorporating actual handmade elements into your collage. This can be physical objects, cutouts, or textures that you scan and integrate into the digital collage. These handmade touches add a tactile and personal feel to your creation.
When adding personal touches and effects to your digital photo collage, let your creativity shine and make it a true reflection of who you are. Experiment with different techniques and explore various styles to create a collage that is uniquely yours.
Balancing Colors and Tones
Colors and tones play a significant role in the overall aesthetic and impact of your digital photo collage. Balancing the colors and tones in your collage ensures a visually cohesive and harmonious composition. By paying attention to color combinations, contrast, and overall tonal balance, you can create a visually stunning collage. Here are some tips for balancing colors and tones in your collage:
- Color Harmony: Select a color palette that harmonizes with the theme or mood of your collage. The color palette can be monochromatic, complementary, analogous, or any combination that suits your vision. Make sure the colors work well together and create a sense of visual unity.
- Contrast: Use contrast strategically to create visual interest and make certain elements stand out. Contrast can be achieved through differences in color, tone, brightness, or saturation. Ensure there is enough contrast between the main elements of your collage to draw attention and create depth.
- Tonal Balance: Aim for a balanced distribution of light and dark tones throughout your collage. Too much light or dark in one area can create imbalance and affect the overall visual impact. Adjust the brightness, contrast, and exposure of each photo to ensure a consistent tonal balance across the entire composition.
- Color Temperature: Pay attention to the color temperature of your photos. Images with warm tones (such as reds, yellows, and oranges) create a cozy and inviting atmosphere, while cool tones (such as blues and greens) evoke a calming and serene vibe. Decide on the desired color temperature and adjust the colors of your photos accordingly.
- Selective Color Adjustments: Make selective color adjustments to individual photos or specific areas within your collage. This allows you to enhance or mute certain colors to achieve the desired look. This technique can help create a focal point, highlight key elements, or add a touch of artistic flair to your collage.
- Consistency and Cohesion: Ensure that the colors and tones in your collage have a consistent and cohesive look. The photos should feel like they belong together and relate to one another in terms of color. Adjust the color balance and saturation of the photos to create a unified visual experience.
- Avoid Overwhelming Colors: Be mindful of overwhelming or overpowering colors that can detract from the overall composition. Use colors in moderation and don’t allow one color to dominate the entire collage. Subtle variations and a balanced distribution of colors will create a more visually pleasing and harmonious collage.
- Test and Review: Regularly test your collage by viewing it at different scales and in various lighting conditions. This allows you to identify any color issues or imbalances that may not be immediately apparent. Make adjustments as needed to achieve an optimal color balance.
By consciously balancing colors and tones in your digital photo collage, you can create a visually appealing and cohesive composition. Pay attention to color harmony, contrast, tonal balance, and consistency to ensure that your collage is a harmonious visual masterpiece.
Including Text and Graphic Elements
Adding text and graphic elements to your digital photo collage can enhance its storytelling capabilities and provide additional visual interest. By incorporating relevant text and thoughtfully chosen graphic elements, you can convey a message, provide context, or create a unique atmosphere within your collage. Here are some tips for including text and graphic elements in your collage:
- Captions and Labels: Consider adding captions, labels, or descriptive text to your photos. This helps provide context and adds a layer of information to the collage. Whether it’s a date, location, or brief description, captions can enhance the viewer’s understanding and engagement with the images.
- Quotes and Song Lyrics: Incorporate meaningful quotes, inspirational phrases, or song lyrics that complement the theme or mood of your collage. Choose text that resonates with the content of your photos, adding depth and emotional connection to the overall composition.
- Handwritten Notes: For a personal touch, consider including handwritten notes or messages on your collage. This can be done by scanning or photographing your handwritten notes and overlaying them onto the photos using photo editing software. Handwritten notes add a warm and personal feel to your collage.
- Decorative Typography: Experiment with different fonts, sizes, and styles to create visually appealing typography elements. Use decorative typography to add artistic flair or draw attention to specific words or phrases within your collage. Make sure the typography complements the theme and aesthetics of your overall composition.
- Shapes and Icons: Incorporate shapes and icons that are relevant to the content of your photos. These graphic elements can help convey a specific message or create a visual theme. They can be used as stand-alone design elements or integrated with the photos themselves.
- Artistic Overlays: Add artistic overlays or textures to your collage to enhance its visual appeal. This can include watercolor washes, grunge effects, or even patterns that add depth and texture to the overall composition. Experiment with different overlays to achieve the desired artistic effect.
- Arrows and Lines: Use arrows or lines to guide the viewer’s eye through your collage. These elements can help create visual flow and direct attention to specific details or focal points within the composition. By strategically placing arrows or lines, you can add emphasis or highlight important aspects of your photos.
- Collage Borders: Consider adding borders or frames around your collage to provide a cohesive and visually appealing edge. Borders can be simple lines, decorative patterns, or customized designs that enhance the overall aesthetics of your collage. Experiment with different border styles and thicknesses to find the perfect fit for your composition.
- Blend and Integrate Elements: Ensure that the added text and graphic elements blend seamlessly with the photos and do not overpower the overall collage. Adjust the opacity, color, or blending mode of the elements to create a harmonious integration. Aim for a cohesive design that allows all the elements to work together effectively.
By including text and graphic elements in your digital photo collage, you can add depth, context, and artistic flair. Consider the purpose of your collage and choose elements that enhance the storytelling aspect while ensuring they complement the overall aesthetics of your composition.
Saving and Sharing Your Digital Photo Collage
Once you have created your digital photo collage, it’s important to save and share it properly to preserve its quality and ensure it reaches its intended audience. Saving and sharing your collage allows you to showcase your creativity, share memories, or deliver a personalized gift. Here are some tips for saving and sharing your digital photo collage:
- Save a High-Resolution Version: Before sharing your collage, save a high-resolution version to maintain its quality. Choose the highest resolution available in your collage-making software to ensure that the images and text remain sharp and detailed. Saving in a lossless file format such as PNG or TIFF is recommended to retain image quality.
- Consider Different Formats: Depending on your intended use, consider saving your collage in different formats. For online sharing, JPEG or PNG formats are commonly used and provide a good balance between image quality and file size. If you plan to print your collage, save it as a high-resolution PDF or TIFF file for optimal printing results.
- Watermark and Copyright: If you want to protect your collage from unauthorized use, consider adding a discreet watermark or copyright notice. This can be done using photo editing software or online tools. Adding a watermark can deter others from using your collage without permission while still allowing it to be shared and enjoyed.
- Choose the Right Resolution for Online Sharing: When sharing your collage on social media platforms or websites, ensure that you choose an appropriate resolution. While high-resolution images offer better quality, they can also slow down the loading speed of webpages. Resize your collage to a resolution that is suitable for online viewing and sharing.
- Select Appropriate Sharing Platforms: Decide on the platforms or channels you want to use for sharing your collage. Social media platforms like Instagram, Facebook, and Twitter are popular for sharing visual content. If you want to share with a more specific audience, consider using email, messaging apps, or creating an online gallery or portfolio.
- Include Descriptive Captions: When sharing your collage, consider adding descriptive captions or a brief story to provide context or share the emotions behind the images. This can help viewers appreciate the collage and understand the significance of the photos. Descriptive captions can enhance the overall impact and engagement of your collage.
- Respect Privacy: If your collage includes photos of others, be mindful of their privacy and obtain their consent before sharing it publicly. Respect their right to privacy and ensure that you only share the collage with the appropriate permissions and in line with their comfort level.
- Print and Display Options: If you want a physical copy of your collage, consider printing it. Explore printing options such as photo printing services, home printers, or creating a photo book. Display your printed collage in frames, on canvas, or as part of a larger display to showcase it in your home or gift it to others.
- Backup and Archive: It’s important to keep a backup of your digital collage to prevent loss due to computer malfunctions or accidents. Store a copy of your collage on external storage devices, in cloud storage, or on multiple devices to ensure its longevity. This way, you can revisit and share your collage for years to come.
By following these tips, you can ensure that your digital photo collage is saved and shared in the best possible way. Whether you choose to share it online, print it, or gift it to someone special, preserving the quality and respecting privacy considerations will help showcase your creative work effectively.