“
Introduction
Welcome to this guide on how to look up your GPU information on Windows 10. Whether you’re a gamer, a content creator, or simply curious about your computer’s hardware, knowing the details of your GPU (Graphics Processing Unit) can be beneficial. Your GPU plays a crucial role in rendering graphics and accelerating tasks related to visual processing.
Windows 10 provides several methods to find the information about your GPU. In this article, we will explore three different methods that you can use to look up your GPU details. The first method involves using the Device Manager, which is a built-in Windows utility that displays information about the hardware installed on your system. The second method entails utilizing the DirectX Diagnostic Tool, commonly referred to as DxDiag, which provides detailed information about your GPU and other DirectX components. Finally, we will discuss third-party software options that can provide even more in-depth GPU information.
Before we dive into the specifics of each method, it’s essential to understand why knowing your GPU information can be valuable. Firstly, if you’re a gamer, understanding your GPU’s capabilities can help you determine whether your system meets the requirements for running certain games. Some games might demand more powerful GPUs to achieve optimal performance and visual quality. By knowing your GPU’s model and specifications, you can make informed decisions about upgrading or overclocking your hardware.
Secondly, if you work with graphic-intensive applications such as video editing software or 3D modeling tools, knowing your GPU’s capabilities becomes even more critical. These applications heavily rely on the GPU for processing complex graphics and rendering tasks. By having a clear understanding of your GPU’s specifications, you can ensure that it can handle the demands of your workflow.
Even if you’re not a gamer or a content creator, understanding your GPU’s capabilities can still be useful. Knowing the type of GPU on your system can help you troubleshoot graphics-related issues and determine whether updating drivers or adjusting settings can improve performance.
Now that we have established the significance of knowing your GPU information, let’s proceed to the first method: using the Device Manager to find your GPU details.
“
“
Finding GPU Information in Windows 10
Windows 10 offers multiple methods to find your GPU information. In this section, we will cover three primary methods: using the Device Manager, utilizing the DirectX Diagnostic Tool (DxDiag), and exploring third-party software options.
Method 1: Using the Device Manager
The Device Manager is a built-in Windows utility that allows you to manage and view information about the hardware devices connected to your computer. To access the Device Manager, simply right-click on the Start menu and select ‘Device Manager’ from the dropdown menu.
Once the Device Manager window opens, expand the ‘Display adapters’ category. Here, you will find the list of GPUs installed on your system. Right-click on the GPU you want to view information for and select ‘Properties.’
In the Properties window, you can view details such as the GPU’s manufacturer, model, driver version, and more. This method provides basic information about your GPU, but if you require more in-depth details, you can proceed to the next method.
Method 2: Using the DirectX Diagnostic Tool (DxDiag)
The DirectX Diagnostic Tool, or DxDiag, is a Windows utility that provides detailed information about your GPU and other DirectX components installed on your system.
To access DxDiag, press the Windows key + R to open the ‘Run’ dialog box. Type ‘dxdiag’ in the text field and click ‘OK.’
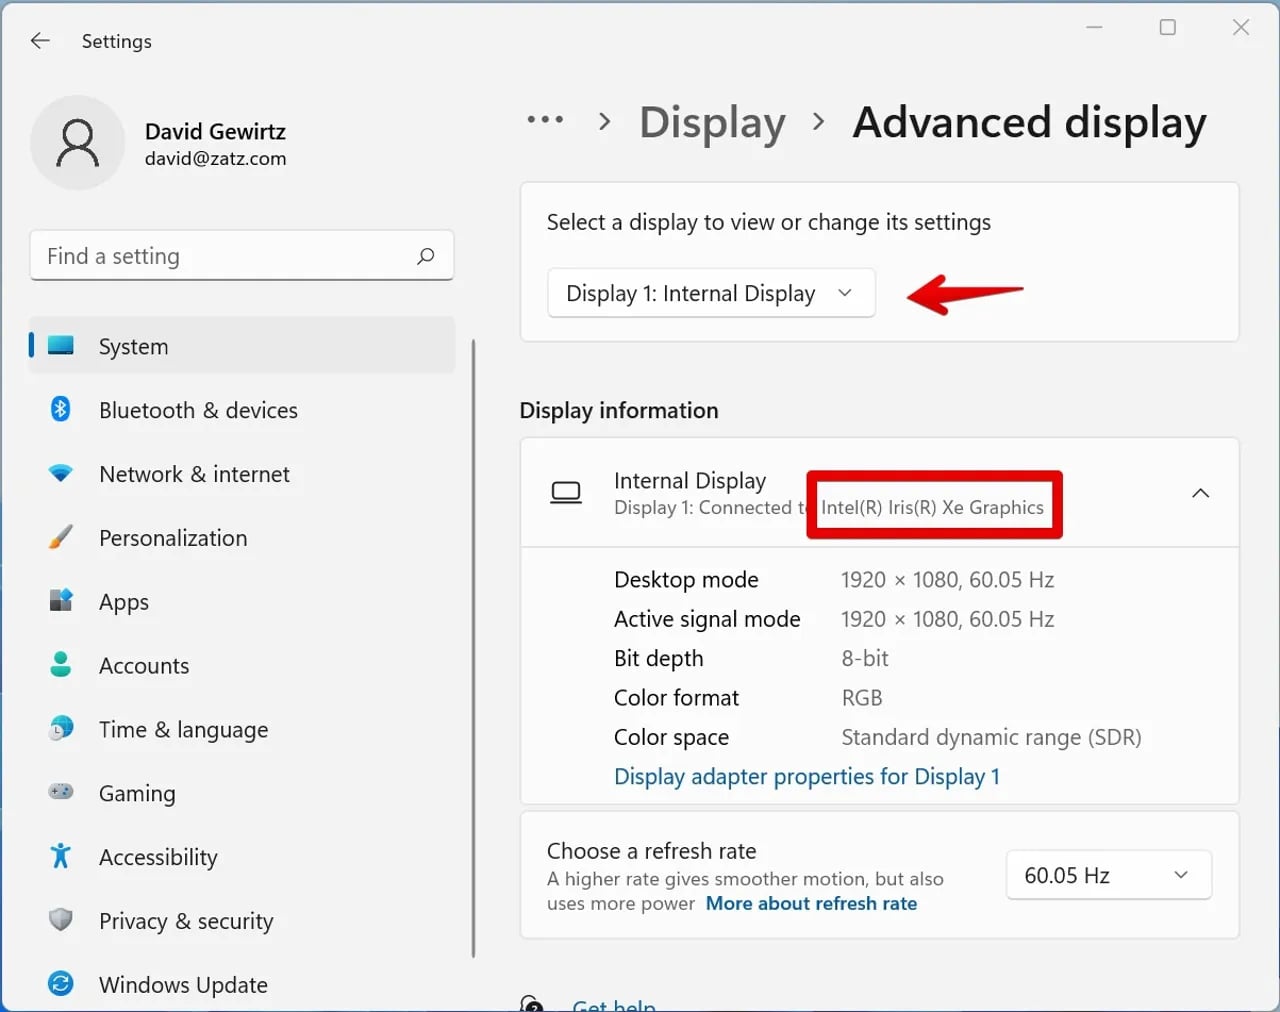
Once DxDiag opens, navigate to the ‘Display’ tab. Here, you will find comprehensive information about your GPU, including the device name, manufacturer, driver version, display memory, and more. This method provides more detailed GPU information compared to the Device Manager.
Method 3: Using Third-Party Software
If you require even more extensive GPU information, you can opt for third-party software dedicated to system monitoring and hardware analysis. These tools offer advanced features and detailed insights into your GPU’s performance, temperature, clock speeds, and more.
Popular third-party software options include GPU-Z, MSI Afterburner, and HWiNFO. These tools are free to download and easy to use. Once installed, they provide real-time monitoring and comprehensive GPU information to help you understand and optimize your GPU’s performance.
With these three methods, you can easily find your GPU information on Windows 10. Depending on your needs, you can choose the method that suits you best. Now that you know how to find your GPU details, you can make informed decisions about your hardware and ensure optimal performance for gaming, content creation, or any graphics-intensive tasks you may undertake.
“
“
Method 1: Using the Device Manager
The Device Manager is a built-in Windows utility that allows you to manage and view information about hardware devices connected to your computer. It is a convenient method to find basic GPU information such as the manufacturer, model, and driver version. Here’s how you can use the Device Manager to find your GPU details:
- Right-click on the Start menu and select ‘Device Manager’ from the dropdown menu. This will open the Device Manager window.
- In the Device Manager window, look for the ‘Display adapters’ category and expand it by clicking on the arrow next to it. You will see a list of GPUs installed on your system.
- Right-click on the GPU for which you want to view details and select ‘Properties’ from the context menu.
- A Properties window specific to your GPU will open. Here, you can find information such as the GPU’s manufacturer, model, driver version, and other relevant details.
The Device Manager method is quick and straightforward, providing you with essential GPU information. However, if you require more in-depth details about your GPU, you may want to explore other methods, such as using the DirectX Diagnostic Tool (DxDiag) or third-party software options.
Please note that the Device Manager may not always display the latest driver version for your GPU. To ensure you have the most up-to-date driver, it is recommended to visit the manufacturer’s website or use dedicated software to check for driver updates.
Now that you are familiar with how to use the Device Manager to find your GPU information, you have a convenient way to access basic GPU details. Let’s move on to the next method: using the DirectX Diagnostic Tool (DxDiag) to obtain more comprehensive GPU information.
“
“
Method 2: Using the DirectX Diagnostic Tool (DxDiag)
The DirectX Diagnostic Tool, commonly known as DxDiag, is a built-in Windows utility that provides detailed information about your GPU and other DirectX components installed on your system. Using DxDiag, you can access comprehensive GPU information, including device name, manufacturer, driver version, display memory, and more. Here’s how you can use DxDiag to find detailed GPU information:
- Press the Windows key + R to open the ‘Run’ dialog box.
- Type ‘dxdiag’ in the text field and click ‘OK’ or press Enter.
- The DirectX Diagnostic Tool window will open, displaying information about your system’s DirectX components.
- Click on the ‘Display’ tab, located at the top of the DxDiag window.
- Under the ‘Device’ section, you will find detailed information about your GPU, including the device name, manufacturer, driver version, display memory, and more.
DxDiag provides more comprehensive and detailed GPU information compared to the Device Manager. It is particularly useful when you need extensive details for troubleshooting purposes or when working with graphically intensive applications.
In addition to providing GPU information, DxDiag also provides information about other DirectX components, such as the DirectX version installed on your system, system information, and input device information.
By having access to detailed GPU information through DxDiag, you can make informed decisions about your hardware setup and troubleshoot any graphics-related issues you may encounter. If you require even more extensive GPU information, you can explore third-party software options, which we will discuss in the next section.
Now that you are familiar with using the DirectX Diagnostic Tool (DxDiag) to obtain detailed GPU information, let’s move on to the third method: using third-party software for advanced GPU analysis.
“
“
Method 3: Using Third-Party Software
If you want to delve even deeper into your GPU’s capabilities and performance, using third-party software can provide you with advanced features and comprehensive GPU information. These tools offer real-time monitoring, temperature readings, clock speeds, memory usage, and more. Here are some popular third-party software options you can consider:
- GPU-Z: GPU-Z is a lightweight utility that provides detailed information about your GPU. It displays data such as GPU clock speed, memory clock speed, GPU temperature, fan speed, and more. You can download GPU-Z for free from the official website.
- MSI Afterburner: MSI Afterburner is a versatile tool that not only allows you to monitor and analyze your GPU’s performance but also provides features for overclocking and customizing fan profiles. It supports a wide range of GPUs and is available for free.
- HWiNFO: HWiNFO is a comprehensive system information and diagnostic tool that provides in-depth information about various hardware components, including your GPU. It offers detailed statistics, sensor monitoring, and customizable reporting. HWiNFO is available as a free version.
These are just a few examples of the many third-party software options available for analyzing and monitoring your GPU. When selecting a tool, consider your specific needs and the level of detail you require. Each software may have different features and display information in a unique way.
Third-party software can be particularly useful for gamers, content creators, and those who frequently perform graphically intense tasks. By closely monitoring your GPU’s performance, you can optimize settings, detect any potential issues, and ensure that your GPU is running at its full potential.
It’s worth noting that, while third-party software can provide valuable insights, it’s important to download them from reputable sources and ensure that you have the latest version installed. Additionally, be cautious when overclocking your GPU, as it can potentially void warranties or cause instability if not done properly.
Now that you are aware of the options available for obtaining advanced GPU information through third-party software, you can choose the one that best suits your needs and take full advantage of the features provided.
”
“
Conclusion
Knowing how to look up your GPU information on Windows 10 is essential for gamers, content creators, and anyone interested in understanding their computer’s hardware capabilities. By accessing detailed GPU information, you can make informed decisions about upgrading your system, optimizing settings, and troubleshooting graphics-related issues.
In this article, we explored three methods for finding GPU information on Windows 10. The Device Manager provides basic GPU details, such as the manufacturer, model, and driver version. The DirectX Diagnostic Tool (DxDiag) offers more comprehensive information, including the device name, display memory, and more. Third-party software options, such as GPU-Z, MSI Afterburner, and HWiNFO, provide advanced features and real-time monitoring for in-depth GPU analysis.
By utilizing these methods, you can gain a deeper understanding of your GPU’s capabilities, monitor its performance, and ensure optimal settings for gaming, content creation, or other graphically intensive tasks. Whether you choose to use the built-in utilities or rely on third-party software, it’s important to remember to download software from reputable sources and keep it up to date.
Now that you have the knowledge and tools to find GPU information on Windows 10, take advantage of these resources to enhance your computing experience and make the most out of your GPU’s potential. With a better understanding of your GPU’s specifications, you can optimize your system to achieve the best performance and visual quality.
So, what are you waiting for? Explore your GPU information and unleash the power of your Windows 10 system!
“