Introduction
Leaving a Discord server can sometimes be a necessary step to take, whether you’ve outgrown the community, want to reduce your digital presence, or simply no longer have an interest in participating. Discord offers a straightforward process to leave a server, allowing you to exit with just a few clicks.
In this guide, we will take you through the steps required to leave a Discord server. Whether you’re a new user or have been a member of the server for some time, this process is designed to be user-friendly and hassle-free. However, it’s important to note that leaving a server is a permanent action, so be sure that you truly want to disassociate yourself from the server’s community before proceeding.
Before we dive into the steps, it’s essential to understand that leaving a server means you will no longer have access to the server’s channels, messages, or any other content associated with that server. Additionally, you will lose any server-specific roles, privileges, and permissions granted to you within that server.
So, without further ado, let’s find out how to go about leaving a Discord server.
Step 1: Accessing the Discord Server
Before you can leave a Discord server, you need to access it through the Discord application or website. Here’s how to do it:
- Open Discord: Launch the Discord application on your desktop or open your preferred web browser and go to the Discord website.
- Sign in to your account: If you’re not already signed in, enter your email and password to log into your Discord account.
- Select the server: From the left-hand sidebar, navigate to the server list and click on the server you wish to leave. This will open up the server’s channels and content.
Keep in mind that you can only leave servers that you are a member of. If you’re trying to leave a server you haven’t joined yet, you will need to join the server first before proceeding with the leaving process.
Once you have successfully accessed the server, you’re now ready to move on to the next step and locate the server settings.
Step 2: Locating the Server Settings
After accessing the Discord server, the next step is to locate the server settings. Here’s how you can find it:
- Look for the server name: In the top left corner of the Discord window, you will see the server name displayed. Click on the server name to open a drop-down menu.
- Select “Server Settings”: From the drop-down menu, click on “Server Settings” to access the server settings page.
The server settings page is where you can manage various aspects of the server, including roles, permissions, channels, and more. By accessing this page, you are now ready to proceed to the next step, which is leaving the Discord server.
Remember, only server administrators have access to all the server settings. If you are not an administrator, you will have limited options available to you in the settings page.
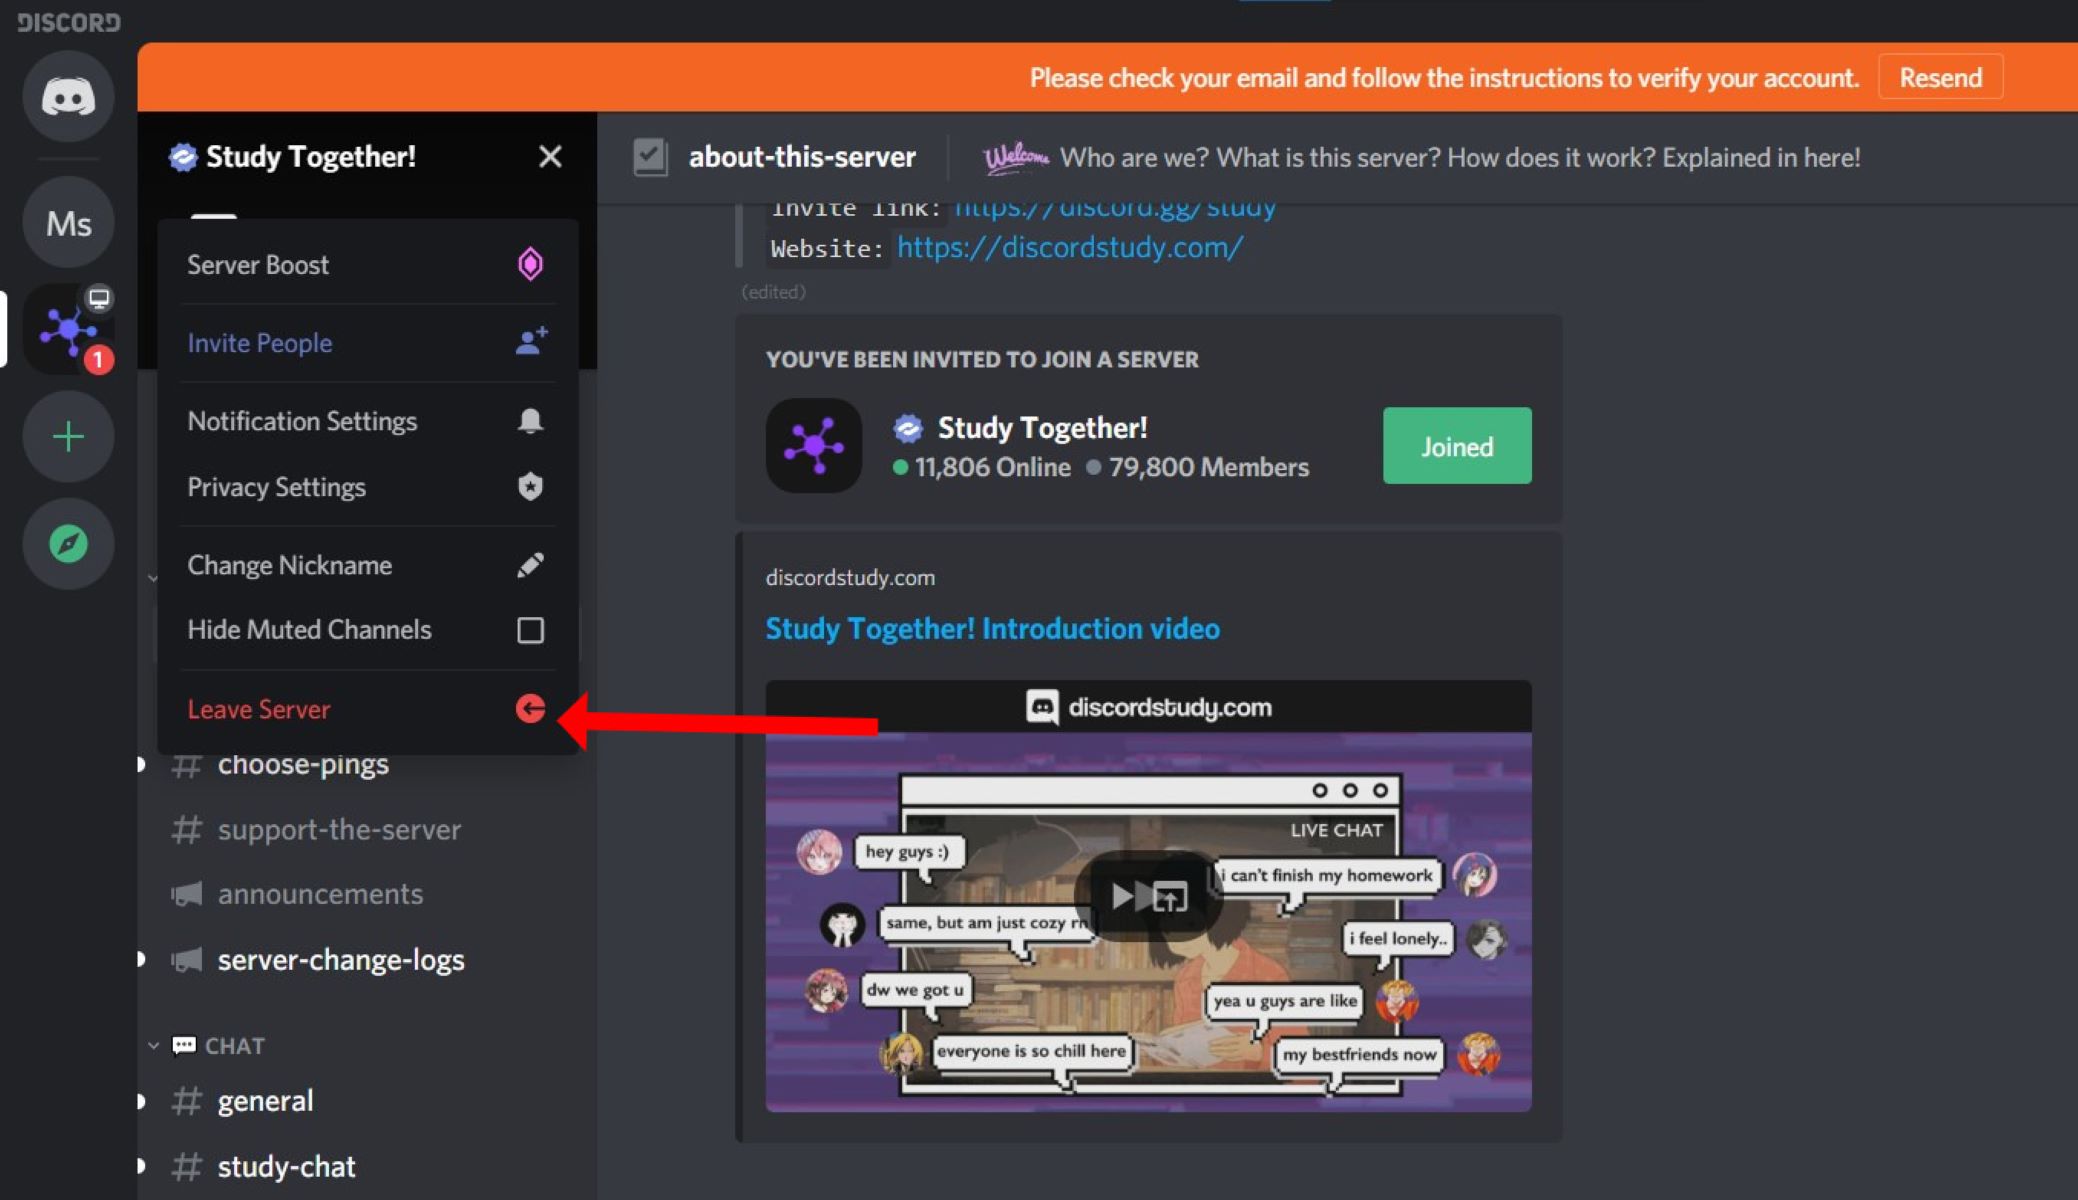
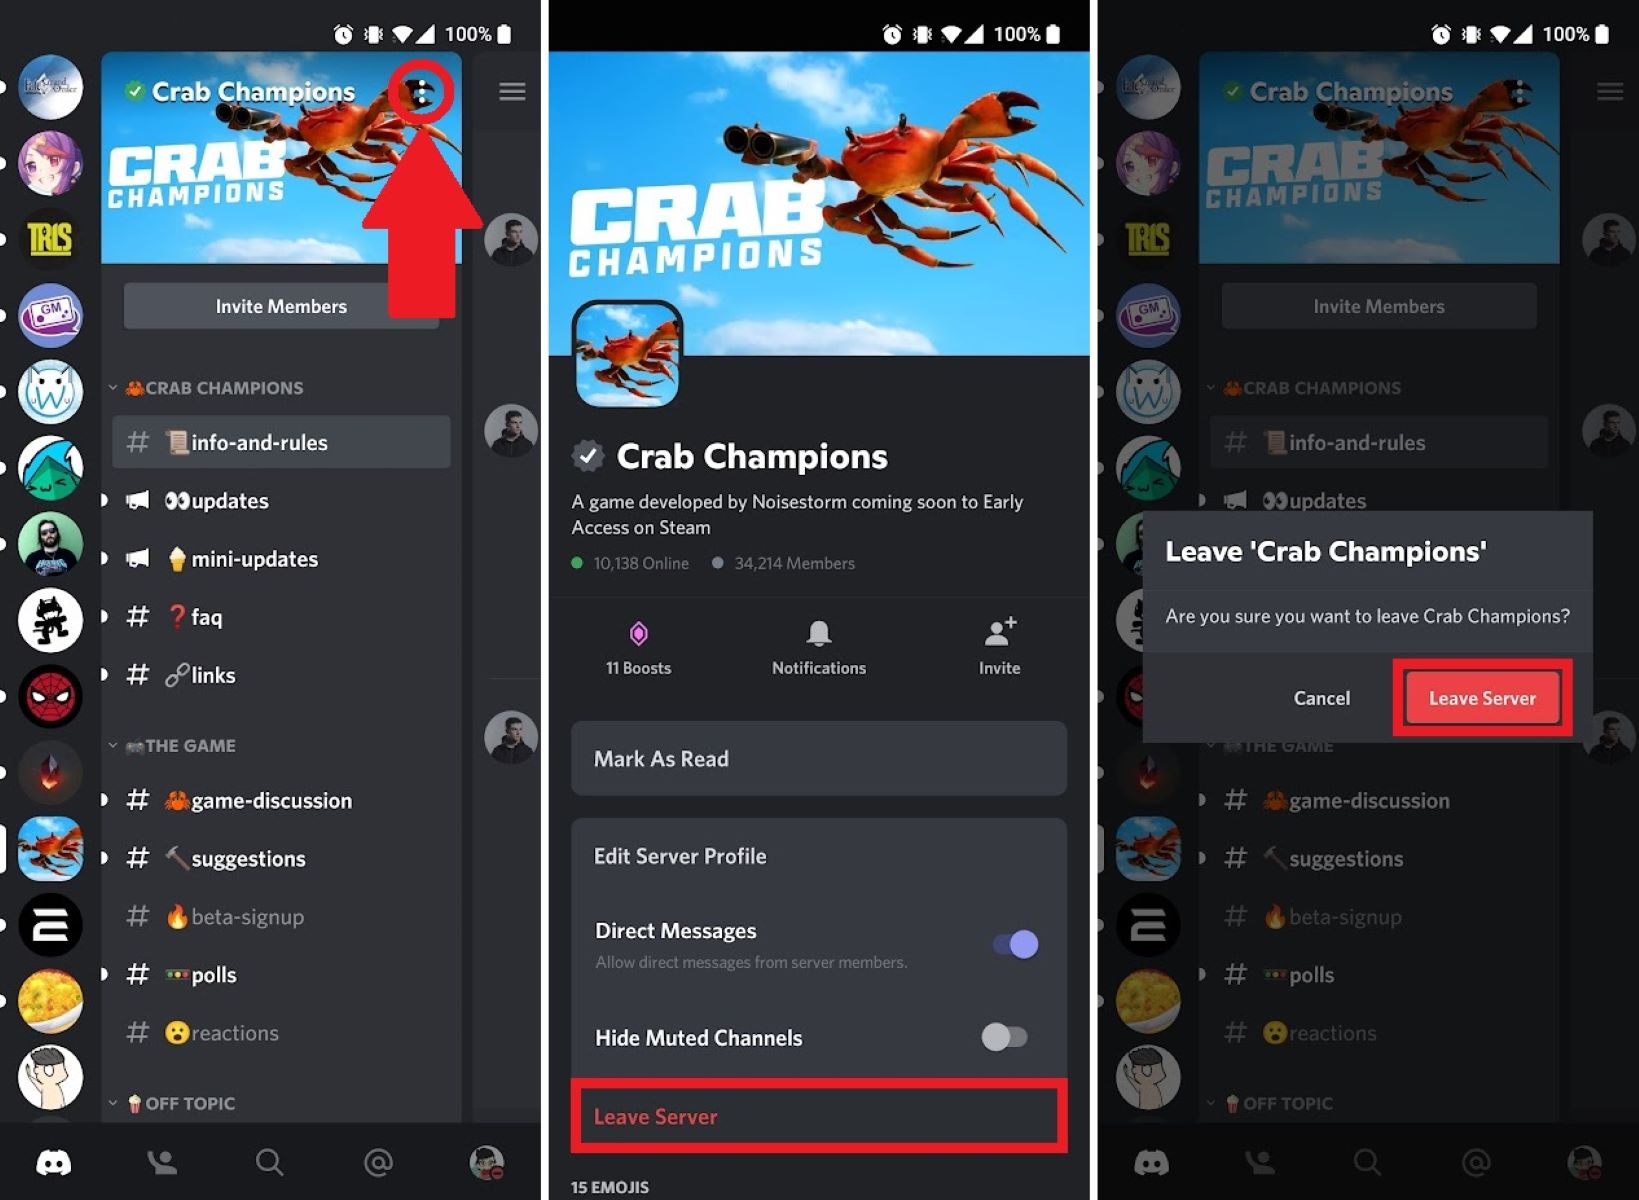
Step 3: Leaving the Discord Server
Once you have located the server settings, you are now ready to leave the Discord server. Here’s how you can do it:
- From the server settings page, navigate to the left-hand sidebar. Look for the “Overview” tab and click on it.
- Scroll down the overview page until you find the “Leave Server” button. The button is usually located at the bottom-right corner of the overview page.
- Click on the “Leave Server” button. A confirmation window will appear, asking you to confirm your decision to leave the server.
It’s important to note that leaving a Discord server is irreversible. Once you leave, you will lose access to all channels, messages, and other server content. Additionally, you will no longer receive any notifications or updates from the server.
If you are certain that you want to proceed with leaving the server, click on the “Leave Server” button on the confirmation window. Congratulations! You have now successfully left the Discord server.
However, if you decide that you don’t want to leave the server after all, you can simply close the confirmation window without clicking on the “Leave Server” button.
Now that you’ve left the server, let’s move on to the next step to learn how to remove the server from your server list permanently.
Step 4: Confirming your Decision
After clicking on the “Leave Server” button, a confirmation window will appear, asking you to confirm your decision to leave the Discord server. This step is crucial to ensure you don’t accidentally leave a server. Here’s what you need to do:
- Take a moment to review your decision: Before proceeding, carefully consider if leaving the server is the right choice for you. Make sure you understand that leaving the server is irreversible, and you will lose access to all server content and notifications.
- Double-check the server name: In the confirmation window, you will see the name of the server you are about to leave. Confirm that it is indeed the correct server.
- Click on the “Leave Server” button to confirm: Once you are certain about your decision, click on the “Leave Server” button in the confirmation window to finalize your departure.
By clicking on the “Leave Server” button, you have officially confirmed your decision to leave the Discord server. The server will no longer appear in your server list, and you will no longer have any affiliation with the server’s community.
If you change your mind after leaving the server, you can always rejoin the server by following the invitation link or by asking a current member to send you an invite.
Now that you have confirmed your decision to leave the server, let’s move on to the next step to learn how to permanently remove the server from your server list.
Step 5: Leaving the Server Permanently
After leaving a Discord server, it will still appear in your server list, but with a “Leave” option next to it. To remove the server permanently from your server list, follow these steps:
- Locate the server in your server list: Scroll through your server list until you find the server you just left. It will be listed with the rest of your servers, but with a “Leave” option next to it.
- Click on the “Leave” option: Next to the server name, you will see a small “Leave” option. Click on it to initiate the process of permanently removing the server from your list.
- Confirm the removal: A confirmation window will appear, asking you to confirm the removal of the server from your server list. Click on the “Remove” button to permanently delete the server from your list.
By following these steps, you have successfully left the server permanently and removed it from your server list. The server will no longer be visible or accessible to you.
Please note that if you wish to rejoin the server in the future, you will need to obtain an invitation link from a current member or from any available sources.
Keep in mind that leaving a server permanently is a final action, and you won’t be able to recover any lost data or messages associated with the server. Therefore, make sure you have backed up any important information before proceeding with the removal.
Now that you know how to leave a server permanently, let’s explore some optional steps you can take after leaving a Discord server.
Step 6: Notifying Server Members (optional)
After leaving a Discord server, you may choose to notify the server members about your departure. While this step is entirely optional, it can be helpful in maintaining a respectful and transparent relationship with the community. Here’s how you can notify the server members:
- Compose a message: Open the server from which you just departed and navigate to a channel where you feel it is appropriate to leave a message.
- Write your departure message: Craft a polite and concise message that expresses your decision to leave the server and your reasons, if desired. It’s recommended to avoid any negative or confrontational language.
- Post your message: Once you are satisfied with your departure message, post it to the channel. Make sure to double-check for any errors or typos before sending.
By notifying the server members about your departure, you provide them with an explanation and the opportunity to ask questions or express their thoughts. It can help maintain positive relationships and avoid any misunderstandings.
Remember, this step is entirely optional. If you’d prefer not to notify the server members, you can simply proceed with leaving the server without any further communication.
Now that you know how to notify members, let’s explore an additional optional step of deleting your server messages.
Step 7: Deleting Server Messages (optional)
After leaving a Discord server, you may choose to delete any of your messages that you no longer wish to remain in the server’s history. While this step is optional, it can help maintain your privacy and ensure that your messages are removed from the server’s record. Here’s how you can delete your server messages:
- Access the server and navigate to the channel where your messages are located.
- Select the messages you want to delete: You can either delete individual messages or select multiple messages by using the control key (Ctrl) on your keyboard while clicking on the desired messages.
- Right-click on the selected messages and choose the “Delete Message” option.
- A confirmation pop-up will appear asking you to confirm the deletion. Click on “Delete” to remove the selected messages permanently.
By deleting your server messages, you can ensure that any content you shared within the server is no longer accessible. It’s important to note, however, that deleting your messages does not remove them from other users’ screens if they have already seen them.
Remember, this step is entirely optional and should only be performed if you have privacy concerns or if you want to maintain control over your shared content. If you have no need to delete your messages, you can skip this step and proceed with peace of mind.
As you can see, leaving a Discord server and managing your presence there is a straightforward process. Whether you choose to notify the members or delete your messages, it’s important to make decisions that align with your personal preferences and circumstances.
Now that you have successfully left the Discord server, you can explore other communities or focus on other aspects of your digital journey.