Introduction
Integrating Asana with Google Calendar can significantly streamline your workflow and enhance your productivity. By syncing your tasks and events between both platforms, you can easily manage your schedule and stay organized. Whether you’re a team leader overseeing multiple projects or an individual striving for better time management, this integration can be a game-changer.
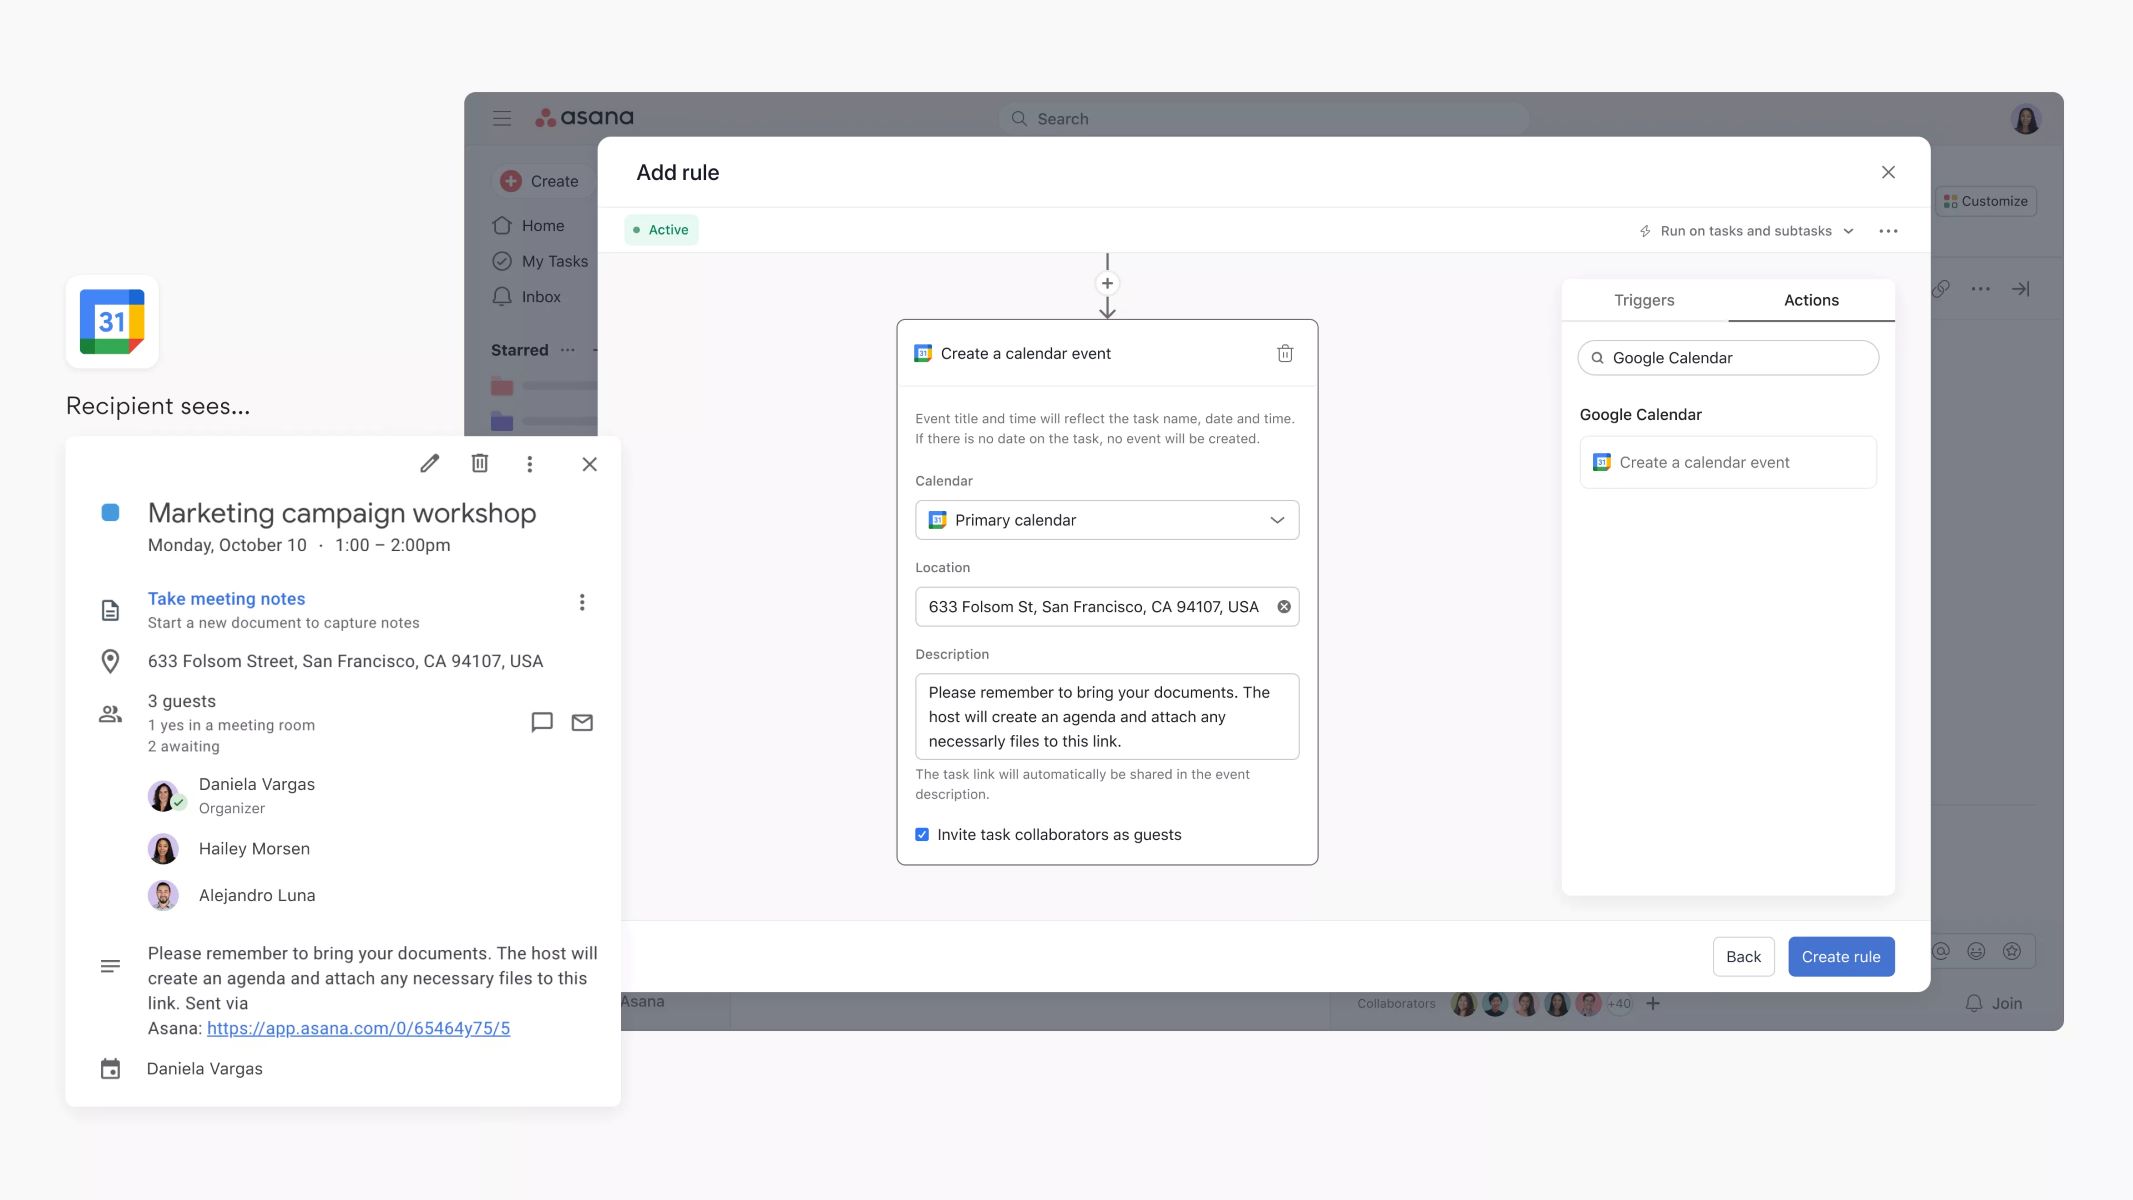
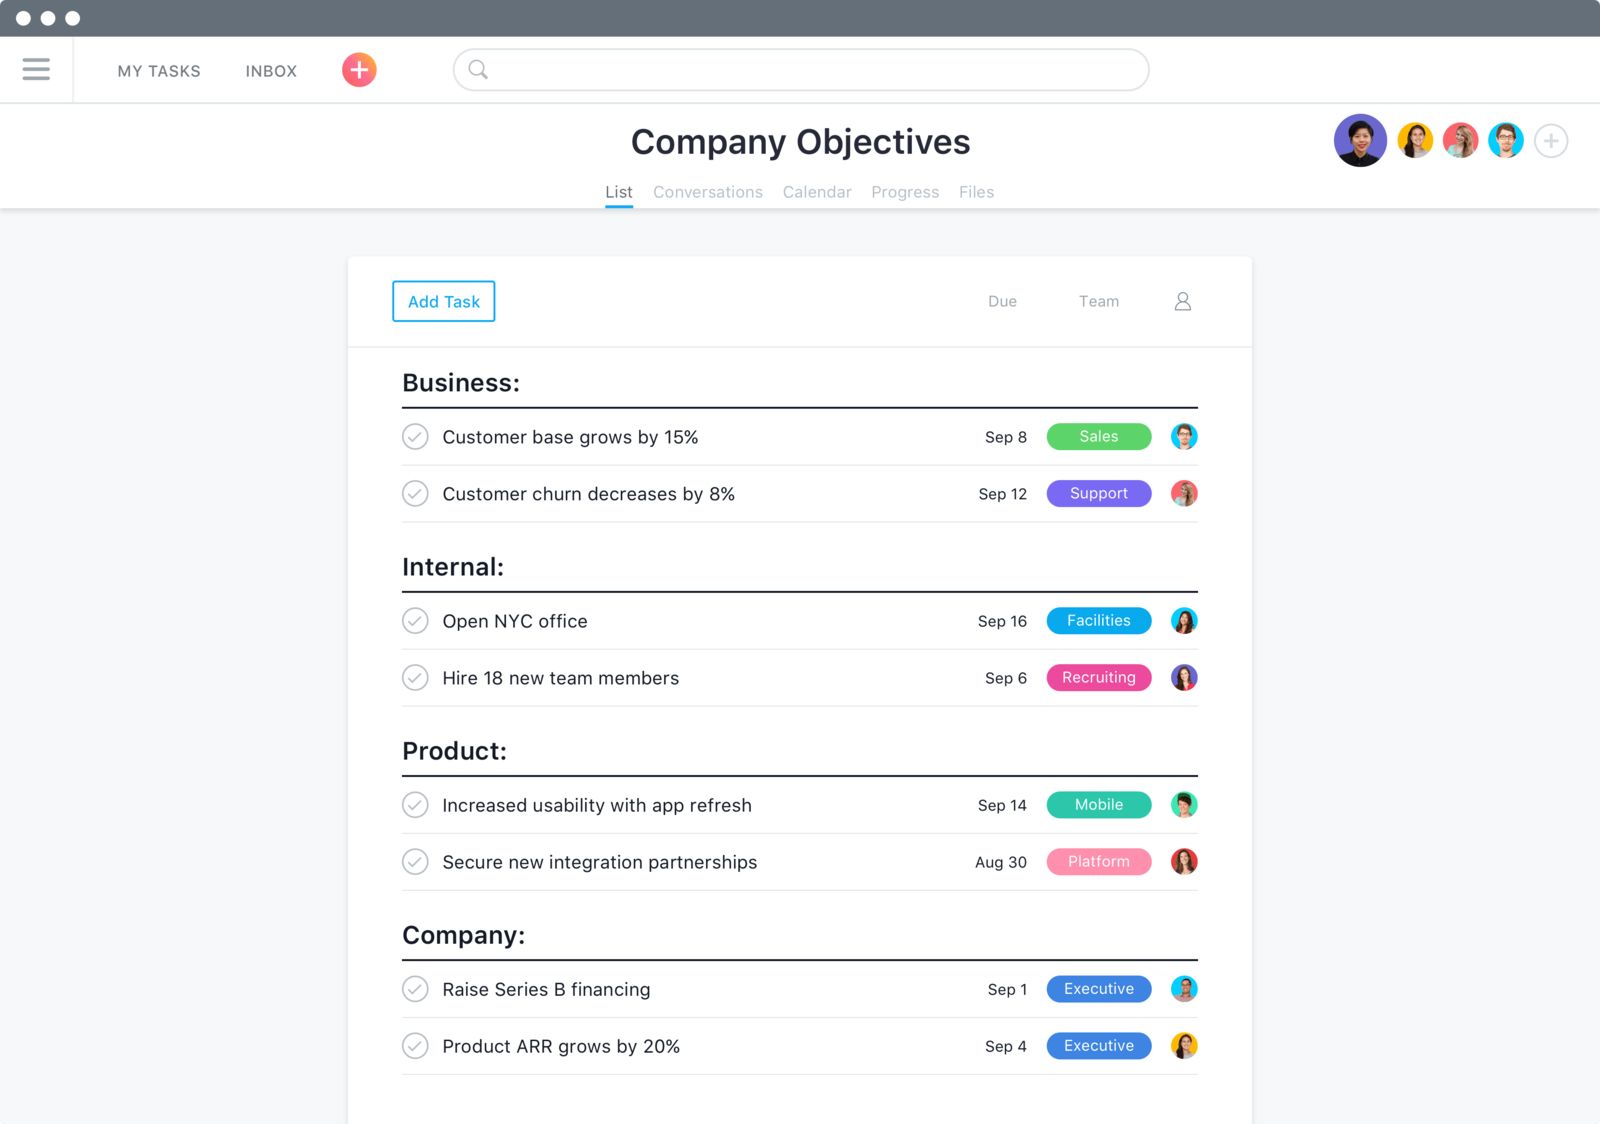
Asana is a powerful project management tool that allows you to create and manage tasks, assign them to team members, set deadlines, and track progress. On the other hand, Google Calendar is a widely used calendar application that helps you schedule events, meetings, and appointments. By integrating these two platforms, you can link your Asana tasks to relevant calendar events, ensuring that you never miss a deadline or important commitment.
With the Asana for Google Calendar integration, you can see your Asana tasks and deadlines directly in your Google Calendar, making it easier to map out your day and prioritize your work. Additionally, any changes made in Asana, such as updating task details or adjusting due dates, will automatically be reflected in your synced Google Calendar events. The real-time synchronization eliminates the need for manual updates, reducing the risk of missing important tasks or overlapping commitments.
This integration provides a seamless experience between Asana and Google Calendar, allowing you to view and manage your tasks and events in one centralized location. Whether you prefer using Asana as your primary task management tool or Google Calendar as your go-to scheduling platform, this integration ensures that you have access to all your essential information without switching between multiple applications.
In this article, we will walk you through the step-by-step process of integrating Asana with Google Calendar. By following these instructions, you will be able to sync your tasks, manage your schedule efficiently, and make the most out of both platforms. So, let’s get started with this powerful collaboration, and enhance your productivity and organization.
Step 1: Sign up for Asana and Google Calendar
Before you can integrate Asana with Google Calendar, you’ll need to have accounts for both platforms. If you already have an account for either Asana or Google Calendar, you can skip this step and proceed to the next one.
To sign up for Asana, visit the Asana website and click on the “Get Started for Free” button. You will be prompted to enter your email address and create a password. Alternatively, you can sign up using your Google account or another single sign-on option if available.
Once you’ve signed up for Asana, you can start creating and managing your tasks. Familiarize yourself with the Asana interface and its features to make the most out of the platform.
Next, sign up for Google Calendar by visiting the Google Calendar website. If you already have a Google account, simply sign in. If not, click on the “Create account” button and follow the on-screen instructions to set up your Google account.
Once you’re signed in to Google Calendar, take some time to explore the interface and get acquainted with its various functions. Familiarize yourself with creating events, setting reminders, and managing your calendar settings.
Remember to use a single Google account for both platforms to ensure a seamless integration experience. Having separate accounts for Asana and Google Calendar may cause complications when syncing your tasks and events.
By ensuring you have accounts set up for both Asana and Google Calendar, you are ready to proceed to the next step of the integration process. This first step may seem straightforward, but it is an essential foundation for successfully integrating the two platforms and maximizing their potential.
Step 2: Install the Asana for Google Calendar integration
Once you have signed up for both Asana and Google Calendar, the next step is to install the Asana for Google Calendar integration. This integration allows you to seamlessly sync your tasks and events between both platforms.
To install the integration, follow these simple steps:
- Open your web browser and go to the Asana website.
- Log in to your Asana account using your credentials.
- Navigate to the Asana App Directory by clicking on the “Apps” tab in the top navigation bar.
- In the App Directory, search for “Google Calendar” in the search bar or browse the available integrations.
- Click on the “Google Calendar” integration to open its details page.
- Click on the “Add to Asana” button or a similar option to initiate the installation process.
- Follow the on-screen instructions to grant Asana access to your Google Calendar.
- Once the installation is complete, you will see a confirmation message indicating that the integration has been successfully installed.
It is important to note that the installation process may slightly vary depending on the updates and changes made by the Asana and Google Calendar teams. Therefore, make sure to refer to the official Asana documentation or support resources for the most up-to-date installation instructions.
By installing the Asana for Google Calendar integration, you are now one step closer to seamlessly connecting your tasks and events. In the next step, we will guide you through the process of authenticating Asana and Google Calendar to establish a secure connection between the two platforms.
Step 3: Authenticate Asana and Google Calendar
After installing the Asana for Google Calendar integration, the next step is to authenticate Asana and Google Calendar. This authentication process establishes a secure connection between the two platforms, allowing them to communicate and sync data seamlessly.
To authenticate Asana and Google Calendar, follow these steps:
- Open your web browser and go to the Asana website.
- Log in to your Asana account using your credentials.
- In the top navigation bar, click on your profile picture or initials to open the account menu.
- From the account menu, select “My Profile Settings”.
- In the left sidebar, scroll down and click on “Apps”.
- Locate the Google Calendar integration and click on “Authorize”.
- A new window will open, prompting you to sign in to your Google account if you haven’t already.
- Follow the on-screen instructions to grant Asana access to your Google Calendar.
- Once you have successfully authenticated Asana and Google Calendar, you will receive a confirmation message.
It is important to note that during the authentication process, you may be prompted to grant various permissions and access levels to Asana. These permissions allow Asana to read and write data to your Google Calendar, ensuring a seamless synchronization of tasks and events.
By successfully authenticating Asana and Google Calendar, you have established a secure connection between the two platforms. In the next step, we will explore how to sync your Asana tasks with Google Calendar, enabling you to view and manage your tasks directly from your calendar.
Step 4: Sync your Asana tasks with Google Calendar
Now that you have authenticated Asana and Google Calendar, it’s time to sync your Asana tasks with Google Calendar. This synchronization enables you to view your tasks directly in your calendar, offering a comprehensive overview of your schedule.
To sync your Asana tasks with Google Calendar, follow these steps:
- Open your web browser and go to the Asana website.
- Log in to your Asana account using your credentials.
- In the navigation bar at the top, click on the “My Tasks” option.
- Click on the “Calendar” tab located on the right side of the screen.
- You will see a “Sync to Calendar” button. Click on it to initiate the synchronization process.
- A pop-up window will appear, prompting you to choose your Google Calendar account. Select the desired calendar or create a new one.
- Once you have selected the calendar, click on the “Sync” or “Save” button to complete the process.
- Your Asana tasks will now be synced with your Google Calendar, and you will see them as events in your calendar, corresponding to their due dates.
It is important to note that the synchronization may take some time, especially if you have a large number of tasks. Give it a few minutes for the initial sync to complete, and then refresh your Google Calendar to see the updated events.
Whenever you create a new task in Asana or update an existing one, the changes will be reflected in your synced Google Calendar events. Similarly, any modifications made in Google Calendar will be updated in Asana as well. This bidirectional synchronization ensures that your task information is always up to date across both platforms.
By syncing your Asana tasks with Google Calendar, you can easily manage your tasks, set reminders, and prioritize your work without switching between multiple applications. In the next step, we will discuss how you can manage your tasks and events in both Asana and Google Calendar, offering you flexibility and convenience.
Step 5: Manage tasks and events in Asana and Google Calendar
Now that you have successfully synced your Asana tasks with Google Calendar, it’s time to explore how you can effectively manage your tasks and events in both platforms. This will allow you to have greater flexibility and convenience in organizing your schedule and staying on top of your work.
Here are some key aspects to consider when managing tasks and events in Asana and Google Calendar:
Task Management in Asana:
- Create new tasks in Asana and assign them to yourself or team members.
- Add due dates, descriptions, and attachments to tasks for better clarity and context.
- Set task priorities and assign tags or labels to easily categorize and filter tasks.
- Use project boards, lists, or kanban views in Asana to organize your tasks.
- Track task progress, add comments, and collaborate with team members within the task.
Event Management in Google Calendar:
- Create new events in Google Calendar and specify the date, time, and duration.
- Add event descriptions, locations, and reminders to make sure you’re prepared.
- Color-code events or assign them to different calendars for better visual organization.
- Set recurring events for tasks that need to be done regularly.
- Invite others to events and manage their responses or availability.
With the Asana and Google Calendar integration, any changes you make in Asana will automatically sync to Google Calendar, and vice versa. This means that you can choose to manage tasks and events in either platform, and the updates will seamlessly reflect in the other. This flexibility allows you to work in the platform that suits your preferences and workflow best.
For instance, if you prefer planning your tasks in Asana, you can access your Google Calendar to get a broader view of your schedule and see how your tasks align with other commitments. On the other hand, if you primarily use Google Calendar for scheduling, you can still track the progress of your tasks and collaborate with team members within Asana.
By effectively managing your tasks and events in Asana and Google Calendar, you can maintain better organization, streamline communication, and ensure that important deadlines are met. In the next step, we will discuss how you can customize your sync settings to further enhance your integration experience.
Step 6: Customize your sync settings
Customizing your sync settings is an essential step to tailor the integration between Asana and Google Calendar according to your specific needs. By adjusting these settings, you can optimize your workflow and ensure that the synchronization between the two platforms aligns with your preferences.
Here are some key areas you can customize in your sync settings:
Task and Event Visibility:
- Choose which Asana tasks you want to sync with Google Calendar. You can select specific projects, tags, or assignees to filter the tasks that appear as events in your calendar.
- Decide whether to show subtasks in Google Calendar or only display parent tasks.
- Configure the visibility of completed tasks or events in your calendar.
Sync Frequency:
- Set how often you want Asana and Google Calendar to sync. You can choose between automatic sync at regular intervals or manual sync whenever you initiate it.
- Customize the time interval for automatic sync to ensure your tasks and events are always up to date.
Event Titles and Details:
- Specify how you want the titles of your Asana tasks to appear in Google Calendar events.
- Decide whether you want to include task descriptions, attachments, or other details in the Google Calendar event.
Calendar Mapping:
- Map your Asana projects or tags to specific Google Calendar calendars. This allows you to keep tasks from different projects or tags organized in separate calendars.
- Configure the default calendar where new tasks will be added in Asana and synced to Google Calendar.
Notification Preferences:
- Choose whether to receive notifications in Asana or Google Calendar when changes are made to your tasks or events.
- Adjust the notification settings to best suit your workflow and ensure you stay informed about updates and deadlines.
To customize your sync settings, follow these steps:
- Open your web browser and go to the Asana website.
- Log in to your Asana account using your credentials.
- In the top navigation bar, click on your profile picture or initials to open the account menu.
- From the account menu, select “My Profile Settings”.
- In the left sidebar, scroll down and click on “Apps”.
- Locate the Google Calendar integration and click on “Settings” or a similar option.
- Explore the available customization options and make adjustments according to your preferences.
- Save the changes to apply your customized sync settings.
By customizing your sync settings, you can further optimize the integration experience between Asana and Google Calendar. These settings allow you to fine-tune the synchronization process to align with your workflow and specific requirements.
Conclusion
Integrating Asana with Google Calendar provides a powerful solution for managing tasks and events in a seamless and efficient manner. By following the step-by-step instructions outlined in this article, you can successfully integrate both platforms and optimize your productivity.
From signing up for Asana and Google Calendar to installing the integration and customizing the sync settings, each step has been designed to ensure a smooth and intuitive integration process. By syncing your Asana tasks with Google Calendar, you gain the ability to view and manage your tasks directly from your calendar, keeping all your important commitments in one place.
Managing tasks and events in Asana and Google Calendar offers flexibility and convenience. You can choose to work primarily in one platform while still having access to the essential information in the other. This flexibility allows you to adopt the workflow that suits you best, without compromising on organization or collaboration.
By customizing your sync settings, you can tailor the integration to your specific preferences and workflow. Whether it’s choosing task visibility, mapping calendars, or adjusting notification preferences, these settings empower you to optimize the synchronization process according to your needs.
Ultimately, the integration between Asana and Google Calendar enables you to streamline your workflow, prioritize your tasks, and stay on top of your commitments. It brings together the power of task management in Asana and the scheduling capabilities of Google Calendar, providing a comprehensive solution for organizing your work and maximizing your productivity.
So, take the time to integrate Asana with Google Calendar and explore the possibilities it offers. Embrace the synchronization of tasks and events, and experience the benefits of seamless collaboration, effective time management, and enhanced productivity.


![20 Best Productivity Apps to Get Things Done [PC & Mac]](https://robots.net/wp-content/uploads/2020/05/write-593333_1920-300x177.jpg)