Introduction
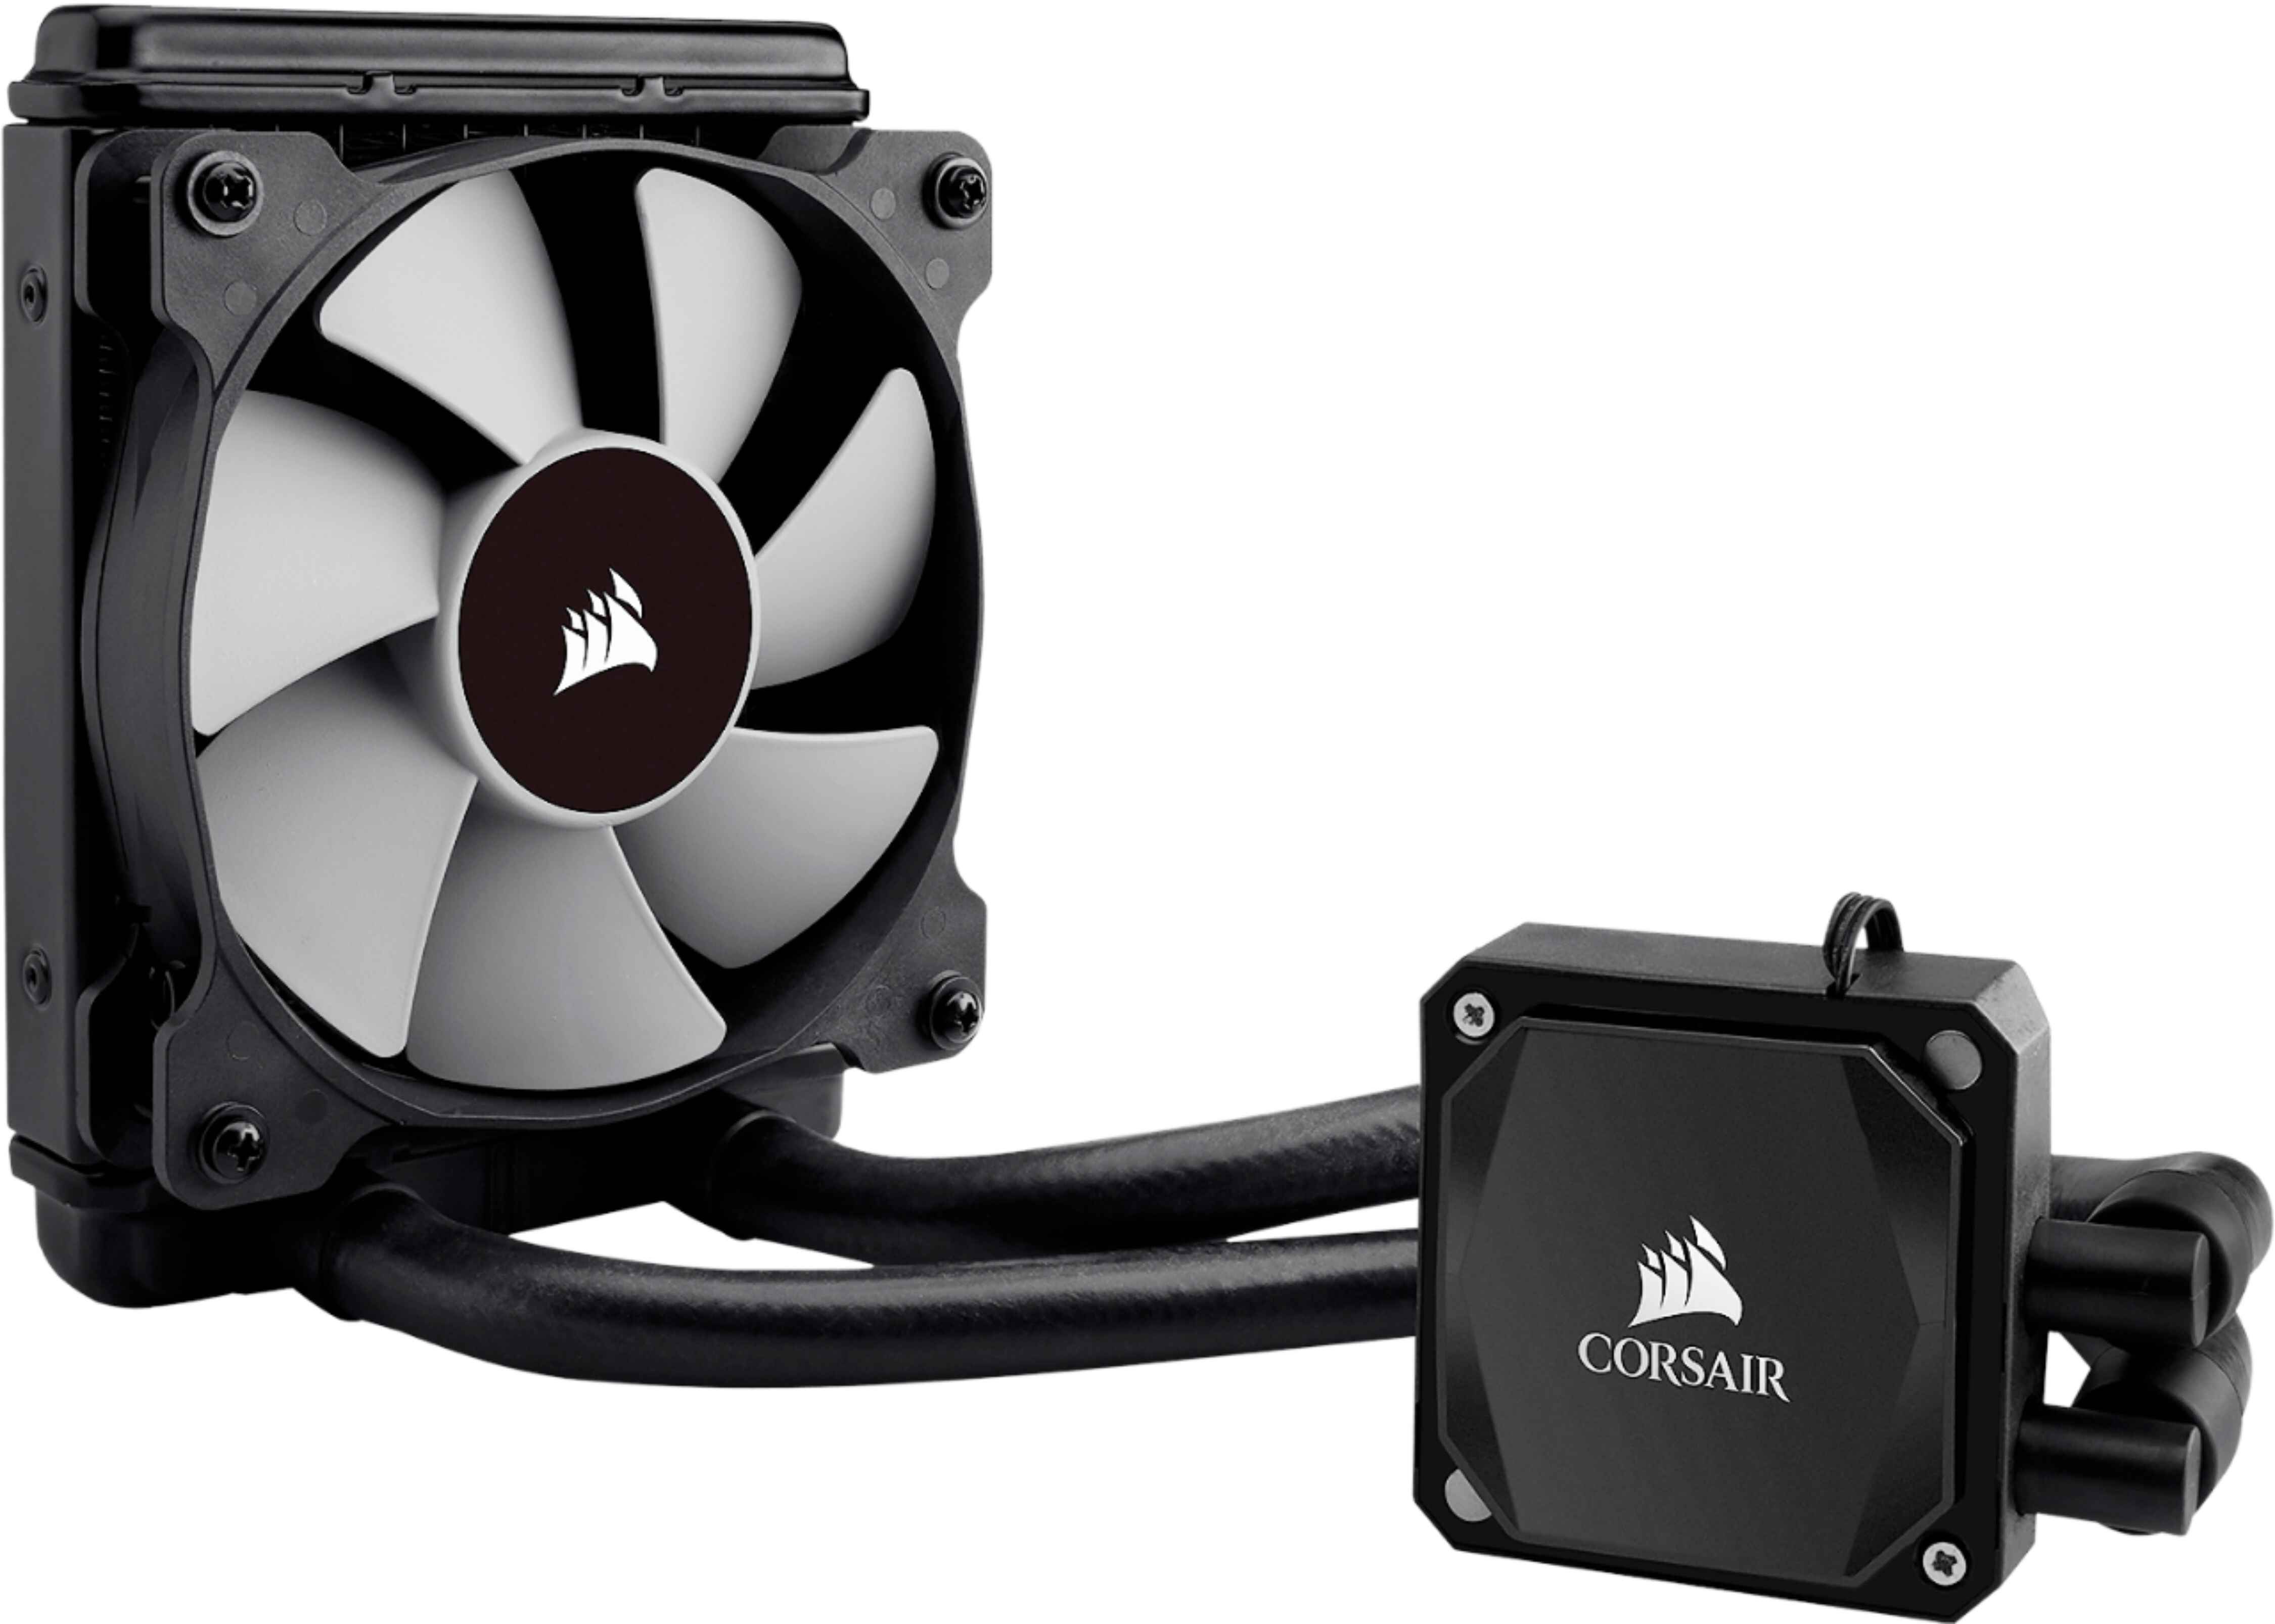
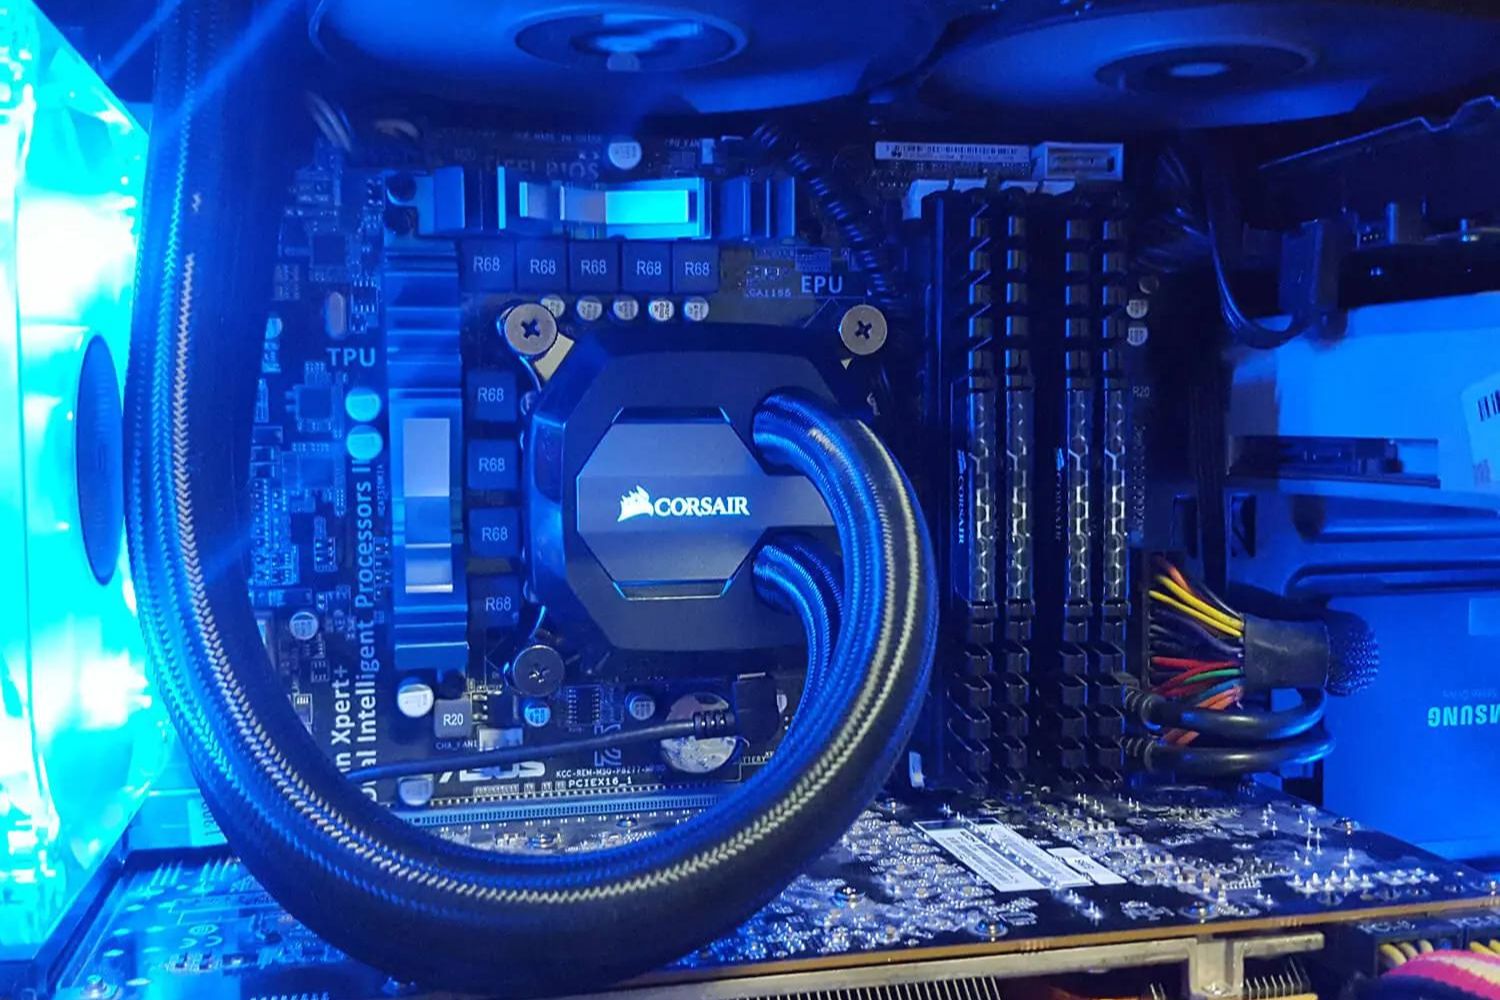
The Corsair Hydro Series H100I V2 Extreme Performance Liquid CPU Cooler is a cutting-edge cooling solution designed to keep your CPU running at optimal temperatures, even during intense and demanding tasks. With its advanced cooling technology and sleek design, this CPU cooler offers superior performance and reliability.
Whether you are a hardcore gamer, video editor, or simply a power user in need of robust cooling for your CPU, the Corsair Hydro Series H100I V2 is a top choice. It combines the benefits of liquid cooling with the convenience of easy installation, making it suitable for both experienced PC builders and newcomers alike.
By effectively dissipating heat from your CPU, the Corsair Hydro Series H100I V2 ensures stable and consistent performance, preventing overheating and reducing the risk of damage to your components. With its powerful cooling capabilities, you can push your CPU to its limits without worrying about it throttling due to excessive temperatures.
Additionally, the Corsair Hydro Series H100I V2 features a sleek and stylish design that enhances the aesthetics of your PC build. Its customizable RGB lighting allows you to personalize the look of your cooling system, matching it to your overall build theme. The cooler’s low-profile design also ensures compatibility with a wide range of PC cases, providing flexibility in its installation.
In this step-by-step guide, we will walk you through the installation process for the Corsair Hydro Series H100I V2 Extreme Performance Liquid CPU Cooler. By following these instructions, you will be able to set up and enjoy the benefits of this high-performance cooling solution for your CPU.
What is the Corsair Hydro Series H100I V2 Extreme Performance Liquid CPU Cooler?
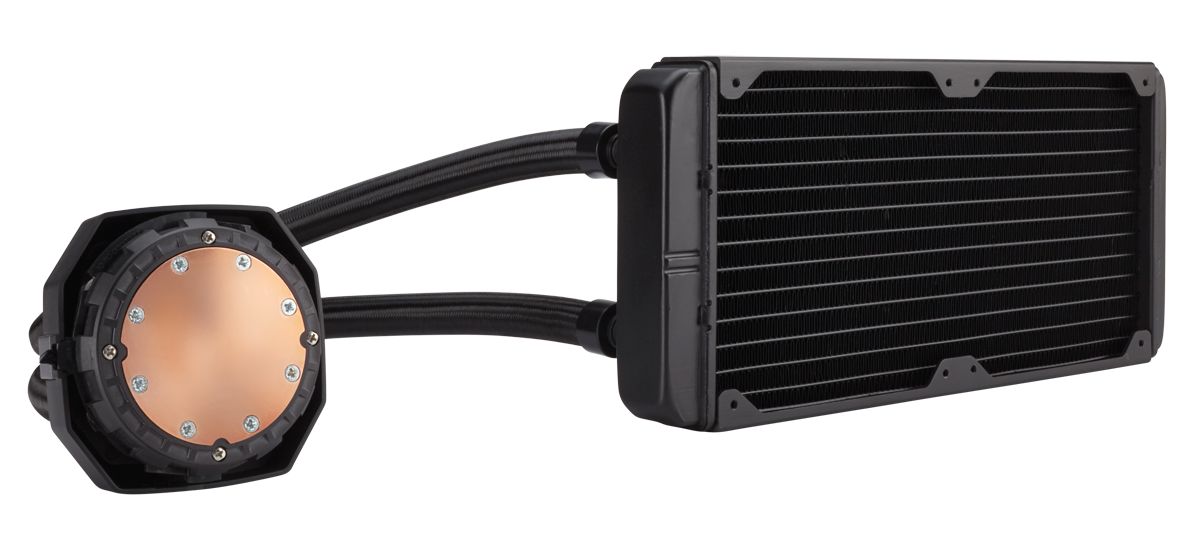
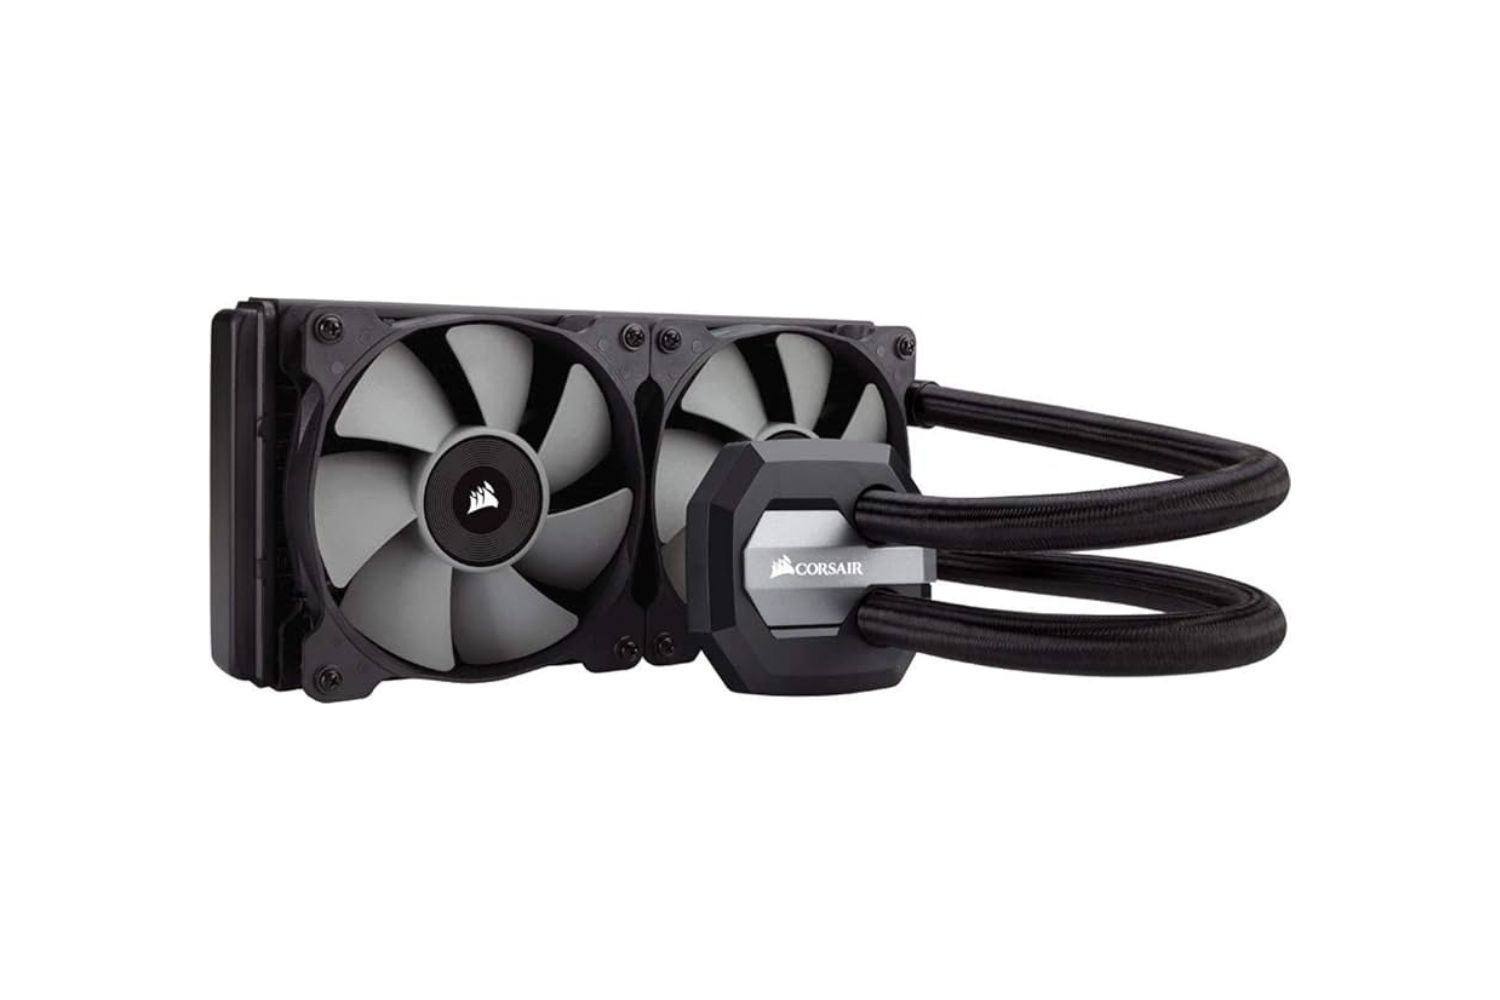
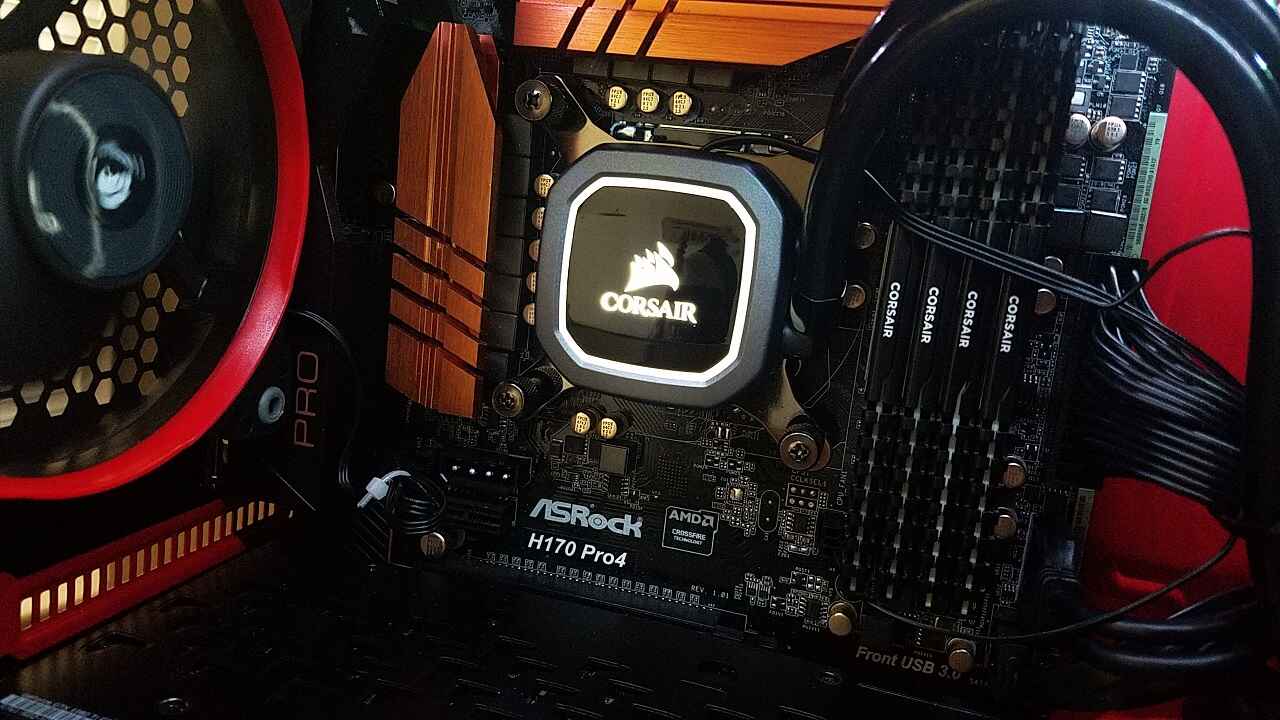
The Corsair Hydro Series H100I V2 Extreme Performance Liquid CPU Cooler is a state-of-the-art cooling system designed to effectively cool down your CPU during intensive tasks. It is a closed-loop liquid-cooling solution, which means it utilizes a pre-filled coolant that circulates through the cooler to dissipate heat from the CPU.
This CPU cooler features a 240mm radiator with high-density cooling fins that maximize heat dissipation. The radiator is equipped with two 120mm fans that deliver excellent airflow and reduce noise levels. These fans are designed to operate quietly, ensuring a peaceful computing experience.
The Corsair Hydro Series H100I V2 utilizes a micro-channel copper cold plate that comes into direct contact with the CPU, efficiently transferring heat away from the processor. The coolant, housed in a sealed system, absorbs the heat and carries it to the radiator, where it is expelled by the fans.
One of the standout features of this CPU cooler is its advanced Corsair Link software. The software allows you to monitor and control various aspects of the cooling system, such as fan speed, coolant temperature, and RGB lighting. It also enables you to create custom cooling profiles and adjust settings to suit your specific requirements.
In addition to its exceptional cooling performance, the Corsair Hydro Series H100I V2 offers easy installation and compatibility with a wide range of Intel and AMD sockets. The included mounting brackets and intuitive design make it a straightforward process to install this cooler, whether you are a seasoned PC builder or a novice.
Overall, the Corsair Hydro Series H100I V2 Extreme Performance Liquid CPU Cooler combines advanced cooling technology with user-friendly features, making it an excellent choice for users looking to keep their CPU cool and maximize its performance.
What do you need to install the Corsair Hydro Series H100I V2 Extreme Performance Liquid CPU Cooler?
Before you begin the installation process for the Corsair Hydro Series H100I V2 Extreme Performance Liquid CPU Cooler, there are a few essential items you will need to ensure a smooth and successful installation:
- A compatible computer case: Make sure your computer case supports a 240mm radiator and has enough space to accommodate the Corsair Hydro Series H100I V2. Check the specifications of your case or consult the manufacturer’s documentation to verify compatibility.
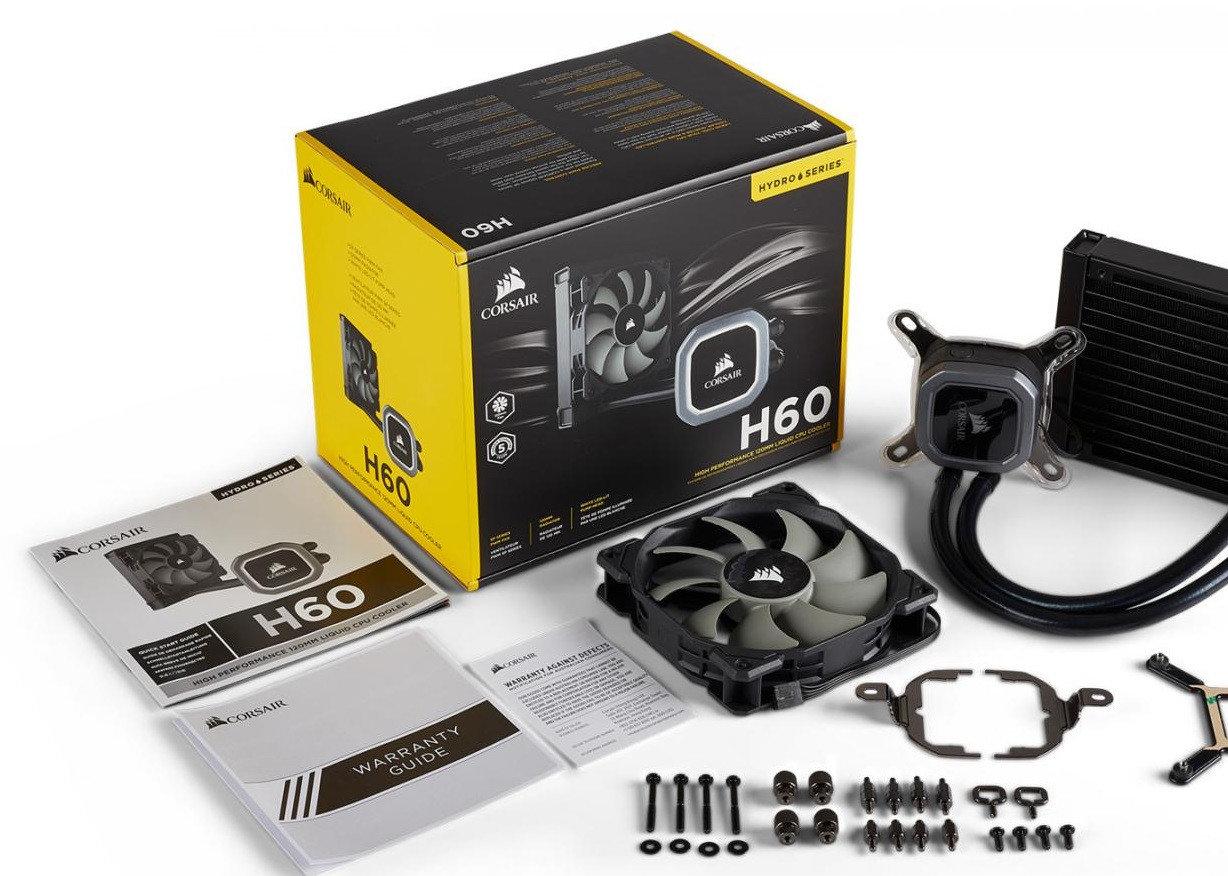
- The Corsair Hydro Series H100I V2 CPU Cooler: Of course, you will need the actual CPU cooler itself. Ensure that you have the complete package, including the radiator, fans, tubing, and mounting hardware.
- A compatible CPU socket: Confirm that your CPU socket is supported by the Corsair Hydro Series H100I V2. It is compatible with most common sockets, including Intel LGA 115x, Intel LGA 2011/2066, and AMD AM3/AM4.
- Thermal paste: Thermal paste is used to facilitate the transfer of heat between the CPU and the cooler’s cold plate. While some coolers come with pre-applied thermal paste, it’s always a good idea to have a spare tube of high-quality thermal paste on hand.
- A screwdriver: You will need a screwdriver to remove the old CPU cooler, mount the brackets, and secure the Corsair Hydro Series H100I V2. Make sure you have the appropriate-sized screwdriver for your case and cooler hardware.
- A clean and well-lit workspace: Before you start the installation, ensure that you have a clean and clutter-free workspace. This will make it easier to handle the components and prevent any accidental damage.
It’s important to have all these items readily available to streamline the installation process and prevent any unnecessary delays or complications. By having the necessary tools and components at hand, you’ll be well-prepared to install the Corsair Hydro Series H100I V2 and enjoy its exceptional cooling performance.
Step 1: Preparing for installation
Before installing the Corsair Hydro Series H100I V2 Extreme Performance Liquid CPU Cooler, it is important to properly prepare your workspace and gather all the necessary tools and components. Follow these steps to ensure a smooth and successful installation:
- Turn off your computer: Before you begin, shut down your computer and disconnect it from the power source. This will prevent any electrical accidents and ensure your safety throughout the installation process.
- Prepare a clean workspace: Clear off a suitable workspace that is clean and well-lit. It is advisable to use an anti-static mat or wear an anti-static wristband to prevent any damage to sensitive electronic components.
- Gather your tools and components: Ensure that you have all the necessary tools and components within reach. This includes the Corsair Hydro Series H100I V2 CPU Cooler, thermal paste, a screwdriver, and any additional mounting hardware specific to your CPU socket.
- Read the instructions: Familiarize yourself with the installation instructions provided by Corsair. It is important to understand the correct step-by-step process for installing the cooler, as well as any specific requirements or precautions.
- Remove the side panel: Open your computer case by removing the side panel. This will give you access to the internal components and allow for easier installation of the cooler. Refer to your case manual for instructions on removing the panel if needed.
- Take note of the existing CPU cooler: If you have an existing CPU cooler installed, take note of its mounting mechanism and configuration. This will help you understand how to remove it and ensure a smoother installation process.
- Plan the cooler’s placement: Determine the ideal placement for the Corsair Hydro Series H100I V2 radiator and fans. This will depend on the available space in your case and the desired airflow direction. Take into account any potential clearance issues and the location of other components.
By properly preparing your workspace and gathering the necessary tools and components, you will set the foundation for a successful installation of the Corsair Hydro Series H100I V2 Extreme Performance Liquid CPU Cooler. Taking the time to read the instructions and plan the cooler’s placement will contribute to a smoother and more efficient installation process.
Step 2: Removing the old CPU cooler
Before installing the Corsair Hydro Series H100I V2 Extreme Performance Liquid CPU Cooler, you need to remove the existing CPU cooler from your system. Follow these steps to safely and effectively remove the old cooler:
- Unplug the computer and turn off the power supply: Shut down your computer and unplug it from the power source. This ensures your safety during the removal process and prevents any electrical accidents.
- Identify the mounting mechanism: Take a moment to identify the mounting mechanism of your current CPU cooler. This will help you understand how to properly detach it from the motherboard.
- Disconnect the fan(s): If your current CPU cooler has an attached fan or fans, carefully disconnect them from the motherboard. Most fans are secured with small clips or screws, so make sure you remove them gently without applying excessive force.
- Remove the mounting hardware: Depending on the type of CPU cooler, there may be additional mounting brackets or screws that need to be removed. Refer to the cooler’s manual or manufacturer’s instructions for specific guidance on removing the mounting hardware.
- Detach the cooler from the CPU: Gently twist or wiggle the CPU cooler to detach it from the CPU surface. Be cautious not to exert too much force as this may damage the CPU or motherboard.
- Clean the CPU surface: Once the old cooler is removed, use a lint-free cloth or isopropyl alcohol wipes to clean the surface of the CPU. This will ensure proper contact with the cold plate of the new cooler.
- Inspect for any damage: Take a moment to inspect the CPU and motherboard for any signs of damage or residue from the old cooler. Clean any remaining thermal paste or debris using isopropyl alcohol if necessary.
Removing the old CPU cooler may require some delicate handling, so take your time and exercise caution to avoid any accidental damage. By following these steps, you will be able to safely remove the old cooler and prepare your system for the installation of the Corsair Hydro Series H100I V2.
Step 3: Preparing the CPU socket
Before installing the Corsair Hydro Series H100I V2 Extreme Performance Liquid CPU Cooler, it is important to properly prepare the CPU socket to ensure a secure and efficient installation. Follow these steps to prepare the CPU socket:
- Refer to the motherboard manual: Consult the manual of your motherboard to familiarize yourself with the layout and configuration of the CPU socket. This will help you locate the necessary components and understand the proper installation process.
- Remove any protective covers: If your motherboard has a protective cover on the CPU socket, remove it carefully. Make sure you do this gently and avoid touching the delicate pins.
- Clean the CPU socket: Inspect the CPU socket for any dust, debris, or thermal paste remnants. Use compressed air or a soft brush to clean any dirt particles from the socket. If there is old thermal paste residue, use isopropyl alcohol and a lint-free cloth to gently clean it.
- Check socket alignment: Take a moment to ensure that the CPU socket is properly aligned. The socket should fit flush against the motherboard without any misalignment or crookedness.
- Inspect the CPU pins: Carefully examine the pins on the CPU socket to ensure that none of them are bent or damaged. If you notice any bent pins, use a small, non-conductive tool (such as a mechanical pencil tip) to straighten them out gently.
- Apply thermal paste: If your Corsair Hydro Series H100I V2 does not come with pre-applied thermal paste on the cold plate, apply a small amount of high-quality thermal paste to the center of the CPU. Consult the thermal paste manufacturer’s instructions for the appropriate amount.
Properly preparing the CPU socket is crucial for a successful installation of the Corsair Hydro Series H100I V2. By referring to the motherboard manual, removing protective covers, cleaning the socket, checking alignment, inspecting pins, and applying thermal paste, you will ensure optimal contact and heat transfer between the CPU and the cooler’s cold plate.
Step 4: Preparing the motherboard
Before installing the Corsair Hydro Series H100I V2 Extreme Performance Liquid CPU Cooler, it is essential to prepare the motherboard to ensure a smooth and secure installation. Follow these steps to prepare the motherboard:
- Refer to the motherboard manual: Consult the manual of your motherboard to understand the specific requirements for installing a CPU cooler. This will help you locate the necessary components and understand any specific steps or precautions.
- Identify the mounting holes: Locate the mounting holes around the CPU socket. These holes are used to secure the cooler’s mounting brackets to the motherboard. Ensure that you are using the correct mounting holes for your CPU socket type.
- Insert the backplate (if applicable): If your motherboard requires a backplate for the CPU cooler installation, carefully align and insert it into the designated area on the backside of the motherboard. Make sure that the backplate is seated securely.
- Install the mounting brackets: Attach the appropriate mounting brackets to the cooler’s radiator. The brackets are typically secured with screws or fasteners. Ensure that the brackets are firmly attached and aligned with the mounting holes on the motherboard.
- Check for clearance: Before proceeding, double-check for any potential clearance issues. Ensure that the installation area has enough space to accommodate the radiator and fans without interfering with other components such as RAM modules or motherboard heatsinks.
- Prepare the fan configuration: Determine the desired fan configuration for the cooler. You can set up the fans to either push air through the radiator (intake) or pull air through the radiator (exhaust) depending on your preference and case airflow setup.
- Connect the fan cables: Attach the fan cables to the appropriate fan headers on the motherboard. Ensure that the cables are securely connected and routed in a way that does not obstruct other components or impede airflow.
By following these steps to prepare the motherboard, you will ensure that it is ready for the installation of the Corsair Hydro Series H100I V2 Extreme Performance Liquid CPU Cooler. Taking the time to consult the motherboard manual, install the necessary mounting brackets, and check for clearance will result in a more secure and efficient installation process.
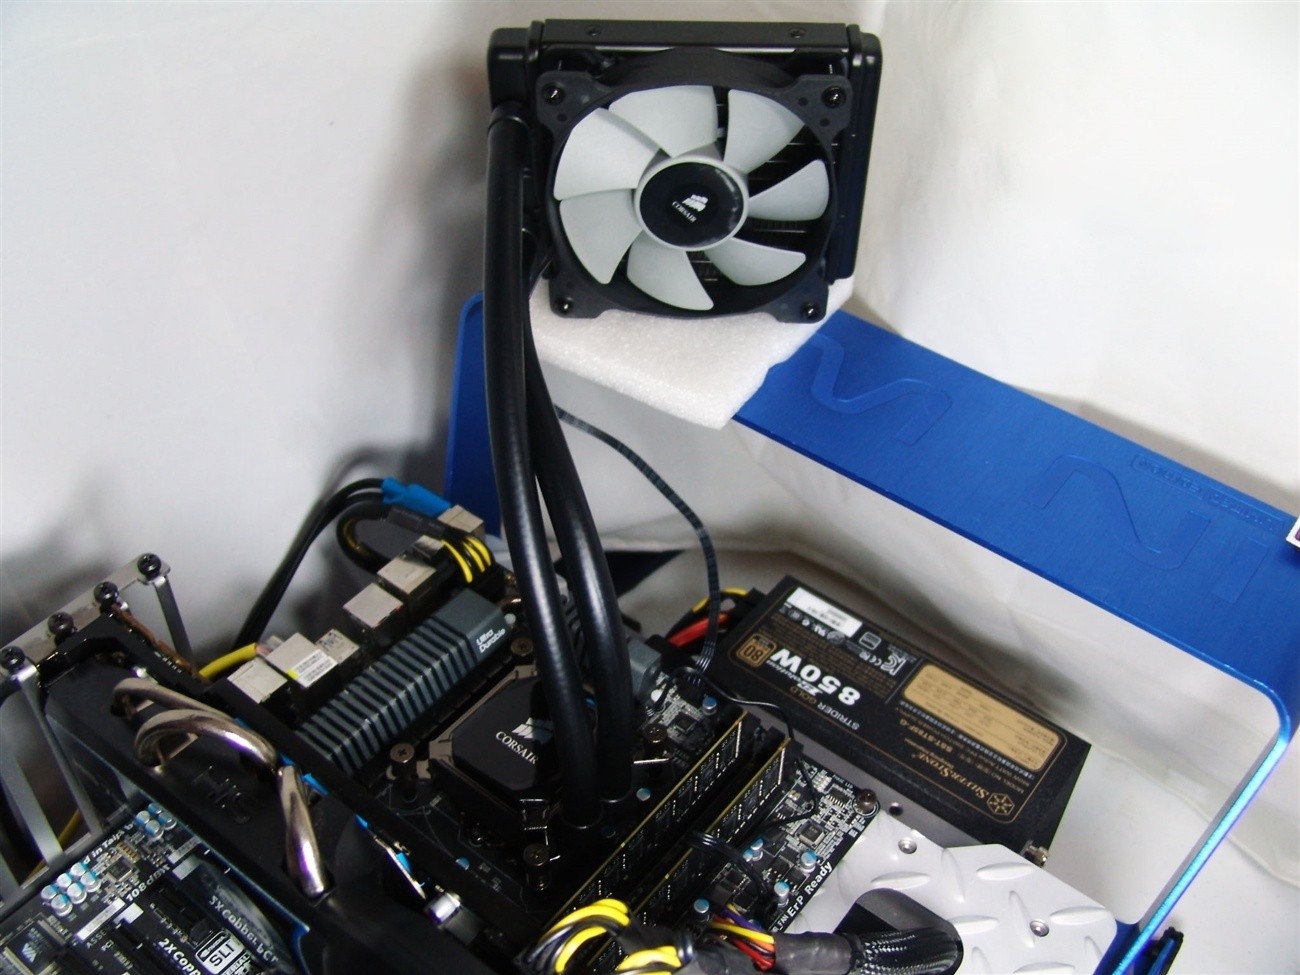
Step 5: Installing the Corsair Hydro Series H100I V2 Extreme Performance Liquid CPU Cooler
Now that you have prepared the necessary components, it’s time to install the Corsair Hydro Series H100I V2 Extreme Performance Liquid CPU Cooler. Follow these steps to ensure a proper installation:
- Place the radiator: Find a suitable location within your computer case to mount the radiator. Typically, the top or front of the case provides a good balance between cooling performance and ease of installation. Secure the radiator using the appropriate screws or fasteners provided.
- Connect the radiator fans: Attach the fans to the radiator using the provided screws or fasteners. Make sure the fans are aligned with the radiator fins for optimal airflow. If your cooler includes RGB fans, ensure that you connect the fan cables to the appropriate headers on the motherboard or RGB controller.
- Install the CPU block: Apply a small amount of thermal paste to the center of the CPU. Carefully position the CPU block on top of the CPU, aligning the mounting brackets with the holes around the CPU socket. Gently tighten the screws in an “X” pattern, gradually increasing the pressure on each screw.
- Secure the CPU block: Ensure that the CPU block is firmly secured to the CPU socket, but avoid overtightening the screws, as this can damage the CPU or motherboard. Refer to the cooler’s manual or manufacturer’s instructions for recommended torque settings.
- Connect the pump cables: Locate the pump cables coming from the CPU block. Connect the pump power cable to the appropriate header on the motherboard, typically labeled “CPU_FAN” or “AIO_PUMP”. Additionally, if your cooler has RGB lighting, connect the RGB cable to the motherboard or RGB controller.
- Organize and secure cables: Take some time to organize the cables and ensure they are neatly routed and secured using cable ties or Velcro straps. Proper cable management improves airflow and helps maintain a clean and tidy appearance inside the case.
- Close the computer case: Once everything is securely installed and cables are organized, carefully close the computer case by reattaching the side panel. Ensure that all screws or latches are properly secured.
By following these steps, you will be able to successfully install the Corsair Hydro Series H100I V2 Extreme Performance Liquid CPU Cooler. Make sure to refer to the cooler’s manual or manufacturer’s instructions for any specific guidance or recommendations throughout the installation process.
Step 6: Connecting the cables
After installing the Corsair Hydro Series H100I V2 Extreme Performance Liquid CPU Cooler, it’s time to connect the necessary cables to ensure proper functioning. Follow these steps to connect the cables:
- Locate the fan headers: Identify the CPU fan header and any additional fan headers on your motherboard. These headers will be used to power and control the radiator fans.
- Connect the radiator fan cables: Attach the cables from the radiator fans to the corresponding fan headers on the motherboard. Make sure to align the connectors correctly and firmly secure them to avoid loose connections.
- Connect the pump power cable: Locate the pump power cable coming from the CPU block. Connect it to the appropriate header on the motherboard, typically labeled “CPU_FAN” or “AIO_PUMP”. This will power the pump, ensuring proper coolant circulation.
- Connect the RGB cable (if applicable): If your Corsair Hydro Series H100I V2 has RGB lighting, locate the RGB cable coming from the CPU block. Connect it to the RGB header on the motherboard or RGB controller, following the manufacturer’s instructions and ensuring proper alignment.
- Check cable organization: Take a moment to check the organization of the cables. Ensure that they are neatly routed, properly secured, and do not obstruct any other components or impede airflow.
- Double-check connections: Verify that all cables are securely connected and in the correct positions. Loose connections can lead to improper cooling performance or functionality issues.
- Close the computer case: Once all the cables are connected and verified, carefully close the computer case by reattaching the side panel. Ensure that all screws or latches are properly secured to prevent any vibrations or accidental disconnections.
By following these steps, you will successfully connect the necessary cables for the Corsair Hydro Series H100I V2 Extreme Performance Liquid CPU Cooler. Proper cable connections are vital to ensure the effective operation of the cooler and maintain stable cooling performance for your CPU.
Step 7: Testing and troubleshooting
Once you have completed the installation of the Corsair Hydro Series H100I V2 Extreme Performance Liquid CPU Cooler, it’s important to test its functionality and troubleshoot any potential issues. Follow these steps to ensure everything is working as intended:
- Power on your computer: Turn on your computer and monitor the startup process. Pay attention to the cooler’s fans and pump to ensure they are operating correctly.
- Access the BIOS: During startup, access the BIOS by pressing the designated key (usually Del, F2, or F12) as indicated on the screen. Check the BIOS settings to ensure that the CPU fan speed is detected and functioning properly.
- Monitor CPU temperatures: Once your operating system has loaded, install a reliable temperature monitoring software and observe the CPU temperatures. The Corsair Link software can also provide real-time information about coolant temperature and pump speed.
- Ensure proper fan operation: Verify that the radiator fans are spinning and adjusting their speed according to CPU temperature changes. In some cases, you may need to adjust fan settings in the BIOS or software utility to achieve the desired cooling performance.
- Check for leaks: Carefully inspect the CPU cooler and surrounding areas for any signs of leaks or liquid accumulation. Check all tubing connections, fittings, and the CPU block carefully. Even a small leak can cause significant damage, so promptly address any leaks that may occur.
- Monitor system stability: Run stress tests or demanding tasks to assess system stability and CPU temperatures under load. This will help you ensure that the cooler is capable of effectively dissipating heat and maintaining optimal CPU performance.
- Troubleshoot any issues: If you encounter any abnormalities, such as unusually high temperatures or abnormal noise levels, refer to the Corsair Hydro Series H100I V2 manual or contact Corsair’s customer support for assistance. They can help troubleshoot and resolve any potential issues.
By thoroughly testing and troubleshooting the Corsair Hydro Series H100I V2, you can verify its functionality, ensure efficient cooling performance, and address any potential issues that may arise. This will help safeguard your CPU and maintain a stable and optimal operating environment for your system.
Conclusion
The installation of the Corsair Hydro Series H100I V2 Extreme Performance Liquid CPU Cooler is an excellent choice for users seeking efficient and reliable cooling for their CPUs. By following the step-by-step guide outlined in this article, you can install this high-performance CPU cooler with confidence.
The Corsair Hydro Series H100I V2 offers advanced cooling technology, a sleek design, and user-friendly features. Its closed-loop liquid cooling system effectively dissipates heat from the CPU, ensuring stable performance even during demanding tasks. With a 240mm radiator, high-density cooling fins, and powerful fans, the H100I V2 provides exceptional cooling capabilities.
Throughout the installation process, it is essential to prepare your workspace, remove the old CPU cooler, prepare the CPU socket and motherboard, and connect the necessary cables. Additionally, testing and troubleshooting after installation will help ensure optimal functionality and performance.
Remember to consult the manual provided by Corsair for any specific instructions or recommendations. In case of any issues or doubts, Corsair’s customer support is available to assist you.
With the Corsair Hydro Series H100I V2 in place, you can enjoy the benefits of a reliable and efficient CPU cooling solution, allowing your system to perform at its best without worrying about overheating. Upgrade your cooling performance today and experience the difference!