Overview
Upgrading the graphics card on your Windows 7 computer can greatly improve its gaming performance and overall visual experience. Whether you’re a passionate gamer or a professional graphic designer, installing a new graphics card can unlock the full potential of your computer’s graphics capabilities.
With a new graphics card, you can enjoy sharper and more detailed graphics, smoother gameplay, and faster rendering times. Additionally, a powerful graphics card allows you to explore the latest games and multimedia applications without any lag or performance issues.
Before diving into the installation process, it’s crucial to ensure compatibility between your computer system and the new graphics card. Check the manufacturer’s specifications of both your computer and the desired graphics card to confirm compatibility in terms of interface, power supply, and other requirements.
This step-by-step guide will walk you through the installation process, from preparing your computer to testing and troubleshooting the new graphics card. By following these instructions carefully, even if you have limited technical knowledge, you’ll be able to successfully install a new graphics card on your Windows 7 computer and enjoy a boosted visual experience.
Please note that while the specific steps may slightly vary depending on your computer and graphics card model, the general process remains the same. It’s always a good idea to consult the documentation provided by the graphics card manufacturer for any additional instructions or specific recommendations.
Now, without further ado, let’s dive into the exciting world of graphics card installation and unleash the power of your Windows 7 computer!
Step 1: Gather Necessary Tools and Materials
Before you begin the installation process, it’s important to gather all the necessary tools and materials. Having everything you need on hand will make the process smoother and prevent any unnecessary delays. Here’s a list of the items you’ll need:
- Screwdriver set: A variety of screwdrivers will be handy for removing the computer’s case or the existing graphics card, depending on your setup.
- New graphics card: Make sure you have the correct graphics card that is compatible with your Windows 7 computer. Refer to your computer’s documentation or the manufacturer’s website to determine the appropriate graphics card model.
- Static wristband (optional): While not essential, a static wristband can protect your computer’s components from damage caused by static electricity.
- Antistatic mat (optional): Similar to the static wristband, an antistatic mat provides an extra layer of protection against static electricity while working on your computer.
- User manual: Keep the user manual for your new graphics card nearby. It contains important information and instructions specific to your graphics card model.
- Internet connection: You will need an active internet connection to download the latest graphics card drivers, which we will install later in the process.
Take a moment to gather all the tools and materials mentioned above. Ensure that your work area is clean, well-lit, and free from any potential hazards. It’s crucial to handle the components with care and avoid any static discharge that could damage sensitive electronic parts.
Step 2: Prepare Your Computer
Before you can install the new graphics card in your Windows 7 computer, you need to prepare the system for the hardware change. Follow these steps to ensure a smooth installation process:
- Power off your computer: Shut down your computer completely and disconnect the power cord from the electrical outlet. This step is crucial to prevent any electrical shocks or damage to your computer components.
- Open the computer case: Depending on your computer model, you may need to remove screws or use a latch to open the case. Refer to your computer’s documentation for specific instructions on accessing the interior.
- Locate the existing graphics card: If your computer already has a graphics card installed, it will be located in one of the PCI Express slots on the motherboard. Take note of its position for reference later. If your computer uses integrated graphics, skip to the next step.
- Disconnect cables: Carefully disconnect any cables connected to the existing graphics card. This may include the power cable, video cables, or any other additional connections. Take note of how the cables are connected, as you’ll need to reattach them to the new graphics card.
- Remove the existing graphics card: If your computer already has a graphics card installed, unscrew any screws or fasteners holding it in place. Gently lift the card from its slot and set it aside in an anti-static bag or on an anti-static mat.
- If needed, remove any protective covers: Some motherboards have protective covers on the PCI Express slots. If your computer has these covers, remove them to expose the slots where you’ll install the new graphics card.
Once you’ve completed these steps, your computer is now prepared for the installation of the new graphics card. Keep the existing graphics card and any screws or fasteners in a safe place in case you need to reinstall it in the future.
Step 3: Remove Old Graphics Card
Now that you’ve prepared your computer for the installation of a new graphics card, it’s time to remove the existing one. Follow these steps to safely remove the old graphics card from your Windows 7 computer:
- Locate the PCI Express slot: Look for an available PCI Express slot on your motherboard. These slots are typically longer and have a locking mechanism on one end.
- Unlock the slot: To remove the old graphics card, you’ll need to release the locking mechanism. Push down on the plastic tab or lever to unlock the slot. The tab may be on one side or at the end of the slot, depending on your motherboard.
- Remove the old card: Gently pull the old graphics card straight out of the PCI Express slot. Be careful not to apply too much force or bend any of the card’s components.
- Inspect the PCI Express slot: Take a moment to inspect the slot for any dust, debris, or obstructions. Use a can of compressed air or a soft brush to clean the slot if necessary. Ensure that the slot is clear and ready for the new graphics card.
Once you’ve removed the old graphics card and inspected the PCI Express slot, you’re now ready to proceed with installing the new graphics card. Keep the old graphics card in a safe place, as you may need it for troubleshooting or future use. With the old card out of the way, the next step is to install the new graphics card and take your computer’s visual performance to new heights!
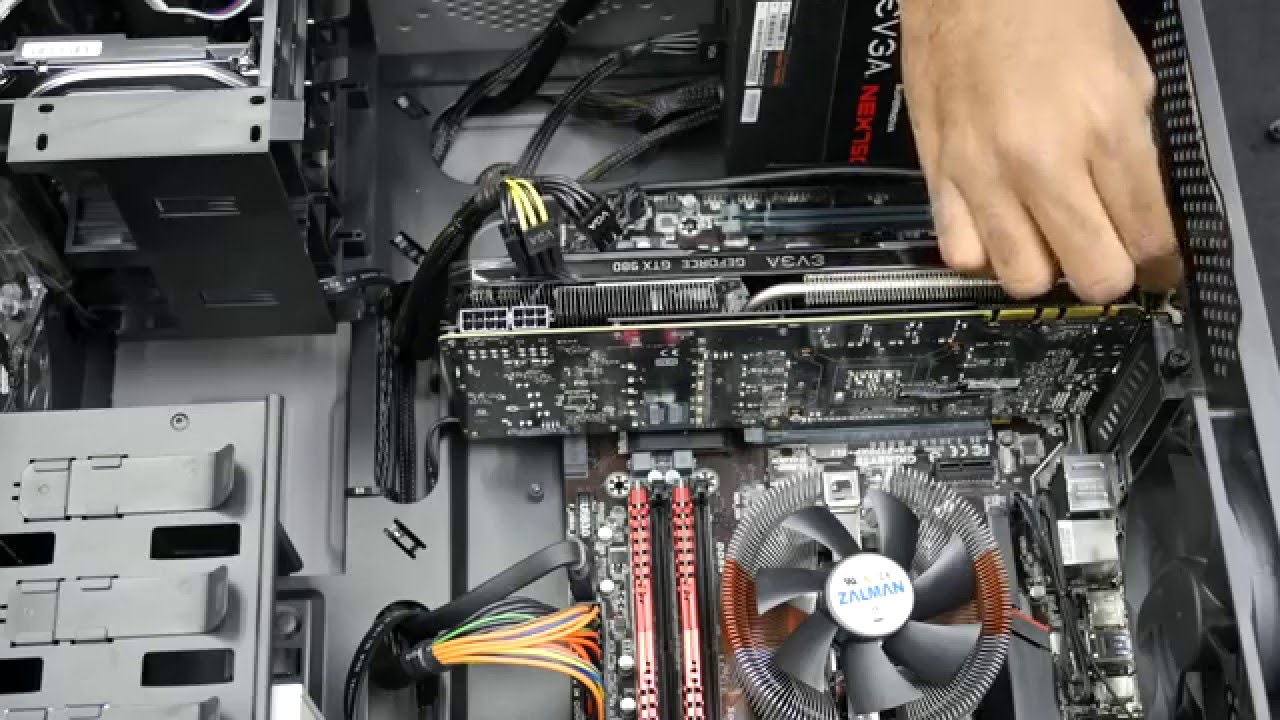
Step 4: Install New Graphics Card
Now that you’ve removed the old graphics card, it’s time to install the new one. Follow these steps to ensure a successful installation of the new graphics card in your Windows 7 computer:
- Locate the PCI Express slot: Look for an available PCI Express slot on your motherboard that matches the specifications of your new graphics card. Depending on your computer’s configuration, you may have multiple slots to choose from.
- Align the card: Hold the new graphics card by its edges and align it with the PCI Express slot. Ensure that the gold contacts on the bottom of the card are facing down and match the slot’s configuration.
- Insert the card: Gently but firmly push the card into the slot until it is fully seated. The locking mechanism should engage and hold the card securely in place. You may hear a click when the card is properly inserted.
- Secure the card: If required, use screws or fasteners to secure the graphics card to the computer’s case or the motherboard itself. Refer to your computer’s documentation for specific instructions on securing the card, as it may vary depending on your setup.
Congratulations! You have successfully installed the new graphics card in your Windows 7 computer. Take a moment to ensure that the card is securely in place and properly aligned with the PCI Express slot. The next step is to connect the necessary power cables to the graphics card to ensure it receives adequate power for optimal performance.
Step 5: Secure New Graphics Card
Now that you’ve installed the new graphics card in your computer, it’s important to secure it properly to ensure it stays in place and functions correctly. Follow these steps to securely fasten the graphics card in your Windows 7 computer:
- Check for additional brackets or clips: Some graphics cards may come with additional brackets or clips that need to be attached to the card for added stability. Refer to the manufacturer’s instructions to see if your graphics card requires any additional hardware.
- Align the bracket or clip: If you have any additional brackets or clips, align them with the appropriate holes on the graphics card and ensure they fit securely.
- Fasten the screws: Use the provided screws to secure the bracket or clip onto the graphics card. Tighten the screws gently, ensuring not to over-tighten and potentially damage the card.
- Inspect the card’s alignment: Double-check that the graphics card is still properly aligned within the PCI Express slot. Ensure that it is fully seated and that no part of the card is protruding or misaligned.
- Replace the computer case: If you had to remove the computer case to access the motherboard and install the graphics card, carefully reattach the case. Make sure all screws or latches are secured tightly.
By securely fastening the new graphics card and ensuring proper alignment, you minimize the risk of damaging the card and optimize its performance. With the graphics card securely in place, you can proceed to the next step of connecting the necessary power cables.
Step 6: Connect Power Cables
Now that you’ve securely installed the new graphics card in your Windows 7 computer, it’s time to provide it with the necessary power. Follow these steps to connect the power cables to your graphics card:
- Locate the power connectors: Look for the power connectors on your graphics card. Most modern graphics cards require additional power from the power supply unit (PSU).
- Check the power requirements: Refer to your graphics card’s documentation or the manufacturer’s website to determine the specific power requirements. Ensure that your computer’s PSU can provide the necessary power.
- Connect the power cables: Take the appropriate power cables from the PSU and connect them to the power connectors on the graphics card. Ensure that the connectors match in shape and size.
- Secure the connections: Once the power cables are connected, check that they are securely fastened. In some cases, you may need to push the connectors together firmly or use the provided clips to secure them in place.
It’s important to connect the power cables to your new graphics card to ensure it receives the required power for optimal performance. Failing to connect the power cables may result in the graphics card not functioning correctly or not working at all. Double-check the connections to ensure they are secure and properly aligned.
With the power cables connected, your new graphics card is now ready to be fully utilized. However, before you can enjoy its enhanced visual capabilities, you’ll need to install the necessary graphics card drivers. The following step will guide you through the process of installing these drivers to ensure your Windows 7 computer recognizes and utilizes your new graphics card correctly.
Step 7: Install Graphics Card Drivers
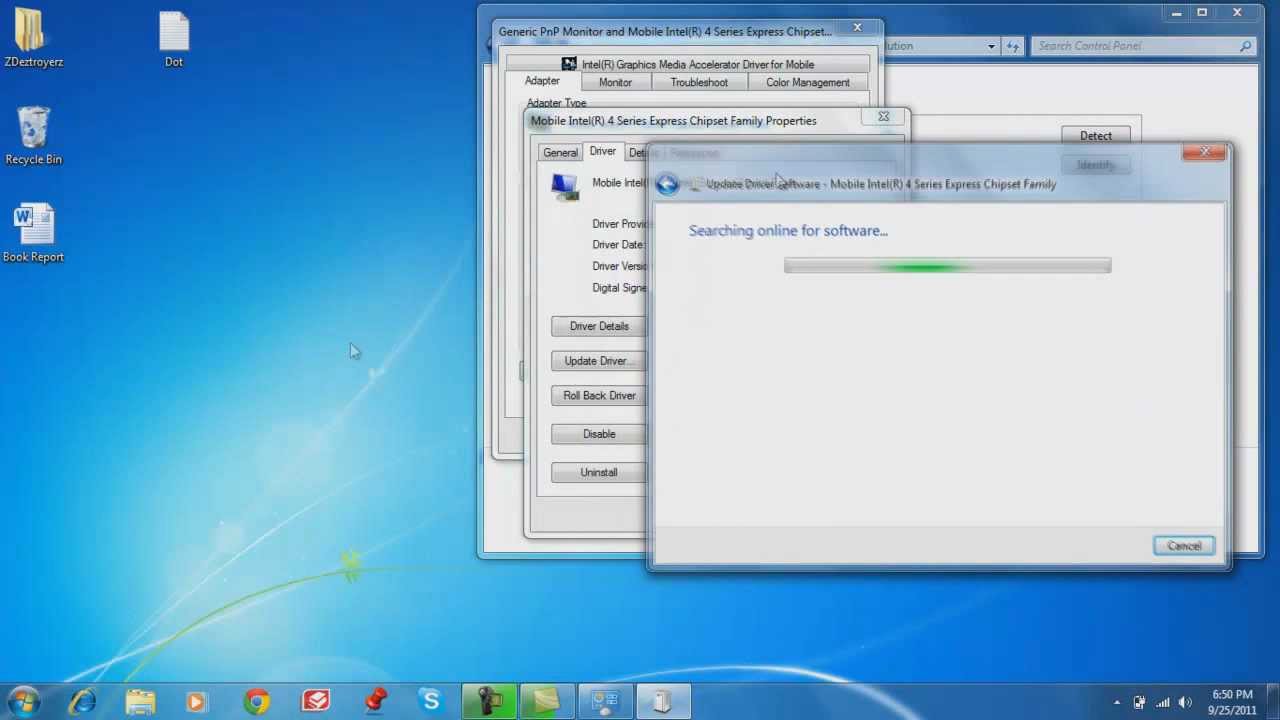
After installing a new graphics card in your Windows 7 computer, it’s essential to install the appropriate drivers for optimal performance. Follow these steps to install the graphics card drivers:
- Access the manufacturer’s website: Visit the website of the graphics card manufacturer, such as NVIDIA, AMD, or Intel. Navigate to the “Drivers” or “Support” section of the website.
- Identify your graphics card model: Locate your specific graphics card model in the provided list or by using the search function on the website. Ensure you select the correct model to download the appropriate drivers.
- Download the drivers: Choose the operating system as Windows 7 and click on the download link for the latest drivers compatible with your graphics card. Save the driver installation file to your computer.
- Run the installer: Locate the downloaded driver file and double-click on it to run the installation wizard. Follow the on-screen prompts to proceed with the installation. You may need to accept the license agreement and choose the installation location.
- Wait for the installation to complete: Allow the driver installation process to complete. It may take a few minutes, and your screen might flicker or go blank temporarily. Avoid interrupting the installation or disconnecting the power during this process.
- Restart your computer: Once the installation is finished, restart your computer. This step ensures that the newly installed graphics card drivers are fully integrated into the system.
By installing the latest drivers provided by the graphics card manufacturer, you ensure that your Windows 7 computer recognizes and optimizes the performance of your new graphics card. These drivers often include additional features and bug fixes, enhancing the overall functionality and stability of the card.
Congratulations! You have successfully installed the graphics card drivers for your new graphics card. Now it’s time to test your computer to ensure everything is functioning properly before diving into your favorite games or graphics-intensive tasks.
Step 8: Test and Troubleshoot
After installing the graphics card drivers in your Windows 7 computer, it’s crucial to test the new graphics card and resolve any potential issues that may arise. Follow these steps to test and troubleshoot your new graphics card:
- Restart your computer: After installing the drivers, restart your computer to ensure that the changes take effect and the graphics card is recognized by the system.
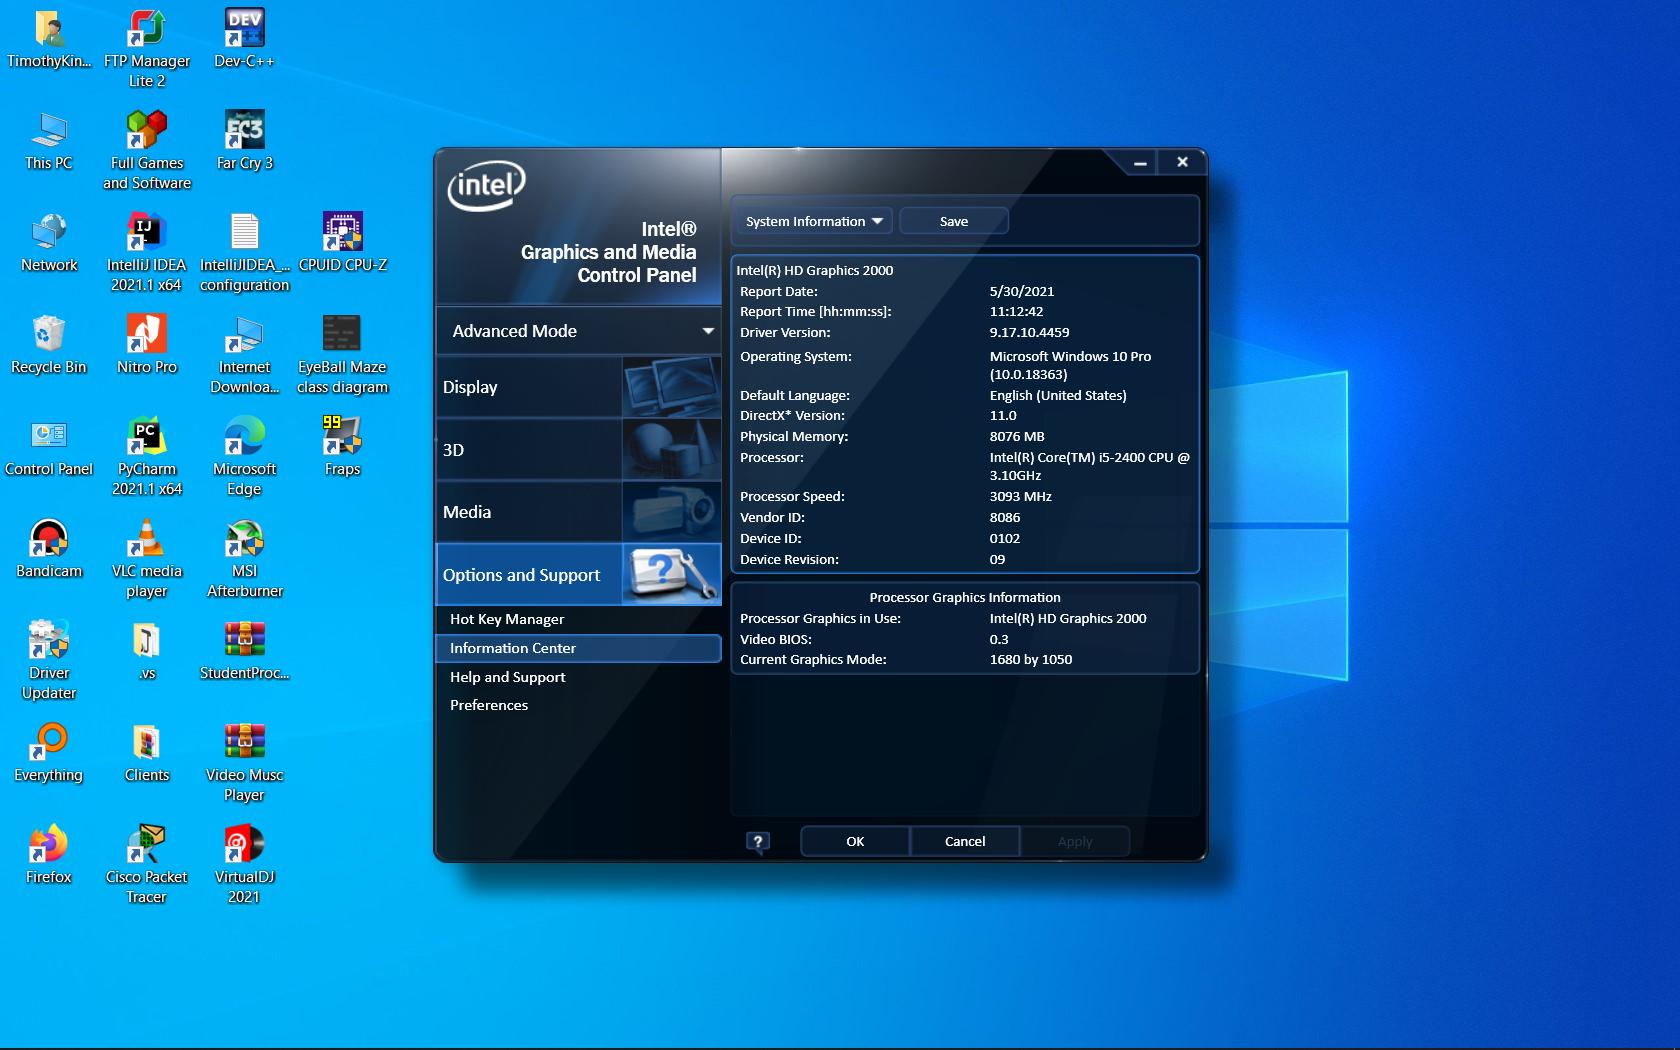
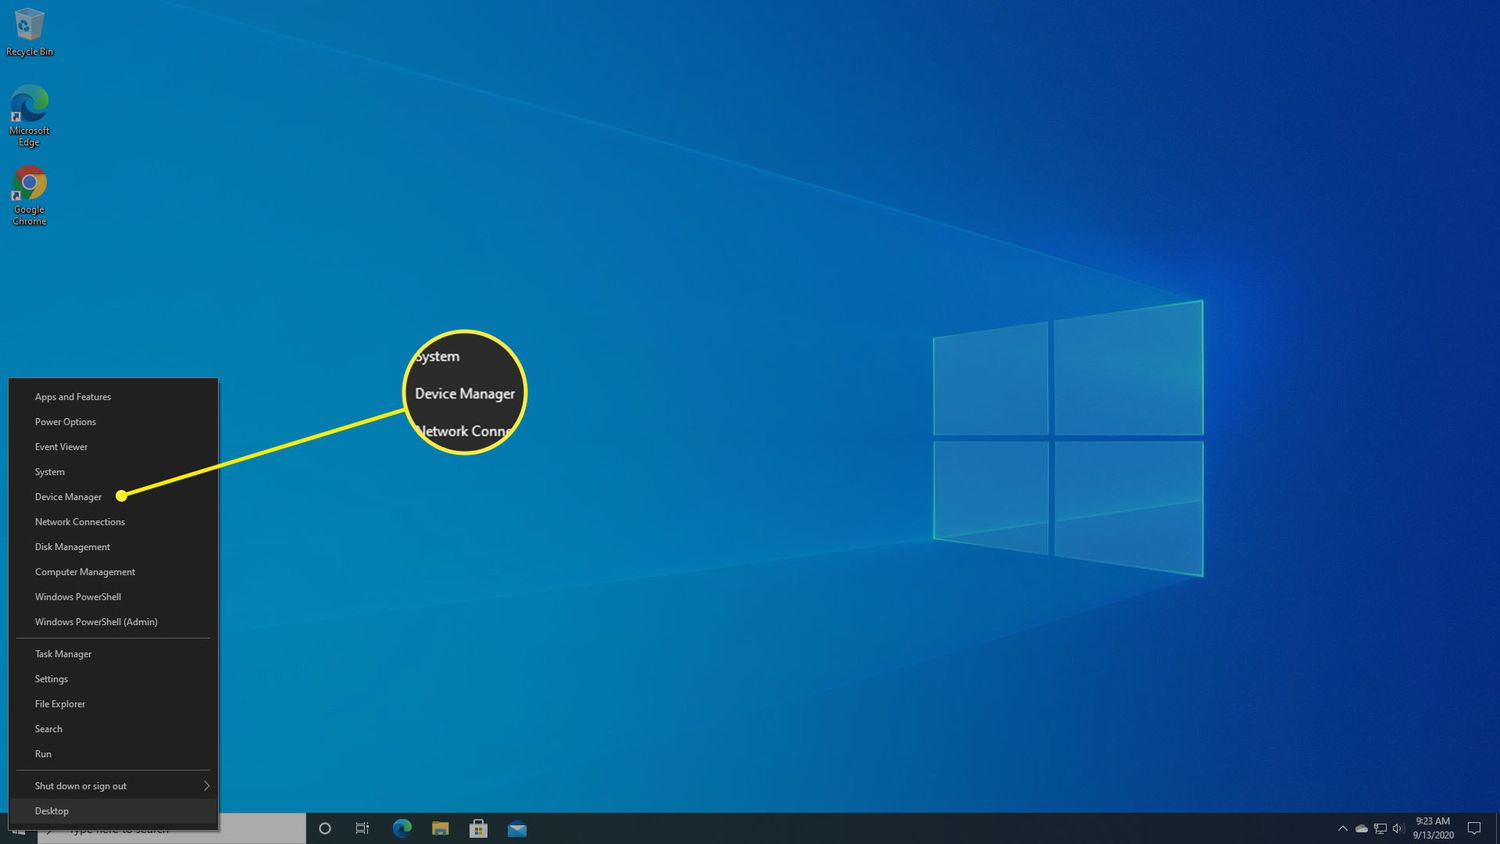
- Check device manager: Right-click on the “Computer” icon on your desktop or in the start menu and select “Manage”. In the computer management window, click on “Device Manager”. Check under “Display adapters” to verify that your graphics card is listed and functioning correctly without any error symbols.
- Monitor connections: Ensure that your monitor or monitors are properly connected to the graphics card. Use the appropriate cables, such as HDMI, DisplayPort, or DVI, and confirm that the connection is secure.
- Check image quality: Open a high-resolution image or video to test the image quality and clarity. Look for any visual anomalies such as artifacts, flickering, or screen tearing. If you notice any issues, double-check that the graphics card drivers are up to date and correctly installed.
- Test with games or applications: Launch a graphics-intensive game or application to assess the performance and stability of the new graphics card. Pay attention to any lag, stuttering, or crashes that may occur during gameplay or while using graphics-intensive software.
- Update drivers if needed: If you encounter any issues during testing, consider updating your graphics card drivers to the latest version. Visit the manufacturer’s website and download the most recent drivers. Follow the same installation process as mentioned in Step 7.
- Contact technical support if necessary: If you continue to experience problems with your new graphics card, it’s advisable to contact the manufacturer’s technical support for further assistance. They can provide guidance and troubleshooting steps specific to your graphics card model.
By thoroughly testing and troubleshooting your new graphics card, you can ensure that it functions optimally and provides the enhanced visual experience you desire. Resolving any issues that arise during the testing phase will allow you to fully enjoy the capabilities of your new graphics card and make the most of its performance.
Step 9: Enjoy Your New Graphics Card!
Congratulations! You have successfully installed and tested your new graphics card in your Windows 7 computer. With this upgrade, you can now enjoy the enhanced visual experience and improved gaming performance that your new graphics card offers. Here are a few things to keep in mind as you start using your new graphics card:
- Explore new games: Take advantage of your upgraded graphics card to play the latest and most demanding games. Enjoy smoother gameplay, higher frame rates, and stunning visuals that will immerse you in the gaming world like never before.
- Create stunning graphics: If you’re a graphic designer, video editor, or content creator, your new graphics card will significantly enhance your workflow. Render high-resolution videos faster, handle complex graphic designs seamlessly, and experience smoother editing processes.
- Stay up to date with drivers: It’s important to regularly check for driver updates for your graphics card. The manufacturer may release new drivers to optimize performance, fix bugs, and introduce new features. Visit their website periodically to download and install the latest drivers.
- Maintain proper cooling: The increased power and performance of your new graphics card may generate more heat. Ensure that your computer’s cooling system is adequate to prevent overheating issues. Keep the computer’s fans clean and periodically check for any dust buildup that may hinder airflow.
- Optimize settings: Take some time to explore the settings of your graphics card’s control panel. Adjusting these settings can further enhance the visuals and performance of your games and applications. Experiment with different options and find the settings that suit your preferences.
- Share your experience: If you’re thrilled with your new graphics card, share your experience with others. Consider writing a review, recommending it to friends, or sharing your stunning in-game screenshots on social media. Your feedback can help others make informed choices when upgrading their graphics cards.
Now that you have completed all the steps and are fully equipped to enjoy your new graphics card, immerse yourself in your favorite games, dive into creative projects, and revel in the visual splendor that your Windows 7 computer will now bring. Embrace the power and capabilities of your upgraded graphics card and elevate your computing experience to new heights!