Introduction
Welcome to this guide on how to hook up a Hyper 212 Evo CPU cooler on AMD processors. If you’re an avid computer user or an enthusiast, you probably understand the importance of a reliable cooling system to keep your CPU running at optimal temperatures. The Hyper 212 Evo CPU cooler is a popular choice among many PC builders due to its excellent performance and affordability.
Designed with a highly efficient heatsink and an adjustable fan, the Hyper 212 Evo can help dissipate heat efficiently, reducing the risk of overheating and extending the lifespan of your processor. Whether you’re a casual gamer or a professional video editor, installing a robust cooling system like the Hyper 212 Evo can significantly enhance your computer’s performance and prevent thermal throttling.
In this guide, we will focus on how to install the Hyper 212 Evo CPU cooler on AMD processors. By following these step-by-step instructions, you’ll be able to seamlessly integrate the cooler with your AMD-compatible motherboard and ensure proper heat dissipation for your CPU.
Before we delve into the installation process, it’s important to note that different CPU coolers may have specific installation requirements. Therefore, always refer to the manufacturer’s instructions and ensure compatibility between your processor, motherboard, and cooler before initiating the installation process.
Now, let’s proceed with the guide and discover how to properly hook up the Hyper 212 Evo CPU cooler on AMD processors, ensuring efficient cooling and optimal performance for your system.
What is the Hyper 212 Evo CPU Cooler?
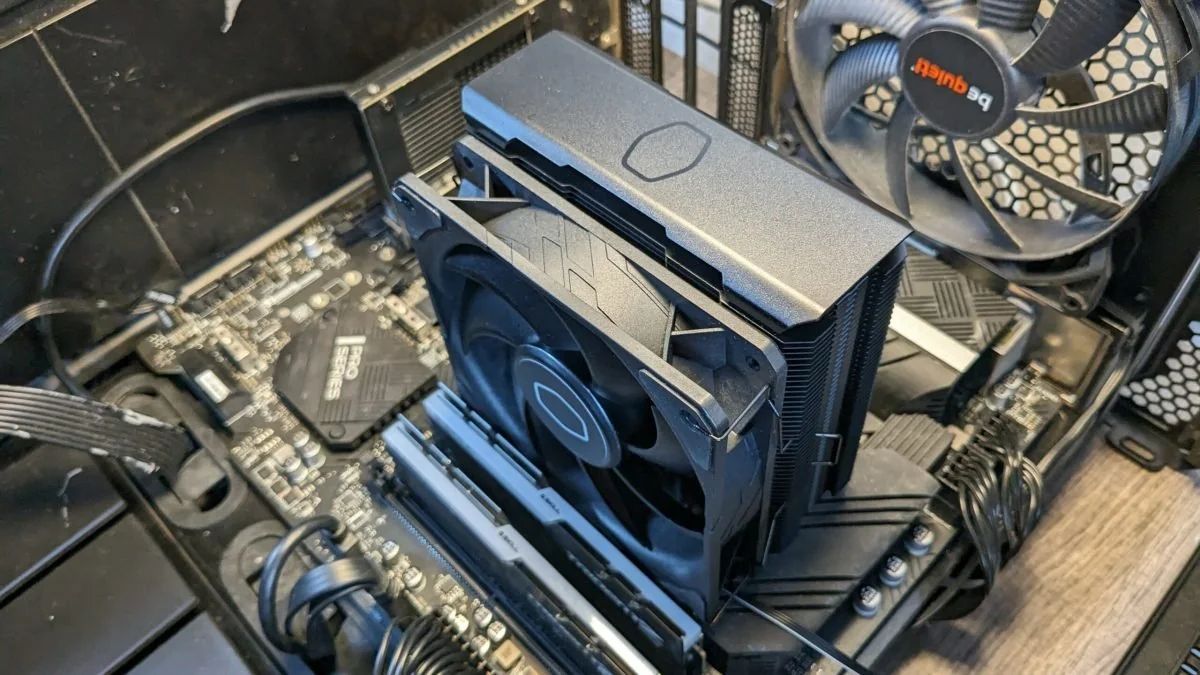
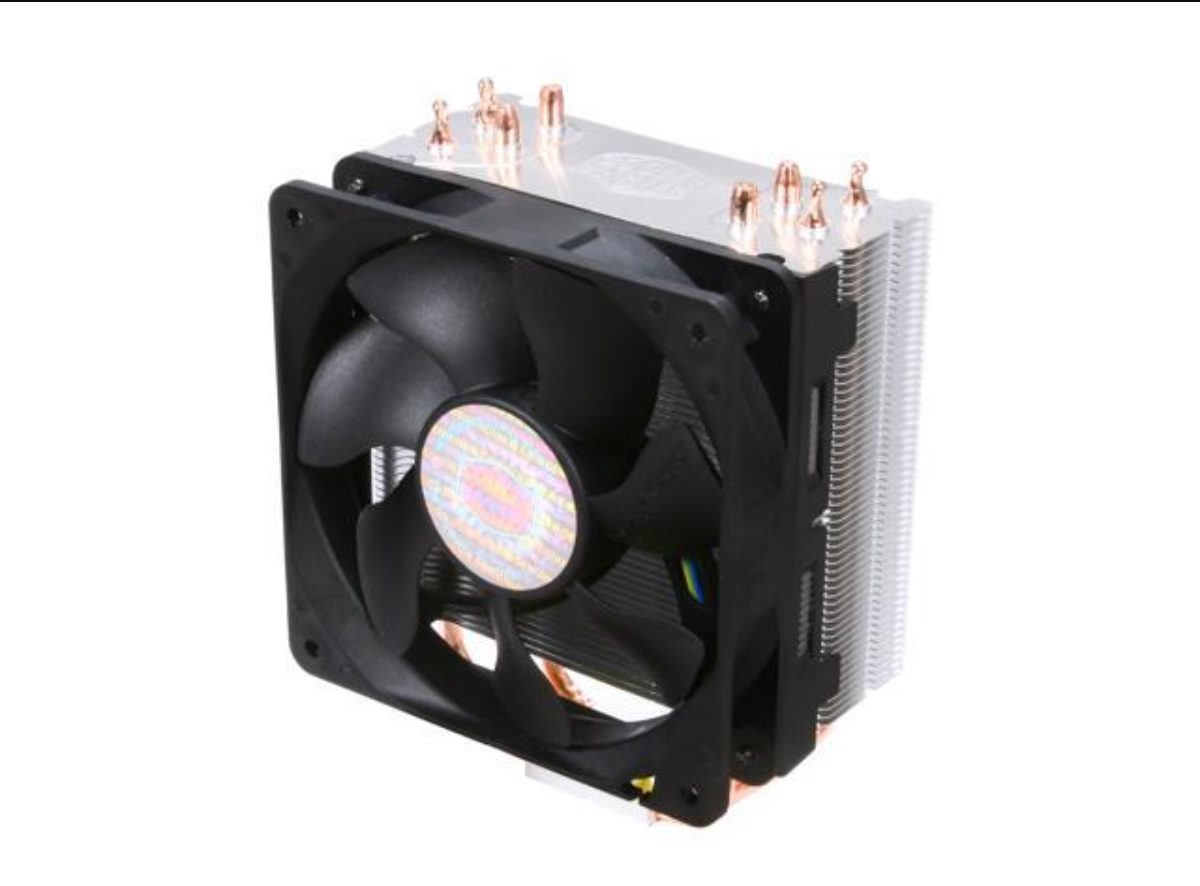
The Hyper 212 Evo CPU cooler is a popular aftermarket cooling solution designed to keep your processor operating at optimal temperatures, ensuring excellent performance and stability. Manufactured by Cooler Master, a renowned company in the computer hardware industry, the Hyper 212 Evo has gained a reputation for its exceptional cooling capabilities and affordable price point.
One of the standout features of the Hyper 212 Evo is its impressive heatsink design. The heatsink consists of a tower-like structure made up of numerous densely packed aluminum fins. This design maximizes the surface area available for heat dissipation, allowing for efficient cooling. The heatsink is also equipped with a heat pipe system, which helps to rapidly transfer heat away from the CPU.
Additionally, the Hyper 212 Evo comes with a highly adjustable fan. The fan can be easily positioned to push air towards the heatsink, maximizing the cooling performance. The fan operates quietly and efficiently, spinning at variable speeds depending on the CPU temperature, thanks to its PWM (Pulse Width Modulation) control.
One of the key advantages of the Hyper 212 Evo CPU cooler is its broad compatibility with various processor sockets. It is compatible with both Intel and AMD processors, making it a versatile option for a wide range of computer systems. In this guide, we will specifically focus on installing the Hyper 212 Evo on AMD processors.
Overall, the Hyper 212 Evo CPU cooler offers an excellent balance between price, performance, and ease of installation. Its robust cooling capabilities and compatibility with AMD processors make it a popular choice among gamers, overclockers, and PC enthusiasts alike.
Now that we have an understanding of what the Hyper 212 Evo CPU cooler is, let’s proceed with the guide to learn how to properly install it on AMD processors.
Compatibility with AMD Processors
The Hyper 212 Evo CPU cooler is specifically designed to be compatible with AMD processors, making it an ideal cooling solution for AMD-based systems. It supports a wide range of AMD processor sockets, including AM4, AM3+, AM3, AM2+, and FM2+.
When it comes to compatibility, it’s essential to ensure that the specific model of your AMD processor is supported by the Hyper 212 Evo CPU cooler. Cooler Master provides a comprehensive list of compatible processors on their website, so it’s recommended to cross-reference your processor model with the official compatibility guide before proceeding with the installation.
Understanding the compatibility requirements is crucial to ensure a seamless installation process and optimal performance. By offering support for various AMD processor sockets, the Hyper 212 Evo CPU cooler provides a versatile cooling solution for different generations and models of AMD processors.
In addition to compatibility with the processor socket, it’s also important to consider the space available inside your computer case. The Hyper 212 Evo CPU cooler is a moderately sized cooler, so it’s essential to ensure that your case has adequate clearance for installation. Measure the dimensions of your case and compare them with the cooler’s specifications to ensure a proper fit.
Moreover, it’s worth noting that the Hyper 212 Evo CPU cooler may not be suitable for extreme overclocking or high-performance applications. While it provides excellent cooling capabilities for most standard usage scenarios, users looking for extreme cooling performance may need to consider alternative cooling solutions.
Overall, the compatibility of the Hyper 212 Evo CPU cooler with AMD processors makes it a reliable choice for users who own AMD-based systems. Its support for various AMD processor sockets ensures that a wide range of users can benefit from its efficient and affordable cooling capabilities.
Now that we understand the compatibility aspect, let’s move on to the next section, where we will discuss the steps involved in preparing for the installation of the Hyper 212 Evo CPU cooler on an AMD processor.
Preparing for Installation
Before diving into the installation process of the Hyper 212 Evo CPU cooler on an AMD processor, it’s essential to take the time to prepare and gather the necessary tools and components. This ensures a smoother installation and reduces the chances of encountering any issues along the way.
Here are the steps to follow when preparing for the installation of the Hyper 212 Evo CPU cooler:
1. Read the Manual: Start by familiarizing yourself with the manufacturer’s instructions and guidelines provided in the Hyper 212 Evo CPU cooler’s manual. This will give you a clear understanding of the installation process and any specific requirements for your particular AMD processor socket.
2. Gather the Tools: Ensure you have all the necessary tools and components ready before beginning the installation. These typically include the Hyper 212 Evo CPU cooler itself, the backplate, mounting brackets, screws, a screwdriver, and thermal paste (which may be included with the cooler or purchased separately).
3. Cleaning: Take the opportunity to clean the surface of your AMD processor and remove any residue from previous thermal paste. Use isopropyl alcohol and a lint-free cloth to gently clean the surface, ensuring a clean and smooth contact for the new thermal paste.
4. Accessibility: Ensure that your computer case is easily accessible and that you have enough space to maneuver during the installation process. Clear any obstacles or cables that may hinder the installation process or interfere with the cooler’s performance.
5. Static Precautions: Before handling any of the components, ensure you discharge any static electricity by touching a metal surface. This helps prevent any potential damage to sensitive components.
By following these preparatory steps, you will have everything organized and ready to proceed with the installation of the Hyper 212 Evo CPU cooler on your AMD processor. The next section will provide a step-by-step guide to help you through the installation process.
Step-by-Step Guide to Installing the Hyper 212 Evo CPU Cooler on an AMD Processor
Now that you’ve prepared for the installation, let’s dive into the step-by-step process of installing the Hyper 212 Evo CPU cooler on an AMD processor. Following these instructions carefully will help ensure a successful installation and optimal cooling performance.
Note: The specific steps may vary slightly depending on your motherboard and CPU socket. Always consult the manual provided by Cooler Master for precise instructions specific to your setup.
Step 1: Mounting the Backplate:
- Start by placing the backplate on the rear side of the motherboard, aligning it with the holes provided for your AMD processor socket.
- Insert the mounting posts through the corresponding holes on the motherboard from the front side, with the retention brackets facing outward.
- Secure the mounting posts with the included nuts on the backplate, ensuring they are tightened securely but not overly tightened.
Step 2: Applying Thermal Paste:
- Apply a small pea-sized dot of thermal paste onto the center of your AMD processor. Avoid applying too much paste as it can lead to inefficient heat transfer.
- Spread the thermal paste evenly with a spreader or by carefully placing the cooler on top, ensuring it covers the entire surface of the processor evenly.
Step 3: Installing the Cooler:
- Position the Hyper 212 Evo cooler on top of the processor, aligning the screw holes of the cooler’s mounting brackets with the mounting posts on the backplate.
- Secure the cooler in place by attaching the provided screws to the mounting posts. Tighten them evenly in a diagonal pattern to ensure even pressure distribution.
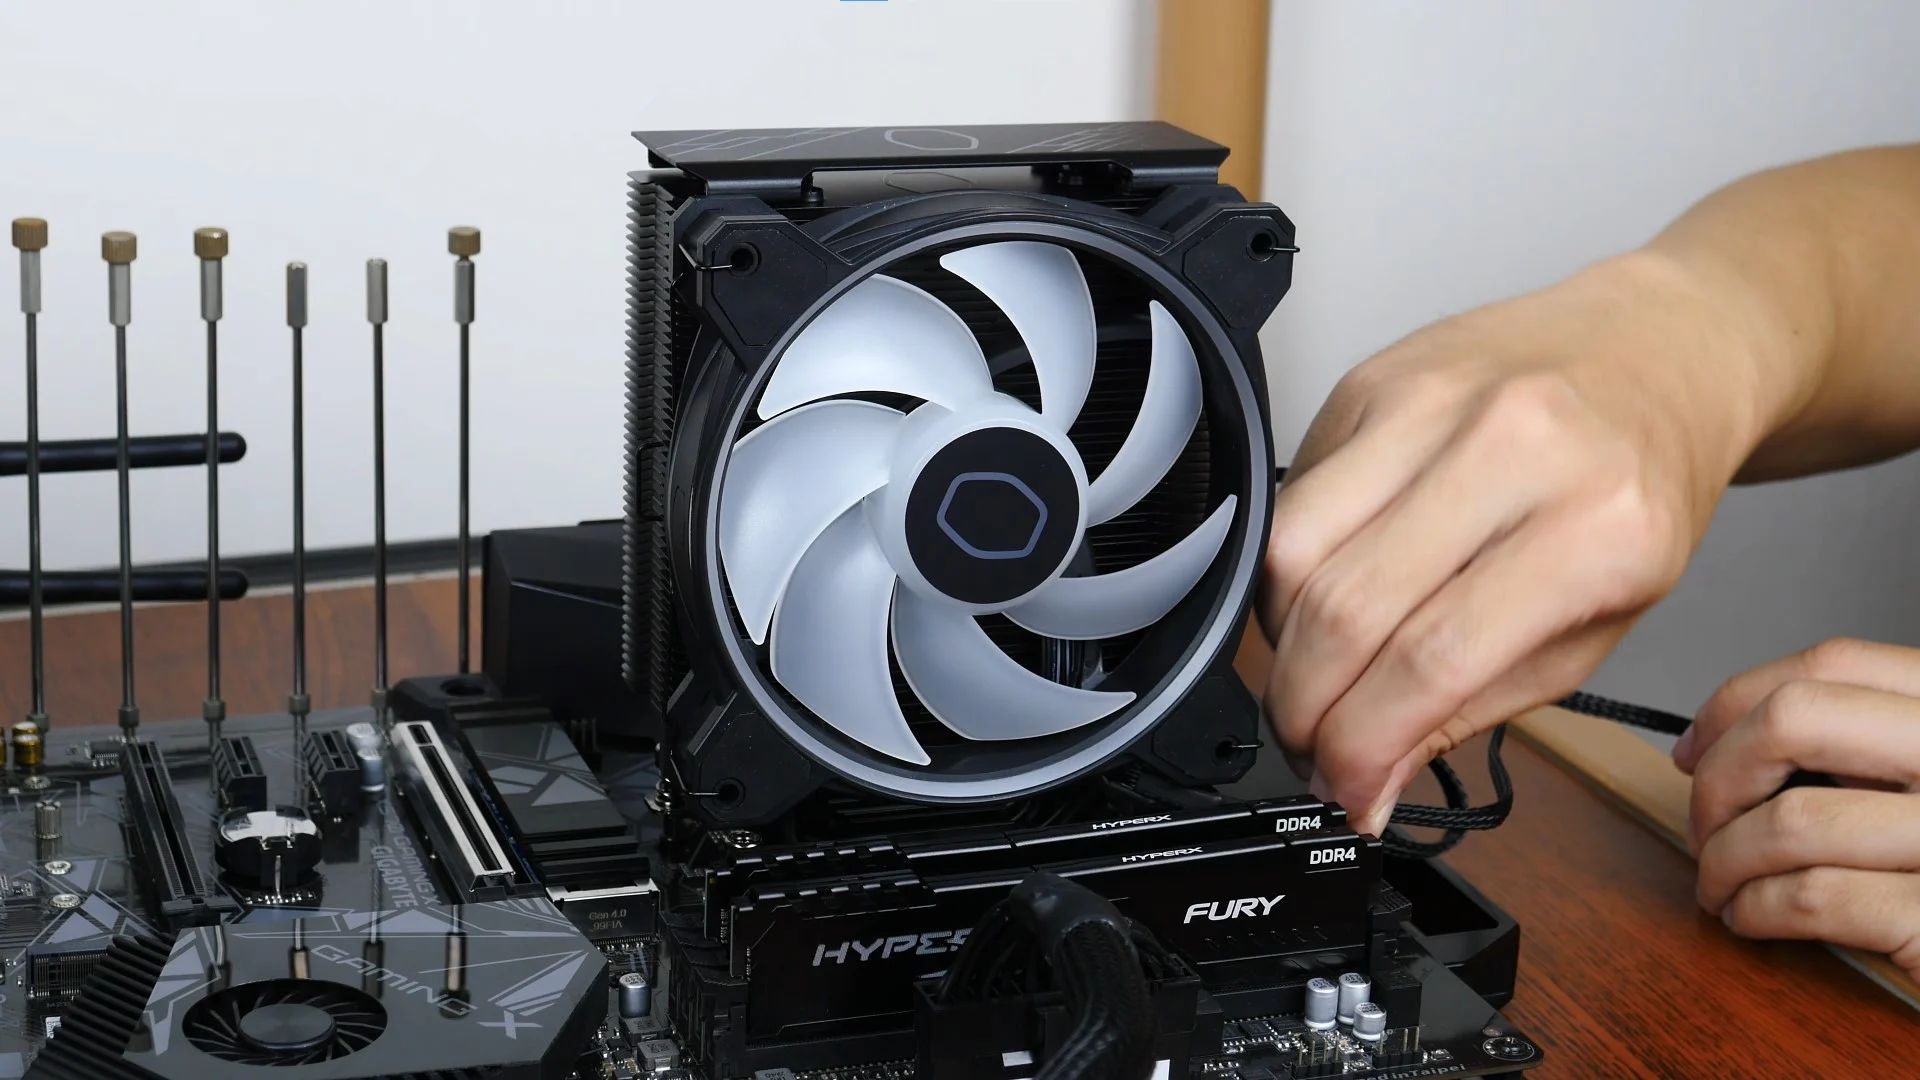
Step 4: Connecting the Fan:
- Locate the fan clips provided and attach them to the sides of the Hyper 212 Evo cooler.
- Connect the fan’s power cable to the CPU fan header on your motherboard.
Step 5: Finishing touches:
- Double-check all the connections and confirm that the cooler is securely installed.
- Reattach any cables or components that were disconnected during the installation process.
With the Hyper 212 Evo CPU cooler successfully installed on your AMD processor, you can now enjoy improved cooling performance and peace of mind knowing your CPU is operating at optimal temperatures.
It’s essential to run a few tests to ensure that the cooler is functioning as intended and the temperatures are within a safe range. Use monitoring software to keep an eye on the CPU temperatures during various workloads, such as gaming or rendering, to verify that the cooler is effectively dissipating heat.
If you encounter any issues during the installation process or notice abnormally high temperatures, refer to the troubleshooting section or seek assistance from Cooler Master’s support team.
Now that you’ve completed the installation, your AMD processor is ready to deliver optimal performance, thanks to the reliable cooling provided by the Hyper 212 Evo CPU cooler.
Applying Thermal Paste
Applying thermal paste is a crucial step in the installation process of the Hyper 212 Evo CPU cooler on your AMD processor. Thermal paste, also known as thermal compound or TIM (Thermal Interface Material), helps improve heat transfer between the processor and the cooler, ensuring efficient cooling performance.
Step 1: Clean the Surface:
Before applying thermal paste, make sure to clean the surface of your AMD processor. Use isopropyl alcohol and a lint-free cloth to gently remove any residue or old thermal paste. Cleaning the surface ensures a clean and smooth contact for the new thermal paste.
Step 2: Apply the Thermal Paste:
There are multiple methods to apply thermal paste, such as the pea-sized dot method or the line method. Here, we will explain the commonly used pea-sized dot method:
- Take a small amount of thermal paste, usually a pea-sized dot, and place it on the center of your AMD processor. Avoid applying too much paste as it can lead to inefficient heat transfer.
- Gently lower the Hyper 212 Evo cooler onto the processor, ensuring that the thermal paste spreads evenly across the entire surface.
Please note that it’s important to use high-quality thermal paste to ensure optimal heat transfer. The Hyper 212 Evo CPU cooler usually comes with a tube of thermal paste included, but if you prefer a different brand, make sure to choose a reputable one for best results.
Step 3: Spreading the Thermal Paste:
Some users prefer to spread the thermal paste manually, ensuring even coverage on the processor surface. If you choose to spread the thermal paste, use a spreader or a clean plastic card to carefully distribute the paste in a thin layer.
However, keep in mind that modern CPU coolers, including the Hyper 212 Evo, are designed to evenly distribute the thermal paste once the cooler is installed and correctly tightened. Therefore, manual spreading is not always necessary, and it can potentially introduce air bubbles or uneven coverage if not done carefully.
Remember, the goal is to ensure that a thin, even layer of thermal paste covers the entire CPU surface. This helps eliminate any small gaps or irregularities between the processor and the cooler, promoting efficient heat transfer.
With the thermal paste properly applied, you can proceed with the installation of the Hyper 212 Evo CPU cooler, confident that it will effectively dissipate heat and keep your AMD processor running at optimal temperatures.
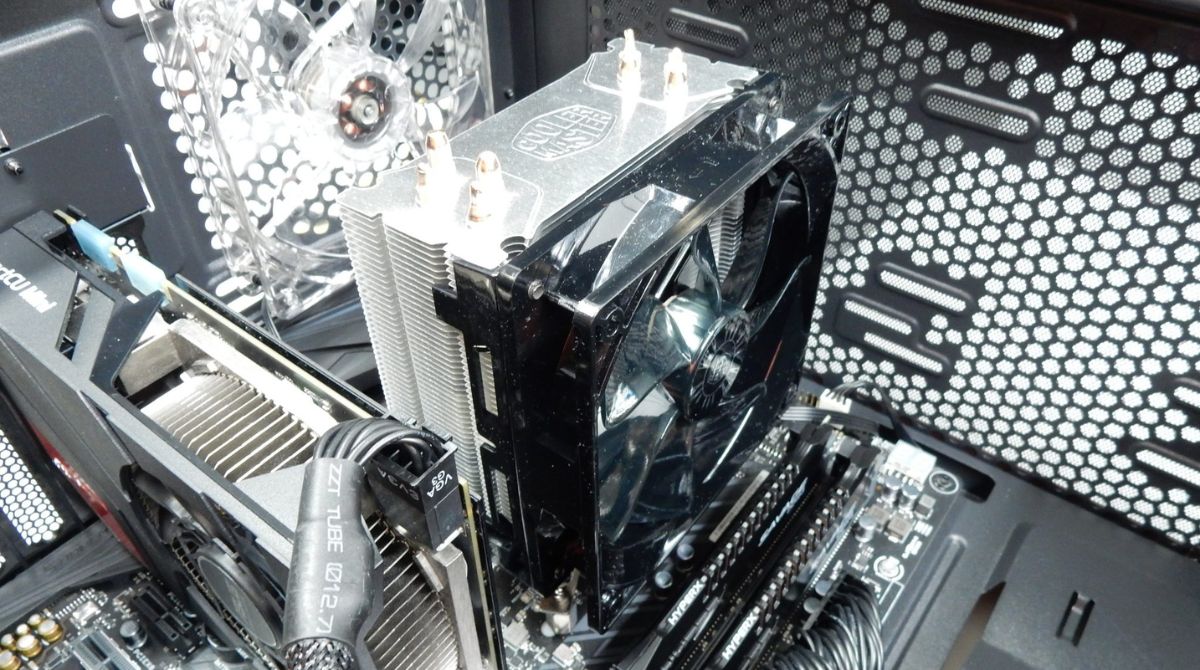
Attaching the Cooler to the Motherboard
Once you have prepared the thermal paste and cleaned the surface of your AMD processor, the next step in installing the Hyper 212 Evo CPU cooler is attaching it firmly to the motherboard. This ensures a secure and efficient cooling solution for your processor.
Follow these steps to properly attach the cooler to the motherboard:
Step 1: Positioning the Cooler:
- Position the Hyper 212 Evo cooler over the AMD processor, aligning the screw holes on the cooler’s mounting brackets with the corresponding ones on the mounting posts of the motherboard.
- Ensure that the four corners of the cooler’s base firmly contact the thermal paste on the AMD processor.
Step 2: Securing the Cooler:
- Once the cooler is positioned correctly, use the provided screws to secure it in place.
- Insert the screws through the holes on the cooler’s brackets and tighten them evenly using a screwdriver. It’s best to tighten the screws in a diagonal pattern to ensure even pressure distribution on the cooler’s base.
- Be careful not to overtighten the screws, as it may damage the motherboard or the cooler’s mounting mechanism. Tighten them until they’re snug, but avoid applying excessive force.
Step 3: Checking Stability:
Once the cooler is securely fastened to the motherboard, gently wiggle it to ensure it’s properly seated and stable. There should be no excessive movement or signs of looseness.
It’s worth noting that the Hyper 212 Evo cooler utilizes a top-down mounting mechanism, which means that it typically requires a compatible CPU cooler retention module pre-installed on the motherboard. Most modern AMD motherboards come with this retention module pre-installed, while older ones may require separate mounting brackets to be installed.
Take your time and ensure proper alignment and attachment of the cooler to avoid any issues with the installation. A securely attached cooler ensures optimal heat transfer and reliable cooling performance for your AMD processor.
With the Hyper 212 Evo CPU cooler successfully attached to the motherboard, you are one step closer to completing the installation process. The next step is to connect the fan to the motherboard and ensure that it is functioning correctly. This step will be discussed in the following section.
Connecting the Fan
Connecting the fan of the Hyper 212 Evo CPU cooler to the motherboard is the next essential step in the installation process. The fan plays a crucial role in the cooling performance of the cooler by pushing air through the heatsink to dissipate heat effectively. Follow these steps to connect the fan properly:
Step 1: Locating the Fan:
Locate the fan that comes with the Hyper 212 Evo CPU cooler. It is usually attached to the side of the heatsink using fan clips.
Step 2: Attaching the Fan Clips:
- Securely attach the fan clips to the sides of the heatsink. The fan clips will hold the fan in place and ensure it is properly aligned with the heatsink for optimal cooling performance.
Step 3: Connecting the Fan Cable:
- Identify the fan cable, which should be located near the fan itself.
- Locate the CPU fan header on your motherboard. It is usually labeled and positioned near the CPU socket.
- Connect the fan cable to the CPU fan header on the motherboard. Ensure that the connection is secure and properly aligned.
Step 4: Verifying the Connection:
After connecting the fan, ensure that it spins freely and is not obstructed by any cables or components. Verify that the fan cable is securely attached and properly seated in the CPU fan header.
It’s important to note that the fan’s speed and performance can be adjusted through the motherboard’s BIOS or a dedicated fan control software. You can customize the fan’s speed curve based on your preferences and requirements for noise levels and cooling performance.
By connecting the fan of the Hyper 212 Evo CPU cooler to the motherboard, you have completed another crucial step in the installation process. The fan will contribute to efficient heat dissipation and help maintain optimal temperatures for your AMD processor.
In the next section, we will discuss some final steps, including testing and troubleshooting, to ensure that everything is functioning as expected before concluding the installation process.
Testing and Troubleshooting
After completing the installation of the Hyper 212 Evo CPU cooler on your AMD processor, it’s essential to perform some testing and troubleshooting to ensure that everything is working correctly. This step will help verify that the cooler is effectively cooling your processor and that temperatures are within a safe range. Here are some steps to follow:
Step 1: Powering On:
Turn on your computer and let it boot up normally. Enter the BIOS or UEFI setup to monitor the CPU temperature.
Step 2: Temperature Monitoring:
- Use monitoring software, such as Core Temp or HWMonitor, to monitor the CPU temperature in real-time. Pay close attention to the temperature readings while the system is idle and under load.
- Ensure that the temperature remains within acceptable limits. The exact temperature will vary depending on your specific CPU model, but generally, temperatures below 80°C under load are considered safe.
- If you notice unusually high temperatures or abnormal fluctuations, it could indicate an installation issue or problem with the cooler. In such cases, it’s important to troubleshoot the problem to prevent any potential damage to the processor.
Step 3: Troubleshooting:
If you encounter any issues or notice high temperatures during testing, consider the following troubleshooting steps:
- Check Mounting: Ensure that the Hyper 212 Evo cooler is firmly and evenly mounted on the processor. Re-seat the cooler if needed, making sure to follow the installation steps carefully.
- Verify Fan Operation: Make sure that the fan is spinning properly and that the fan cable is securely connected to the CPU fan header on the motherboard. Check for any obstructions or loose connections that may interfere with the fan’s operation.
- Inspect Thermal Paste: Review the application of thermal paste. If you suspect that there may be too much or too little thermal paste, consider reapplying it following the recommended methods. Ensure that the thermal paste has proper coverage and is evenly distributed.
- Clean Heatsink: If you observe that the CPU temperatures are consistently high, it may be necessary to clean the heatsink and fan of any accumulated dust. Use compressed air or a soft brush to remove any debris that may be hindering proper airflow.
By performing these testing and troubleshooting steps, you can identify and resolve any potential issues with the installation or the cooler itself, ensuring that your AMD processor remains cool and operates optimally.
If you are unable to resolve the issue or need further assistance, it’s advisable to consult the user manual of the Hyper 212 Evo, reach out to Cooler Master’s technical support, or seek guidance from online communities and forums dedicated to computer hardware.
Now that you have tested and troubleshooted the installation of the Hyper 212 Evo CPU cooler, you can enjoy the benefits of improved cooling performance and peace of mind, knowing that your AMD processor is operating at optimal temperatures.
Conclusion
Congratulations! You have successfully learned how to install the Hyper 212 Evo CPU cooler on your AMD processor. The Hyper 212 Evo is a reliable cooling solution that helps maintain optimal temperatures and enhances the performance and longevity of your system.
Throughout this guide, we covered various aspects of the installation process, including the compatibility of the Hyper 212 Evo with AMD processors, preparations for the installation, step-by-step instructions for attaching the cooler to the motherboard, applying thermal paste, connecting the fan, and testing and troubleshooting.
By following the instructions and taking the necessary precautions, you can ensure a seamless installation experience and effective cooling performance for your AMD processor.
Remember, proper CPU cooling is essential for maintaining stable system performance, especially during demanding tasks or overclocking. The Hyper 212 Evo CPU cooler’s robust design and compatibility with AMD processors provide a powerful cooling solution to keep your system running smoothly.
If you encounter any difficulties during the installation or have unique circumstances that require additional assistance, don’t hesitate to refer to the manufacturer’s manual or seek help from Cooler Master’s support team. Online communities and forums dedicated to computer hardware can also provide valuable insights and solutions to specific problems.
Now that you have successfully installed the Hyper 212 Evo CPU cooler, take some time to monitor your system’s temperatures and performance to ensure everything is operating within acceptable limits. Enjoy the benefits of improved cooling and the peace of mind knowing that your AMD processor is well-protected.
Thank you for following this guide, and we wish you the best in your computing experience with the Hyper 212 Evo CPU cooler installed on your AMD processor!