Introduction
Welcome to the world of VPNs! In this digital age where privacy and security are of utmost importance, a Virtual Private Network, or VPN, has become an essential tool for internet users. Whether you are an individual browsing the web or a business protecting sensitive data, having a VPN can greatly enhance your online experience.
But what exactly is a VPN? Put simply, a VPN is a service that allows you to create a secure and encrypted connection to another network over the internet. It acts as a tunnel between your device and the websites or services you access, ensuring that your online activities remain private and your data remains secure.
The need for a VPN arises from the growing number of cyber threats and privacy concerns we face every day. With hackers, government surveillance, and data breaches becoming more prevalent, using a VPN has become a proactive measure to safeguard your personal information.
Using a VPN offers a multitude of benefits, the foremost being online security. By encrypting your internet connection, a VPN protects your sensitive data from being intercepted by malicious third parties. This makes it nearly impossible for hackers to access your personal information or track your online activities.
Furthermore, a VPN allows you to bypass geographical restrictions and censorship. It lets you access content and websites that may be blocked or restricted in your country. Whether you want to stream your favorite TV shows while traveling or access a website that is otherwise unavailable, a VPN gives you the freedom to do so.
Choosing the right VPN provider is crucial to ensure a reliable and secure connection. With numerous options available, it can be overwhelming to make the right choice. Factors to consider include encryption protocols, server locations, connection speed, and customer support. Researching and reading reviews about different VPN providers can help you make an informed decision.
Ready to get started with a VPN? In the following sections, we will guide you through the step-by-step process of getting a VPN, from downloading the software to testing your connection. By the end, you’ll be equipped with the knowledge and skills to use a VPN effortlessly and protect your online presence.
What is VPN?
A Virtual Private Network, commonly known as VPN, is a technology that allows users to create a secure and encrypted connection between their device and a private network. It creates a virtual tunnel through which your internet traffic is routed, protecting your online activities from prying eyes and ensuring your data remains secure.
When you connect to the internet without a VPN, your device sends and receives data packets directly between your device and the websites or services you access. This makes your online activities vulnerable to interception and exploitation by hackers, government agencies, and even your Internet Service Provider (ISP).
With a VPN, your internet traffic is encrypted and routed through a secure server located in a different location. This effectively hides your IP address and replaces it with the IP address of the VPN server, making it nearly impossible for anyone to trace your online activities back to your device.
One of the primary uses of a VPN is to enhance online privacy and security. By encrypting your internet connection, a VPN ensures that your sensitive information, such as passwords, credit card details, and browsing history, remains protected from potential threats.
Moreover, using a VPN allows you to browse the internet anonymously. Your online activities are masked behind the VPN server’s IP address, making it difficult for websites, advertisers, and other entities to track your movements and behavior online.
In addition to privacy and security, a VPN offers other benefits as well. It allows you to bypass geographical restrictions and access region-locked content. For example, if a streaming service or website is only available in certain countries, you can use a VPN to connect to a server in that country and bypass the restrictions.
A VPN can also improve your online gaming experience by reducing lag and improving connection stability. By connecting to a server closer to the gaming server, you can minimize latency and enjoy smoother gameplay.
In summary, a VPN provides a secure and private connection to the internet by encrypting your data and routing it through a remote server. It allows you to protect your online privacy, bypass restrictions, and enhance your overall online experience. Now that you have a clear understanding of what a VPN is, let’s explore why you need a VPN in the next section.
Why do you need a VPN?
In today’s digital landscape, where cyber threats and privacy concerns are on the rise, using a Virtual Private Network (VPN) has become a necessity. Here are several compelling reasons why you need a VPN:
1. Enhanced Security: One of the primary reasons to use a VPN is to safeguard your online activities and protect sensitive information. By encrypting your internet connection, a VPN ensures that your data remains secure, even when using public Wi-Fi networks. It creates a secure tunnel between your device and the websites or services you access, making it extremely difficult for hackers to intercept or access your data.
2. Privacy Protection: With growing concerns about online privacy, a VPN helps you maintain anonymity and protects your privacy by masking your IP address. Your online activities are encrypted and routed through the VPN server, making it nearly impossible for anyone to identify your real IP address or track your browsing history.
3. Bypassing Geographical Restrictions: Many streaming services, social media platforms, and websites impose geographic restrictions on their content. With a VPN, you can easily bypass these restrictions by choosing a server in a different location. This allows you to access region-locked content and enjoy your favorite TV shows, movies, or websites, regardless of your physical location.
4. Online Anonymity: When using a VPN, your internet activities are hidden and your IP address is replaced with that of the VPN server. This makes it difficult for websites, advertisers, and other entities to track your online behavior and target you with personalized ads or intrusive tracking.
5. Protection from Data Throttling: Some Internet Service Providers (ISPs) engage in data throttling, intentionally slowing down internet speeds for specific activities or services. By using a VPN, you can bypass data throttling and enjoy faster and more consistent internet speeds for streaming, downloading, gaming, and other online activities.
6. Secure Remote Access: If you frequently work remotely or need to access sensitive corporate resources, a VPN provides a secure and encrypted connection to your company’s network. It ensures that your data remains protected even when accessing it from outside the office or using public Wi-Fi networks.
7. Torrenting and P2P File Sharing: If you engage in torrenting or peer-to-peer (P2P) file sharing activities, using a VPN is essential. It masks your IP address and encrypts your internet traffic, ensuring that your online activities remain private and protecting you from potential legal consequences or copyright infringement issues.
Overall, a VPN offers a range of benefits including enhanced security, privacy protection, bypassing geographical restrictions, online anonymity, protection from data throttling, secure remote access, and safe torrenting. Whether you are an individual concerned about online privacy or a business aiming to protect sensitive data, a VPN is a crucial tool to ensure a safe and secure online experience.
Choosing the right VPN provider
With the increasing demand for VPN services, there is a wide array of VPN providers available in the market. However, not all VPNs are created equal, and choosing the right VPN provider is essential to ensure a reliable and secure connection. Here are some key factors to consider when selecting a VPN provider:
1. Security and Privacy Features: The primary purpose of a VPN is to enhance your security and privacy. Look for a VPN provider that offers robust encryption protocols, such as OpenVPN or IKEv2, to ensure the confidentiality of your data. Additionally, check if the VPN provider follows a strict no-logs policy, meaning they do not store any records of your online activities.
2. Server Locations and Coverage: The number and location of servers offered by a VPN provider can have a significant impact on your browsing experience. Choose a VPN with a wide range of server locations, as this allows you to bypass geographical restrictions more effectively and ensures better connectivity and faster speeds.
3. Connection Speed and Performance: VPNs can sometimes result in slower internet speeds due to the encryption and the distance between your device and the VPN server. Look for VPN providers that offer high-speed connections and have a reputation for providing reliable and consistent performance.
4. Cross-Platform Compatibility: Consider the compatibility of the VPN software with your device’s operating system. A good VPN provider should offer applications for various platforms, including Windows, Mac, iOS, Android, and even routers. This ensures that you can protect all your devices without any compatibility issues.
5. Customer Support: In case you encounter any issues or have questions regarding your VPN service, reliable customer support is crucial. Look for VPN providers that offer responsive customer support through various channels, such as live chat, email, or phone, so that you can get assistance whenever you need it.
6. Pricing and Subscription Plans: Consider your budget and the pricing structure of the VPN provider. While some VPNs offer free versions or trial periods, they often come with limitations in terms of server options, data usage, or connection speed. Paid VPN services typically provide more features and better performance, so it’s worth investing in a reputable provider that suits your budget.
7. User-Friendly Interface: Look for a VPN provider that offers an intuitive and user-friendly interface. This makes it easier for you to navigate the application, select servers, and customize settings according to your preferences.
By carefully evaluating and considering these factors, you can choose the right VPN provider that meets your specific needs. It’s also recommended to read reviews and testimonials from other users to get an overall assessment of the VPN provider’s reputation and reliability.
Step-by-step guide to getting a VPN
Getting a VPN is a straightforward process that can greatly enhance your online security and privacy. Follow this step-by-step guide to set up and start using a VPN:
Step 1: Research and Choose a VPN Provider: Begin by researching different VPN providers and assessing their features, security protocols, server locations, and reputation. Read reviews and compare pricing plans to find a provider that best suits your needs.
Step 2: Download and Install the VPN Software: Once you have chosen a VPN provider, navigate to their official website and locate the download page. Download the VPN software compatible with your device’s operating system and follow the installation prompts to complete the setup process.
Step 3: Create Your VPN Account: After installing the software, open the VPN application and create your VPN account. This typically involves providing your email address and setting a secure password. Some VPN providers may offer additional account security measures, such as two-factor authentication.
Step 4: Log in to Your VPN Account: Use the login credentials you created in the previous step to log in to your VPN account within the VPN software. This will enable you to access the VPN’s features and settings.
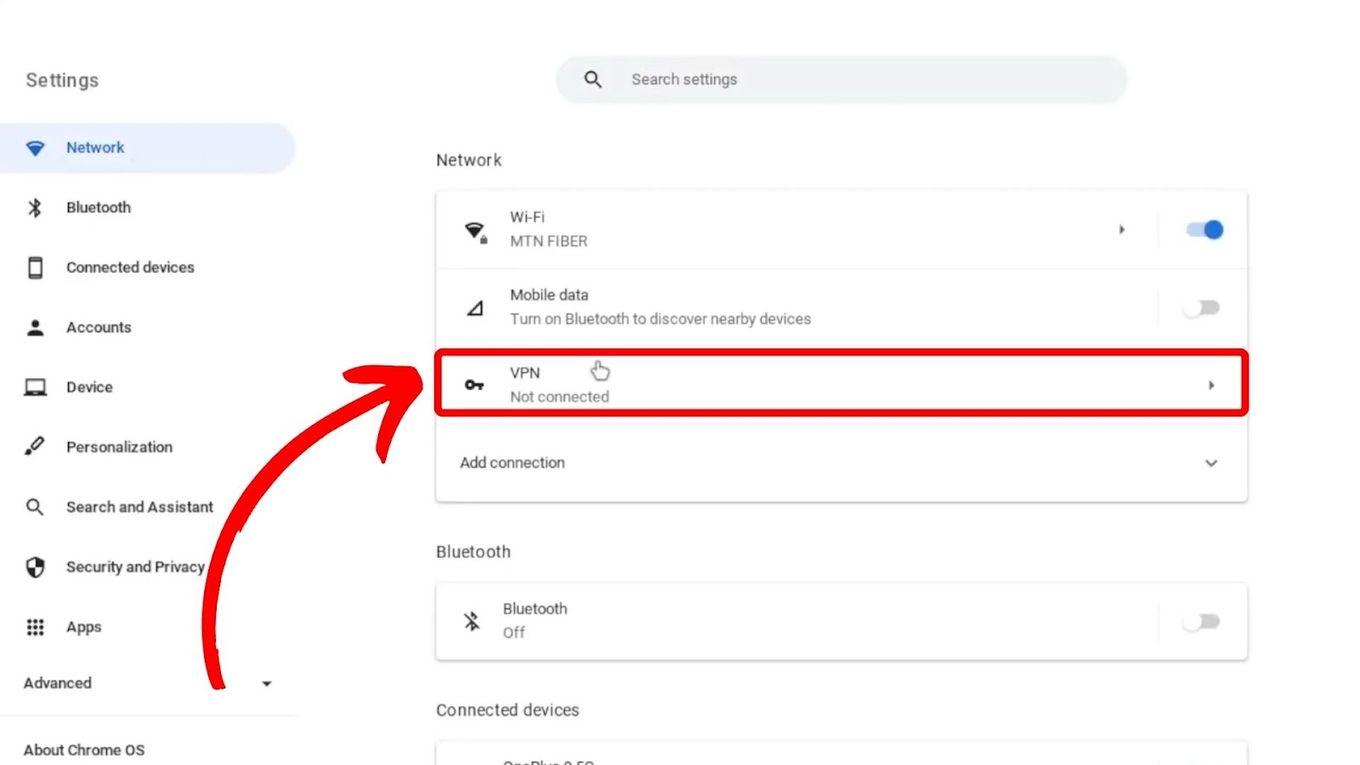
Step 5: Select a Server Location: Within the VPN software, you will usually find a list of server locations available. Choose a server location based on your needs, such as bypassing geographical restrictions or optimizing connection speeds.
Step 6: Connect to the VPN Server: Once you have selected a server location, click on the Connect button within the VPN software to establish a connection to the chosen server. The VPN software will encrypt your internet traffic and route it through the selected server, providing you with a secure connection.
Step 7: Test Your VPN Connection: After successfully connecting to the VPN server, it’s important to test your connection to ensure it is working as intended. Open a web browser and visit a website that can display your IP address. Verify that the IP address shown corresponds to the server location you selected in the VPN software.
Step 8: Customize VPN Settings (Optional): Most VPN software allows you to customize settings according to your preferences. Explore the VPN application to adjust features such as Kill Switch, DNS leak protection, or auto-connect options. These settings can further enhance your VPN experience.
Step 9: Enjoy a Secure and Private Online Experience: With your VPN connected, you can now enjoy a secure and private online experience. Your internet traffic is encrypted, protecting your data from potential threats and allowing you to browse the web anonymously.
Remember, to maintain optimal security, always connect to your VPN when accessing the internet, especially when using public Wi-Fi networks or conducting sensitive online activities.
Now that you have successfully set up your VPN, you are ready to enjoy the benefits of enhanced online privacy, security, and unrestricted access to content.
Downloading and installing the VPN software
Before you can start using a VPN, you need to download and install the VPN software on your device. Here is a step-by-step guide on how to do it:
Step 1: Choose the Right VPN Provider: Research and select a reputable VPN provider that offers software compatible with your device’s operating system. Consider factors such as security features, server locations, and customer reviews to make an informed decision.
Step 2: Visit the VPN Provider’s Website: Go to the official website of your chosen VPN provider using your preferred web browser.
Step 3: Locate the Download Page: Once you are on the VPN provider’s website, navigate to the page where you can download the VPN software. This can typically be found under the “Downloads” or “Get Started” section.
Step 4: Select Your Device’s Operating System: Most VPN providers offer software for various operating systems, including Windows, Mac, iOS, Android, and Linux. Click on the download option that corresponds to your device’s operating system.
Step 5: Start the Download: Click on the download button or link to initiate the download process. Depending on your internet speed, the download may take a few seconds to a couple of minutes.
Step 6: Open the Downloaded File: Once the download is complete, locate the file in your device’s default download location, usually the “Downloads” folder. Double-click on the downloaded file to start the installation process.
Step 7: Follow the Installation Prompts: The installation process may vary depending on your operating system and the VPN software you are using. Simply follow the on-screen prompts to install the VPN software on your device.
Step 8: Agree to the Terms and Conditions: During the installation process, you will likely be prompted to accept the terms and conditions of the VPN provider. Read through the terms and conditions, and if you agree, check the box or click the “Accept” button to proceed.
Step 9: Customize Installation Settings (Optional): Some VPN software installations may provide customization options. For instance, you may be able to choose the installation location or customize certain features. Adjust these settings according to your preferences, or proceed with the default settings if you are unsure.
Step 10: Complete the Installation: Once you have gone through the installation prompts and made any necessary customizations, click the “Finish” or “Complete” button to finalize the installation process.
Step 11: Run the VPN Software: After installation, you can usually find the VPN software icon on your desktop or in the applications folder. Double-click on the icon to launch the VPN software.
Step 12: Log in to Your VPN Account: When you run the VPN software for the first time, you will need to log in with your VPN account credentials. Enter your email address and password associated with your VPN account to proceed.
Step 13: Connect to a VPN Server: Once logged in, you will have access to the VPN software’s dashboard. Select a server location from the available options and click the “Connect” or “Start” button to establish a connection to the VPN server.
Step 14: Verify Your Connection: After connecting, you can verify that your VPN connection is active by checking the software interface or visiting a website that displays your IP address. Ensure that the IP displayed corresponds to the VPN server location you selected.
Now that you have downloaded and installed the VPN software, you can enjoy a secure and private internet browsing experience. Remember to launch the VPN software and connect to a server whenever you want to use the VPN.
Creating your VPN account
Creating a VPN account is an essential step in getting started with a VPN service. It allows you to access the VPN provider’s network and enjoy secure and private internet browsing. Here’s a step-by-step guide on how to create your VPN account:
Step 1: Choose a VPN Provider: Select a reputable VPN provider that suits your needs and offers the features you require, such as encryption protocols, server locations, and customer support.
Step 2: Visit the VPN Provider’s Website: Go to the official website of the VPN provider using your preferred web browser.
Step 3: Sign Up or Register: Look for the “Sign Up,” “Register,” or “Get Started” button on the VPN provider’s website and click on it.
Step 4: Provide Your Email Address: Enter your email address in the designated field. Make sure to use a valid email address as this will be used for account verification and communication with the VPN provider.
Step 5: Set a Secure Password: Create a strong and unique password for your VPN account. It should include a combination of upper and lower case letters, numbers, and special characters to ensure its security.
Step 6: Agree to Terms and Conditions: Read through the VPN provider’s terms and conditions to understand their policies. If you agree to them, check the box or click the acknowledgment button to proceed.
Step 7: Complete any additional Information: Some VPN providers may request additional information during the registration process, such as your name or payment details. Fill in the required fields accurately and securely.
Step 8: Verify your Email (if required): Depending on the VPN provider, you may need to verify your email address by clicking on a verification link sent to your inbox. Follow the instructions in the email to complete the verification process.
Step 9: Select a Subscription Plan: If the VPN provider offers different subscription plans, choose the plan that best fits your needs and budget. Select the desired plan and proceed to the payment options, if applicable.
Step 10: Enter and Verify Payment Information (if applicable): If you have chosen a paid subscription plan, you may need to enter your payment details. Fill in the required information accurately and ensure that the transaction is secure.
Step 11: Submit and Confirm: Review all the information you have provided, including your email address, password, and subscription plan. Once you are satisfied, click “Submit,” “Create Account,” or any similar confirmation button to finalize the account creation process.
Step 12: Receive Confirmation: After successfully creating your VPN account, you will typically receive a confirmation email from the VPN provider. This email may contain important account details and instructions on how to get started with the VPN service.
By following these steps, you can create your VPN account and gain access to the VPN provider’s network. Your VPN account credentials, including your registered email address and password, will be used to log in to the VPN software or application.
Keep your VPN account credentials secure and be sure to maintain the privacy of your account information. With your VPN account, you can now proceed to the next steps of installing the VPN software and configuring your VPN connection.
Setting up the VPN connection
Once you have the VPN software installed and your account created, the next step is to set up the VPN connection. This involves configuring the settings in the VPN software to establish a secure and encrypted connection. Follow these steps to set up the VPN connection:
Step 1: Launch the VPN Software: Open the VPN software by locating its icon on your desktop or in the applications folder. Double-click on the icon to launch the VPN software.
Step 2: Log in to Your VPN Account: When the VPN software opens, you will typically be prompted to log in to your VPN account. Enter the email address and password associated with your VPN account to proceed.
Step 3: Choose a Server Location: Within the VPN software, you will usually find a list of available server locations. Choose a server based on your requirements, such as bypassing geographical restrictions or optimizing connection speeds.
Step 4: Connect to the VPN Server: Once you have selected a server location, click on the “Connect” or “Start” button within the VPN software to initiate the connection. The VPN software will establish a connection to the chosen server.
Step 5: Wait for the Connection: Give the VPN software a few seconds to establish the connection. During this time, the software will negotiate the secure connection between your device and the VPN server.
Step 6: Verify the Connection: Once the connection is established, you will typically see an indication within the VPN software that you are now connected. It may display the server location and your new IP address.
Step 7: Test the Connection: To ensure that your VPN connection is working properly, visit a website that can display your IP address or use an IP address checking tool. Verify that the IP address shown matches the server location you selected in the VPN software.
Step 8: Customize Connection Settings (Optional): Explore the VPN software’s settings to customize the connection according to your preferences. You may find options for features such as a Kill Switch, which terminates internet connectivity if the VPN connection drops, or DNS leak protection to prevent DNS queries from bypassing the VPN.
Step 9: Disconnect from the VPN: When you are finished using the VPN, you can disconnect from the VPN server by clicking on the “Disconnect” or “Stop” button within the VPN software. This will terminate the secure connection and restore your regular internet connection.
Step 10: Reconnect as Needed: Whenever you want to use the VPN in the future, simply launch the VPN software, log in to your account, and select a server location to reconnect.
By following these steps, you can easily set up and establish a VPN connection. Remember to connect to the VPN whenever you want to secure your internet traffic and enjoy the benefits of unrestricted browsing, enhanced privacy, and improved online security.
Testing your VPN connection
After setting up your VPN connection, it’s essential to test the connection and ensure that it is working correctly. Verifying the functionality of your VPN connection will give you peace of mind and confirm that your online activities are secure and protected. Follow these steps to test your VPN connection:
Step 1: Verify IP Address: Start by confirming that your IP address has changed. Use a search engine to find a website that displays your IP address. Access the website and compare the displayed IP address with the server location you selected in the VPN software. If they match, it indicates that your VPN connection is working correctly.
Step 2: Test Geolocation: Visit a website or service that provides information based on your geolocation. For example, check your location on a mapping application or access a region-locked streaming service. If the website or service recognizes your location as the VPN server’s location and allows access to region-restricted content, it confirms that your VPN is successfully bypassing geographical restrictions.
Step 3: Conduct a DNS Leak Test: Perform a DNS leak test to ensure that your DNS queries are not bypassing the VPN tunnel. Many websites offer DNS leak tests; simply search for “DNS leak test” in your preferred search engine. The test should indicate that your DNS server matches the VPN server’s location, verifying that your DNS queries are encrypted and routed through the VPN.
Step 4: Check for WebRTC Leaks: WebRTC is a communication protocol that can sometimes leak your real IP address despite using a VPN. Several websites provide WebRTC leak tests. Visit one of these websites and run the test to confirm that your VPN connection is not leaking your IP address through WebRTC.
Step 5: Perform Speed Tests: Test the speed of your internet connection while connected to the VPN. Use websites or applications that measure your download and upload speeds, such as Ookla’s Speedtest. Compare the results to your regular internet connection without the VPN. While some speed reduction is expected when using a VPN due to encryption, the speed should remain satisfactory for your online activities.
Step 6: Test Website Accessibility: Verify that you can access various websites and services while connected to the VPN. Visit different websites, including ones that were previously inaccessible due to geographical restrictions. Ensure that the VPN connection does not interfere with your ability to browse the internet, access your favorite apps, or stream content.
Step 7: Repeat the Test Periodically: VPN connections can sometimes encounter issues or performance fluctuations. It is a good practice to periodically test your VPN connection to ensure consistent and reliable performance. Regularly checking your VPN connection will help you identify any potential problems early on and take necessary actions to resolve them.
By following these testing steps, you can ensure that your VPN connection is functioning as intended, providing you with enhanced security, privacy, and unrestricted internet access. If you encounter any issues or inconsistencies during the testing process, reach out to your VPN provider’s customer support for assistance.
Tips for using your VPN
A VPN is a powerful tool that can significantly enhance your online security, privacy, and browsing experience. To make the most out of your VPN service, consider the following tips:
1. Connect to the VPN when using public Wi-Fi: Public Wi-Fi networks are notoriously insecure, making your data vulnerable to interception by hackers. Always connect to your VPN when using public Wi-Fi to encrypt your internet traffic and protect your sensitive information from prying eyes.
2. Choose the right server location: Experiment with different server locations to find the one that provides the best performance and meets your specific needs. If your priority is bypassing geographical restrictions, select a server in the desired location. For optimal speed, choose a server in close proximity to your physical location.
3. Enable the Kill Switch feature: Most VPN software offers a Kill Switch feature that terminates internet connectivity if the VPN connection drops unexpectedly. This prevents your data from being sent over an unsecured connection, ensuring that your online activities remain protected at all times.
4. Regularly update the VPN software: Keeping your VPN software up to date is vital to ensure that you have the latest security enhancements, bug fixes, and performance improvements. Set your VPN software to automatically update or check for updates regularly to stay protected.
5. Use split tunneling selectively: Some VPNs offer a split tunneling feature, allowing you to choose which traffic goes through the VPN and which bypasses it. Use this feature with caution and only for specific applications or websites that require the VPN’s protection. By doing so, you can optimize speed and productivity.
6. Test your VPN speed and consider switching servers: If you experience slow internet speeds or inconsistent connections, try connecting to different servers to find the one that provides the best performance. Run periodic speed tests to assess the impact of the VPN on your internet speed and make adjustments accordingly.
7. Be mindful of VPN limitations: While VPNs offer numerous benefits, it’s important to understand their limitations. Some websites or services may block VPN connections, and not all VPNs may be able to bypass stringent restrictions. Additionally, VPNs cannot fully protect against malware or phishing attacks, so it’s important to maintain other security measures.
8. Understand the VPN provider’s logging policy: Read and understand your VPN provider’s logging policy to ensure that it aligns with your privacy requirements. Ideally, choose a VPN provider that follows a strict no-logs policy, meaning they do not track or store any information about your online activities.
9. Use multi-factor authentication for your VPN account: Adding an extra layer of security to your VPN account with multi-factor authentication provides an additional safeguard against unauthorized access. Enable this feature if your VPN provider offers it and use a reliable authentication app or method.
10. Utilize VPN on all compatible devices: Make the most of your VPN subscription by utilizing it on all of your compatible devices. Many VPN providers offer applications for various operating systems, including smartphones, tablets, and routers. This ensures that all your internet-connected devices benefit from the security and privacy of the VPN.
By following these tips, you can optimize your VPN experience and maximize the benefits it provides. Enjoy a secure and anonymous online presence while browsing the internet, accessing geo-restricted content, and protecting your sensitive data.