Introduction
Are you a student who wants to access blocked websites on your school Chromebook? Or perhaps you just want to enhance your online privacy and security while using the school network? In either case, using a VPN (Virtual Private Network) on your school Chromebook can be the ideal solution. A VPN allows you to bypass restrictions and encrypt your internet connection, giving you access to blocked content and ensuring your online activities remain private.
However, before diving into the steps needed to get a VPN on your school Chromebook, it’s important to understand that not all schools allow the use of VPNs on their networks. Some schools have strict policies in place that prohibit the use of VPNs to access blocked content. Therefore, it’s crucial to check with your school’s IT department or review your school’s acceptable use policy to ensure that using a VPN is permitted.
If your school allows VPN usage, this article will guide you through the process of getting a VPN on your school Chromebook. By following these steps, you’ll be able to browse the internet freely and securely, without worrying about any restrictions or potential privacy concerns.
Step 1: Check if your school allows VPNs
Before you can proceed with installing a VPN on your school Chromebook, it’s important to determine if your school allows the use of VPNs. Some schools have strict policies in place that prohibit the use of VPNs on their networks. Checking with your school’s IT department or reviewing your school’s acceptable use policy is essential to ensure that using a VPN is permitted.
Start by reaching out to the IT department of your school and inquire about their policy on VPN usage. They should be able to provide you with clear guidelines regarding the use of VPNs on school devices. Alternatively, you can check your school’s website or student handbook for information about acceptable use policies.
If your school does not explicitly state whether VPN usage is allowed or prohibited, it’s best to seek permission from the appropriate authority. This can be the IT department, school administration, or a designated staff member. Getting official permission will prevent any potential consequences or violations of your school’s policies.
Keep in mind that even if your school permits VPN usage, there may still be certain restrictions in place. For example, they might have a list of approved VPN providers or particular settings that must be followed. Make sure to familiarize yourself with these guidelines to ensure compliance.
If your school prohibits the use of VPNs, it’s important to respect their policy and find alternative ways to access the content you need. Additionally, always prioritize your education and follow your school’s rules and regulations.
In the next step, we will explore how to choose a VPN service provider that suits your needs and preferences.
Step 2: Choose a VPN service provider
Once you’ve confirmed that your school allows the use of VPNs, it’s time to choose a reliable VPN service provider. There are numerous options available, so it’s essential to consider a few factors before making your decision.
First, you’ll want to look for a VPN provider that offers a dedicated Chromebook app or supports Chromebook compatibility. This ensures a seamless and hassle-free installation process specifically tailored for your device.
Next, consider the availability and quality of server locations. A wide range of server locations allows for better flexibility in accessing geographically restricted content. It’s also important to choose a provider with servers located in regions that you are specifically interested in.
Security and privacy should be top priorities when choosing a VPN service provider. Look for providers that offer strong encryption protocols, such as OpenVPN or IKEv2, to protect your data from unauthorized access. Also, ensure that the provider has a strict no-logs policy, meaning they do not store any of your online activities.
Another aspect to consider is the speed and performance of the VPN service. A reliable provider should offer fast and stable connections, ensuring smooth browsing and streaming experiences while connected to the VPN. Checking user reviews and ratings can give you insights into the performance of different providers.
Lastly, consider the cost and pricing plans offered by various VPN providers. While free VPNs may seem appealing, they often come with limitations on data usage or speed, and may display ads. Paid VPN services usually offer better features and customer support. Look for providers that offer reasonable pricing plans that fit within your budget.
By considering these factors, you can narrow down and choose a VPN service provider that meets your requirements and provides a secure, fast, and reliable VPN connection for your school Chromebook.
In the next step, we will explore how to install the VPN app from the Chrome Web Store.
Step 3: Install the VPN app from the Chrome Web Store
Once you’ve chosen a VPN service provider, it’s time to install the VPN app on your school Chromebook. Most VPN providers offer their apps through the Chrome Web Store, making the installation process quick and straightforward.
Here’s how to install the VPN app from the Chrome Web Store:
- Open the Chrome browser on your school Chromebook.
- Go to the Chrome Web Store by typing “chrome://apps/” in the address bar and hitting Enter.
- In the Chrome Web Store, search for the VPN app provided by your chosen VPN service provider. Alternatively, you can visit the VPN provider’s website and look for a direct link to the Chrome Web Store installation page.
- Click on the “Add to Chrome” button next to the VPN app you want to install.
- Review and confirm any permissions or access requirements requested by the app.
- Wait for the VPN app to download and install on your Chromebook. This process may take a few moments depending on your internet connection speed.
- Once the installation is complete, you’ll see the VPN app appear in your Chromebook’s app launcher or on the Chrome OS shelf.
That’s it! You have successfully installed the VPN app on your school Chromebook. In the next step, we will guide you through the process of opening the VPN app and creating an account.
Step 4: Open the VPN app and create an account
Now that you have installed the VPN app on your school Chromebook, it’s time to open the app and create an account. This step is necessary to authenticate your device and establish a secure connection to the VPN server.
Follow these steps to open the VPN app and create an account:
- Locate the VPN app on your Chromebook’s app launcher or Chrome OS shelf.
- Click on the VPN app icon to open it.
- Upon opening the app, you may be prompted to sign in or create a new account. If you already have an account with the VPN service provider, sign in using your credentials. If not, select the option to create a new account.
- Fill in the required information to create your account. This typically includes providing an email address, choosing a password, and agreeing to the terms and conditions.
- After creating your account, you may need to verify your email address by clicking on a verification link sent to the email provided.
- Once your account is verified, you’ll be able to log in to the VPN app using your credentials.
It’s important to note that some VPN service providers offer both free and premium account options. Free accounts often have limitations on data usage or server selection, while premium accounts provide additional features and benefits. Choose the account type that best suits your needs and budget.
After creating your account and logging in to the VPN app, you’ll be one step closer to accessing blocked content and enhancing your online privacy on your school Chromebook. In the next step, we will cover the process of connecting to a VPN server.
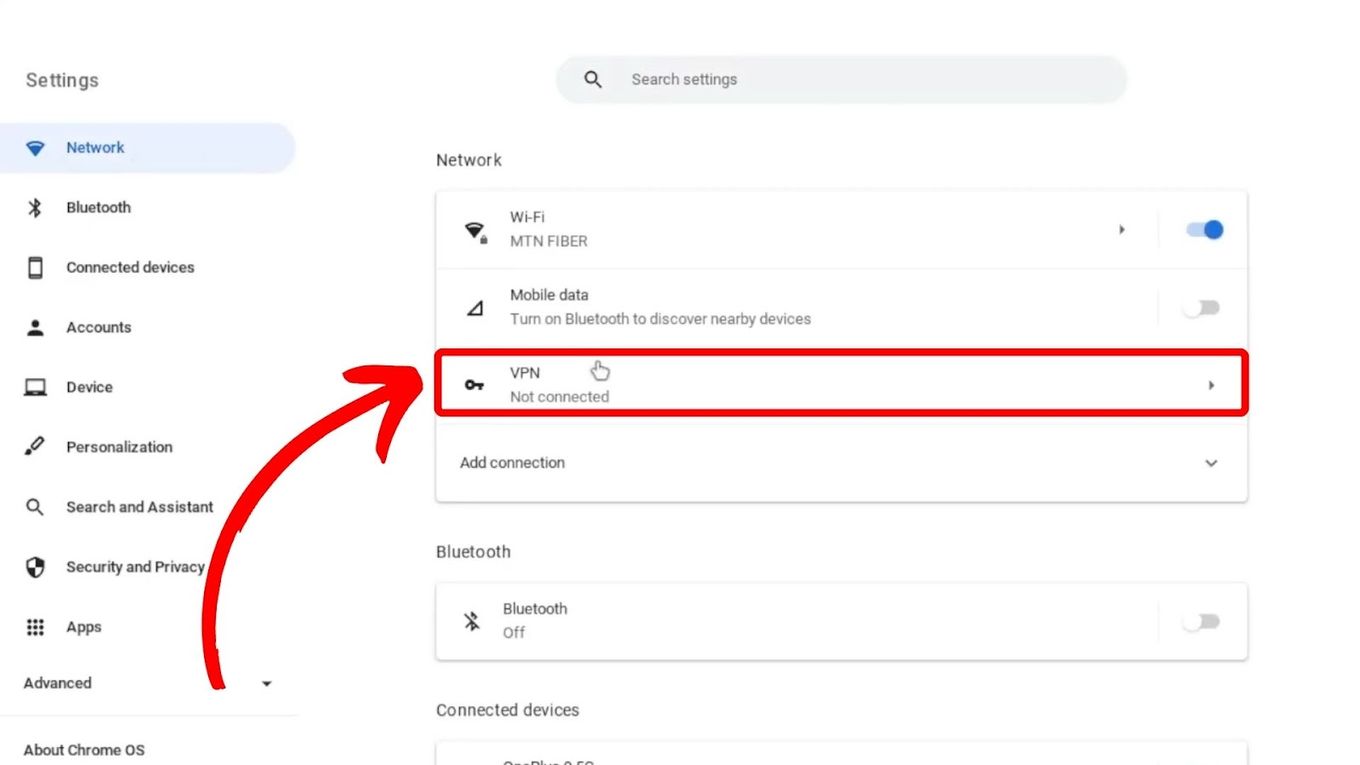
Step 5: Connect to a VPN server
With your VPN app installed and your account created, it’s time to connect to a VPN server on your school Chromebook. This step establishes a secure connection between your device and the VPN server, allowing your internet traffic to be encrypted and routed through the server.
Follow these steps to connect to a VPN server:
- Open the VPN app on your school Chromebook.
- Enter your login credentials to sign in to the app, if required.
- Once you’re logged in, you’ll typically see a list of available server locations. Select your desired VPN server from the list.
- Some VPN apps automatically connect to the nearest or fastest server. However, if you have specific server preferences, you can manually select the desired server location.
- Click on the “Connect” or “On” button to initiate the connection to the VPN server.
- Wait for the VPN app to establish a secure connection. Once connected, you’ll see a confirmation message or indicator in the VPN app.
It’s important to note that the connection process may vary slightly depending on the VPN service provider and the app’s interface. However, the general steps mentioned above should guide you through the process.
Once you’re connected to the VPN server, all of your internet traffic on the school Chromebook will be encrypted and routed through the server. This means that your online activities are protected and appear as if they are originating from the server location.
In the next step, we will cover how to test your VPN connection to ensure it’s working correctly.
Step 6: Test your VPN connection
After connecting to a VPN server on your school Chromebook, it’s essential to test your VPN connection to ensure that it’s working correctly. Testing your connection will verify that your internet traffic is being securely encrypted and routed through the VPN server.
Here are a few steps you can take to test your VPN connection:
- Visit a website that displays your IP address, such as whatismyip.com or iplocation.net.
- Before connecting to the VPN server, take note of your original IP address.
- Connect to the VPN server using your VPN app.
- Once connected, revisit the same website and check if it displays a new IP address different from what you noted earlier.
- If the website shows a new IP address, it indicates that your VPN is working correctly, and your internet traffic is being routed through the VPN server.
- To further test your VPN connection, you can try accessing a blocked website or streaming service that was previously unavailable. If you can now access the content, it confirms that your VPN is successfully bypassing restrictions.
If you encounter any issues during the testing process, such as an IP address not changing or being unable to access blocked content, you may need to troubleshoot the VPN connection. Start by disconnecting and reconnecting to the VPN server, ensuring that you’ve followed all the necessary steps correctly. If the problem persists, reach out to your VPN service provider’s support team for assistance.
Remember, regularly testing your VPN connection ensures that you are effectively securing your online activities and accessing the content you need on your school Chromebook.
In the next step, we will explore optional configuration settings that you can adjust according to your preferences.
Step 7: Configure VPN settings (optional)
Configuring VPN settings on your school Chromebook is an optional step but can provide additional customization and control over your VPN experience. While the default settings are usually sufficient for most users, adjusting certain settings can enhance your VPN performance or cater to your specific preferences.
Here are a few optional VPN settings you can consider configuring:
- Auto-connect: Enable the auto-connect feature so that the VPN app automatically connects to the VPN server whenever you start your Chromebook or connect to a new network. This ensures that your internet traffic is always protected.
- Protocol selection: Some VPN apps allow you to choose the encryption protocol used for your connection. If available, you can experiment with different protocols to find the one that provides the best combination of security and performance for your needs.
- Split tunneling: Split tunneling allows you to specify which apps or websites should use the VPN connection and which ones can directly access the internet. This feature can be useful if you only want to route specific traffic through the VPN while allowing others to bypass it.
- Kill switch: A kill switch is a crucial feature that cuts off your internet connection if the VPN connection drops unexpectedly. Enabling this feature ensures that your online activities are never exposed in case of VPN disconnections.
- Server selection: If your VPN app allows manual server selection, you can explore different server locations to access content specific to certain regions or to find the fastest server for optimal performance.
These are just a few examples of the settings that may be available in your VPN app. The exact configuration options will depend on the VPN service provider and the app’s functionality.
Remember to use caution and consider the potential impact of each setting change. If you’re unsure about a particular configuration option, refer to your VPN provider’s documentation or reach out to their support team for guidance.
By configuring the VPN settings according to your preferences, you can customize your VPN experience on your school Chromebook to ensure optimal performance and privacy.
Conclusion
Congratulations! You have successfully learned how to get a VPN on your school Chromebook. By following the steps outlined in this guide, you can now access blocked websites, enhance your online privacy, and secure your internet connection while using the school network.
Remember to always check with your school’s IT department or review your school’s acceptable use policy to ensure that using a VPN is permitted. Respecting your school’s policies and guidelines is crucial to maintaining a positive and responsible online presence.
When choosing a VPN service provider, consider factors such as compatibility with Chromebook, server locations, security protocols, and pricing plans. These considerations will help you find a reliable provider that meets your needs and provides a seamless VPN experience.
Installing the VPN app from the Chrome Web Store is a straightforward process, and creating an account allows you to authenticate your device for secure VPN connections. Testing your VPN connection ensures that your internet traffic is being routed through the VPN server and that you can access blocked content as desired.
Optional configuration settings provide additional customization options, allowing you to automate connection, adjust protocols, enable split tunneling, activate a kill switch, and select specific servers.
Remember, while using a VPN can provide benefits such as accessing blocked content and enhancing privacy, it’s important to use it responsibly and abide by applicable laws and regulations.
By following these steps and guidelines, you can enjoy a safe and unrestricted browsing experience on your school Chromebook. Stay informed, stay protected, and make the most of your online education journey!