Introduction:
Welcome to the ultimate guide on how to fix your Wi-Fi connection issues. We all rely heavily on a stable and fast internet connection, and nothing is more frustrating than when our Wi-Fi starts acting up. From slow speeds to intermittent connections, these problems can disrupt our work, entertainment, and daily life. But fear not, as we’ve got you covered with this step-by-step guide to troubleshoot and resolve your Wi-Fi issues.
Before we dive into the solutions, it’s important to understand that Wi-Fi problems can arise due to various factors. It could be a simple glitch, interference from other devices, outdated firmware, or even physical obstructions in your home. By following the steps outlined in this guide, you’ll be equipped with the knowledge to identify and fix common Wi-Fi issues, allowing you to enjoy a seamless online experience.
Whether you’re experiencing slow speeds, frequent disconnections, or no connectivity at all, this guide will provide you with a comprehensive set of troubleshooting tips. No technical expertise is required, as we’ll break down the steps into simple and easily understandable instructions.
So, let’s get started with the basics and work our way towards more advanced solutions. By the end of this guide, you’ll have the know-how to diagnose and resolve your Wi-Fi problems, ensuring smooth browsing, streaming, and online productivity. Let’s dive in!
Step 1: Check the Basics:
When experiencing Wi-Fi issues, it’s important to start with the basics. Sometimes, the solution to your problem can be as simple as checking a few essential settings. Here are some steps to help you get started:
- Ensure Wi-Fi is enabled: Double-check that Wi-Fi is turned on both on your device and your router. It’s easy to overlook this simple step, but it can save you a lot of frustration.
- Check the signal strength: Move closer to your router and observe the signal strength on your device. Low signal strength can result in slow speeds or dropped connections. If the signal is weak, you may need to reposition your router or consider using a Wi-Fi extender.
- Verify the network name and password: Make sure you’re connected to the correct Wi-Fi network. Sometimes, nearby networks can have similar names, causing your device to connect to the wrong one. Additionally, ensure you’ve entered the correct password for your network.
- Restart your device: Sometimes a simple restart can fix minor software glitches. Turn off your device, wait for a few seconds, and then turn it back on. Once it’s back on, try connecting to your Wi-Fi network and check if the problem persists.
- Try a different device: If possible, test the Wi-Fi connection on a different device. This will help determine if the issue is specific to one device or a network-wide problem.
By checking these basic elements, you’ll be able to eliminate common issues that can impact your Wi-Fi connection. If your problem persists after going through these steps, don’t worry—there are several more troubleshooting methods to explore. Let’s move on to the next step.
Step 2: Restart Your Router:
One of the most effective troubleshooting steps for Wi-Fi connection issues is restarting your router. This simple action can help resolve temporary glitches and refresh your network settings. Follow these steps to restart your router:
- Power off your router: Locate the power button or unplug the power adapter from the router. Wait for about 10 seconds to ensure all residual power is drained.
- Disconnect power to your modem (if applicable): If your router is connected to a modem, disconnect the power to the modem as well. This will ensure a complete restart of both devices.
- Wait for a few minutes: Give your router and modem (if applicable) a couple of minutes to rest before powering them back on. This will help clear any internal cache or memory issues.
- Power on your modem (if applicable) and router: Start by plugging in or turning on your modem, allowing it to establish a stable connection with your internet service provider. Once the modem is fully connected, power on your router.
- Wait for the router to boot up: It may take a few minutes for your router to fully boot up and establish a connection. Patience is key during this step.
- Reconnect to your Wi-Fi network: Once your router is up and running, reconnect your device to the Wi-Fi network and check if the issues have been resolved.
Restarting your router can often fix common connectivity issues caused by temporary glitches or conflicts in the network. If the problem persists after restarting, don’t worry—there are further troubleshooting steps to explore. Let’s move on to the next step.
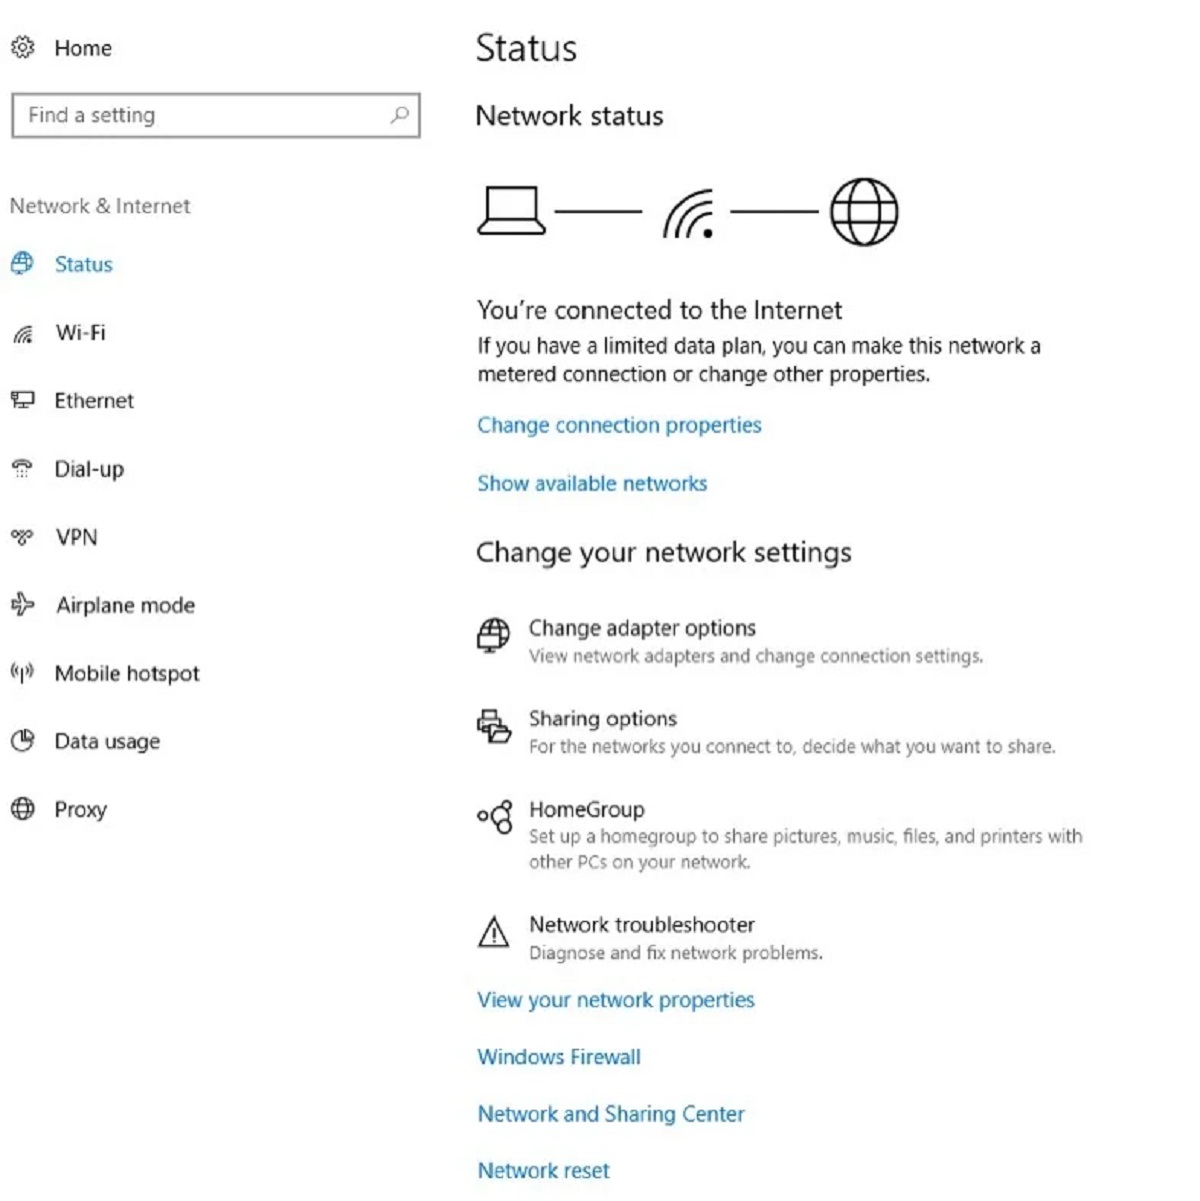
Step 3: Check Your Network Settings:
When troubleshooting Wi-Fi issues, checking your network settings is crucial to identify any misconfigurations or conflicts. By verifying and adjusting your network settings, you can often resolve connectivity problems. Here are the steps to follow:
- Access your router’s configuration page: Open a web browser and enter the IP address of your router in the address bar. This IP address is usually mentioned on the router itself or in the user manual. If you’re unsure, you can try commonly used default IP addresses like 192.168.1.1 or 192.168.0.1.
- Login to your router: Enter the required username and password to log in to your router’s configuration page. If you haven’t changed the default credentials, you can find them in the user manual or on the manufacturer’s website.
- Check the Wi-Fi settings: Once logged in, navigate to the wireless settings section. Verify that the Wi-Fi network name (SSID) and password are correct. If you’ve recently changed your Wi-Fi password, make sure to update it on your devices as well.
- Switch to a different Wi-Fi channel: By default, routers automatically select the Wi-Fi channel. However, neighboring networks or electronic devices can cause interference. Try switching to a different channel (usually 1, 6, or 11) to minimize interference and improve your Wi-Fi signal.
- Enable MAC address filtering (optional): Some routers allow you to set up MAC address filtering, which only allows specific devices to connect to your Wi-Fi network. If this feature is enabled, make sure your device’s MAC address is added to the allowed list.
- Save and apply the changes: After making any necessary adjustments to the settings, save the changes and apply them. Your router may take a moment to apply the new settings.
Checking your network settings is an important step in troubleshooting Wi-Fi issues. By ensuring accurate Wi-Fi configurations and minimizing interference, you can often improve connectivity and fix common problems. If the issues persist, don’t worry—there are still more troubleshooting steps to try. Let’s move on to the next step.
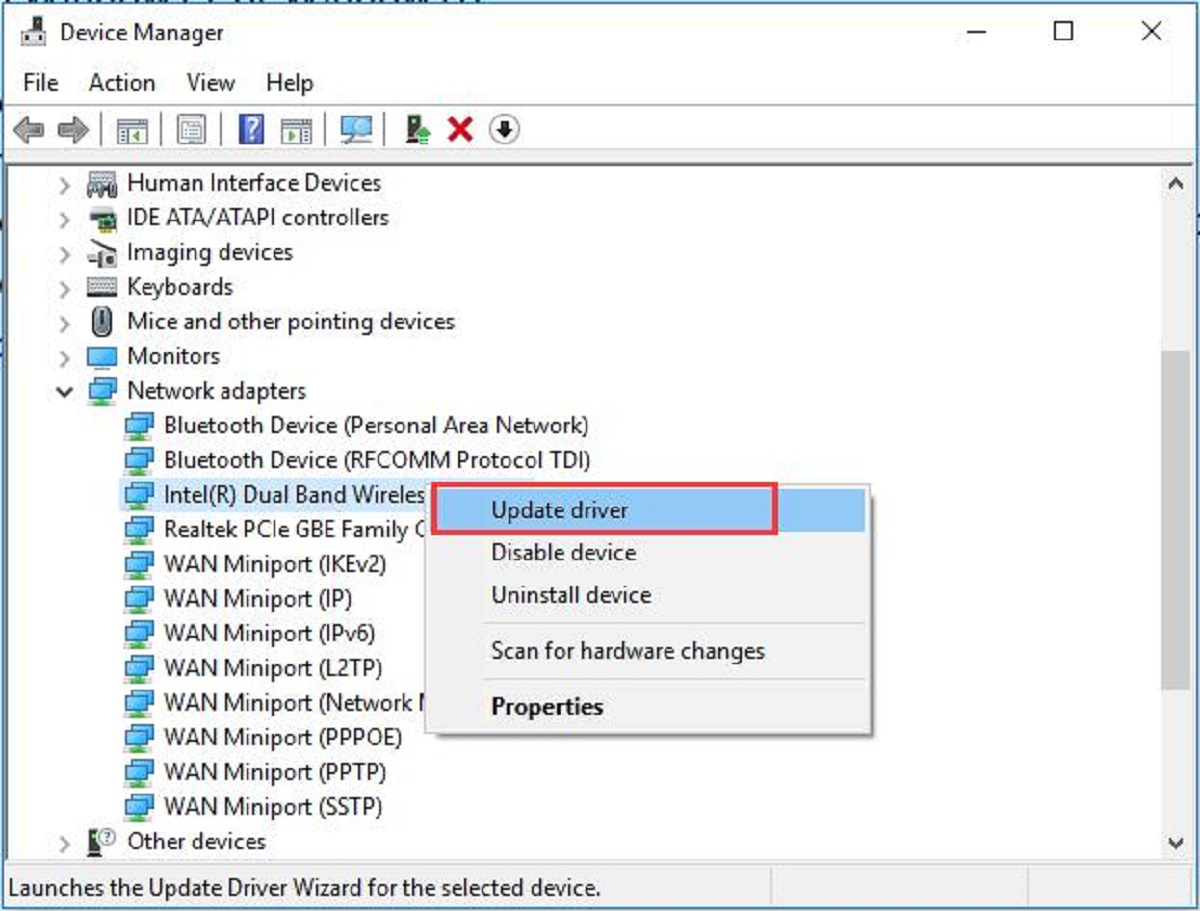
Step 4: Update Your Router’s Firmware:
Keeping your router’s firmware up to date is essential for optimal performance and security. Firmware updates often include bug fixes, performance enhancements, and improved compatibility with newer devices. If your router’s firmware is outdated, it can contribute to Wi-Fi connectivity issues. Follow these steps to update your router’s firmware:
- Identify your router model: Look for the model number, which is usually mentioned on the router itself or in the user manual. This information is necessary to download the correct firmware update.
- Visit the manufacturer’s website: Open a web browser and navigate to the manufacturer’s website. Look for the support section or downloads page, where you can find firmware updates for your specific router model.
- Download the latest firmware: Locate the latest firmware release for your router and download it to your computer or device. Make sure to save it in an easily accessible location.
- Access your router’s configuration page: Open a web browser and enter the IP address of your router in the address bar. Log in using your router’s username and password.
- Locate the firmware upgrade section: In the router’s configuration page, navigate to the firmware or system update section.
- Upload the firmware file: Browse your computer or device for the downloaded firmware file and upload it to the router’s firmware upgrade section.
- Start the firmware upgrade: Once the firmware file is uploaded, follow the on-screen instructions to start the firmware upgrade process. It may take a few minutes for the upgrade to complete.
- Restart your router: After the firmware has been successfully updated, restart your router to apply the changes.
Updating your router’s firmware can address compatibility issues and improve the overall performance of your Wi-Fi network. It’s recommended to periodically check for firmware updates and keep your router’s software up to date. If the issue persists after updating the firmware, don’t worry—there are still more troubleshooting steps to explore. Let’s continue with the next step.
Step 5: Move Your Router:
The placement of your router plays a crucial role in the strength and stability of your Wi-Fi signal. Physical obstructions, distance, and interference from other devices can affect the signal quality. By moving your router to an optimal location, you can improve Wi-Fi coverage and minimize connectivity issues. Here’s what you need to do:
- Identify the current router placement: Take note of where your router is currently located. Is it hidden away in a corner? Placed on the floor? Or obstructed by walls or furniture?
- Choose a central location: Ideally, place your router in a central location within your home or office. This will help distribute the signal evenly to different areas.
- Elevate the router: If possible, place your router on a higher surface, such as a shelf or table. This can help to minimize signal obstruction from furniture or other devices on the ground.
- Avoid physical obstructions: Keep your router away from walls, large appliances, and metal objects that can interfere with the signal. These obstructions can significantly reduce the Wi-Fi range and strength.
- Minimize interference: Keep your router away from other electronic devices that may cause interference, such as cordless phones, microwave ovens, and baby monitors.
- Consider a Wi-Fi extender: If your Wi-Fi signal doesn’t reach certain areas of your home or office, you may want to consider using a Wi-Fi extender to boost the coverage.
Moving your router to an optimal location can significantly improve your Wi-Fi signal strength and coverage. However, it’s important to note that certain factors like the size and layout of your space can impact the effectiveness of this step. If the issues persist after moving your router, don’t worry—there are still further troubleshooting steps to explore. Let’s move on to the next step.
Step 6: Remove Interference:
Interference from other electronic devices can disrupt your Wi-Fi signal and cause connectivity issues. Identifying and eliminating sources of interference can help improve the reliability and speed of your Wi-Fi network. Follow these steps to remove interference:
- Identify potential sources of interference: Look for devices in your home or office that can interfere with Wi-Fi signals. Common culprits include cordless phones, microwave ovens, Bluetooth devices, and even neighboring Wi-Fi networks.
- Adjust the placement of interfering devices: If possible, move devices like cordless phones or microwaves further away from your router. This can help reduce interference and boost your Wi-Fi signal.
- Change the Wi-Fi channel: If you’re experiencing interference from other Wi-Fi networks, try changing your router’s Wi-Fi channel. This can minimize overlap with nearby networks and reduce interference.
- Use the 5 GHz band: If your router supports it, switch to the 5 GHz band instead of the 2.4 GHz band. The 5 GHz band is less crowded and can offer faster and more reliable connections.
- Upgrade old devices: Older Wi-Fi devices may not support the latest network standards and can cause compatibility issues and slower speeds. Consider upgrading to newer devices that support the latest Wi-Fi standards.
- Power off or unplug interfering devices: If you’re not actively using devices that are causing interference, turn them off or unplug them from power. This can help minimize their impact on your Wi-Fi signal.
- Invest in Wi-Fi range extenders: If you’re still experiencing interference or weak Wi-Fi in certain areas, consider adding Wi-Fi range extenders. These devices amplify and extend your Wi-Fi signal to reach further distances.
Removing interference is essential for maintaining a stable and strong Wi-Fi connection. By addressing sources of interference and optimizing your network, you can enjoy faster speeds and better Wi-Fi performance. If the issues persist after removing interference, don’t worry—there are still more troubleshooting steps to explore. Let’s move on to the next step.
Step 7: Reset Your Router:
If you’ve tried all the previous steps and are still experiencing Wi-Fi issues, a router reset can help resolve any lingering configuration problems. Resetting your router will restore it to its default factory settings, eliminating any potential software or setting conflicts. Follow these steps to reset your router:
- Locate the reset button: Look for a small reset button on your router. It’s usually located on the back or bottom of the device. You may need to use a paperclip or a similar pointed object to press and hold the button.
- Press and hold the reset button: Press and hold the reset button for about 10-15 seconds. Make sure to keep holding it until the router’s lights start flashing or the device restarts.
- Wait for the router to reset: After releasing the reset button, give your router a few minutes to reset. It will go through the initialization process, and the lights will stabilize once it’s fully reset.
- Reconfigure your router: Once your router has been reset, you’ll need to reconfigure it. Access the router’s configuration page (usually by entering the default IP address) and set up your Wi-Fi network name (SSID) and password again.
- Connect your devices: After reconfiguring your router, reconnect your devices to the Wi-Fi network using the updated network name and password. Check if the issues have been resolved.
A router reset can help clear any persistent configuration issues and restore your Wi-Fi network to its default state. Keep in mind that resetting your router will erase any personalized settings, so you’ll need to set them up again. If the issues continue after resetting your router, don’t worry—there are still more troubleshooting steps to try. Let’s move on to the next step.
Step 8: Upgrade Your Router:
If you’ve exhausted all troubleshooting steps and your Wi-Fi issues persist, it might be time to consider upgrading your router. Old or outdated routers may struggle to keep up with modern Wi-Fi standards and technologies, resulting in poor performance and connectivity problems. Upgrading to a newer router can offer faster speeds, improved coverage, and enhanced stability. Here’s what you need to consider:
- Check your router’s specifications: Review your current router’s specifications, including the supported Wi-Fi standards (such as 802.11ac or 802.11ax) and maximum data transfer rates. Compare these specifications with newer router models to see the potential benefits of an upgrade.
- Research and choose a suitable router: Look for routers that support the latest Wi-Fi standards and have positive reviews regarding performance, coverage, and reliability. Consider factors such as the size of your space, the number of connected devices, and any specific features you may need.
- Consider mesh Wi-Fi systems: If you have a large home or office with multiple floors or areas that struggle with Wi-Fi coverage, a mesh Wi-Fi system might be a suitable choice. These systems consist of multiple routers that work together to create a seamless and expanded network.
- Follow the manufacturer’s instructions: Once you’ve chosen a new router, carefully follow the manufacturer’s instructions for setting it up and configuring your Wi-Fi network. Make sure to choose a strong and unique network password for security.
- Connect your devices to the new router: After setting up the new router, connect your devices to the Wi-Fi network using the updated network name (SSID) and password. Enjoy the benefits of a faster and more reliable Wi-Fi connection.
Upgrading your router can be a worthwhile investment if you’re consistently experiencing Wi-Fi issues that cannot be resolved through troubleshooting. However, it’s important to consider factors such as budget and specific requirements before making a purchase. With a new and improved router, you can enjoy a seamless and hassle-free Wi-Fi experience. If you’re still facing issues after upgrading your router, it’s advisable to seek further assistance from a professional or your internet service provider.
Conclusion:
Dealing with Wi-Fi connection issues can be frustrating, but with the right troubleshooting steps, you can overcome them and enjoy a fast and reliable internet connection. In this comprehensive guide, we’ve covered various techniques to fix common Wi-Fi problems.
We started by checking the basics, ensuring Wi-Fi is enabled and checking network settings. Then, we moved on to restarting the router, which can resolve temporary glitches. Checking and updating the router’s firmware is crucial for optimal performance and security. We also discussed the importance of router placement, minimizing interference, and considering a router upgrade if needed.
Remember, troubleshooting Wi-Fi issues requires patience and persistence. Not all solutions may work for every situation, as each network setup can be unique. It’s important to identify the specific problem and try the appropriate troubleshooting steps to resolve it.
If you continue to experience Wi-Fi problems despite following these steps, consider consulting with a professional or contacting your internet service provider for further assistance. They will have the expertise to diagnose more complex issues and provide specific guidance for your network setup.
By employing the strategies outlined in this guide, you can overcome Wi-Fi challenges and enjoy a seamless online experience. Don’t let slow speeds or connectivity problems hold you back—take proactive steps to troubleshoot and resolve your Wi-Fi issues today.