Introduction
Welcome to this step-by-step tutorial on how to draw a PC! Whether you want to create a realistic artwork or simply have fun sketching, this guide will show you the process of drawing a computer from scratch. Computers are essential tools in our modern world, and by learning to draw them, you can capture their functionality and elegance on paper.
Before we dive into the steps, let’s talk about why drawing a PC can be a rewarding experience. Drawing allows us to express our creativity, and depicting a computer can be a unique way of showcasing our technological dependence. Plus, by understanding the structure and components of a computer, you can develop a deeper appreciation for the devices we use every day.
If you’re new to drawing, don’t worry! This tutorial is suitable for beginners and experienced artists alike. You can follow along at your own pace, and feel free to improvise and add your personal touch to the drawing.
So, let’s gather our art supplies and get started on this exciting journey of creating a masterpiece of computer art!
Materials Needed
Before we begin drawing a PC, let’s make sure we have all the necessary materials on hand. Here are the supplies you’ll need:
- Pencil: Using a pencil will allow you to sketch the initial outline lightly, making it easier to erase any mistakes or make adjustments as needed.
- Eraser: A good quality eraser is essential for refining your drawing and removing any unwanted lines or smudges.
- Drawing Paper: Choose a medium-weight or heavyweight paper that is suitable for pencil drawings. The smooth surface will help you achieve clean lines and details.
- Ruler: A ruler can be handy for creating straight lines and ensuring accurate proportions in your drawing.
- Colored Pencils (optional): If you want to add color to your drawing, have a set of colored pencils ready. They will allow you to bring your PC to life with vibrant hues.
These are the basic materials you’ll need to begin your PC drawing. Depending on your preferences, you can also use additional tools like blending stumps for shading or fine liners for precise details. Remember, the goal is to have fun and experiment with different techniques, so don’t be afraid to explore beyond the listed materials.
Now that we’ve gathered our supplies, let’s move on to the next step: sketching the outline of our PC!
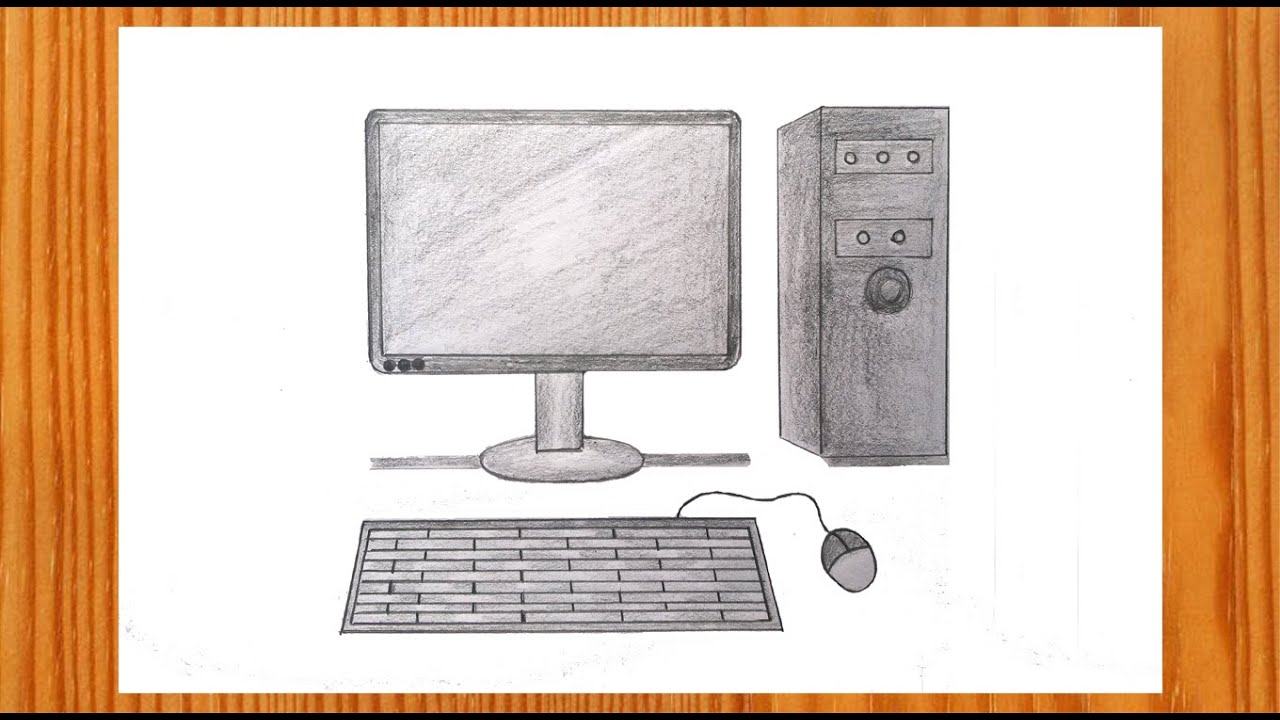
Step 1: Sketch the Outline
The first step in drawing a PC is to sketch the outline of its basic shape. Start by lightly drawing a rectangular shape in the center of your paper. This will form the main body of the computer. Use a ruler to ensure the lines are straight and proportionate.
Next, add a smaller rectangular shape above the main body to represent the monitor. Position it in a way that looks visually balanced with the main body. Remember that the monitor can vary in size, so feel free to adjust its proportions based on your preference.
Now, let’s sketch the keyboard and mouse. Draw two rectangular shapes at the bottom of the main body, representing the keyboard. The keyboard should be slightly wider than the mouse, which can be represented by a smaller rectangular shape adjacent to the keyboard.
Once you have the basic shapes in place, you can add rounded corners to the main body and the monitor to give them a more realistic appearance. Don’t worry about adding too much detail at this stage; we will refine the drawing in later steps.
Remember to keep your pencil lines light and easy to erase. This will allow for flexibility in adjusting the proportions and making any necessary changes as you go. Take your time with this step, ensuring that the overall outline looks balanced and captures the essence of a PC.
With the outline now in place, we can move on to the next step: adding details to the monitor of our computer drawing.
Step 2: Draw the Monitor
Now that we have the basic outline of the PC, let’s focus on drawing the monitor. The monitor is where we see all the visual information displayed on the computer screen. Follow these steps to add detail to the monitor:
- Start by refining the shape of the monitor. Use curved lines to soften the corners and create a more realistic appearance.
- Draw a rectangle or a square shape within the monitor to represent the screen. Make sure the proportions are accurate and aligned with the overall shape of the monitor.
- Within the screen, draw a smaller rectangle to represent the display area. This is where images and text will be shown. You can add a border around the display area to give it a polished look.
- Next, add buttons or controls below the screen, if applicable. These buttons are typically used to adjust brightness, volume, or power options. Use small circles, circles with arrows, or any other shapes that resemble the buttons found on most computer monitors.
- To add a sense of depth, draw a thin line or shadow beneath the monitor, slightly inclined towards the bottom. This creates the illusion of the monitor resting on a surface.
Remember to keep your lines light and smooth. Take your time in this step to ensure that the monitor looks well-defined and proportional to the rest of the drawing. Once you’re satisfied with the monitor, we can move on to the next step: adding the keyboard and mouse.
Step 3: Add the Keyboard and Mouse
Now that we have the main body and monitor in place, it’s time to add the keyboard and mouse to our computer drawing. These components are essential for inputting commands and interacting with the PC. Follow these steps to add detail to the keyboard and mouse:
- Start by refining the shape of the keyboard. Draw rectangular keys within the designated area, making sure they are evenly spaced and proportional. You can choose to draw all the keys or just a few to give the impression of depth.
- Next, add details such as function keys, arrows, and special keys that are commonly found on computer keyboards. Be sure to research the layout of a standard keyboard for reference if needed.
- Draw small lines or shapes beneath the keys to represent the gaps between them.
- Moving on to the mouse, draw a circular shape for the main body and a smaller circle towards the front for the clicker. Add a small rectangle or oval shape for the scroll wheel.
- To give the mouse a realistic appearance, add detailing such as buttons on the sides or textured grips.
- Position the keyboard and mouse appropriately in relation to the main body of the PC. Ensure they are proportionate and symmetrical.
Take your time to add these details, and remember that accuracy in proportion and positioning will make the drawing look more realistic. Once you’re satisfied with the keyboard and mouse, we can move on to the next step: detailing the CPU.
Step 4: Detail the CPU
Now that we have the main components in place, let’s turn our attention to detailing the CPU (Central Processing Unit) of the PC. The CPU is the brain of the computer and houses the processor that performs all the calculations and executes instructions. Follow these steps to add detail to the CPU:
- Refine the shape of the CPU by rounding the corners and edges. Make it slightly smaller than the monitor to maintain proportion.
- Within the CPU, draw a series of rectangular shapes to represent the various ports and connectors. These can include USB ports, audio jacks, and memory card slots.
- Add detailing to the CPU by drawing lines or patterns that indicate texture or ventilation grills. These details help convey the complexity and functionality of the CPU.
- Draw a fan or cooling vents on the top or sides of the CPU to represent the cooling system. This helps prevent the CPU from overheating during heavy usage.
- To add depth and realism, incorporate shading and shadowing. Pay attention to the direction of light sources and apply shading accordingly.
Take your time in this step to ensure that the CPU appears visually appealing and accurately represents the intricate details found in real-life computers. Once you’re satisfied with the CPU, we can move on to the next step: enhancing the components of our PC drawing.
Step 5: Enhance the Components
With the major components of the PC defined, it’s time to enhance the details and make them visually appealing. This step involves adding depth, texture, and realism to our computer drawing. Follow these steps to enhance the components:
- Refine the outlines of all the components by darkening the lines. This will make them stand out more and add definition to the drawing.
- Add texture to the different surfaces of the PC. Use short, quick strokes to create the appearance of smooth plastic, brushed metal, or textured materials.
- Pay attention to light and shadow. Imagine the direction of the light source and darken areas that are in shadow while leaving areas facing the light source lighter.
- Think about reflections and highlights. Add small white areas or lighter shading to simulate reflections on glossy surfaces.
- Use your pencil to create gradients and shading to give the components a three-dimensional look. This will make them appear more realistic and add depth.
- Don’t be afraid to experiment and add your own creative touch. If you want to incorporate stickers, decals, or unique designs, go for it. This is your opportunity to personalize the PC drawing.
Take your time in this step, as it requires attention to detail and a focus on creating a visually appealing composition. Remember to step back from your drawing and assess it from a distance to identify any areas that may need further enhancement. Once you’re satisfied with the enhanced components, we’re ready to move on to the final step: adding color to our computer drawing.
Step 6: Add Color
Adding color to your PC drawing can bring it to life and make it even more vibrant and engaging. Whether you prefer a realistic color scheme or a more imaginative palette, follow these steps to add color to your drawing:
- Start by selecting the colors you want to use. Look at real computers or reference images to get an idea of the color schemes commonly seen in PCs.
- Begin by coloring the different components of the PC. Use light strokes and layer the colors to achieve depth and dimension.
- Consider the material qualities of each component. For example, the monitor might have a glossy screen, while the keyboard and mouse may have a matte finish.
- Pay attention to light and shadow when applying color. Imagine the light source and how it would interact with the different surfaces, adding shading and highlights accordingly.
- Experiment with color variations and blending to achieve the desired effect. You can use colored pencils, markers, or even digital tools to color your drawing.
- If you’re unsure about color choices, start with a base color and gradually build up layers and details. You can always make adjustments along the way.
- Feel free to add additional elements, such as a background or surrounding objects, to further enhance the composition and make the drawing more visually interesting.
Remember, adding color is a personal choice, and you have the creative freedom to explore different palettes and experiment with different techniques. Don’t be afraid to let your imagination run wild and create a unique representation of a PC that reflects your style and preferences.
Once you’re satisfied with the colors and overall appearance of your PC drawing, you’ve successfully completed all the steps. Take a moment to admire your creation and showcase your artwork to others!
Conclusion
Congratulations on completing your PC drawing! Through the step-by-step process outlined in this tutorial, you have learned how to sketch the outline, add details to each component, and bring your drawing to life with color. Drawing a PC allows you to explore the intricate design and functionality of these essential devices found in our modern world.
Remember, drawing is a skill that improves with practice. Allow yourself to experiment, make mistakes, and learn from them. Each drawing you create brings you closer to becoming a more skilled artist.
Take pride in your artwork and share it with others. Whether you choose to display your PC drawing digitally or in a traditional medium, don’t hesitate to showcase your creativity and talent. Inspire others to explore their artistic abilities and encourage them to try drawing a PC of their own.
Keep in mind that this tutorial provides a basic framework, but you can customize your drawing by adding unique details, backgrounds, or even additional components. Feel free to think outside the box and let your imagination guide you.
Most importantly, enjoy the process of drawing. It’s a joyful and satisfying way to express your creativity and showcase your perspective. So, grab your pencils, gather your materials, and start drawing a PC that captures the essence of modern technology.