Introduction
Welcome to our guide on how to disable your internal graphics card. If you’re a tech-savvy individual looking to enhance your computer’s performance or simply want to switch to an external graphics card, this article is for you.
Graphics cards play a crucial role in the overall performance of a computer, especially when it comes to tasks like gaming, photo and video editing, and graphic-intensive applications. Most computers come with an integrated, or internal, graphics card that is capable of handling everyday tasks. However, these internal graphics cards may not always meet the demands of power users and gamers.
Disabling the internal graphics card and replacing it with an external one allows you to enjoy smoother graphics, higher frame rates, and better performance in resource-demanding applications. It also provides you with the flexibility of customizing your system according to your specific needs.
Before proceeding with the steps to disable the internal graphics card, it’s important to note that this process involves accessing and modifying the BIOS (Basic Input/Output System) settings. Manipulating these settings incorrectly can cause serious issues with your computer’s functionality. Therefore, it’s crucial to follow the steps outlined in this guide carefully and proceed at your own risk.
In the following sections, we will provide you with a step-by-step guide on how to disable your internal graphics card in order to make way for your new external graphics card. So, without further ado, let’s jump right in!
Why Disable Internal Graphics Card?
Before we delve into the process of disabling the internal graphics card, it’s important to understand why you might want to do so in the first place. Here are a few reasons why you might consider disabling your internal graphics card:
- Enhanced Performance: One of the main reasons to disable your internal graphics card is to unlock the full potential of an external graphics card. External graphics cards are designed to handle high-quality visuals and demanding tasks, providing a significant boost in performance for gaming, video editing, and other graphics-intensive applications.
- Advanced Graphics and Visuals: Integrated graphics cards are typically limited in terms of their capabilities, offering basic visuals and lower frame rates. By disabling the internal graphics card and installing a dedicated one, you can enjoy enhanced graphics, sharper images, and smoother animations.
- Support for Multiple Monitors: If you need to connect multiple monitors to your computer, disabling the internal graphics card allows you to seamlessly utilize the ports on your external graphics card. This gives you the flexibility to extend your desktop and improve productivity.
- Hardware Upgrades: Disabling the internal graphics card may be necessary when upgrading other components in your system, such as the motherboard or CPU. Certain hardware configurations require the use of an external graphics card, so disabling the internal one becomes a necessary step.
It’s essential to note that while disabling the internal graphics card can bring many advantages, it’s not suitable for every situation. If you primarily use your computer for basic tasks like web browsing, document editing, or casual gaming, the integrated graphics card should be sufficient. Disabling it may not yield noticeable improvements in these scenarios.
Before making any changes to your computer’s hardware configuration, it’s always a good idea to research and ensure compatibility between your external graphics card and other components of your system, as well as considering the power requirements and cooling capabilities.
Now that we’ve explored the reasons for disabling the internal graphics card, let’s proceed to the step-by-step process of accomplishing this task in the next section.
Step 1: Check Your System Requirements
Before disabling your internal graphics card, it’s crucial to ensure that your system meets the requirements for installing and using an external graphics card. Here are a few key factors to consider:
- Power Supply: External graphics cards require a significant amount of power to operate efficiently. Make sure that your power supply unit (PSU) can handle the additional power demands of the new graphics card. Check the recommended power requirements provided by the manufacturer.
- Physical Space: Determine if your computer has enough physical space to accommodate the new graphics card. Measure the internal slots or ports available and compare them to the dimensions of the graphics card. Ensure that the card will fit properly and that there is enough room for proper airflow and cooling.
- Compatibility: Verify whether your computer’s motherboard supports external graphics card installations. Check the motherboard’s specifications and look for compatibility with the specific type of graphics card you intend to install.
- Ports and Cables: Take note of the available ports and cables on your external graphics card and ensure compatibility with the peripherals you plan to connect. Consider the number and type of ports required for your displays, as well as any additional ports needed for accessories like VR headsets or external hard drives.
- Operating System Support: Confirm that the operating system you are using supports the external graphics card you wish to install. Check the manufacturer’s website for driver compatibility and any specific requirements related to your operating system version.
By checking these system requirements beforehand, you can avoid any compatibility issues or potential hardware conflicts when installing your new graphics card.
Once you’ve verified that your system meets the necessary prerequisites, you can proceed to the next step: accessing your BIOS settings to disable the internal graphics card. We’ll cover this step in detail in the following section.
Step 2: Access Your BIOS Settings
In order to disable your internal graphics card, you’ll need to access your computer’s BIOS (Basic Input/Output System) settings. The BIOS is a firmware interface that allows you to configure and manage various hardware settings on your computer. Here’s how you can access the BIOS:
- Restart Your Computer: Start by restarting your computer if it’s currently powered on. You’ll need to access the BIOS during the boot process.
- Enter BIOS Key: While your computer is restarting, pay close attention to the screen for any prompts indicating the key or keys to press to enter the BIOS. The most common keys to access the BIOS are
Del,F2, andF10, but it may vary depending on your computer’s manufacturer. - Press the Key: Once you identify the correct key to enter the BIOS, press it repeatedly until the BIOS settings menu appears on your screen. It’s important to press the key at the right time to access the BIOS, as missing the opportunity may require you to restart your computer again.
If you’re having trouble accessing the BIOS, consult your computer’s documentation or the manufacturer’s website for specific instructions. Each computer brand and model may have slightly different procedures for entering the BIOS settings.
Once you’ve successfully accessed the BIOS, you’re ready to proceed to the next step: locating the graphics card settings. We’ll explore this step in detail in the following section.
Step 3: Locate the Graphics Card Settings
After accessing your computer’s BIOS settings, the next step is to locate the graphics card settings. These settings may vary depending on the BIOS version and the manufacturer of your motherboard. Here’s how you can find the graphics card settings:
- Look for the “Advanced” or “Integrated Peripherals” Tab: Navigate through the BIOS menu to find the “Advanced” or “Integrated Peripherals” tab. These sections typically contain settings related to hardware configuration and peripherals.
- Search for “Graphics” or “Display” Options: Within the “Advanced” or “Integrated Peripherals” tab, look for options related to graphics or display settings. These settings are where you’ll find the controls for the internal graphics card.
- Explore Submenus: Once you’ve located the graphics or display settings, explore any submenus within this section. Look for options such as “Internal Graphics”, “Integrated Graphics”, or a similar term that refers to the internal graphics card.
- Disable Internal Graphics: Once you’ve found the relevant setting, select it and choose the option to disable it. This action will effectively disable the internal graphics card and make way for your new external graphics card.
It’s important to note that the specific labels and options in your BIOS may differ slightly. Some systems may also require you to change the graphics card preference from “Internal” to “PCI” or “External.” Make sure to carefully read the descriptions, consult your motherboard’s manual if needed, and proceed with caution.
Once you’ve successfully located and disabled the internal graphics card, it’s time to move on to the next step: saving and exiting the BIOS settings. We’ll cover this step in detail in the following section.
Step 4: Disable Internal Graphics Card
With the graphics card settings identified in your computer’s BIOS, you can now proceed to disable the internal graphics card. Follow these steps to disable the internal graphics card:
- Select the Internal Graphics Card: Within the graphics or display settings, locate the option that refers to the internal graphics card. It may be labeled as “Internal Graphics”, “Integrated Graphics”, or something similar.
- Choose the Disable Option: Once you’ve selected the internal graphics card option, choose the option to disable it. This action will effectively turn off the internal graphics card, allowing you to utilize the external graphics card instead.
- Save Changes: After disabling the internal graphics card, navigate to the option to save the changes you’ve made in the BIOS. Look for options such as “Save Settings and Exit” or “Apply Changes and Exit”. Select this option to save the changes you’ve made to the graphics card settings.
Please note that the specific steps and options may vary depending on your computer’s BIOS version and motherboard manufacturer. Be sure to read the descriptions carefully and refer to your motherboard’s manual if necessary.
Once you’ve successfully disabled the internal graphics card in the BIOS, you’re almost ready to start using your new external graphics card. However, there are a few additional steps you need to follow to ensure everything functions properly. In the next steps, we’ll cover how to install and update the external graphics card drivers, as well as connecting your displays to the new graphics card.
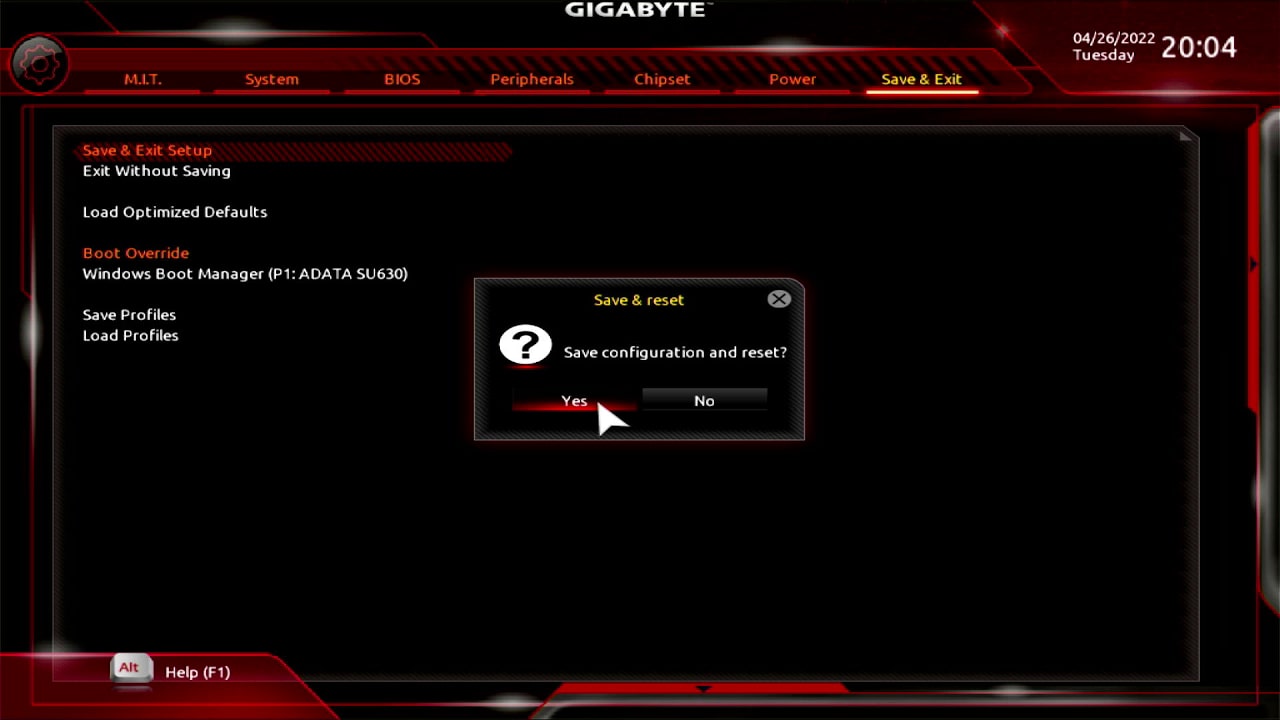
Step 5: Save and Exit BIOS Settings
After disabling the internal graphics card in the BIOS, it’s essential to save the changes and exit the BIOS settings correctly. Following these steps will ensure that the changes take effect and your computer is ready to use the new external graphics card:
- Save Changes: In the BIOS menu, locate the option to save the changes you’ve made. This option is typically labeled as “Save Settings and Exit” or “Apply Changes and Exit”. Choose this option to save the updated BIOS settings.
- Confirm Saving Changes: Some BIOS interfaces may prompt you to confirm that you want to save the changes. Read the on-screen instructions carefully and confirm that you want to save the changes you’ve made. This step varies depending on your computer’s BIOS version.
- Exit BIOS: After saving the changes, exit the BIOS settings interface. Look for the option to exit the BIOS, typically labeled as “Exit”, “Exit BIOS”, or “Exit Setup”. Select this option to exit the BIOS and continue with the boot-up process.
By saving the changes and exiting the BIOS settings properly, you ensure that the disabled internal graphics card is no longer active, and your computer will recognize and utilize the new external graphics card instead. It’s important to note that you may experience a black screen or temporary loss of display during the transition from the internal to the external graphics card. This is normal and should resolve once your operating system loads.
Now that you’ve successfully saved and exited the BIOS settings, you’re ready to move on to the next steps: installing and updating the drivers for your new external graphics card, as well as connecting your displays to the new card. These steps will be covered in detail in the upcoming sections.
Step 6: Install and Update External Graphics Card Drivers
After disabling the internal graphics card and saving the changes in the BIOS, the next step is to install and update the drivers for your new external graphics card. The drivers are essential software components that enable your operating system to communicate effectively with the graphics card. Follow these steps to install and update the drivers:
- Download the Latest Drivers: Visit the manufacturer’s website for your external graphics card and locate the driver download section. Look for the most recent and compatible drivers for your specific graphics card model. Download the appropriate drivers for your operating system.
- Run the Installer: Once the driver download is complete, run the installer file. Follow the on-screen prompts and instructions provided by the installation wizard. This process may vary depending on the manufacturer and driver package.
- Complete the Installation: Allow the installer to complete the driver installation process. This may involve extracting files, updating system components, and configuring the necessary settings for your graphics card.
- Restart Your Computer: After the driver installation is complete, it’s recommended to restart your computer. This allows the system to fully recognize and utilize the new drivers for the external graphics card.
- Check for Updates: Once your computer restarts, check for any additional driver updates. Graphics card manufacturers often release regular updates to enhance performance, fix any bugs, and introduce new features. Visit the manufacturer’s website or use the provided software to check for and install any available driver updates.
By installing and updating the drivers for your new external graphics card, you ensure that your operating system can effectively utilize the features and capabilities of the graphics card. This step is crucial for optimal performance and compatibility with your system.
Now that you’ve successfully installed and updated the drivers for your external graphics card, it’s time for the final step: connecting your displays to the new graphics card. This step will be covered in detail in the following section.
Step 7: Connect Display to External Graphics Card
After disabling the internal graphics card, saving the changes in the BIOS, and installing the drivers for your new external graphics card, the final step is to connect your displays to the graphics card. This will ensure that your computer utilizes the external graphics card for all visual output. Follow these steps to connect your displays:
- Identify Available Ports: Take note of the available ports on your external graphics card. Common ports include HDMI, DisplayPort, DVI, and VGA. Your graphics card may have multiple ports, allowing you to connect multiple displays simultaneously.
- Select the Correct Cable: Choose the appropriate cable to connect your display to the graphics card. Use a cable that matches the ports on both the graphics card and the display. For example, use an HDMI cable if both your graphics card and display have HDMI ports.
- Connect the Cable: Plug one end of the cable into the appropriate port on the graphics card and the other end into the corresponding port on your display. Ensure a secure fit to establish a reliable connection.
- Repeat for Multiple Displays: If you have multiple displays, repeat the previous steps to connect each display to the available ports on the graphics card. This allows you to extend your desktop across multiple screens or configure them in a way that suits your needs.
- Configure Display Settings: Once your displays are connected, you may need to configure the display settings in your operating system. This can include settings such as resolution, refresh rate, and display arrangement. Access the display settings in your operating system and make any necessary adjustments to ensure optimal display performance.
By connecting your displays to the external graphics card, you ensure that the visual output is directed through the new graphics card and not the disabled internal graphics card. This step completes the process of disabling the internal graphics card and successfully utilizing the capabilities of your new external graphics card.
Congratulations! You have successfully disabled the internal graphics card and installed an external graphics card, unlocking enhanced performance and advanced graphics capabilities. Enjoy your improved computing experience!
Conclusion
Disabling the internal graphics card and installing an external graphics card can significantly enhance the performance and visual capabilities of your computer. By following the steps outlined in this guide, you can successfully make the switch and reap the benefits of improved graphics and increased processing power.
In this guide, we covered the reasons why you might want to disable the internal graphics card, such as enhanced performance, advanced graphics, support for multiple monitors, and hardware upgrades. We also provided detailed instructions on how to disable the internal graphics card in your computer’s BIOS settings, save the changes, and exit the BIOS properly.
Additionally, we discussed the importance of verifying system requirements, such as power supply, physical space, compatibility, ports, and operating system support. Ensuring that your system meets these requirements is crucial for a smooth installation and operation of the external graphics card.
We then instructed you on how to install and update the drivers for your new external graphics card, enabling seamless communication between the card and your operating system. Finally, we walked you through the process of connecting your displays to the external graphics card, allowing you to fully utilize its capabilities.
Remember, while disabling the internal graphics card and installing an external one can bring many benefits, it’s essential to research and choose a graphics card that is compatible with your system and meets your specific needs. Additionally, be cautious when modifying BIOS settings, as incorrect changes can cause system problems.
By following the steps outlined in this guide, you are well on your way to enhancing your computer’s graphics performance and unlocking new possibilities for gaming, video editing, and other resource-demanding tasks. Enjoy the power and visual prowess that your new external graphics card brings!