Introduction
Outlook is a popular email client used by millions of people around the world to manage their emails and stay organized. However, over time, our email folders can become cluttered with old and unnecessary messages, making it difficult to find the important ones.
If you’re struggling to manage your Outlook inbox and want to clear out the clutter, don’t worry! Deleting emails in Outlook is a simple process that can help you regain control over your inbox and improve your productivity. Whether you want to delete emails individually or in bulk, Outlook provides several options to make the process quick and efficient.
In this article, we will guide you through the step-by-step process of deleting emails in Outlook. From accessing your Outlook account to permanently deleting the messages, we will cover everything you need to know to clean up your inbox and keep it organized.
So, if you’re ready to declutter your Outlook and get rid of those unnecessary emails, let’s dive into the steps and start deleting those messages that are taking up valuable space in your inbox.
Step 1: Accessing Outlook
The first step to deleting emails in Outlook is accessing your Outlook account. Here’s how you can do it:
- Launch your web browser: Open your preferred web browser (such as Google Chrome, Mozilla Firefox, or Microsoft Edge) on your computer.
- Visit the Outlook website: In the address bar of your web browser, type in the URL for Outlook, which is https://outlook.com.
- Enter your credentials: On the Outlook sign-in page, enter your email address and password associated with your Outlook account. If you are using a public or shared computer, make sure to uncheck the “Keep me signed in” option for security purposes.
- Click “Sign in”: Once you’ve entered your credentials, click the “Sign In” button to access your Outlook account.
Once you’ve successfully signed in, you will be redirected to your Outlook inbox, where you can manage and delete your emails. It’s important to note that these steps are applicable for accessing Outlook through a web browser. If you are using Outlook as a desktop application, you can open it by double-clicking the Outlook icon on your desktop or searching for it in your computer’s start menu.
Now that you’ve accessed your Outlook account, let’s move on to the next step: opening the email folder.
Step 2: Opening the Email Folder
Once you’re logged into your Outlook account, the next step is to open the email folder that contains the emails you want to delete. Follow these simple steps:
- Locate the folders pane: On the left-hand side of your Outlook interface, you will see a folders pane that displays various folders such as “Inbox,” “Sent Items,” “Drafts,” and more.
- Select the folder: Click on the folder that contains the emails you want to delete. For example, if you want to delete emails from your inbox, click on the “Inbox” folder.
- View the emails: Once you’ve selected the folder, the main section of your Outlook interface will display the emails within that folder. You can see a list of emails along with their subject lines, senders, and other information.
By selecting the appropriate folder, you can narrow down your focus to the specific set of emails you want to delete. This can be the inbox folder, a specific subfolder, or even the sent items folder, depending on your requirements.
It’s important to note that Outlook allows you to create custom folders to organize your emails. If you have organized your emails into custom folders, you can select the appropriate folder where the emails you want to delete are located.
Now that you have opened the email folder containing the messages you wish to delete, let’s proceed to the next step: selecting the emails.
Step 3: Selecting the Emails to Delete
Once you have accessed the Outlook email folder that contains the messages you want to delete, it’s time to select the specific emails you wish to remove. Follow these steps to select the emails:
- Review the emails: Take a look at the list of emails displayed in the folder. Scroll through the emails and identify the ones you want to delete. You can choose individual emails or multiple emails at once.
- Select individual emails: To delete emails individually, simply click on the checkbox or the circle beside the email. This will mark the email for deletion. You can select multiple individual emails by clicking on the checkboxes or circles next to each email.
- Select multiple emails at once: If you want to delete multiple emails at once, you can use the select all option. To do this, locate the checkbox or circle at the top of the emails list, usually found in the column header. Clicking this box will select all the emails in the current folder.
- Unselect specific emails (optional): If you have used the select all option but want to exclude specific emails from deletion, you can manually uncheck the checkboxes or circles beside those emails. This allows you to fine-tune your selection before proceeding.
By carefully selecting the emails you want to delete, you can ensure that you are removing the right messages while keeping important emails intact. Take your time to review and double-check your selection before moving on to the next step.
Now that you have chosen the emails you wish to delete, let’s move on to the next step: deleting emails individually.
Step 4: Deleting Emails Individually
If you want to delete emails one by one in Outlook, you can easily do so by following these simple steps:
- Select an individual email: Start by selecting the email you want to delete. You can click on the checkbox or circle beside the email to mark it for deletion.
- Click on the delete button: Once the email is selected, locate the delete button in your Outlook interface. This button is usually represented by a trash can icon and can often be found in the toolbar at the top of your screen. Clicking on it will initiate the deletion process for the selected email.
- Confirm the deletion: After clicking the delete button, Outlook will display a confirmation message asking if you want to permanently delete the email. Verify that it is indeed the email you want to delete, and if so, click “OK” or “Yes” to confirm the deletion.
By following these steps, you can delete individual emails in Outlook with ease. This method is especially useful when you only need to remove specific emails while keeping the rest of your inbox intact.
It’s important to note that deleting an individual email will move it to the “Deleted Items” folder in Outlook. This folder acts as a temporary storage for deleted emails, allowing you to recover them if needed. However, if you are certain that you no longer need the email, you can proceed to permanently delete it by emptying the “Deleted Items” folder, which will be covered in later steps.
Now that you know how to delete emails individually, let’s move on to the next step: deleting multiple emails at once.
Step 5: Deleting Multiple Emails at Once
If you have a large number of emails to delete in Outlook, selecting and deleting each email individually can be time-consuming. To save time and efficiently remove multiple emails at once, follow these steps:
- Select multiple emails: Use the methods mentioned in Step 3 to select multiple emails that you want to delete. You can individually click on the checkboxes or circles next to each email or use the “select all” option to choose all the emails in the current folder.
- Click on the delete button: Once you have selected the desired emails, locate the delete button in the Outlook interface, usually represented by a trash can icon. Click on this button to initiate the deletion process for the selected emails.
- Confirm the deletion: After clicking the delete button, Outlook will display a confirmation message asking if you want to permanently delete the selected emails. Review the selected emails to ensure they are the ones you want to delete, then click “OK” or “Yes” to confirm the deletion.
By following these steps, you can quickly delete multiple emails at once, saving you valuable time and effort. This method is particularly useful when you want to remove a large number of unnecessary emails or perform regular inbox clean-ups.
It’s important to remember that deleting multiple emails will move them to the “Deleted Items” folder in Outlook. The emails will remain in this folder until you choose to permanently delete them by emptying the “Deleted Items” folder, which will be covered in the next step.
Now that you know how to delete multiple emails at once, let’s move on to the next step: emptying the “Deleted Items” folder.
Step 6: Emptying the Deleted Items Folder
After deleting emails individually or in bulk, they are moved to the “Deleted Items” folder in Outlook. However, to free up space and permanently remove these emails from your account, you need to empty the “Deleted Items” folder. Follow these steps to complete this process:
- Locate the “Deleted Items” folder: On the left-hand side of your Outlook interface, you will find a list of folders. Scroll through the list and locate the folder labeled “Deleted Items.” Click on this folder to view its contents.
- Select the empty folder option: Once you are within the “Deleted Items” folder, look for the toolbar at the top of your Outlook interface. In this toolbar, you should find the option to “Empty Folder” or a trash can icon. Click on this option to initiate the process of permanently deleting the emails from the “Deleted Items” folder.
- Confirm the deletion: Outlook will prompt you with a confirmation message asking if you want to permanently delete all the emails in the “Deleted Items” folder. If you are sure that you no longer need these emails, click “OK” or “Yes” to proceed with the deletion.
By emptying the “Deleted Items” folder, you are permanently removing the deleted emails from your Outlook account. This action cannot be undone, so make sure to review your selection before confirming the deletion.
It’s important to note that emptying the “Deleted Items” folder can help you reclaim storage space in your Outlook account and ensure that deleted emails do not contribute to mailbox clutter.
Now that you have successfully emptied the “Deleted Items” folder, let’s move on to the final step: permanently deleting emails from Outlook.
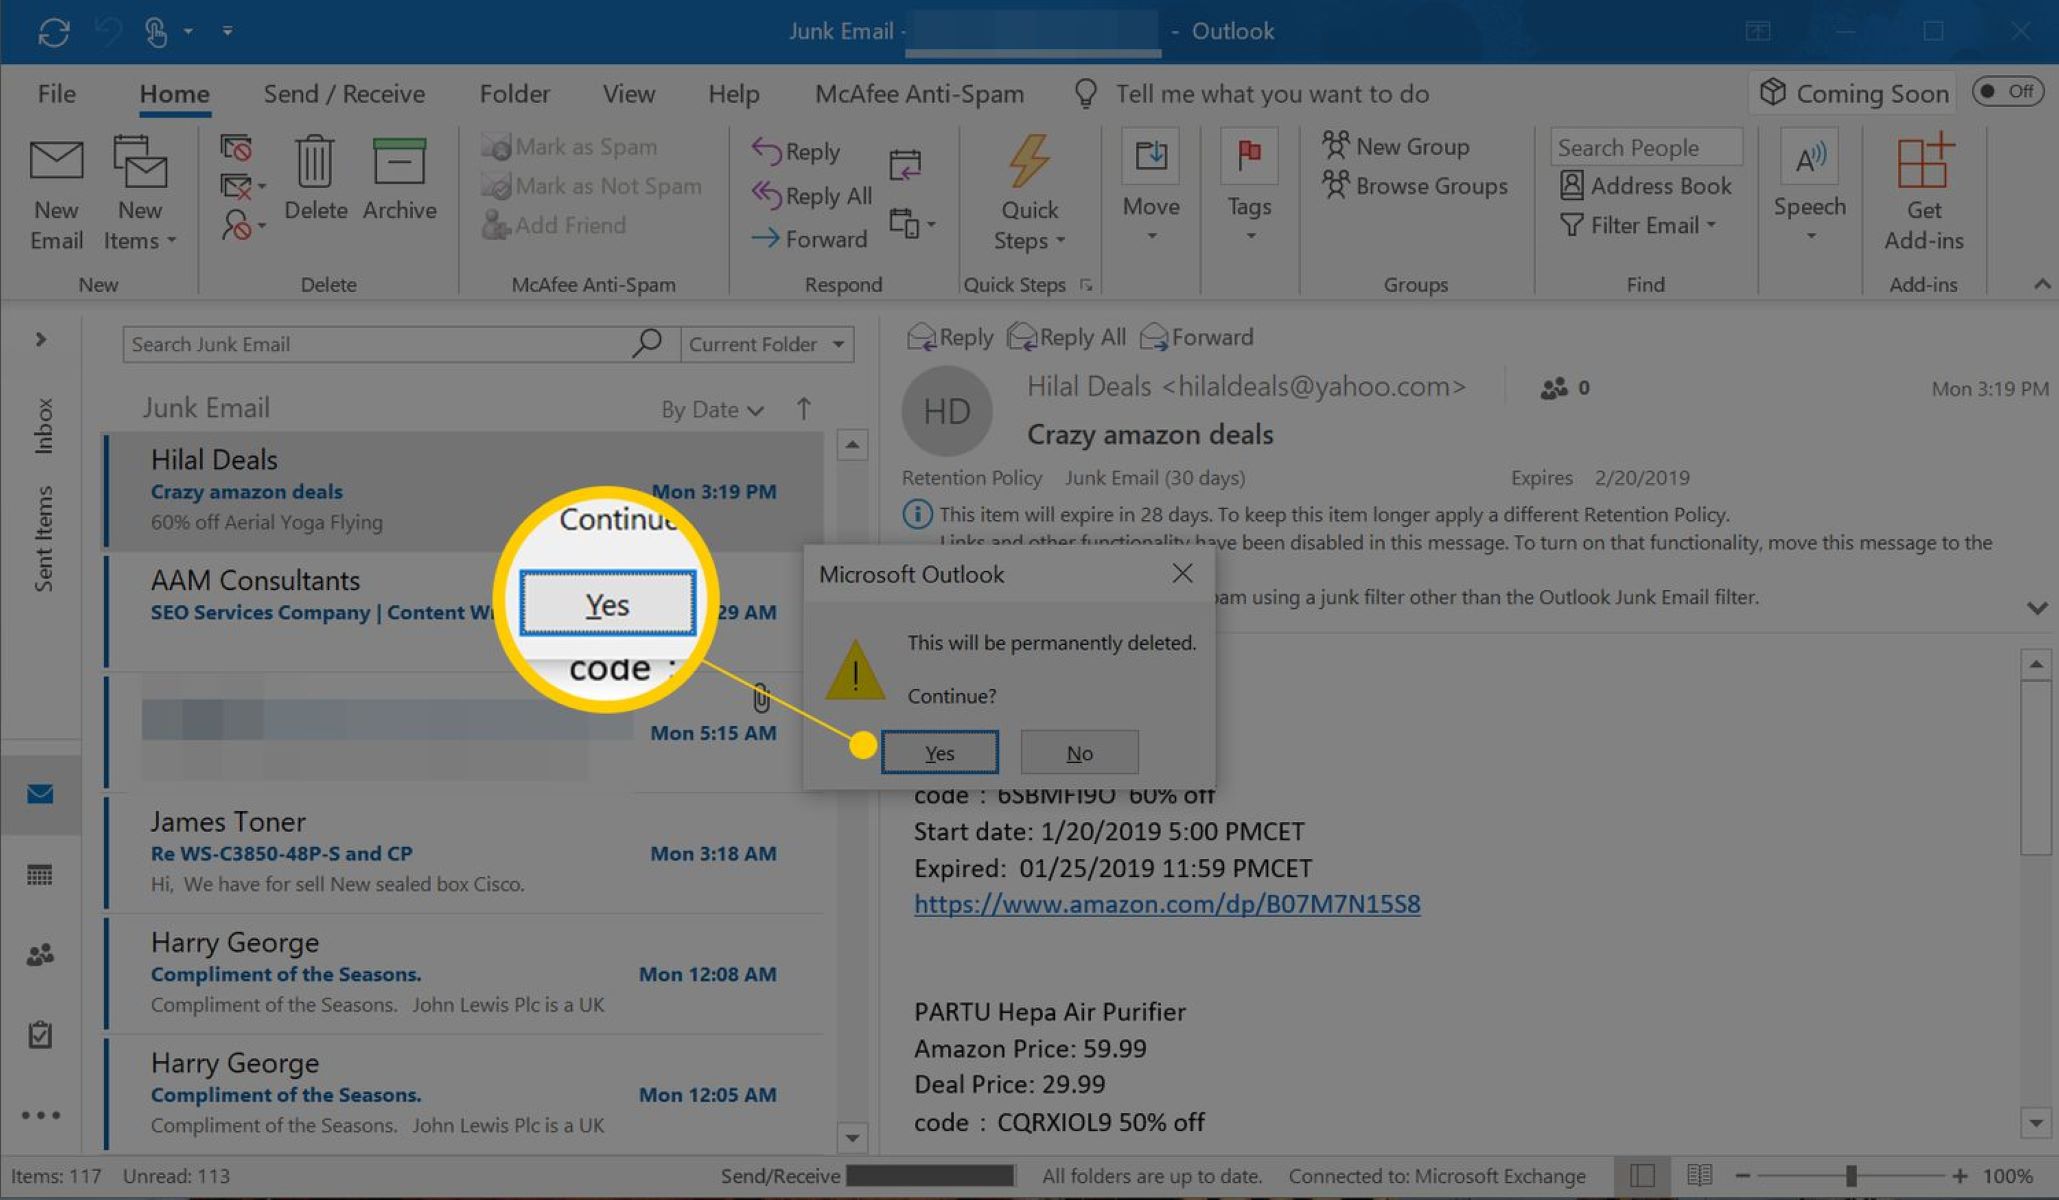
Step 7: Permanently Deleting Emails from Outlook
After following the previous steps to delete and empty the “Deleted Items” folder, you may wonder if there’s a way to permanently delete emails from Outlook. While Outlook does not have a dedicated “permanently delete” option, there is a straightforward method to achieve this. Here’s how:
- Select the email(s) to permanently delete: Start by locating the email or emails you want to permanently delete. You can select individual emails or use the methods mentioned in Step 3 to choose multiple emails at once.
- Hold down the “Shift” key (optional): If you want to select a range of consecutive emails, you can hold down the “Shift” key on your keyboard while clicking on the first and last email in the range. This will select all the emails in between as well.
- Right-click and choose “Delete”: Once you have selected the email(s), right-click on one of the selected emails to open the context menu. From the menu options, choose “Delete” to permanently remove the selected email(s) from your Outlook account.
- Confirm the deletion: Outlook will ask for confirmation before permanently deleting the email(s). Verify that you have selected the correct email(s) and click “OK” or “Yes” to proceed with the permanent deletion.
By following these steps, you can permanently delete emails from your Outlook account. Once deleted in this manner, the emails cannot be recovered.
It’s important to exercise caution when using the permanent deletion option. Make sure you have selected the correct emails to delete and that you no longer need them, as there is no way to retrieve them once permanently deleted.
Congratulations! You’ve successfully learned how to delete emails individually, in bulk, empty the “Deleted Items” folder, and permanently delete emails from Outlook.
By regularly managing and deleting emails, you can keep your Outlook inbox organized, improve your productivity, and maintain a clutter-free email environment.
Thank you for following this step-by-step guide. We hope it has been helpful in assisting you with deleting emails from Outlook!
Conclusion
Managing and deleting emails in Outlook is an essential task to keep your inbox organized and ensure optimal productivity. By following the steps outlined in this guide, you can easily delete emails individually, in bulk, empty the “Deleted Items” folder, and even permanently delete emails from your Outlook account.
Regularly deleting unnecessary emails not only helps to declutter your inbox but also frees up storage space in your Outlook account. This, in turn, ensures that important emails are easier to find and allows for better email management.
Remember to exercise caution when permanently deleting emails as this action cannot be undone. Before confirming the permanent deletion, double-check your selection to ensure that you are removing the correct emails.
By incorporating these practices into your email management routine, you can maintain a clean and organized Outlook inbox, making it easier to stay productive and focused on your important tasks.
So, go ahead and apply these steps to delete unwanted emails from your Outlook account. Enjoy the benefits of a clutter-free inbox and a more streamlined email experience!