Introduction
Eset Cybersecurity is a powerful antivirus software designed to protect your Mac from malware, viruses, and other online threats. However, there may come a time when you need to uninstall or delete Eset Cybersecurity from your Mac. Whether you want to switch to a different antivirus program or you no longer require its services, this guide will walk you through the steps to properly delete Eset Cybersecurity from your Mac.
Uninstalling Eset Cybersecurity involves more than just dragging the application to the Trash. You will also need to remove associated files and folders to ensure a complete removal. It’s important to follow these steps carefully to avoid any potential issues or lingering traces of Eset Cybersecurity on your Mac.
Before proceeding with the uninstallation process, make sure you have an alternative antivirus software installed on your Mac, if desired. This will ensure that your Mac remains protected even after removing Eset Cybersecurity.
This guide will provide step-by-step instructions on how to properly delete Eset Cybersecurity from your Mac. By following these instructions, you will be able to remove all traces of the antivirus software and free up valuable disk space on your Mac.
Step 1: Close Eset Cybersecurity
Before proceeding with the uninstallation process, it is crucial to ensure that Eset Cybersecurity is completely closed. This step is essential to prevent any conflicts or interruptions during the uninstallation process.
Here is how you can close Eset Cybersecurity:
- Click on the Eset Cybersecurity icon in the menu bar at the top-right corner of your Mac’s screen. It is typically represented by a small green or red icon.
- A drop-down menu will appear. Select the “Quit Eset Cybersecurity” option from the menu.
- If prompted, confirm that you want to quit the application.
By completing these steps, you have successfully closed Eset Cybersecurity, allowing you to proceed with the uninstallation process without any conflicts.
It is worth noting that if you are unable to close Eset Cybersecurity using the steps mentioned above, you can force quit the application by following these steps:
- Click on the Apple menu at the top-left corner of your screen.
- Select the “Force Quit” option from the drop-down menu.
- A window will appear displaying the currently running applications on your Mac. Locate Eset Cybersecurity from the list.
- Select Eset Cybersecurity and click on the “Force Quit” button.
Force quitting should only be used as a last resort if you encounter any difficulties closing the application using the regular method.
Now that you have successfully closed Eset Cybersecurity, you can proceed to the next step of the uninstallation process.
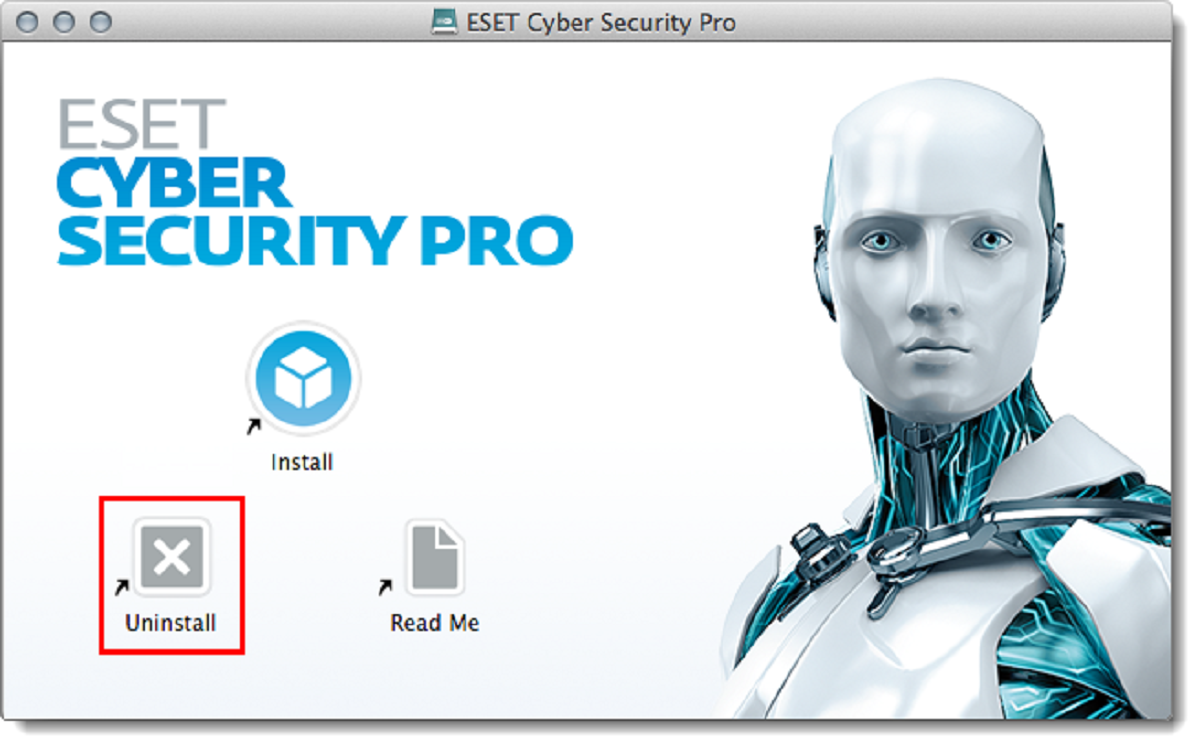
Step 2: Uninstall Eset Cybersecurity
Uninstalling Eset Cybersecurity is a straightforward process that can be done using the built-in uninstaller. Here are the steps to uninstall Eset Cybersecurity from your Mac:
- Navigate to the “Applications” folder on your Mac. You can access the “Applications” folder by clicking on the “Finder” icon in the dock and selecting “Applications” from the side menu.
- Locate the Eset Cybersecurity application in the “Applications” folder.
- Click and hold the Eset Cybersecurity icon, then drag it to the Trash bin in your dock. Alternatively, you can right-click on the Eset Cybersecurity icon and select “Move to Trash.”
- If prompted, enter your administrator password to confirm the uninstallation. This step is necessary as it ensures that only authorized users can uninstall applications from your Mac.
After completing these steps, you have successfully uninstalled Eset Cybersecurity from your Mac. However, there may still be associated files and folders remaining on your system that need to be removed to ensure a complete uninstallation.
Next, we will proceed to the next step to remove any leftover files and folders associated with Eset Cybersecurity.
Step 3: Remove Eset Cybersecurity Files from the Library
Although you have uninstalled Eset Cybersecurity from your Mac, there may still be files and folders associated with the application lingering in your Library. To ensure a complete removal, it is important to remove these leftover files. Follow the steps below:
- Click on the “Finder” icon in the dock to open a Finder window.
- In the menu bar at the top of the screen, click on “Go” and select “Go to Folder” from the drop-down menu.
- A small window will appear. Type in “~/Library” (without the quotes) in the text field and click on the “Go” button.
- You will be taken to the Library folder. Locate and open the “Application Support” folder.
- Look for any folders associated with Eset Cybersecurity, such as “Eset” or “Eset Cybersecurity,” and move them to the Trash.
- Next, go back to the Library folder and open the “Preferences” folder.
- Search for any files with “Eset” or “Eset Cybersecurity” in their names and move them to the Trash.
- Finally, go to the Library folder and open the “Caches” folder.
- Locate and remove any Eset Cybersecurity-related files that you find in the “Caches” folder.
By completing these steps, you have successfully removed the remaining files and folders associated with Eset Cybersecurity from your Mac’s Library. This ensures a more thorough uninstallation.
Now, let’s move on to the final step to fully delete Eset Cybersecurity from your Mac.
Step 4: Delete Eset Cybersecurity from the Trash
After completing the previous steps and removing all associated files and folders from your Mac, the final step is to delete Eset Cybersecurity from the Trash. Here is how to do it:
- Locate the Trash bin on your Mac. It is usually located in the bottom-right corner of the dock.
- Click on the Trash bin icon to open the Trash.
- Within the Trash, you will find the Eset Cybersecurity application and any associated files you have moved earlier.
- Right-click on the Eset Cybersecurity application or any associated files you want to delete, then select “Delete Permanently” from the menu. Alternatively, you can click on the file and then press the “Command + Delete” keys on your keyboard.
- If prompted, confirm the action by clicking on “Delete” or pressing the “Enter” key.
By following these steps, you have successfully deleted Eset Cybersecurity and any associated files from your Mac’s Trash.
It is important to note that once you delete an application from the Trash, it cannot be undone. Therefore, double-check that you have selected the correct files before permanently deleting them.
With this final step, you have completed the process of deleting Eset Cybersecurity from your Mac. Your system is now free from any traces of the antivirus software.
Remember to regularly update and maintain an antivirus program on your Mac to ensure the ongoing protection of your system against potential threats.
Conclusion
Uninstalling and deleting Eset Cybersecurity from your Mac is a straightforward process that involves a few simple steps. By following the steps outlined in this guide, you have successfully removed Eset Cybersecurity and any associated files from your Mac.
It is important to note that uninstalling Eset Cybersecurity ensures the removal of the antivirus software itself, but there may still be residual files and folders in your Mac’s Library. It is crucial to remove these leftover files to ensure a complete uninstallation. Additionally, always remember to empty the Trash bin to permanently delete the application from your system.
Now that you have successfully deleted Eset Cybersecurity, your Mac is ready for a new antivirus solution, or you can choose to rely on the built-in macOS security features. Whichever option you choose, make sure to keep your Mac protected from online threats by regularly updating your new antivirus software and practicing safe browsing habits.
By taking the time to properly uninstall and delete unwanted applications like Eset Cybersecurity, you can optimize your Mac’s performance and free up valuable disk space.
Remember, if you encounter any issues during the uninstallation process or have any questions, it is always recommended to consult Eset Cybersecurity’s official documentation or reach out to their customer support for assistance.
Thank you for following this guide, and we hope it has helped you successfully remove Eset Cybersecurity from your Mac!