Introduction
Welcome to the world of Slack! If you’re looking to improve communication and collaboration within your team, you’ve come to the right place. Slack provides a convenient platform for team members to connect, share ideas, and work together effectively.
One of the key features of Slack is the ability to create channels, which serve as dedicated spaces for focused discussions and specific topics. Whether you want to create a channel for a department, a project, or even just a shared interest, Slack makes it easy to do so.
In this guide, we will walk you through the process of creating a new channel on Slack. We’ll cover everything from accessing the channel settings to customizing channel preferences. By the end of this tutorial, you’ll be well-equipped to create and manage channels on Slack.
Before diving into the steps, make sure you have access to a Slack workspace. If you don’t have one yet, you can sign up for free and create your own workspace or join an existing one.
So, let’s get started and create your first Slack channel!
Step 1: Logging in to Slack
Before you can create a new channel on Slack, you need to log in to your Slack account. Here’s how you can do it:
- Open your preferred web browser and visit Slack’s website at https://slack.com/.
- Click on the “Sign In” button, located at the top-right corner of the page.
- Enter your email address and click on the “Continue” button. If you already have a Slack account, you can simply enter your login credentials.
- Check your email for a login link from Slack. Click on the link to be redirected back to the Slack website.
- Once redirected, you’ll be logged in to your Slack account and taken to the Slack workspace that you’re part of.
If you’re part of multiple Slack workspaces, make sure you select the correct workspace in which you want to create the new channel. You can switch between workspaces by clicking on the workspace name located at the top-left corner of the Slack interface.
Now that you’re logged in to Slack and within the desired workspace, let’s move on to the next step and access the channel settings to create a new channel.
Step 2: Accessing the Channel Settings
Once you’re logged in to Slack and in the desired workspace, it’s time to access the channel settings in order to create a new channel. Here’s how you can do it:
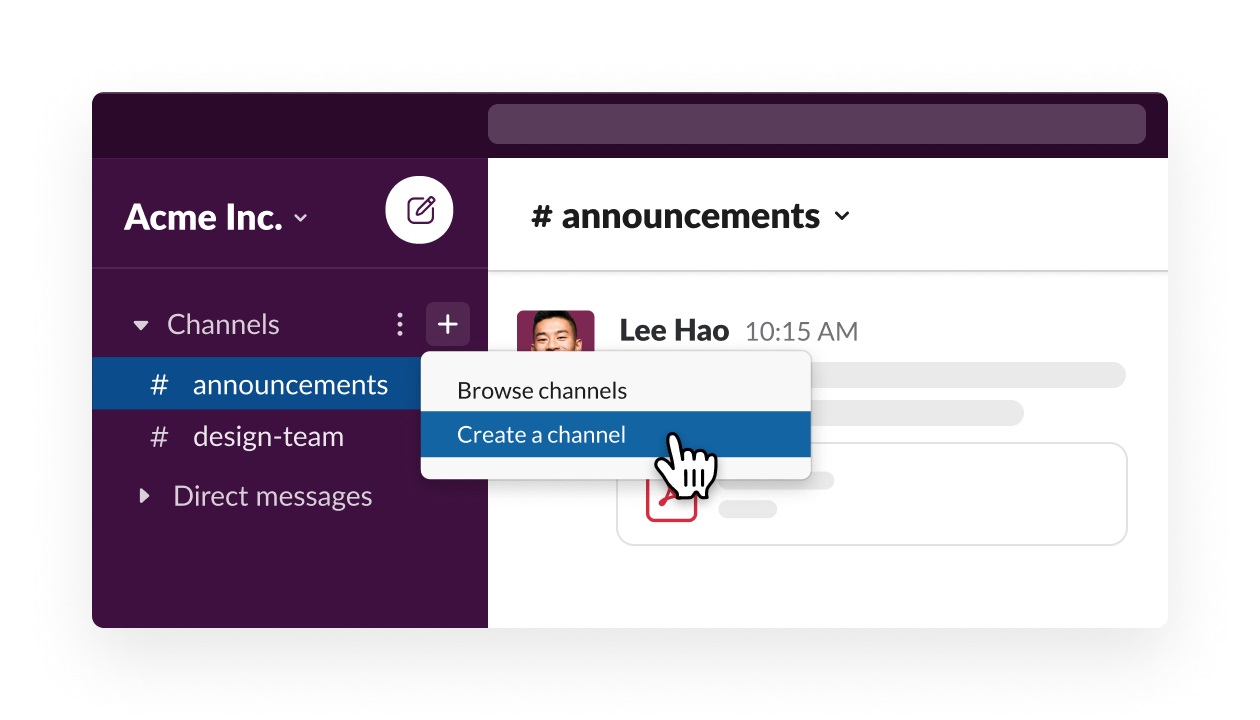
- Look for the sidebar on the left-hand side of the Slack interface. This sidebar contains various sections, including Channels, Direct Messages, and Apps.
- Click on the “Channels” section in the sidebar. This will display a list of all the channels that exist within the workspace.
- At the top of the channels list, you’ll find a button labeled “Create a channel.” Click on it to proceed to the channel creation page.
- If the “Create a channel” button is not visible, look for a plus (+) icon either next to the “Channels” section or at the bottom of the channels list. Click on it to create a new channel.
Once you’ve completed these steps, you’ll be directed to the channel creation page where you can provide all the necessary information to set up your new channel. We’ll walk you through this process in the next steps.
Getting ready to create your channel? Great! Let’s move on to Step 3 and start creating your new channel on Slack.
Step 3: Creating a New Channel
Now that you’ve accessed the channel settings, it’s time to create a new channel on Slack. Follow these steps to get started:
- On the channel creation page, you’ll see a form with several fields to fill out. Start by entering a name for your new channel in the “Channel Name” field. Choose a descriptive and relevant name that clearly reflects the purpose or topic of the channel.
- Next, you have the option to provide a brief description of the channel in the “Channel Purpose” field. This is a great way to give other team members an idea of what the channel is all about.
- If you want to restrict access to the channel and make it private, toggle the “Make private” switch. Private channels can only be viewed and joined by invitation, ensuring that only team members with permission can access the channel and its discussions.
- After filling out the necessary information, click on the “Create Channel” button to finalize the creation of your new channel.
Congratulations! You’ve successfully created a new channel on Slack. The channel will now appear in the sidebar under the Channels section, and you can start using it to communicate and collaborate with your team members.
Remember, you can always create multiple channels on Slack to organize your discussions and keep different topics separate. This helps to streamline communication and fosters effective collaboration among team members.
Ready to take your channel to the next level? Let’s proceed to Step 4 and learn how to set the details for your newly created channel.
Step 4: Setting the Channel Details
Now that you’ve created a new channel on Slack, it’s time to set the details for the channel. Here’s what you need to do:
- Navigate to the newly created channel in the sidebar and click on its name to open the channel.
- Once inside the channel, locate the ellipsis (…) icon next to the channel name. Click on it to open a dropdown menu with various options.
- Select “Edit Channel Details” from the dropdown menu. This will take you to the channel settings page where you can customize the details.
- On the channel settings page, you’ll find several fields to update the channel details. Here are a few key details you can modify:
- Name: If you want to rename the channel, simply edit the name in the “Channel Name” field.
- Purpose: If you want to change or provide a more detailed description of the channel’s purpose, update the text in the “Channel Purpose” field.
- Topic: Setting a topic for your channel helps establish the main focus or ongoing discussion. You can enter a topic in the “Channel Topic” field.
After updating the desired fields, make sure to click on the “Save Changes” button to apply the modifications to the channel’s details.
By customizing the channel details, you provide more context to team members and make it easier for them to understand the purpose and focus of the channel. Clear and concise details help teams stay organized and facilitate effective communication.
Now that you’ve set the channel details, it’s time to invite team members and start collaborating. In the next step, we’ll show you how to add members to your newly created channel.
Step 5: Adding Members to the Channel
Now that you’ve created a channel and set the details, it’s time to add members to the channel so they can participate in the discussions. Here’s how you can do it:
- With the channel open, look for the “Add people to channel” field, usually located below the channel details or in the sidebar.
- Enter the names or email addresses of the team members you want to add to the channel. As you type, Slack will suggest matching users from your workspace.
- Select the desired team members from the suggestions or continue typing their names to refine the search.
- When you’re done adding team members, click on the “Add” or “Done” button to invite them to the channel.
Once you’ve invited team members to the channel, they will receive a notification and an invitation to join. They can then accept the invitation and start participating in the channel’s discussions.
Adding relevant team members to a channel ensures effective collaboration and facilitates easy communication within the context of the specific topic or project. It allows team members to stay informed and contribute to the discussions that are most relevant to them.
Now that you’ve added members to your channel, let’s move on to Step 6 and explore how to configure channel preferences to enhance your team’s Slack experience.
Step 6: Configuring Channel Preferences
Configuring channel preferences can help you personalize the experience and tailor it to your team’s needs. Here’s how you can configure channel preferences on Slack:
- Open the desired channel and look for the settings icon (usually represented by a gear or a cog) next to the channel name.
- Click on the settings icon to open the channel preferences.
- Within the preferences menu, you’ll find various options to customize your channel experience.
- Some common preferences include:
- Language: You can set the default language for the channel’s notifications and messages.
- Notifications: Customize how and when you receive notifications for messages in the channel, such as sound, desktop, or mobile notifications.
- Important Events: Choose what events you want to receive notifications for, such as mentions, edits, or pins.
- Do Not Disturb: Configure channel-specific “Do Not Disturb” settings to mute notifications during specific times or when you want uninterrupted focus.
Take some time to explore the different preferences and adjust them according to your preferences and working style. Customizing channel preferences allows you to fine-tune your Slack experience and ensure that you receive the right notifications at the right time.
Remember, these preferences are specific to each channel, so you can configure them differently for different channels based on their importance and relevance to your work.
With channel preferences configured, you can now focus on the discussions and effortlessly collaborate with your team members. In the next step, we’ll delve into channel notifications and explore how to customize them to suit your needs.
Step 7: Customizing Channel Notifications
Customizing channel notifications allows you to stay informed without being overwhelmed by constant interruptions. Here’s how you can customize channel notifications on Slack:
- Open the channel for which you want to customize notifications.
- Locate the bell icon next to the channel name and click on it.
- An options menu will appear, providing different notification settings to choose from.
- Select the desired notification settings based on your preferences and needs.
Slack offers several notification options, including:
- All messages: Receive notifications for all messages posted in the channel, ensuring you stay up to date with every conversation.
- Only @mentions: Get notified only when someone mentions you in the channel, minimizing distractions from other conversations.
- Nothing: Disable all notifications for the channel, allowing you to check it at your convenience without receiving any alerts.
You also have the option to configure notifications in more detail by clicking on “Preferences” within the notification menu. This allows you to set specific preferences for various notification channels, such as desktop, mobile, or email notifications.
Customizing channel notifications helps you manage your time effectively and stay focused on the conversations that are most relevant to you. By choosing the right level of notifications, you can strike a balance between staying informed and avoiding overwhelming distractions.
Now that you’ve customized the channel notifications, let’s move on to Step 8 and explore how to set channel privacy settings.
Step 8: Setting Channel Privacy Settings
Setting channel privacy helps ensure that only authorized team members can access and participate in specific discussions. Here’s how you can set channel privacy settings on Slack:
- Open the channel for which you want to adjust privacy settings.
- Click on the settings icon (usually represented by a gear or a cog) next to the channel name.
- In the channel settings menu, locate the “Privacy” section or a similar option.
- Choose the desired privacy setting for the channel.
Slack offers two main options for channel privacy:
- Public: Public channels are open to all members of the workspace. They can be discovered and joined by anyone, allowing for open collaboration and knowledge sharing.
- Private: Private channels, on the other hand, provide a more restricted access. Only invited team members can join private channels, ensuring that discussions and information are kept within a select group.
When setting channel privacy, consider the sensitivity of the information being shared. For confidential or sensitive discussions, it’s best to choose private settings. Public channels are ideal for open conversations, project updates, and broader team involvement.
By setting appropriate privacy settings, you can ensure that only the right team members have access to specific channel discussions, maintaining confidentiality and encouraging focused collaboration.
With channel privacy settings established, you can move forward and enhance the channel’s purpose and organization by adding purpose and topic information. We’ll cover this in Step 9.
Step 9: Adding Channel Purpose and Topic
Adding a purpose and topic to your Slack channels helps provide context and clarity for team members. Here’s how you can add a purpose and topic to your channel:
- Open the channel for which you want to add a purpose and topic.
- Click on the settings icon (usually represented by a gear or a cog) next to the channel name.
- In the channel settings menu, look for the “Purpose” or “Topic” section.
- Enter a clear and concise purpose for the channel in the “Purpose” field. This helps team members understand the primary objective or intended use of the channel.
- If desired, provide additional information or context related to the channel’s ongoing discussions in the “Topic” field.
By adding a purpose and topic to your channel, you can ensure that team members understand the channel’s focus and goals. It helps set expectations, encourages relevant discussions, and improves overall communication within the channel.
When describing the purpose and topic, try to be concise but provide enough information to give a clear understanding of what the channel is about. This will make it easier for team members to engage and contribute effectively.
Remember, you can update the channel’s purpose and topic anytime to reflect the evolving nature of the discussions or to provide additional information as needed.
With the purpose and topic added, your channel is now ready for active collaboration and communication. Enjoy the benefits of organized discussions and improved teamwork on Slack!
Conclusion
Congratulations on successfully creating and configuring a new channel on Slack! You have learned how to log in to Slack, access the channel settings, and create a new channel with specific details. Additionally, you have discovered how to add members to the channel, configure channel preferences and notifications, set privacy settings, and add purpose and topic information to enhance communication and collaboration within the team.
Creating channels on Slack allows you to organize discussions, facilitate focused conversations, and foster effective teamwork. Whether you’re creating channels for projects, departments, or special interests, Slack provides a platform that promotes seamless communication and knowledge sharing.
Remember to utilize the customization options available to tailor your Slack experience based on your team’s preferences and requirements. This includes adjusting notification settings, setting privacy levels, and providing clear purpose and topic information for each channel.
As you continue to explore Slack and utilize its various features, make sure to take advantage of other functionalities like file sharing, integrations with external tools, and the ability to search for specific messages or conversations. These features can further enhance collaboration and productivity within your team.
Now that you have the knowledge to create, manage, and optimize Slack channels, it’s time to put it into practice. Start creating channels for your team and see the improvement in communication and collaboration firsthand. Happy Slacking!