Introduction
Welcome to the world of holograms! Have you ever wondered what it would be like to bring virtual objects to life? With a hologram projector, you can do just that. Creating your own hologram projector can be a fascinating and rewarding project that will not only amaze your friends and family but also provide you with a glimpse into the cutting-edge technology of holography.
A hologram is a three-dimensional image produced by the interference of light beams. It creates the illusion of depth and can be viewed from different angles, making it appear as if the virtual objects are floating in mid-air. While professional hologram projectors can be quite expensive, you can create a simple yet effective version using materials that are readily available.
In this step-by-step guide, we will walk you through the process of creating your own hologram projector. You will learn how to prepare the hologram template, construct the hologram pyramid, position the projector in the right spot, and even enhance the viewing experience for optimal results. By the end of this tutorial, you will have a fully functional hologram projector that will bring a touch of futuristic magic into your own home.
Before we dive into the details, let’s take a quick look at the materials you will need for this project.
Materials Needed
Before you embark on this hologram projector journey, it’s important to gather all the necessary materials. Don’t worry, most of them can be found around the house or easily purchased at a local store. Here’s what you need:
- A transparent plastic material: This could be a CD case, a plastic sheet, or even a transparent plastic container. Make sure it’s flat and clear to achieve the best hologram projection.
- A sharp utility knife or scissors: You’ll need these to cut the plastic material according to the template.
- Graph paper: You’ll use this to create the hologram template, so ensure you have enough sheets.
- A marker or pen: This will be used to draw the template on the graph paper.
- A ruler: This will help you create accurate lines and measurements on the graph paper.
- Transparent tape: You’ll use this to hold the plastic material together and create the pyramid shape.
- A smartphone or tablet: This will act as the projector to display the hologram.
- A hologram video or app: You can find a wide range of hologram videos or apps online that are specifically designed for hologram projectors.
- A dark room: For the best hologram viewing experience, it’s recommended to set up the projector in a dark room or dimly lit area.
Once you have gathered all the necessary materials, you’re ready to move on to the next step: preparing the hologram template. Let’s dive in!
Step 1: Gather the Materials
The first step in creating your hologram projector is to gather all the necessary materials. Make sure you have everything mentioned in the previous section. Once you have everything ready, you can proceed to the next steps with ease.
Start by finding a transparent plastic material that will serve as the base for your hologram projector. This can be a CD case, a plastic sheet, or even a transparent plastic container. Ensure that the plastic is flat and clear to achieve the best hologram projection.
Next, grab a sharp utility knife or a pair of scissors. You will need these tools to cut the plastic material according to the template. Make sure they are clean and sharp to ensure precise and clean cuts.
Fetch some graph paper, as you will be using it to create the hologram template. The graph paper will serve as a guide for drawing the necessary lines and shapes for the hologram projector. Make sure you have enough sheets to accommodate all the measurements and drawings.
Find a marker or pen to draw the hologram template on the graph paper. While a marker is recommended for clearer lines, you can use a pen as well. Just make sure the markings are visible and easy to follow when cutting the plastic material.
Don’t forget to grab a ruler. This will help you create precise lines and measurements on the graph paper. Accuracy is key when creating the hologram template to ensure the hologram projection is clear and well-defined.
Lastly, make sure you have transparent tape on hand. You will use this to hold the plastic material together and create the pyramid shape. Transparent tape is essential for maintaining the transparency of the plastic and allowing the hologram to project without obstruction.
With all the materials ready, you are now prepared to move on to the next step: preparing the hologram template. Let’s continue our hologram projector journey!
Step 2: Prepare the Hologram Template
Now that you have gathered all the necessary materials, it’s time to dive into the exciting process of preparing the hologram template. The hologram template will serve as the guide for creating the pyramid shape that will project the hologram.
Begin by placing a sheet of graph paper on a flat surface. Take your ruler and marker or pen and carefully draw a square on the graph paper. The size of the square will depend on the size of your transparent plastic material. Ideally, the dimensions of the square should be equal to the width and height of the plastic material.
Once you have drawn the square, divide it into four smaller squares by drawing two diagonal lines from corner to corner. These lines will serve as reference points for creating the pyramid shape.
Now, draw a small circle in the center of the square. This will act as the starting point for connecting the lines and creating the pyramid template. Make sure the circle is clear and centered to ensure accurate measurements.
Starting from the circle, draw four lines connecting it to the corners of the square. These lines will form the base of the pyramid shape. Ensure that the lines are straight and evenly spaced.
Next, draw four more lines from the corners of the square to the top center of the square. These lines will converge at the top and complete the pyramid shape. Again, make sure the lines are straight and evenly spaced.
With all the lines drawn, take your ruler and marker or pen and darken the lines that will be used as the cutting guide for the plastic material. This will make it easier to see the lines when cutting.
Once you have completed the template, carefully cut it out using a sharp utility knife or scissors. Be precise when cutting along the lines to ensure accurate and clean shapes.
Now that your hologram template is ready, you are one step closer to creating your very own hologram projector. In the next step, we will delve into constructing the hologram pyramid. Stay tuned!
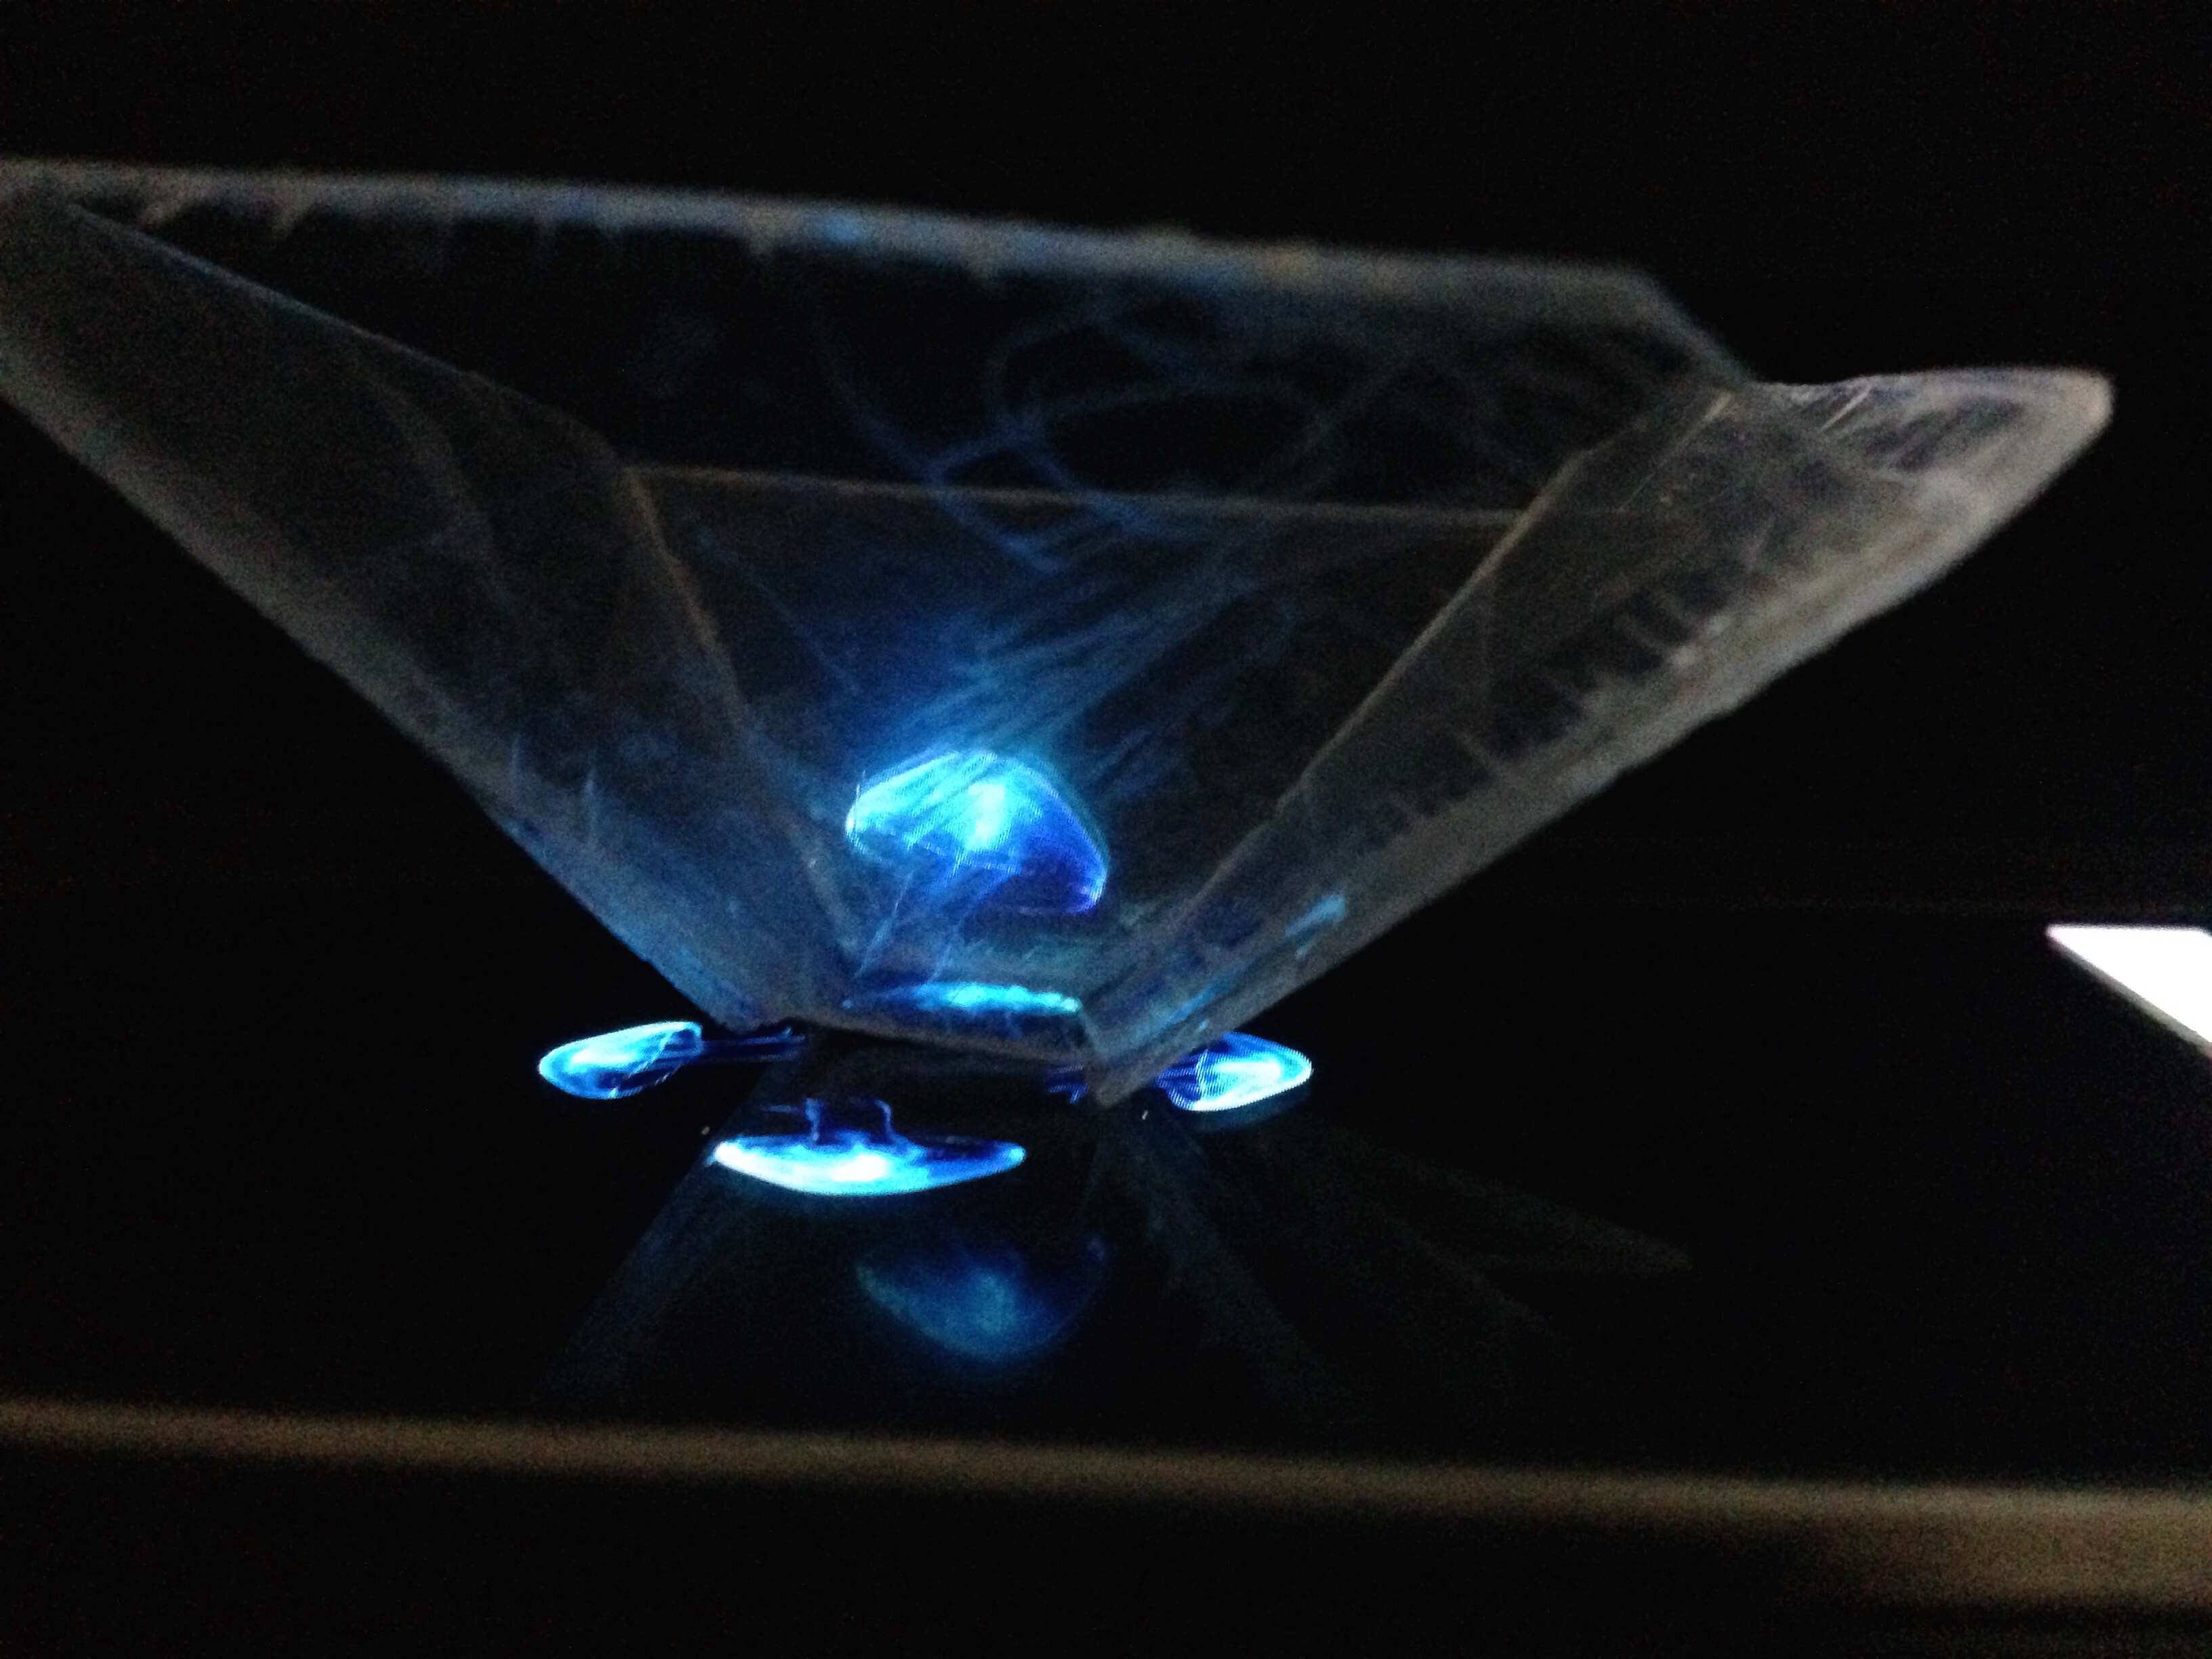
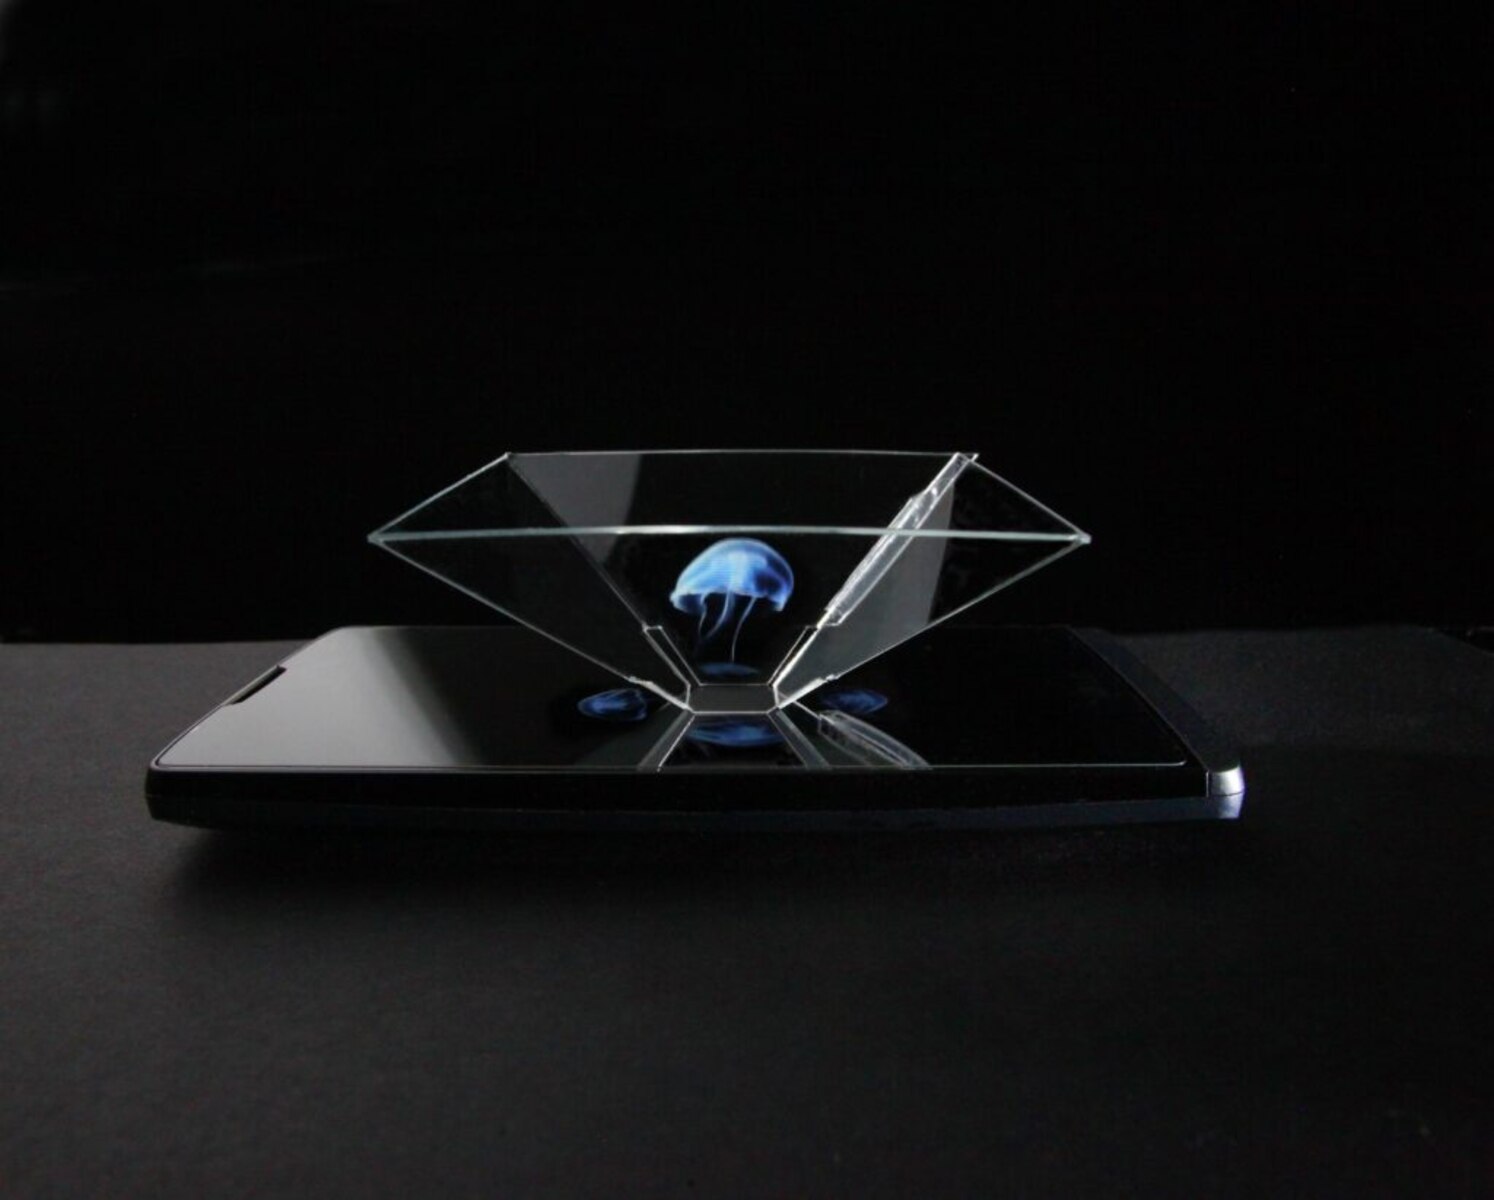
Step 3: Construct the Hologram Pyramid
With the hologram template prepared, it’s time to move on to constructing the hologram pyramid. The pyramid shape will act as the housing for the hologram and allow for proper projection.
Take your transparent plastic material and place it flat on a clean surface. Ensure that the material is clear and free from any scratches or smudges that could obstruct the hologram projection.
Using your template as a guide, carefully trace the pyramid shape onto the plastic material. Make sure to align the template accurately and trace the lines as accurately as possible.
Once the pyramid shape is traced onto the plastic, it’s time to cut it out. Use a sharp utility knife or scissors to carefully cut along the lines. Take your time and make precise cuts to achieve a clean and well-defined pyramid shape.
After cutting out the pyramid shape, carefully fold along the lines to create the sides of the pyramid. Use a ruler to ensure that the folds are crisp and straight. This will give your hologram projector a sturdy and stable structure.
To secure the folded sides of the pyramid, use transparent tape to hold them together. Apply the tape along the edges of the plastic, making sure to line up the edges carefully. This will help keep the pyramid shape intact and maintain its transparency.
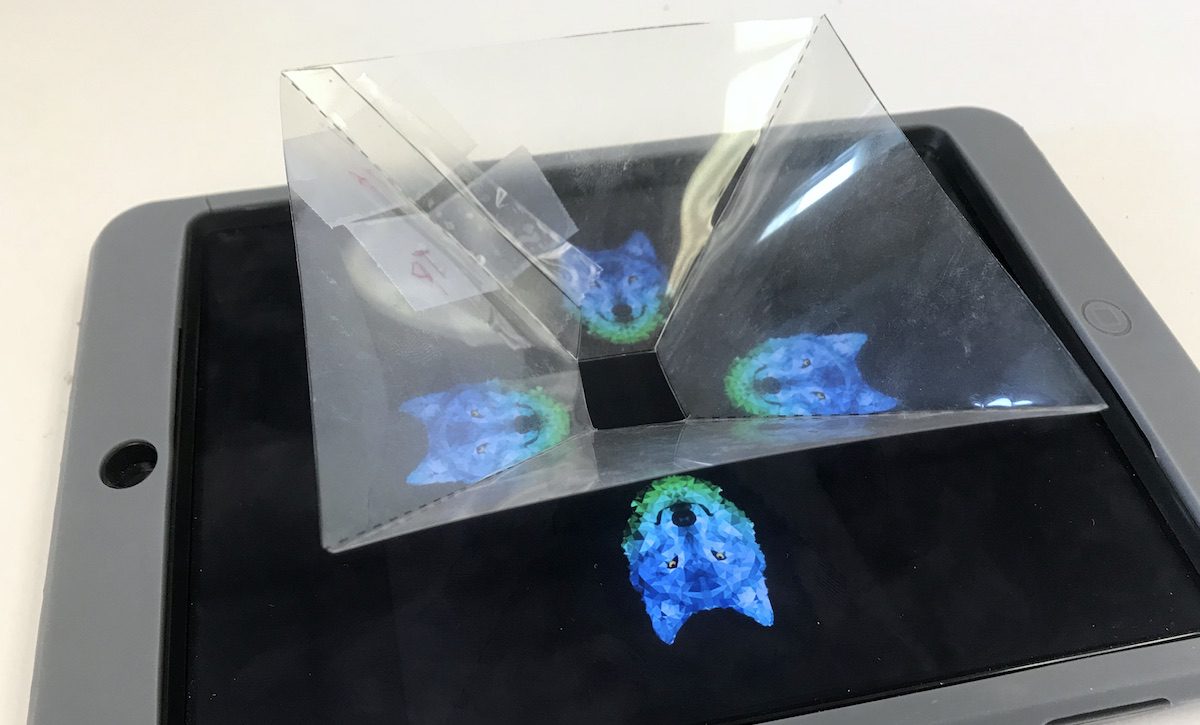
Once the sides are taped together, your hologram pyramid should be complete. You can now place it on a flat surface, ensuring that it stands upright and stable.
It’s important to note that the size of the pyramid will affect the quality of the hologram projection. A larger pyramid will provide a more immersive experience, while a smaller one may result in a smaller and less detailed hologram. Experiment with different sizes to find the right balance for your projector.
With the hologram pyramid constructed, you are now ready to move on to the next step: positioning the hologram projector for optimal viewing. Keep reading to discover the secrets of perfect hologram projection!
Step 4: Position the Hologram Projector
Now that you have constructed the hologram pyramid, it’s time to position the hologram projector for optimal viewing. The placement of the projector is crucial to ensure a clear and captivating hologram projection.
Begin by finding a dark room or a dimly lit area. This will create the ideal atmosphere for the hologram to shine and be easily visible. Ensure that there are no harsh lights or reflections that could interfere with the projection.
Place your smartphone or tablet at the base of the hologram pyramid, inside the pyramid structure. The screen of your device should face upwards, towards the apex of the pyramid. Make sure the screen is clean and free from any smudges or scratches that could affect the clarity of the hologram.
Open a hologram video or app on your device that is specifically designed for hologram projectors. These videos or apps will generate the necessary visuals to create a hologram. You can find a wide variety of free hologram videos or apps online for different effects and themes.
Once you have the hologram video or app ready, dim the lights or turn off any unnecessary sources of light in the room. This will enhance the visibility of the hologram and create a more immersive experience.
Place the hologram projector in the center of the darkened room. Ensure that there is enough distance between the projector and the walls or objects around it to allow for a wide and unobstructed viewing angle.
Activate the hologram video or app on your device and adjust the brightness and volume settings to your preference. You can also experiment with different angles and positions of the hologram projector to achieve the best visual effects.
Now, step back and witness the magic unfold as the hologram is projected from the pyramid structure. Enjoy the mesmerizing three-dimensional images that seem to come to life right in front of your eyes.
Remember to take breaks and not to overuse the hologram projector to avoid straining your eyes. It’s important to immerse yourself in the holographic experience responsibly and with moderation.
Congratulations! You have successfully positioned your hologram projector and are ready to experience captivating holographic projections. In the next step, we will explore ways to further enhance your hologram viewing experience. Keep reading to uncover the secrets!
Step 5: Test Your Hologram Projector
Now that you have positioned your hologram projector, it’s time to test it and ensure that everything is set up correctly. Testing your hologram projector will allow you to make any necessary adjustments and ensure optimal performance.
Start by playing the hologram video or app on your smartphone or tablet. Make sure that the video or app is specifically designed for hologram projectors, as this will provide the best visual effects.
Observe the hologram projection from different angles and distances. Move around the projector to see how the hologram changes and adapts as you view it from various perspectives. This will give you a better understanding of the hologram’s depth and visual appeal.
Take note of any issues or imperfections in the projection. Look for areas where the hologram appears distorted or blurry. This could indicate that the plastic material or the pyramid structure needs adjustment.
If you notice any distortions or blurriness, try repositioning the plastic material and adjusting the folds of the pyramid. Make sure that the plastic is clean and free from any smudges that could affect the clarity of the hologram.
Experiment with different hologram videos or apps to explore a wide range of visual effects and themes. This will allow you to fully experience the capabilities of your hologram projector and find the content that suits your preferences.
Adjust the brightness and volume settings on your device to achieve the desired visual and audio experience. This will help enhance the overall hologram viewing experience and make it even more captivating.
Don’t forget to share the excitement with your friends and family! Invite them to witness the wonders of holographic projections and share in the awe-inspiring experience.
Remember to give yourself breaks and not to overuse the hologram projector. Allow your eyes to rest periodically to avoid strain and fatigue. Hologram viewing should be a fun and enjoyable experience, so make sure to use it responsibly.
By testing your hologram projector and making any necessary adjustments, you can ensure that you are getting the most out of your creation. Enjoy the magical world of holography and surprise yourself with the endless possibilities that lie ahead.
Step 6: Enhance Your Hologram Viewing Experience
Now that you’ve successfully tested your hologram projector, it’s time to take your holographic experience to the next level by enhancing the overall viewing experience. Here are some tips and tricks to make your hologram projections even more immersive and captivating.
1. Experiment with Different Backgrounds: Change the background behind your hologram projector to enhance the illusion of the hologram floating in mid-air. Try placing a black cloth or dark-colored surface behind the projector to minimize distractions and draw more focus to the hologram.
2. Play with Lighting: Experiment with different lighting techniques to create a more dramatic effect. Use colored LED lights placed strategically around the hologram projector to add ambiance and enhance the colors of the hologram. Remember to keep the lighting subtle to avoid overpowering the hologram’s visibility.
3. Create Custom Hologram Videos: Take your hologram experience to the next level by creating your own custom hologram videos. Use a video editing software to craft unique holographic content that is personalized to your liking. You can showcase family photos, animations, or even short films to surprise and delight your viewers.
4. Expand Your Hologram Collection: Explore and expand your collection of hologram videos or apps. Look for different genres, themes, and effects to keep the hologram viewing experience fresh and exciting. Engage with online communities to discover new and innovative holographic content created by fellow enthusiasts.
5. Optimize the Projector Alignment: Pay attention to the alignment of your hologram projector. Make sure it is centered and perpendicular to the ground for the best viewing experience. Adjust the angle and position of the projector if needed to ensure a clear and well-defined hologram projection.
6. Share the Hologram Experience: Invite friends, family, or even colleagues to share in the hologram experience. Organize hologram viewing parties where everyone can marvel at the captivating visuals together. Encourage discussions and interactions around the holograms to make the experience even more memorable and enjoyable.
7. Document and Share your Holograms: Capture photos or videos of your holograms to preserve the memories and share them with others. Documenting your hologram creations allows you to revisit them later and showcase your creativity and technical skills.
Remember, the possibilities for enhancing your hologram viewing experience are endless. Don’t be afraid to experiment, explore, and let your imagination run wild. With each enhancement, you’ll discover a new level of wonder and fascination with holographic technology.
Congratulations on reaching the final step of your hologram projector journey! By following these steps and implementing the suggested enhancements, you are now equipped to fully immerse yourself and others in the captivating world of holograms. Enjoy the magic and endless possibilities that come with creating your very own hologram projector.
Conclusion
Congratulations! You have reached the end of this guide on how to create a hologram projector. By following the step-by-step instructions, you have learned how to gather the necessary materials, prepare the hologram template, construct the hologram pyramid, position the hologram projector, test the projection, and enhance your hologram viewing experience. You are now ready to immerse yourself in the captivating world of holography.
Crafting your own hologram projector is an exciting and rewarding endeavor that allows you to explore the limitless possibilities of holographic technology. From bringing virtual objects to life to experiencing three-dimensional visuals right in your own home, the possibilities for creativity and innovation are endless.
Remember, as you embark on your hologram projector journey, don’t hesitate to experiment and make adjustments along the way. Tweak the materials, try different hologram videos or apps, and explore various lighting and background settings to create your unique holographic experiences.
Share your hologram projector with others and let them marvel at the captivating visuals you have brought to life. Host hologram viewing parties, engage in conversations, and inspire others to delve into the enchanting world of holography.
As technology continues to advance, holography is becoming more accessible and pervasive. By learning how to create a hologram projector, you are staying ahead of the curve and gaining valuable knowledge in this rapidly evolving field.
Remember, creating a hologram projector is just the beginning. Stay curious, continue exploring holographic technology, and unleash your creativity by venturing into new hologram projects and experiments.
Thank you for joining us on this hologram projector journey! We hope that this guide has inspired you to delve into the fascinating world of holography. Enjoy the magic of bringing virtual objects to life and creating awe-inspiring holographic experiences!