TECHNOLOGYtech

How To Create A Calculator Using PHP

how-to-create-a-calculator-using-php

Introduction

Creating a calculator using PHP is a great way to enhance your web development skills and add interactive features to your website. Calculators are commonly used on various types of websites, such as e-commerce platforms, financial institutions, and educational resources. By building your own calculator, you have complete control over its layout and functionality, allowing you to tailor it to your specific needs and style.

In this tutorial, we will guide you through the process of creating a simple calculator using PHP. PHP is a powerful and versatile programming language that is widely used for web development. With PHP, you can perform calculations, handle user inputs, and display the results seamlessly.

Before we begin, it’s important to have a basic understanding of HTML, CSS, and PHP. Familiarity with these technologies will make it easier for you to follow along and implement the necessary code. Don’t worry if you’re new to PHP; we will explain the concepts step by step, making it accessible for beginners as well.

By the end of this tutorial, you will have a fully functioning calculator that can perform basic arithmetic operations such as addition, subtraction, multiplication, and division. You will also be able to expand on this foundation to include more complex operations if desired.

So, let’s get started and dive into the process of creating your own calculator using PHP. Put on your coding hat and get ready to embark on this exciting journey!


Setting up the environment

Before we jump into creating the calculator, we need to ensure that our development environment is properly set up. To build the calculator using PHP, you will need a local server with PHP installed or an online server with PHP support. Here are the steps to set up your environment:

  1. Install a local server: If you prefer working on your local machine, you can install a local server like XAMPP or WAMP. These servers provide an all-in-one package that includes PHP, Apache, and MySQL. Simply download the installation package for your operating system and follow the instructions to install the server.
  2. Configure the server: Once you have installed the server, you may need to configure it to enable PHP. This typically involves editing the server’s configuration files to activate the PHP module. Detailed instructions can be found in the documentation provided by the server you are using.
  3. Use an online server: Alternatively, you can use an online server that supports PHP. There are many hosting providers available that offer PHP support. Simply sign up for an account and follow their instructions to upload your files to the server.
  4. Test the server: After setting up your server, it’s important to test that PHP is running correctly. Create a simple PHP file, such as “test.php”, and write the following code inside it:
    <?php echo "Hello, world!"; ?>
    Save the file and place it in the server’s root directory (e.g., htdocs for XAMPP). Open your web browser and navigate to “localhost/test.php” (replace “test.php” with the actual filename if necessary). If everything is set up correctly, you should see the message “Hello, world!” displayed on the page.

Once your environment is set up and working correctly, you are ready to move on to the next step: creating the HTML structure for your calculator.


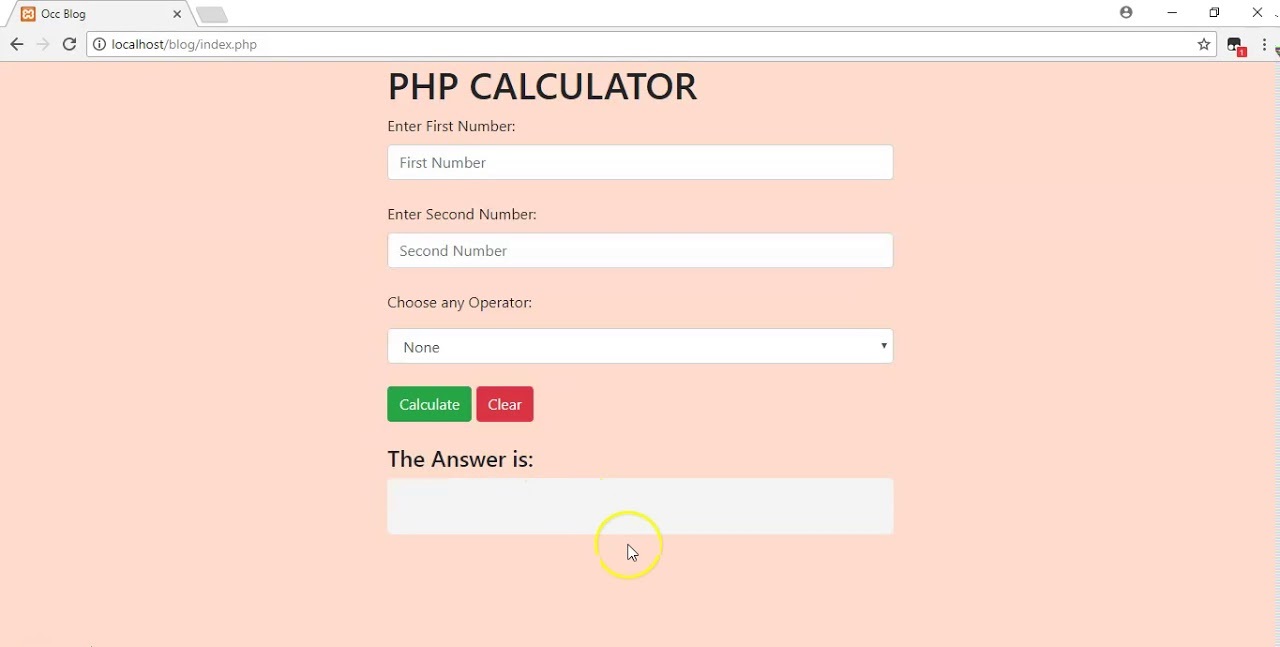
Creating the HTML structure

In order to build a calculator, we need to start by creating the HTML structure that will hold the calculator’s interface and user input elements. This structure will provide the foundation for the calculator’s functionality.

We will use a simple HTML form element to create the calculator layout. Inside the form, we will include the necessary input fields, buttons, and display area. Here is an example of the HTML structure for our calculator:


html


Result:

Let’s break down the HTML structure:

– We start with a `

` element and set the action attribute to an empty string. This means that when the form is submitted, it will be handled by the same file.
– Inside the form, we have three main input elements:
– Two `` elements with respective names “num1” and “num2”. These will allow the user to enter the numbers for the calculation.
– A `


Result:

In the PHP code block above, we first check if the “calculate” button is clicked and if the input fields for both numbers are set. If both conditions are met, we store the values of the numbers and the selected operator in variables.

Next, we use a switch statement to perform the appropriate calculation based on the selected operator. We have cases for addition, subtraction, multiplication, and division. If the selected operator is division, we also check if the second number is zero to avoid division by zero errors.

Finally, we display the result of the calculation using the `echo` statement within the `

` element with the class “result”.

With this code in place, the calculator will now perform the selected arithmetic operation and display the result on the webpage. Try entering different numbers and operators to see the calculator in action.

In the next section, we will explore how to add more complex operations to our calculator.


Adding more complex operations

Now that we have implemented the basic calculator functions for addition, subtraction, multiplication, and division, let’s explore how we can add more complex operations to our calculator using PHP.

One common complex operation is calculating the exponentiation of a number. This involves raising a number to a power. To add this functionality to our calculator, we can modify the HTML structure and extend the PHP code.

First, let’s update the HTML structure by adding a new option for exponentiation in the select element:

html

Next, let’s modify the PHP code to include the logic for exponentiation:

php
if (isset($_POST[‘calculate’]) && isset($_POST[‘num1’]) && isset($_POST[‘num2’])) {
$num1 = $_POST[‘num1’];
$num2 = $_POST[‘num2’];
$operator = $_POST[‘operator’];

// Perform calculation based on the selected operator
switch ($operator) {
case ‘+’:
$result = $num1 + $num2;
break;
case ‘-‘:
$result = $num1 – $num2;
break;
case ‘*’:
$result = $num1 * $num2;
break;
case ‘/’:
if ($num2 != 0) {
$result = $num1 / $num2;
} else {
$result = “Cannot divide by zero”;
}
break;
case ‘**’:
$result = $num1 ** $num2;
break;
default:
$result = “Invalid operator”;
}

// Display the result
echo $result;
}

In the updated PHP code, we have added a case for the (double asterisk) operator, which represents exponentiation. If this operator is selected, we calculate the exponentiation using the `` operator in PHP.

Now, our calculator can perform basic arithmetic operations as well as exponentiation. Feel free to explore other complex operations and enhance your calculator’s functionality by adding additional cases in the switch statement.

Remember to test your calculator with different inputs to ensure accurate results.

In the next section, we will dive into the process of evaluating the user’s input to handle various scenarios and improve the user experience.


Evaluating the input

As we continue to enhance the functionality of our calculator, it is important to evaluate the user’s input to handle various scenarios and improve the overall user experience. This includes checking for valid input, handling errors, and providing appropriate feedback to the user.

One aspect of input evaluation is ensuring that the user enters valid numbers for the calculations. We can add HTML input validation using the `pattern` attribute to enforce numeric input. For example, we can modify the number input fields as follows:

html

With this pattern attribute, the input fields will only accept numeric values. If the user enters non-numeric characters, they will receive a validation error.

Additionally, we can handle other errors such as division by zero by checking for specific conditions in our PHP code. In the case of division, we can add an if statement to display an error message when the second number is zero:

php
if ($operator === ‘/’ && $num2 == 0) {
$result = “Cannot divide by zero”;
} else {
// Perform calculation here
}

By implementing input evaluation, we can improve the user experience by providing clear feedback and preventing calculations with invalid input.

Another consideration is displaying the result in a user-friendly format. For example, we can limit the decimal places for the result using the `number_format()` function:

php
echo number_format($result, 2);

This will round the result to 2 decimal places, making it easier for the user to read.

Furthermore, we can enhance the user experience by adding error handling for scenarios such as invalid operators or missing input fields. For example, we can add an “Invalid operator” message for cases where the user selects an unsupported operator:

php
default:
$result = “Invalid operator”;

By evaluating the user’s input and handling errors, we can create a more robust and user-friendly calculator.

In the next section, we will wrap up the tutorial with some final thoughts and suggestions for further improvements to our calculator implementation.


Handling errors

When building a calculator, it’s important to consider error handling to ensure that the user receives appropriate feedback and the application remains robust. Here are some key error scenarios to consider and handle in our calculator implementation.

One common error scenario is division by zero. In our PHP code, we already check for this condition and display the error message “Cannot divide by zero”. However, we can enhance this further by disabling the calculate button when the second number is zero. This will prevent users from attempting to perform division with a zero denominator. We can achieve this using JavaScript:

html

With this JavaScript code, the calculate button will be disabled if the second number input is zero, preventing the user from submitting the form for calculations involving division by zero.

Another error scenario to handle is invalid input values. We can use PHP’s `is_numeric()` function to check if the input values are valid numbers before performing calculations. If the input values are not numeric, we can display an error message:

php
if (!is_numeric($num1) || !is_numeric($num2)) {
$result = “Please enter valid numbers”;
}

Additionally, we can handle cases where the user does not enter any values by checking if the input fields are empty:

php
if (empty($num1) || empty($num2)) {
$result = “Please enter both numbers”;
}

By implementing error handling in our calculator, we can provide clearer feedback to the user and prevent calculations with invalid or incomplete input.

It’s important to keep in mind that error handling is not limited to these scenarios. Depending on the specific requirements of your calculator, you may need to handle other error cases as well. Always test your calculator thoroughly to identify and address any potential errors or edge cases.

In the final section, we will conclude this tutorial with some closing thoughts and suggestions for further improvements to our calculator implementation.


Final thoughts and next steps

Congratulations on successfully creating your own calculator using PHP! You have learned how to set up the environment, create the HTML structure, add styling, implement basic and complex calculations, evaluate user input, and handle errors. Your calculator is now capable of performing various arithmetic operations.

As you continue to explore and enhance your calculator, here are some next steps and suggestions for further improvements:

1. Expand the functionality: Consider adding more advanced mathematical operations, such as square root, trigonometric functions, or logarithms. This will make your calculator even more versatile and useful for a wider range of calculations.

2. Improve the user interface: Enhance the visual appearance of your calculator by applying more CSS styles, such as colors, gradients, or animations. Make it visually appealing and intuitive for users to interact with.

3. Implement responsive design: Ensure that your calculator is responsive and adapts well to different screen sizes and devices. This will make it accessible and usable for users on desktops, laptops, tablets, and mobile devices.

4. Add memory functionality: Implement memory storage and retrieval features in your calculator. This will allow users to store and recall numbers for multiple calculations, providing added convenience.

5. Refactor your code: Take a closer look at your code and identify areas where you can improve efficiency, readability, and maintainability. Consider using functions or classes to organize your code and make it more modular.

6. Improve input validation: Enhance the validation of user input by providing more specific error messages. For example, you can display an error message when non-numeric characters are entered in the number fields.

7. Add unit tests: Write unit tests to ensure the accuracy and reliability of your calculator’s calculations. This will help catch any potential bugs or issues before they affect the user experience.

Remember to continue practicing and exploring PHP, as well as other web development technologies, to further enhance your skills. Building more complex projects and experimenting with different features will contribute to your growth as a web developer.

Now that you have a solid foundation, let your creativity and curiosity guide you as you continue to develop your programming skills. Have fun expanding and refining your calculator, and don’t hesitate to seek inspiration from other calculators or resources available online.

Happy coding!

Leave a Reply

Your email address will not be published. Required fields are marked *