Introduction
Welcome to the world of cooking with an electric pressure cooker! If you’re new to this versatile kitchen appliance, you’re in for a treat. In this article, we’ll be focusing on how to cook pearl barley in an electric pressure cooker.
Pearl barley is a nutritious and versatile grain that has been a staple in many cuisines around the world for centuries. It is rich in fiber, protein, vitamins, and minerals, making it a healthy addition to your diet. Cooking pearl barley in an electric pressure cooker is not only convenient but also helps to retain its nutritional value and results in perfectly cooked, tender grains.
Using an electric pressure cooker can be a game-changer in your kitchen. It reduces cooking time, locks in flavors and nutrients, and requires minimal supervision. Whether you’re a busy professional, a home cook with limited time, or simply someone who wants to explore new cooking techniques, cooking pearl barley in an electric pressure cooker is a great option.
In this article, we’ll guide you through the step-by-step process of cooking pearl barley in an electric pressure cooker. From rinsing the grains to achieving the perfect texture, we’ll cover all the necessary tips and tricks to help you succeed in your culinary adventure. So, let’s get started and unlock the delicious possibilities of cooking pearl barley in an electric pressure cooker!
What is Pearl Barley?
Pearl barley is a form of barley that has been processed to remove its outer husk and polished to remove the bran layer. This process gives the grain a pearlescent appearance, hence the name “pearl barley.” It is one of the most common and widely used types of barley, known for its versatility and nutritional benefits.
Barley, in general, is a cereal grain that has been cultivated for thousands of years and is a staple food in many parts of the world. It has a rich history and has been a staple of traditional diets in various cultures, from ancient civilizations to modern times.
Pearl barley has a mild, nutty flavor and a chewy texture when cooked. It can be used in a variety of dishes, including soups, stews, salads, risottos, and pilafs. It serves as a versatile substitute for rice, couscous, or pasta, adding a unique texture and flavor to your cooking.
One of the reasons why pearl barley is gaining popularity is its nutritional profile. It is high in fiber, which helps with digestion and promotes a feeling of fullness. It also contains essential vitamins and minerals, including niacin, thiamine, iron, magnesium, and phosphorus.
Furthermore, pearl barley has a low glycemic index, making it a good choice for those watching their blood sugar levels. It can contribute to a balanced diet, providing sustained energy and helping to regulate blood sugar levels.
Whether you’re looking to incorporate more whole grains into your diet or simply explore new culinary possibilities, pearl barley is a fantastic ingredient to have in your pantry. Its versatility, nutritional benefits, and delicious taste make it a valuable addition to a wide range of recipes.
Benefits of Cooking Pearl Barley in an Electric Pressure Cooker
When it comes to cooking pearl barley, using an electric pressure cooker offers several advantages that make it a preferred method for many home cooks. Let’s explore the benefits of cooking pearl barley in an electric pressure cooker:
1. Time-saving:
One of the greatest benefits of using an electric pressure cooker is its ability to significantly reduce cooking time. Pearl barley typically takes a long time to cook using traditional stovetop methods, but with an electric pressure cooker, you can cut the cooking time by almost half. This means you can enjoy a delicious and nutritious meal in a fraction of the time it would take with conventional cooking methods.
2. Retains nutrients:
An electric pressure cooker uses pressurized steam to cook food quickly and efficiently. This high-pressure environment helps to retain more of the nutrients present in pearl barley compared to other cooking methods, such as boiling or simmering. This means that your cooked pearl barley will be packed with essential vitamins, minerals, and fiber, contributing to a healthier and more nutritious meal.
3. Uniform cooking:
Electric pressure cookers distribute heat evenly and maintain a consistent cooking temperature throughout the cooking process. This ensures that your pearl barley cooks uniformly, resulting in evenly cooked grains with a perfect texture. Say goodbye to undercooked or overcooked pearls and enjoy a consistently satisfying culinary experience.
4. Hands-off cooking:
Cooking pearl barley in an electric pressure cooker requires minimal supervision. Once you’ve set the cooking time and pressure level, you can simply press a button and let the appliance do the work. This hands-off approach allows you to multitask or attend to other kitchen tasks while your pearl barley cooks to perfection.
5. Versatility:
Electric pressure cookers are incredibly versatile kitchen appliances, capable of cooking a wide range of dishes. The same goes for cooking pearl barley. With an electric pressure cooker, you can not only cook plain pearl barley but also use it as a base for various recipes like soups, stews, risottos, and even desserts. The versatility of an electric pressure cooker opens up endless possibilities for incorporating pearl barley into your favorite dishes.
With these benefits in mind, it’s clear that cooking pearl barley in an electric pressure cooker provides convenience, time-saving, nutrition, and consistent results. So, if you’re looking to enjoy the goodness of pearl barley in a hassle-free and efficient manner, an electric pressure cooker is the way to go.
Step 1: Rinse the Pearl Barley
Before cooking pearl barley in an electric pressure cooker, it’s important to start by rinsing the grains. Rinsing helps remove any dust, debris, or residue that may be present on the surface of the barley.
Here’s how to properly rinse the pearl barley:
1. Measure the desired amount of pearl barley:
Decide on the quantity of pearl barley you want to cook, depending on the recipe or the number of servings you plan to make. Use a measuring cup to ensure accurate measurements.
2. Place the pearl barley in a fine-mesh strainer:
Set a fine-mesh strainer or sieve over a sink or a large bowl. Pour the measured pearl barley into the strainer.
3. Rinse under cold water:
Turn on the faucet and let cold water run over the pearl barley. Gently agitate the grains with your fingers or a spoon while rinsing. Continue rinsing until the water runs clear, indicating that the pearl barley is thoroughly rinsed.
4. Drain excess water:
After rinsing, allow the excess water to drain from the strainer. You can gently shake the strainer or tap it against the sink to help remove any remaining water.
5. Transfer the rinsed pearl barley:
Transfer the rinsed pearl barley from the strainer to a clean bowl or directly into the electric pressure cooker’s cooking pot, ready for the next steps in the cooking process.
Rinsing the pearl barley removes any impurities and ensures that you start with clean grains. This step is crucial as it helps to improve the overall taste and texture of the cooked pearl barley. So, take a few moments to rinse the pearl barley properly before moving on to the next steps.
Step 2: Soak the Pearl Barley (Optional)
Soaking pearl barley before cooking is an optional step that can help to soften the grains and reduce the cooking time. While not necessary, soaking can enhance the overall texture of the cooked pearl barley, making it even more tender and fluffy.
If you choose to soak the pearl barley, here’s how to do it:
1. Measure the desired amount of pearl barley:
Determine the quantity of pearl barley you want to cook. Use a measuring cup to ensure accurate measurements.
2. Place the pearl barley in a bowl:
Transfer the measured pearl barley to a bowl or container that is large enough to hold the grains and water.
3. Add water:
Pour enough water into the bowl to cover the pearl barley completely. Make sure there is ample water to allow for expansion as the grains soak.
4. Soak the pearl barley:
Let the pearl barley soak for a minimum of 30 minutes and up to overnight, depending on your preference. The longer you soak, the softer the grains will become.
5. Drain the soaked pearl barley:
After the desired soaking time, drain the water from the soaked pearl barley. Use a fine-mesh strainer or sieve to remove any excess water.
6. Rinse the soaked pearl barley:
Rinse the soaked pearl barley under cold water to remove any remaining impurities or starchy residue.
Once you’ve soaked and rinsed the pearl barley, you can proceed with the cooking process as usual. Keep in mind that soaking can reduce the cooking time, so adjust your cooking settings accordingly.
While optional, soaking the pearl barley can result in a more tender and evenly cooked final result. So, consider this step if you prefer a softer texture in your cooked pearl barley.
Step 3: Prepare the Electric Pressure Cooker
Before you start cooking pearl barley in an electric pressure cooker, it’s important to properly prepare the appliance. Follow these steps to ensure your electric pressure cooker is ready for use:
1. Clean the cooking pot:
Begin by cleaning the cooking pot of your electric pressure cooker. Ensure it is free from any food residue or impurities from previous use. Refer to the manufacturer’s instructions for specific cleaning guidelines.
2. Check the pressure release valve:
Take a moment to locate and check the pressure release valve on your electric pressure cooker. Ensure it moves freely and is not blocked or clogged. This valve is responsible for releasing pressure after cooking, so it’s important to keep it in good working condition.
3. Ensure the sealing ring is in place:
Electric pressure cookers typically have a removable sealing ring that helps create an airtight seal while cooking. Before using the cooker, ensure the sealing ring is properly installed in its designated groove to prevent any leakage during the cooking process.
4. Check the gasket:
If your electric pressure cooker has a gasket, inspect it for any signs of wear or damage. The gasket is a rubber or silicone ring that helps create a tight seal. If the gasket is cracked or worn out, it may need to be replaced before using the cooker.
5. Ensure the cooking pot is dry:
Before placing the pearl barley and water in the electric pressure cooker, make sure the cooking pot is dry. Excess moisture can affect the cooking process and result in unevenly cooked grains.
By properly preparing your electric pressure cooker, you can ensure optimal performance and cooking results. Taking the time to clean, check, and ensure the components are in good working order will contribute to a successful cooking experience with your pearl barley.
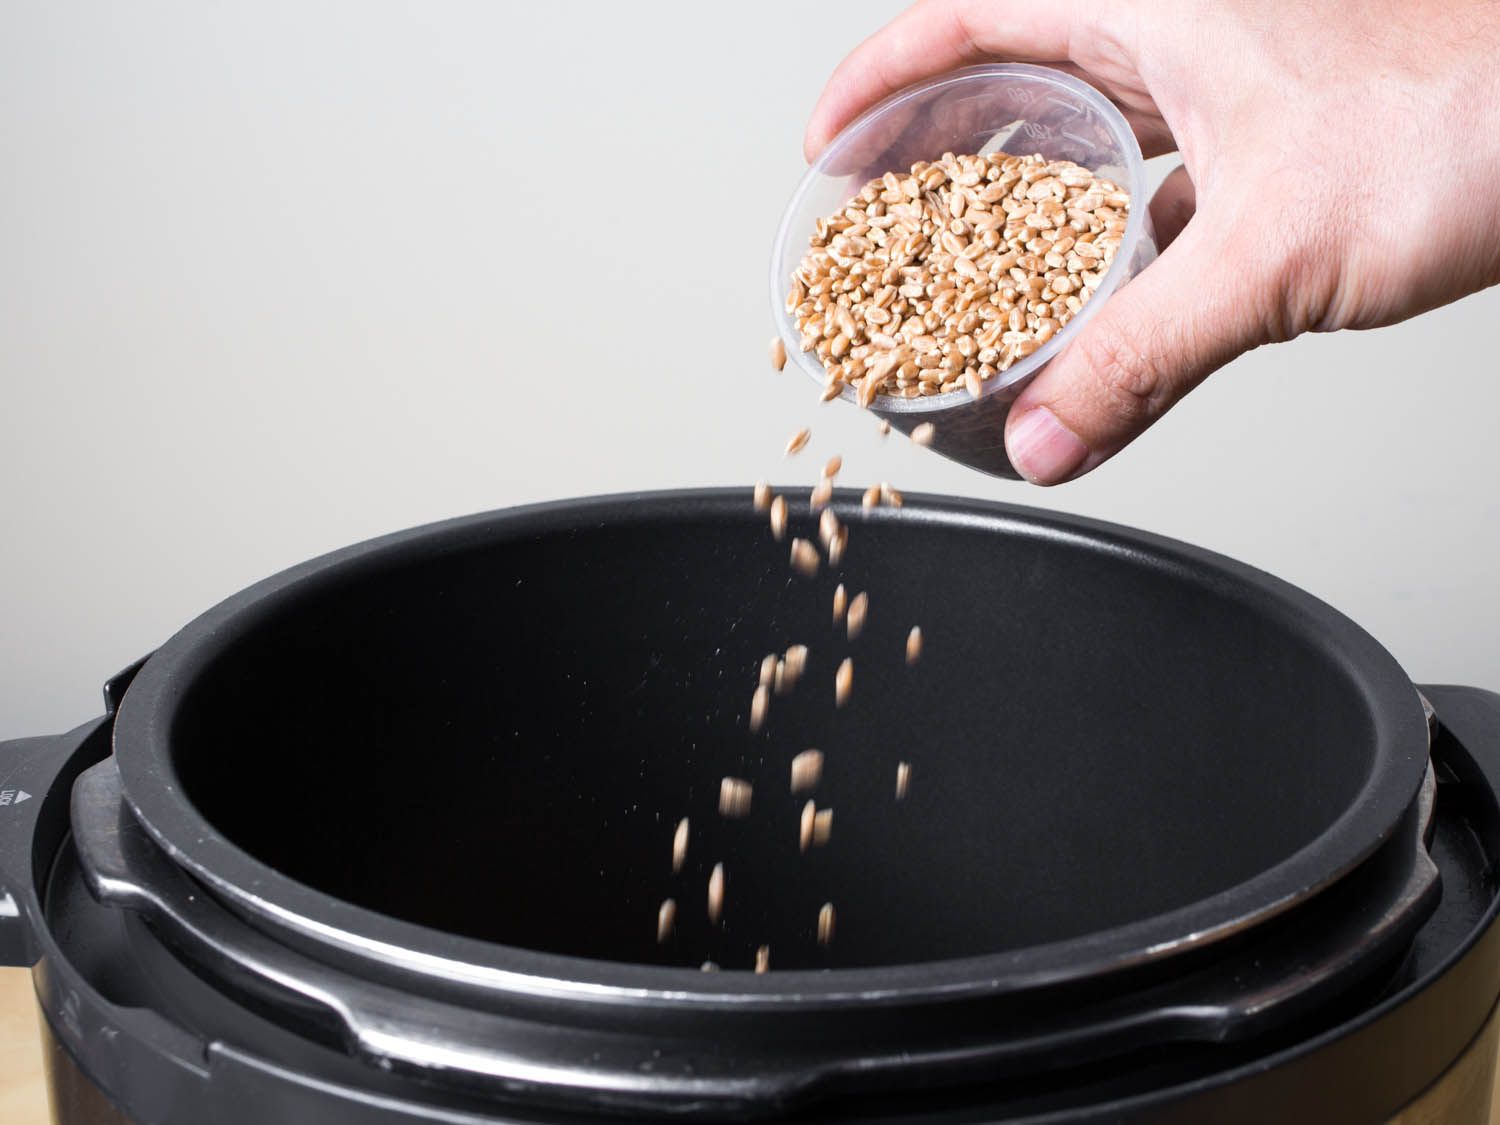
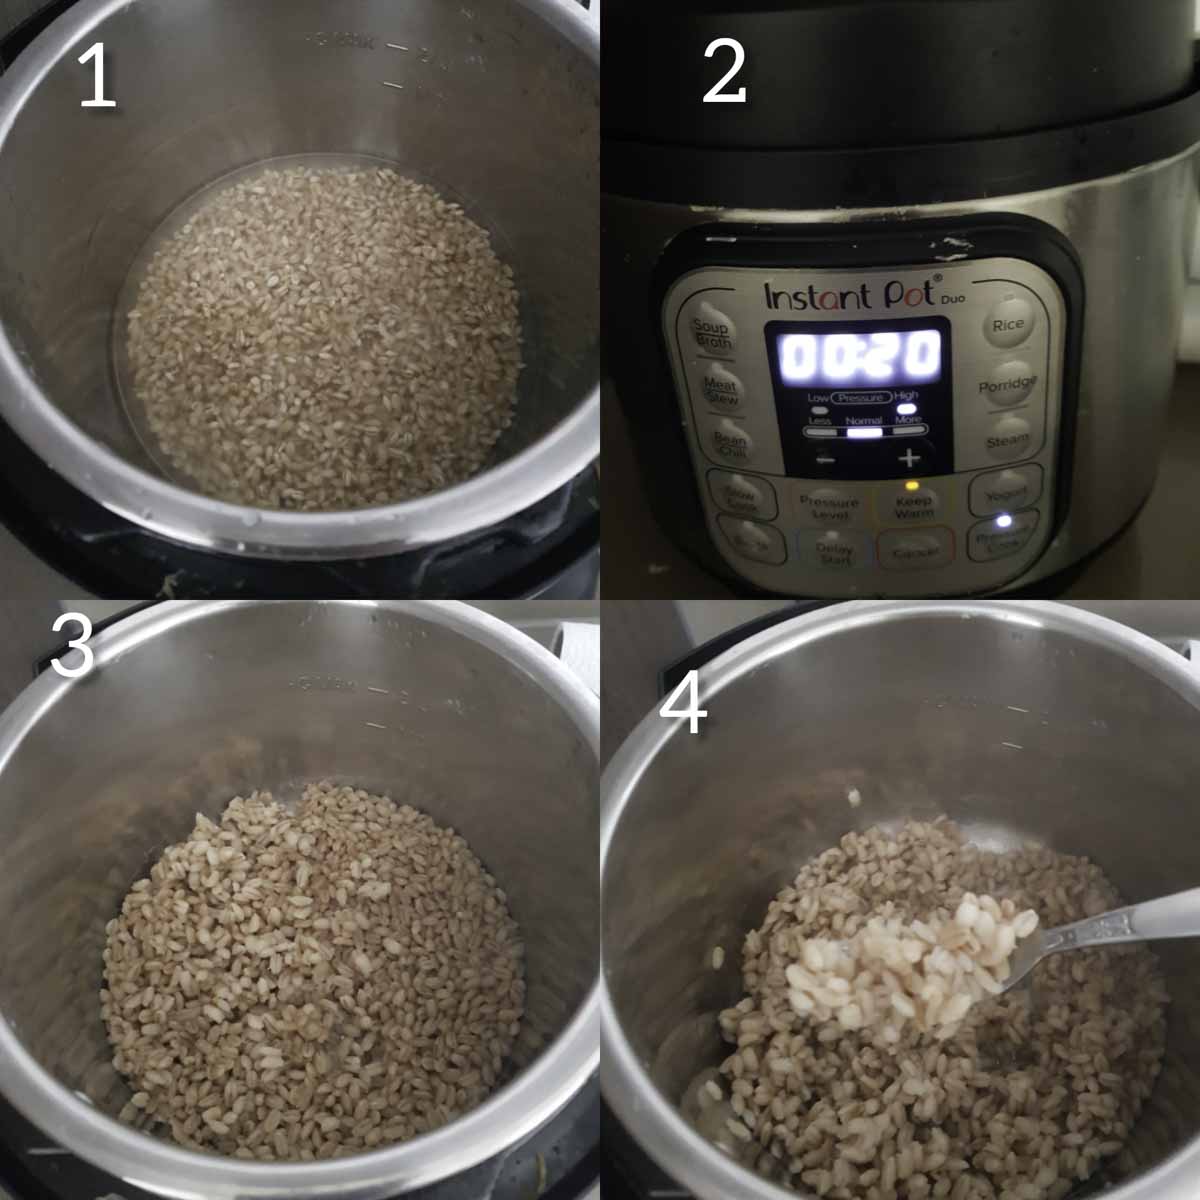
Step 4: Add Water and Pearl Barley to the Electric Pressure Cooker
With your electric pressure cooker prepared, it’s time to add the water and pearl barley to begin the cooking process. Follow these steps to ensure the right proportions and a successful result:
1. Measure the water:
Determine the amount of water needed for cooking the pearl barley. As a general rule of thumb, the ratio of water to pearl barley is usually 2:1. For example, if you’re using 1 cup of pearl barley, add 2 cups of water.
2. Add the water to the cooking pot:
Pour the measured amount of water into the cooking pot of your electric pressure cooker. Make sure not to exceed the maximum fill line indicated on the pot.
3. Add the rinsed or soaked pearl barley:
Transfer the rinsed or soaked pearl barley into the cooking pot with the water. Use a spoon or spatula to evenly distribute the grains in the pot.
4. Mix the water and pearl barley:
Gently stir the water and pearl barley together in the cooking pot to ensure that the grains are evenly submerged in the liquid. This will help with even cooking and prevent any grains from sticking to the bottom of the pot.
5. Do not overfill the cooking pot:
It’s important not to overfill the cooking pot to ensure proper pressurization during the cooking process. Leave enough space for the steam to build up without risk of overflow. Follow the manufacturer’s guidelines for the maximum fill level of your specific electric pressure cooker.
By adding the correct amount of water and pearl barley to your electric pressure cooker, you’ll set the stage for perfectly cooked pearl barley. The right water-to-grain ratio is crucial for achieving the desired texture and consistency. So, take the time to measure accurately and mix the water and grain evenly before proceeding to the next step.
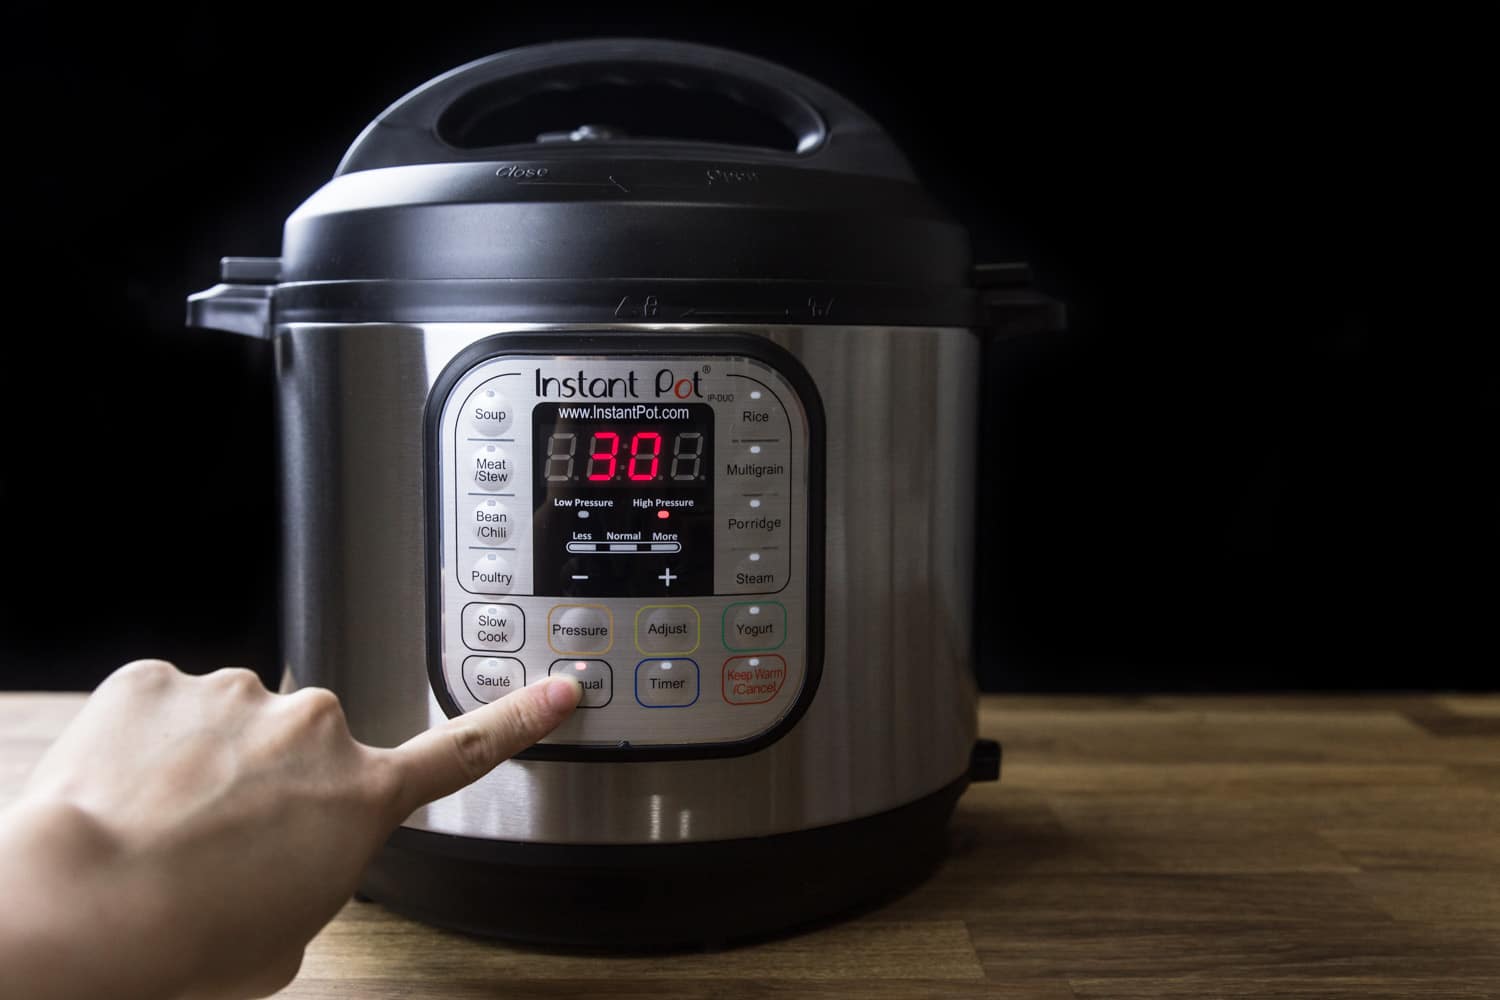
Step 5: Set the Cooking Time and Pressure Level
Setting the correct cooking time and pressure level is essential to ensure that the pearl barley cooks thoroughly and becomes tender. Follow these guidelines to configure the cooking settings on your electric pressure cooker:
1. Consult the recipe or package instructions:
Refer to the specific recipe you’re using or the instructions on the package of pearl barley for recommended cooking times. Different brands and types of pearl barley may require slight variations in cooking time and pressure level.
2. Select the cooking time:
Using the control panel or settings on your electric pressure cooker, select the appropriate cooking time for the pearl barley. Typically, cooking pearl barley under pressure takes around 15 to 20 minutes. Adjust the cooking time according to the recommendations from your recipe or package instructions.
3. Choose the pressure level:
Most electric pressure cookers offer different pressure levels to choose from, such as low pressure or high pressure. For pearl barley, it’s recommended to use high pressure settings to ensure thorough cooking and tender grains. Select the high-pressure option on your electric pressure cooker.
4. Set any additional cooking preferences:
Depending on your electric pressure cooker model and personal preferences, you may have the option to select additional cooking preferences. This could include options like “rice,” “grains,” or specific presets that are designed for cooking grains. Consult the user manual of your electric pressure cooker if you have any specific options like these.
5. Double-check the settings:
Before starting the cooking process, double-check that you have selected the correct cooking time, pressure level, and any additional preferences. Confirm that the settings align with the recipe or package instructions.
By setting the appropriate cooking time and pressure level, you’ll ensure that the pearl barley cooks perfectly in your electric pressure cooker. Following the recommended cooking times and pressure settings will help you achieve tender, flavorful, and evenly cooked grains.
Step 6: Start the Electric Pressure Cooker
With the cooking time and pressure level properly set, it’s time to start the cooking process in your electric pressure cooker. Follow these steps to initiate the cooking cycle:
1. Secure the lid:
Ensure that the lid of your electric pressure cooker is properly aligned and securely sealed. Check that the sealing ring is in place and the pressure release valve is closed. This ensures a tight seal, allowing the pressure to build up inside the cooker.
2. Plug in the cooker:
Connect the electric pressure cooker to a power source and plug it in. Make sure the power cord is securely inserted into both the cooker and the electrical outlet.
3. Start the cooking cycle:
Depending on your electric pressure cooker model, there may be a specific button or sequence of buttons to start the cooking cycle. Press the appropriate button or follow the instructions on the control panel to begin the cooking process.
4. Wait for the pressure to build up:
After initiating the cooking cycle, the electric pressure cooker will start building up the required pressure. This may take a few minutes, during which the cooker will heat up and reach the desired pressure level.
5. Cooking process begins:
Once the pressure inside the electric pressure cooker reaches the set level, the cooking process will commence. You may notice steam being released from the pressure release valve. This is normal and indicates that the cooker has reached the desired pressure.
6. Cooking countdown:
The electric pressure cooker will now begin the countdown of the set cooking time. The cooking cycle will continue until the set time is complete.
During the cooking process, it’s important to avoid opening the lid unless necessary for specific recipes that require ingredient additions or adjustments. Opening the lid prematurely can interrupt the cooking cycle and affect the final result.
By starting the electric pressure cooker and allowing it to build up pressure, you’re on your way to perfectly cooked pearl barley. Follow the specific instructions for your electric pressure cooker model to ensure a safe and successful cooking experience.
Step 7: Natural Release or Quick Release?
After the cooking time is complete, you have two options for releasing the pressure in your electric pressure cooker: natural release or quick release. Both methods have their respective benefits, so let’s explore the differences between them:
Natural Release:
Natural release refers to allowing the pressure inside the electric pressure cooker to decrease naturally over time after the cooking process is complete. During natural release, you simply turn off the heat and leave the pressure cooker undisturbed. This gradual release of pressure can take anywhere from 10 to 20 minutes or more, depending on the recipe and the amount of pressure built up inside the cooker.
Natural release is preferable for certain types of recipes, particularly those with a higher liquid content, such as soups, stews, or dishes with delicate ingredients. It allows the flavors to further develop and the ingredients to fully absorb the liquid, resulting in a more intense and harmonious taste. Natural release is also recommended when cooking pearl barley, as it gives the grains time to absorb any remaining moisture, resulting in a fluffier texture.
Quick Release:
Quick release involves manually releasing the pressure from the electric pressure cooker immediately after the cooking time is complete. To execute a quick release, carefully turn the pressure release valve from the sealing position to the venting position, allowing the steam and pressure to escape rapidly. This process can cause a sudden release of steam and may result in hot liquid spraying from the valve, so exercise caution and use oven mitts or a long-handled utensil to turn the valve.
Quick release is suitable for recipes where you want to halt the cooking process quickly or if the recipe calls for ingredients that are sensitive to overcooking, such as vegetables or seafood. It’s worth noting that quick release can lead to slight moisture loss and potentially affect the texture of certain dishes. However, for pearl barley, quick release can still yield satisfactory results if you’re short on time or prefer a slightly denser texture.
Ultimately, the choice between natural release and quick release will depend on the recipe and your desired outcome. Consider the specific needs of your dish and follow the instructions in your recipe to determine which method is most suitable.
Step 8: Open the Electric Pressure Cooker and Fluff the Pearl Barley
Now that the cooking process is complete and the pressure has been released, it’s time to open the electric pressure cooker and give the pearl barley a final touch. Follow these steps to open the cooker and fluff the grains:
1. Ensure the pressure is fully released:
Before attempting to open the electric pressure cooker, ensure that all the pressure has been fully released. This can be confirmed by checking the pressure indicator or making sure the float valve has dropped, indicating that the cooker has depressurized.
2. Carefully open the lid:
Gently twist the lid of the electric pressure cooker in a counter-clockwise direction to unlock and remove it. Be cautious of any residual steam that may escape as you open the lid. Use oven mitts or a towel to protect your hands from the hot steam.
3. Fluff the pearl barley:
Using a fork or a spoon, gently fluff the cooked pearl barley. This helps separate the grains and prevents clumping. Gently stir the grains, breaking up any clumps and ensuring that they are evenly distributed.
4. Check the texture and adjust, if needed:
Take a moment to assess the texture of the cooked pearl barley. If it’s still too firm or requires additional moisture, you can add a small amount of hot water or broth to the cooker. Stir well to incorporate the liquid and allow the barley to absorb it. Alternatively, if the barley is too moist, you can leave it uncovered for a few minutes to allow excess moisture to evaporate.
5. Serve or incorporate into your recipe:
At this point, your perfectly cooked and fluffed pearl barley is ready to be served as a side dish or incorporated into your chosen recipe. Enjoy the tender and flavorful grains as part of a delicious meal!
Remember that fluffing the pearl barley is important to ensure that the grains are light, separate, and well-cooked. Take your time to gently stir and break up any clumps for an optimal serving or usage experience.
Step 9: Enjoy Your Perfectly Cooked Pearl Barley!
Congratulations! You have successfully cooked pearl barley in your electric pressure cooker. Now it’s time to savor the delicious results and reap the rewards of your culinary efforts. Here’s what you can do to fully enjoy your perfectly cooked pearl barley:
1. Taste and adjust the seasoning:
Before serving or using your cooked pearl barley, take a moment to taste it and adjust the seasoning if needed. Depending on the recipe or your personal preference, you may want to add a pinch of salt, a squeeze of lemon juice, or a sprinkling of herbs to enhance the flavor of the grains.
2. Use it as a standalone side dish:
Pearl barley cooked in an electric pressure cooker makes a delightful side dish on its own. Serve it alongside roasted vegetables, grilled meats, or as a bed for sautéed mushrooms. The tender texture and nutty flavor of the barley will complement a variety of dishes and add a satisfying element to your meal.
3. Incorporate it into recipes:
Utilize your perfectly cooked pearl barley as an ingredient in various recipes. Add it to soups, stews, salads, or grain-based dishes for extra nourishment and a pleasant chewy texture. Pearl barley can elevate the overall taste and nutritional value of your favorite recipes.
4. Store leftovers appropriately:
If you have any leftover cooked pearl barley, store it in an airtight container in the refrigerator. It will stay fresh for a few days, allowing you to enjoy it in different meals throughout the week. Before using any leftovers, make sure to reheat them thoroughly to retain their quality.
5. Get creative with flavors:
Don’t be afraid to experiment with different flavors and ingredients when incorporating pearl barley into your meals. Consider adding roasted vegetables, herbs, spices, or a drizzle of olive oil to enhance the taste and create unique flavor combinations.
Now that you have cooked perfect pearl barley in your electric pressure cooker, it’s time to savor the wholesome and nutritious grains. Enjoy the versatile possibilities and let your imagination guide you in creating delicious meals with your newfound culinary accomplishment!
Conclusion
Cooking pearl barley in an electric pressure cooker is a convenient, efficient, and flavorful way to enjoy this versatile grain. With the step-by-step guide provided in this article, you now have the knowledge and confidence to cook pearl barley to perfection in your own kitchen.
Pearl barley, with its nutty taste and tender texture, serves as a nutritious addition to a variety of dishes. Whether you use it as a standalone side dish or incorporate it into soups, stews, salads, or other recipes, the possibilities are endless. The electric pressure cooker helps save time, preserves nutrients, and ensures even cooking, making it an ideal cooking method for pearl barley.
Remember the key steps of rinsing the pearl barley, preparing the electric pressure cooker, adding the appropriate amount of water and grain, setting the cooking time and pressure level, and choosing between natural release and quick release. These steps, when followed correctly, lead to flavorful and perfectly cooked pearl barley.
Once your pearl barley is cooked, you can fluff it with a fork, adjust the seasoning to your taste, and incorporate it into your desired dishes. The tender grains will provide a delightful chewy texture and add a wholesome element to your meals.
So, go ahead and embark on a culinary adventure with pearl barley in your electric pressure cooker. Explore new recipes, experiment with flavors, and enjoy the nutritional benefits this grain has to offer. With your new skills and the versatility of the electric pressure cooker, your cooking possibilities will expand, and your taste buds will thank you!