Introduction
Connecting to Wi-Fi on your Android device is a fundamental step to accessing the internet and enjoying various online services. Whether you are at home, in a coffee shop, or traveling, being able to connect to a Wi-Fi network provides you with a faster and more stable internet connection compared to using cellular data. In this article, we will guide you through the process of connecting to Wi-Fi on your Android device, ensuring that you can stay connected wherever you go.
Having a Wi-Fi connection not only allows you to browse the web, but it also enables you to download apps, stream videos, make video calls, and stay connected to friends and family through social media. With the increasing prevalence of Wi-Fi networks worldwide, knowing how to connect to Wi-Fi on your Android device is a necessary skill for staying connected and taking full advantage of the digital world.
Connecting to Wi-Fi on your Android device is a straightforward process that can be done in just a few simple steps. Whether you are a tech-savvy individual or new to using Android devices, this guide will walk you through the process, ensuring that you can connect to Wi-Fi networks effortlessly. So, let’s dive in and discover how to connect to Wi-Fi on your Android device.
Step 1: Go to Settings
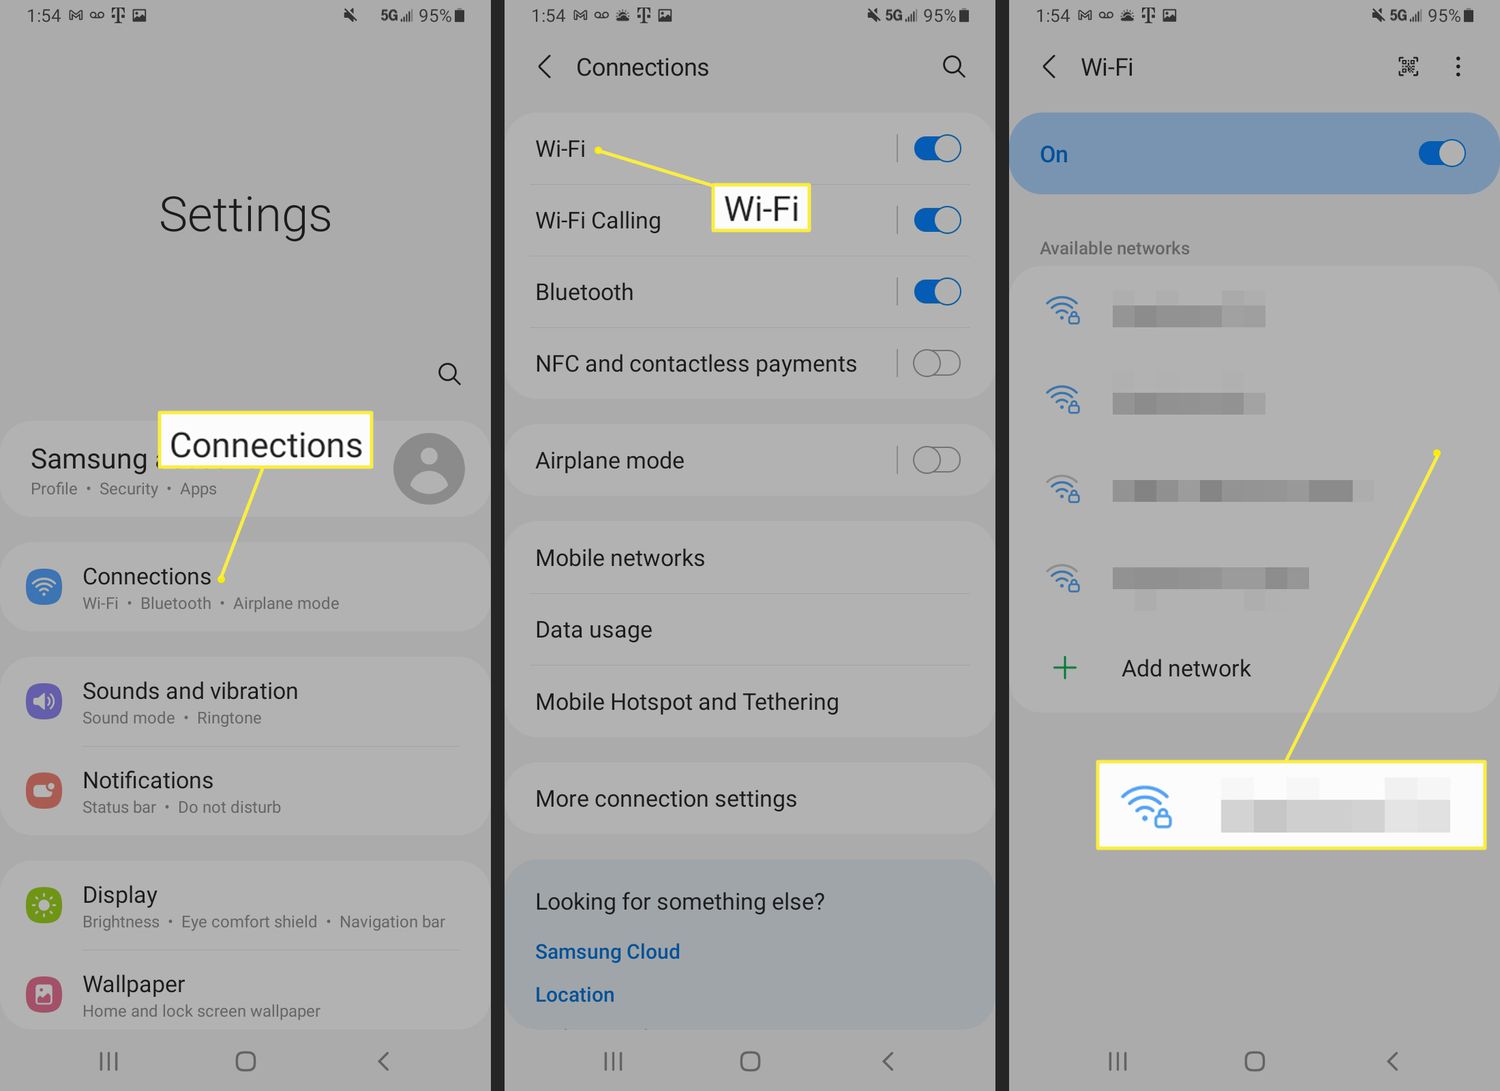
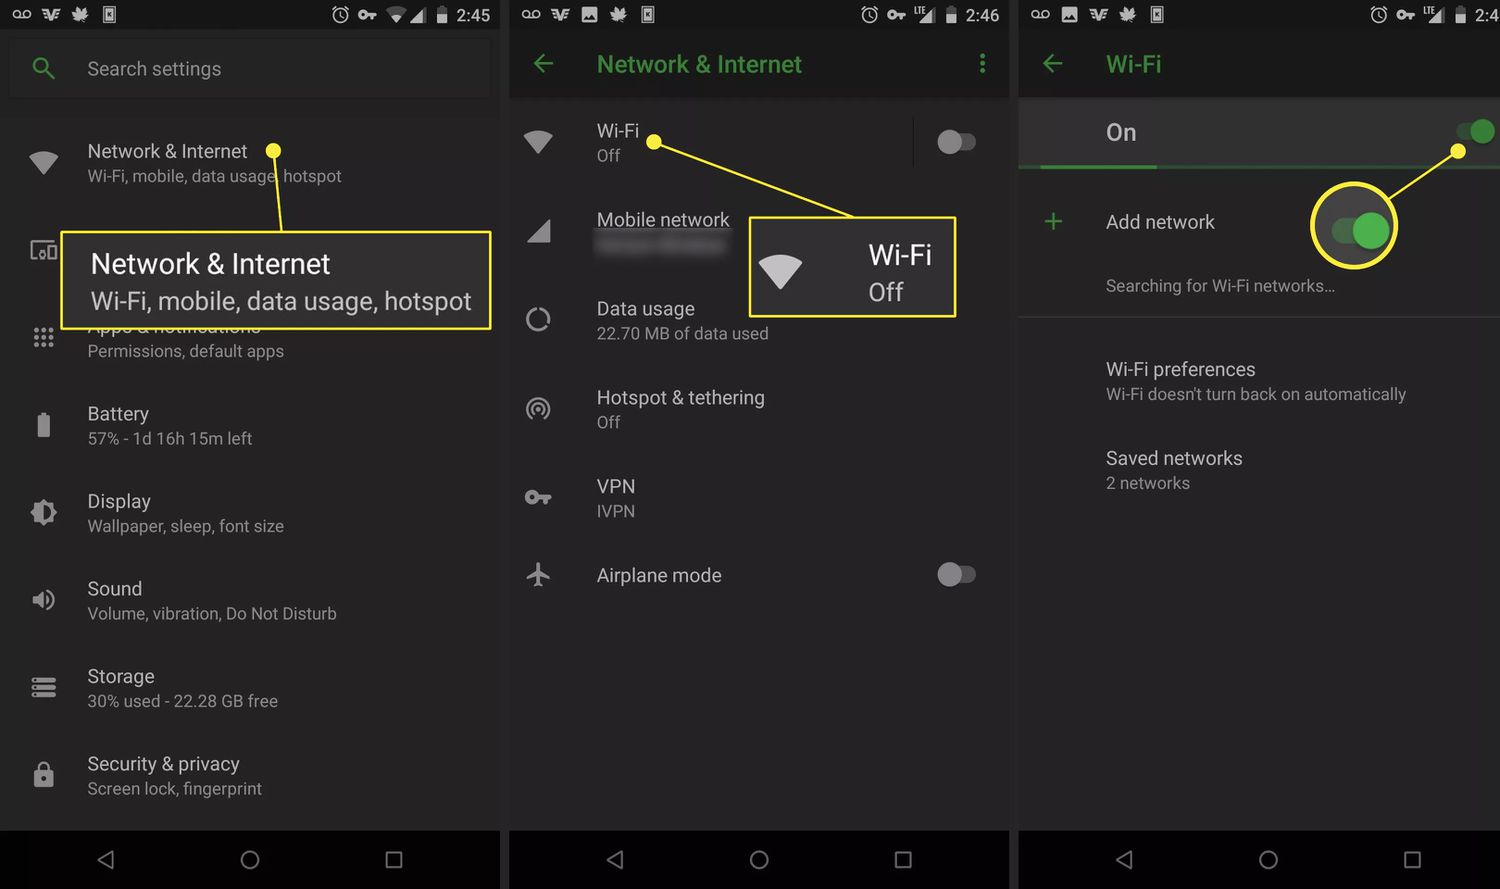
The first step in connecting to Wi-Fi on your Android device is to access the device settings. To do this, swipe down from the top of your screen to open the notification panel. Then, tap on the gear icon or navigate to the Settings app in your app drawer. This will open the settings menu, where you can make various changes and access different features of your Android device.
Once you’re in the settings menu, you’ll see a list of different options and settings you can adjust. Look for the “Network & internet” or “Connections” option, as the exact wording may vary depending on your Android device and version. Tap on this option to proceed to the next step.
Some Android devices might have a separate Wi-Fi option in the settings menu instead of having it within the “Network & internet” or “Connections” option. If that’s the case, simply tap on the Wi-Fi option to proceed.
It’s worth noting that the appearance and layout of the settings menu may differ slightly between Android devices. However, the general steps to connect to Wi-Fi remain the same across most Android devices, so you should be able to follow along regardless of your device’s specific interface.
Once you’ve successfully accessed the settings menu or the Wi-Fi option, you’re ready to move on to the next step and start connecting to a Wi-Fi network.
Step 2: Select Wi-Fi
After accessing the settings menu or the Wi-Fi option on your Android device, the next step is to select the Wi-Fi settings. On most Android devices, you will see a list of available Wi-Fi networks. These networks are represented by their names, also known as SSIDs (Service Set Identifiers).
Tap on the Wi-Fi network that you want to connect to from the list. The networks in the list may vary depending on your location and the range of available Wi-Fi signals. You may see a mix of private home networks, public networks, or networks from nearby businesses or establishments.
If you don’t see the desired Wi-Fi network in the list, make sure that your Android device’s Wi-Fi is turned on and that you are within range of the network. Keep in mind that some Wi-Fi networks may be hidden and require you to manually enter the network information.
When selecting a Wi-Fi network, it’s important to consider the network’s security and reliability. Public Wi-Fi networks, such as those found in coffee shops, airports, or libraries, may require additional steps or agreeement to connect. Private home networks are generally more secure, as they require a password for access. Choose the network that suits your needs and preferences.
Additionally, if you have connected to a network in the past, your Android device may automatically connect to that network again if it is available. This can save you time and effort in reconnecting to Wi-Fi networks that you frequently use.
Once you have selected the Wi-Fi network you want to connect to, you’re ready to proceed to the next step and enter the network password, if required.
Step 3: Toggle Wi-Fi on
Before connecting to a Wi-Fi network on your Android device, it is essential to ensure that the Wi-Fi functionality is turned on. By default, most Android devices have Wi-Fi turned on, but it’s always good to double-check.
To toggle the Wi-Fi feature on, go back to the Wi-Fi settings screen in the settings menu. At the top of the screen, you will see a switch or slider to enable or disable Wi-Fi. Make sure the switch or slider is in the “on” position, typically indicated by the color blue or the word “On” being displayed.
Enabling Wi-Fi allows your Android device to detect and connect to available Wi-Fi networks in your vicinity. It also conserves battery life by prioritizing Wi-Fi connections over cellular data, which can be especially beneficial if you’re in an area with a weak cellular signal.
In some cases, you may encounter a situation where the Wi-Fi feature is greyed out or disabled. This can happen due to various reasons, such as software glitches or restrictions set by your device administrator. If you’re unable to toggle the Wi-Fi feature on, make sure to check for any system updates or consult the documentation provided by your device’s manufacturer for troubleshooting steps.
Once you have successfully toggled the Wi-Fi feature on, you’re ready to proceed to the next step and scan for available Wi-Fi networks.
Step 4: Scan for Networks
After enabling the Wi-Fi feature on your Android device, the next step is to initiate a scan for available Wi-Fi networks. Scanning allows your device to detect and display a list of networks within its range.
To start the scan, go back to the Wi-Fi settings screen. On this screen, you will see a button or option labeled “Scan” or “Refresh.” Tap on this button to initiate the scan. Your device will then search for nearby Wi-Fi networks and populate the list with the available options.
The scan process may take a few seconds depending on your device’s speed and the number of networks in the area. During this time, your device will display a loading or searching animation to indicate that it is actively searching for networks.
Once the scan is complete, you will see a list of detected Wi-Fi networks. Each network will be identified by its name, also known as the SSID (Service Set Identifier). The list may also include additional information such as signal strength, security type, and whether the network is public or private.
Take a moment to review the list and consider factors such as signal strength and network security before selecting a network to connect to. Networks with a stronger signal will provide better connectivity, while networks with security measures such as WPA2 encryption offer enhanced protection for your data.
If you don’t see the Wi-Fi network you want to connect to, make sure you are within range of the network and that the network is actively broadcasting its SSID. Some networks may be hidden, requiring you to manually enter the network information.
Once you have identified the network you want to connect to, proceed to the next step to establish a connection by entering the network password, if required.
Step 5: Select a Network
After scanning for available Wi-Fi networks, you will see a list of options on your Android device. This list includes the names of the detected networks, also known as SSIDs (Service Set Identifiers). Now, it’s time to select the network you want to connect to.
Review the list of networks and locate the name of the network you wish to connect to. The list may include both public and private networks, with varying signal strengths and security levels. Consider factors like network reliability, signal strength, and security before making your selection.
To connect to a specific network, tap on its name in the list. If the network is secured, indicated by a lock icon next to its name, you will be prompted to enter the network password to establish a connection. If the network is open and does not require a password, you may be able to join it immediately.
When entering a password, make sure to enter it correctly, paying attention to uppercase and lowercase letters, as well as special characters if applicable. Avoid sharing your Wi-Fi passwords with unauthorized individuals to maintain the security and privacy of your network.
In some instances, you may encounter networks that require additional steps to connect, such as agreeing to terms and conditions or authenticating through a web-based portal. Follow the on-screen instructions provided by the network provider or establishment to complete the connection process.
After entering the password (if required) or completing any necessary additional steps, your Android device will attempt to establish a connection to the selected network. It may take a few moments for the connection to be established, so be patient during this process.
Once the connection is successfully established, your Android device will display a “Connected” status or a Wi-Fi symbol in the notification bar, indicating that you are now connected to the selected Wi-Fi network. Congratulations! You can now enjoy a stable and fast internet connection on your Android device through Wi-Fi.
Step 6: Enter Password (if required)
When connecting to a secured Wi-Fi network on your Android device, you will often need to enter a password to authenticate and gain access. This step ensures that only authorized individuals can connect to the network and protects the privacy and security of the network’s users.
After selecting a network from the list of detected Wi-Fi networks, your device will prompt you to enter the password. The password is unique to the network and is typically set by the network administrator or the owner of the network router.
To enter the password, you will see a text field or a dialog box where you can input the characters. The password can be a combination of letters, numbers, and special characters. Pay attention to the case sensitivity of the password, as uppercase and lowercase letters may be treated differently.
Take care when entering the password to ensure its accuracy. Android devices may display a series of dots or asterisks in place of the actual characters to maintain security and privacy. Double-check the entered password before proceeding to prevent any errors that may prevent successful connection to the network.
In cases where you are connecting to a familiar Wi-Fi network that you have connected to in the past, your Android device may remember the password and automatically fill it in for you. This feature saves you from the hassle of manually entering the password each time you connect to a familiar network.
However, if you are connecting to a new network or if your device does not have the password saved, you will need to manually input the password to proceed with the connection process.
Once you have entered the correct password, tap on the “Connect” button or the equivalent option on your device. Your Android device will attempt to establish a connection to the network using the provided password. It may take a few moments for the connection to be established.
Upon successful authentication, your Android device will display a “Connected” status and you will be able to enjoy the benefits of a fast and stable Wi-Fi connection on your device.
Step 7: Connect to Network
After entering the password (if required) and completing the necessary authentication steps, it’s time to establish a connection to the Wi-Fi network you selected on your Android device.
Once you have entered the correct password and tapped on the “Connect” button or the equivalent option on your device, your device will attempt to connect to the network. It may take a few seconds for the connection process to complete.
During the connection process, your Android device will send a connection request to the network. The network will verify the provided password and authorize your device to join the network. If the password is correct and the network accepts your device’s request, the connection will be established, and your device will be connected to the Wi-Fi network.
To confirm that you are successfully connected, look for the Wi-Fi symbol or the “Connected” status in the notification bar of your Android device. This indicates that your device is now actively connected to the selected Wi-Fi network.
Now that you are connected to the Wi-Fi network, you can start enjoying faster internet speeds, seamless browsing, and the ability to access online services without relying on cellular data.
Keep in mind that your device may automatically connect to the network in the future if it is in range and the Wi-Fi feature is enabled. This eliminates the need to manually connect each time you’re in the vicinity of the network.
In situations where you experience connectivity issues or if your device fails to connect to the network, double-check the entered password, verify that you’re within range of the network, and ensure that the network is operational. If the problem persists, try restarting your device or consult the network provider for further assistance.
Congratulations! You have successfully connected to the Wi-Fi network on your Android device. Enjoy your enhanced internet experience and make the most out of the numerous online services and features available to you.
Troubleshooting Common Issues
While connecting to a Wi-Fi network on your Android device is usually a straightforward process, there may be times when you encounter common issues. Here are some troubleshooting steps to help you resolve these issues and ensure a successful connection.
1. Incorrect Password: Double-check the entered password to ensure its accuracy. Pay attention to uppercase and lowercase letters, and special characters if applicable. If you’re unsure of the password, contact the network administrator or the owner of the Wi-Fi network for assistance.
2. Weak Signal: If you’re experiencing a weak signal, make sure you are within range of the Wi-Fi network. Walls, furniture, and other obstacles can interfere with the signal strength. Try moving closer to the router or adjusting the position of your device to improve signal reception.
3. No Available Networks: If no Wi-Fi networks are detected during the scan, ensure that the Wi-Fi feature on your Android device is turned on. Also, check if you are in an area with available Wi-Fi networks. If you still can’t find any networks, restart your device or reset the Wi-Fi settings to refresh the connection.
4. Incompatible Security Protocols: Some older devices may have compatibility issues with certain security protocols for Wi-Fi networks. If you’re unable to connect to a specific network, check if your device supports the security protocol being used. Updating your device’s software or contacting the network administrator may help resolve this issue.
5. Interference from Other Devices: Other electronic devices, such as cordless phones, microwaves, or Bluetooth devices, can interfere with Wi-Fi signals. Keep these devices away from your router and Android device to minimize interference and improve connection stability.
6. Network Reset: If you’re experiencing persistent connectivity issues, try resetting your network settings on your Android device. This will clear any saved Wi-Fi network information and restore the network settings to their default state. Note that this will also remove any saved passwords, so you’ll need to re-enter them when reconnecting to Wi-Fi networks.
If none of these troubleshooting steps resolve the issue, consult your device’s user manual or contact the manufacturer’s support for further assistance. They will be able to provide specific solutions based on your Android device model and software version.
Remember that each Wi-Fi network may have unique settings and configurations, so it’s always good to refer to any documentation provided by the network provider or establishment for any additional troubleshooting steps specific to that network.
Conclusion
Connecting to a Wi-Fi network on your Android device is essential for accessing the internet and enjoying various online services. By following the step-by-step guide outlined in this article, you can easily connect to Wi-Fi networks and experience faster and more reliable internet connectivity on your device.
We started by accessing the settings menu and selecting the Wi-Fi option. Then, we toggled the Wi-Fi feature on and scanned for available networks. Once we found the desired network, we entered the password (if required) and established a connection. We also provided troubleshooting tips for common issues that may arise during the connection process.
Remember to choose networks with strong signal strength and consider the security measures implemented by each network. Be cautious when entering passwords and avoid sharing them with unauthorized individuals to protect the security of your network.
If you encounter any difficulties or have specific questions, consult your device’s user manual or reach out to the manufacturer’s support for personalized assistance.
Now that you’re connected to Wi-Fi, you can enjoy faster browsing, seamless streaming, and stay connected to your favorite online services. Take advantage of the numerous opportunities that Wi-Fi connectivity provides and make the most out of your Android device’s capabilities.
Thank you for taking the time to read this guide. We hope it has been helpful in assisting you with connecting to Wi-Fi on your Android device. Stay connected and enjoy the limitless possibilities of the internet!