Introduction
Connecting your Chromecast to a new Wi-Fi network can be a straightforward process that ensures you can continue enjoying your favorite shows, movies, and music. Whether you’ve recently changed your Wi-Fi password, moved to a new home, or upgraded your internet service, updating the network settings on your Chromecast is essential for uninterrupted streaming.
In this guide, we will walk you through the step-by-step process of connecting your Chromecast to a new Wi-Fi network. These instructions apply to all generations of Chromecast devices and can be easily followed by anyone, regardless of their technical expertise.
Before we dive into the steps, it’s essential to note that you need a smartphone, tablet, or computer with the Google Home app installed to complete the setup. The Google Home app is available for both Android and iOS devices and allows you to customize and manage your Chromecast settings effortlessly.
So, without further ado, let’s get started with connecting your Chromecast to a new Wi-Fi network and bringing your favorite entertainment to life!
Step 1: Prepare your Chromecast
Before you can connect your Chromecast to a new Wi-Fi network, it’s essential to ensure that your Chromecast device is ready for the setup process. Here’s what you need to do:
- Ensure that your Chromecast device is plugged into your TV and connected to a power source. You should see the Chromecast logo on your TV screen.
- Make sure that your TV is turned on and set to the correct HDMI input where your Chromecast is connected.
- Ensure that your smartphone, tablet, or computer is connected to the same Wi-Fi network you want your Chromecast to be connected to. This is necessary for the initial setup process.
- If you have used your Chromecast before and want to connect it to a new Wi-Fi network, perform a factory reset on your Chromecast. You can do this by holding down the button on the Chromecast device for about 25 seconds until the LED light on the device starts flashing.
By ensuring that your Chromecast device is prepared and in the optimal state for setup, you will have a smooth experience when connecting it to a new Wi-Fi network. Once you’ve completed these steps, you’re ready to proceed to the next step and connect your Chromecast to your TV.
Step 2: Connect Chromecast to your TV
Now that your Chromecast is prepared, it’s time to connect it to your TV. Follow these simple steps:
- Locate an available HDMI port on your TV and insert the HDMI end of the Chromecast into it.
- Ensure that the USB end of the Chromecast is connected to a USB port on your TV or to the included power adapter, which should then be plugged into a power outlet.
- Using your TV remote, navigate to the HDMI input that corresponds to the HDMI port where your Chromecast is connected. This is typically done by pressing the “Input” or “Source” button on the remote.
- Once you’re on the correct HDMI input, you should see the Chromecast setup screen appear on your TV.
- Take note of the code displayed on the screen. This is necessary for the setup process and will be used to confirm the connection later.
It’s important to ensure that your Chromecast is correctly connected to your TV for a successful setup. By following these steps, you will have your Chromecast hardware ready and be prepared to move on to the next step.
Step 3: Download and launch Google Home app
With your Chromecast connected to your TV, it’s time to download and launch the Google Home app on your smartphone, tablet, or computer. The Google Home app is essential for managing and customizing your Chromecast settings. Follow these instructions:
- Open the app store on your device (Google Play Store for Android, App Store for iOS) and search for “Google Home.”
- Download and install the Google Home app on your device.
- Once the installation is complete, open the Google Home app.
- If this is your first time using the app, you will be guided through a brief tutorial. Follow the on-screen instructions to familiarize yourself with the features and functionalities of the app.
- Make sure your smartphone, tablet, or computer is connected to the same Wi-Fi network you want your Chromecast to connect to during the setup process.
The Google Home app serves as your control center for managing and controlling your Chromecast. It allows you to customize settings, stream content, and control playback with ease. By downloading and launching the app, you are one step closer to connecting your Chromecast to your new Wi-Fi network.
Step 4: Connect your device to your Chromecast
Now that the Google Home app is installed on your device, it’s time to connect your device to your Chromecast. This step is crucial for establishing a connection between your device and Chromecast. Follow these instructions:
- Open the Google Home app on your smartphone, tablet, or computer.
- On the main screen of the app, you should see the devices available for setup. Tap on the “+” icon to add a new device.
- Follow the on-screen instructions to set up a new device. Make sure you select the correct Chromecast model that matches the one you are setting up.
- The Google Home app will scan for nearby devices. Once it finds your Chromecast device, tap on it to establish a connection.
- Confirm the connection by comparing the code displayed on your TV screen with the code shown in the app. If they match, tap “Yes” to confirm.
By connecting your device to your Chromecast, you are enabling seamless communication between the two. This is crucial for managing and controlling your Chromecast settings and content. Once the connection is established, you can proceed to the next step and locate your Chromecast device settings.
Step 5: Locate your Chromecast device settings
After successfully connecting your device to your Chromecast, the next step is to locate the device settings within the Google Home app. These settings allow you to customize various aspects of your Chromecast and prepare it for connection to a new Wi-Fi network. Follow these instructions:
- Open the Google Home app on your device.
- From the app’s main screen, locate and tap on the icon or name representing your Chromecast device.
- This will take you to the settings screen for your Chromecast. Here, you can find options to customize the device’s name, backdrop, ambient mode, and more.
- Scroll through the settings to familiarize yourself with the available options. You may also want to explore additional settings like Guest Mode and Privacy settings.
Locating your Chromecast device settings is important for personalizing your device and adjusting its functionality to suit your preferences. By accessing these settings, you are one step closer to connecting your Chromecast to a new Wi-Fi network. In the next step, we will guide you through the process of connecting your Chromecast to a new Wi-Fi network.
Step 6: Connect Chromecast to a new Wi-Fi network
Now that you are in the device settings for your Chromecast, you can proceed with connecting it to a new Wi-Fi network. Follow the instructions below:
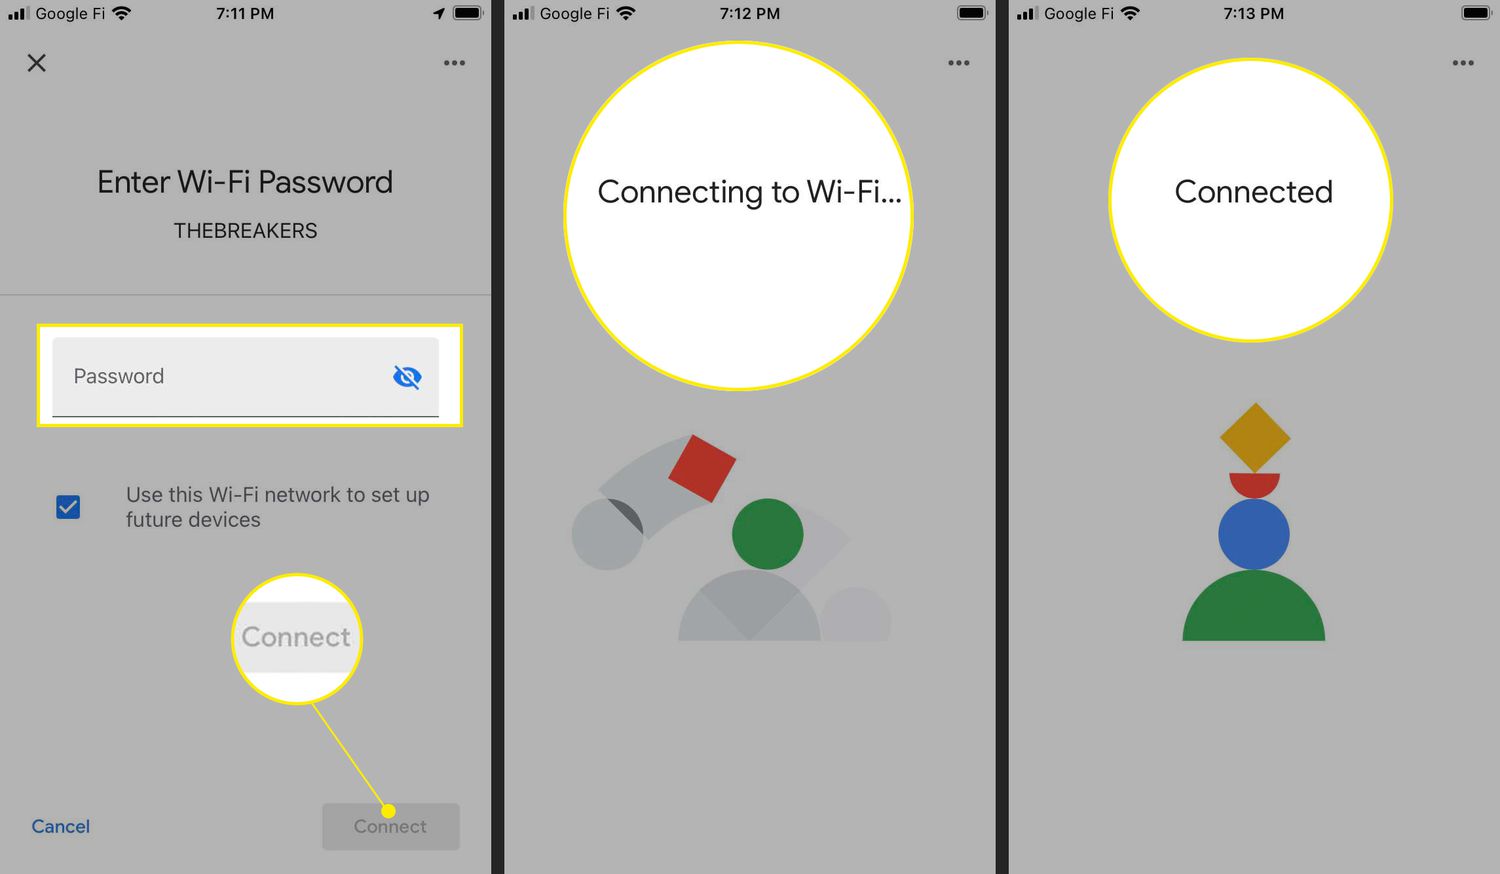
- Within the device settings screen of the Google Home app, locate and tap on the “Wi-Fi” or “Network” option.
- The app will display a list of available Wi-Fi networks. Select the new Wi-Fi network you want to connect your Chromecast to.
- Enter the password for the new Wi-Fi network, if prompted. Ensure that you enter the correct password to avoid any connection issues.
- Wait for the app to complete the process of connecting your Chromecast to the new Wi-Fi network. This may take a few moments.
- Once the connection is established, you will see a confirmation message indicating that your Chromecast is now connected to the new Wi-Fi network.
Connecting your Chromecast to a new Wi-Fi network allows you to enjoy seamless streaming and access to your favorite content on your TV. With this step completed, you’re almost done with the setup process. In the final step, we will guide you through the process of setting up your Chromecast with the new Wi-Fi network.
Step 7: Set up Chromecast with the new Wi-Fi network
With your Chromecast connected to the new Wi-Fi network, you’re ready to complete the setup process. Follow these final steps:
- Open the Google Home app on your device.
- From the app’s main screen, locate and tap on the icon or name representing your Chromecast device.
- Within the device settings screen, tap on the gear or settings icon to access the overall settings for your Chromecast.
- Select the “Set up” or “Device setup” option.
- Follow the on-screen instructions provided by the app to complete the setup process. This may include verifying your Google account information, updating the Chromecast firmware, and granting relevant permissions.
- Once the setup is successfully completed, you will receive a confirmation message indicating that your Chromecast is now fully connected to the new Wi-Fi network.
Congratulations! You have now successfully set up your Chromecast with the new Wi-Fi network. You can now enjoy seamless streaming of your favorite content on your TV. If you encounter any issues during the setup process, double-check your internet connection, ensure that the Wi-Fi network is stable, and restart the setup process if necessary.
Conclusion
Connecting your Chromecast to a new Wi-Fi network is a fairly simple but important task to ensure uninterrupted streaming of your favorite content. By following the step-by-step instructions outlined in this guide, you can successfully connect your Chromecast to a new Wi-Fi network and enjoy seamless entertainment on your TV.
Starting with preparing your Chromecast and connecting it to your TV, you then downloaded and launched the Google Home app to manage your Chromecast settings. You connected your device to your Chromecast and located the device settings within the app. Afterward, you connected your Chromecast to a new Wi-Fi network, ensuring a stable and reliable connection.
In the final step, you set up your Chromecast with the new Wi-Fi network, completing the setup process and allowing you to fully enjoy your streaming experience. Remember to always double-check your internet connection, follow the instructions carefully, and take note of any error messages or troubleshooting tips provided by the Google Home app.
Now that your Chromecast is connected to a new Wi-Fi network, you can explore a world of entertainment and stream your favorite shows, movies, and music with ease. Sit back, relax, and enjoy the seamless streaming experience on your Chromecast-connected TV!