Introduction
Apple TV is a popular streaming device that allows you to access a wide range of entertainment options, including movies, TV shows, music, and more. To enjoy all the features and benefits of Apple TV, it is essential to connect it to your Wi-Fi network. This connection will enable you to stream content, download apps, and even use AirPlay to mirror your iPhone or iPad screen.
Connecting Apple TV to Wi-Fi is a relatively simple process that can be completed in just a few steps. In this article, we will guide you through the process of connecting your Apple TV to Wi-Fi, ensuring you can start enjoying your favorite entertainment in no time.
Before we start, make sure you have the following requirements:
- An Apple TV device (Apple TV 4K or Apple TV HD)
- A compatible Wi-Fi network
- The Wi-Fi network name (SSID) and password
Once you have everything you need, follow the step-by-step instructions below to connect your Apple TV to Wi-Fi.
Step 1: Power on your Apple TV
The first step in connecting your Apple TV to Wi-Fi is to power it on. Start by plugging your Apple TV into a power outlet using the included power cord. Make sure the power outlet is easily accessible and within reach of your TV. Once you have connected the power cord, press the power button on your Apple TV or use the remote control to turn it on.
After powering on your Apple TV, you will see the Apple logo appear on your TV screen. This indicates that your Apple TV is booting up and getting ready for setup.
It is important to note that if this is your first time setting up your Apple TV, you will need to follow the on-screen instructions to complete the initial setup process before you can connect it to Wi-Fi. If you have already set up your Apple TV and are looking to connect it to a new Wi-Fi network, you can skip the initial setup process and proceed directly to the Wi-Fi configuration.
Once your Apple TV is powered on and ready for setup, proceed to the next step to begin connecting it to your Wi-Fi network.
Step 2: Navigate to Settings
To connect your Apple TV to Wi-Fi, you need to access the Settings menu. On your Apple TV home screen, you will see various app icons and options. Navigate to the Settings icon, which looks like a gear or a cogwheel.
You can use the Apple TV remote control to navigate through the home screen. Simply use the directional buttons (up, down, left, right) to highlight the Settings icon, and then press the “Select” or “OK” button to enter the Settings menu.
If you are using the latest Apple TV remote with a touchpad, swipe left or right on the touchpad to highlight the Settings icon, and then tap on the touchpad to enter the Settings menu.
Once you are in the Settings menu, you can access various options and configurations for your Apple TV. Make sure you are in the main Settings menu and not within a specific submenu, as you will need to access the Network settings to connect to Wi-Fi.
Now that you are in the Settings menu, proceed to the next step to select the Network option and continue with the Wi-Fi configuration.
Step 3: Select Network
Once you are in the Settings menu of your Apple TV, it’s time to select the Network option. This will allow you to configure the Wi-Fi settings and connect your Apple TV to your wireless network.
Using the Apple TV remote control, navigate through the Settings menu and locate the Network option. Depending on the version of the Apple TV software, the exact location of the Network option may vary slightly. Look for options like “Network,” “Wi-Fi,” or “Internet” to find the appropriate setting.
Highlight the Network option and press the “Select” or “OK” button on the remote control to enter the Network settings.
Within the Network settings, you may see options for both Wi-Fi and Ethernet connections. Since we are focusing on connecting Apple TV to Wi-Fi, make sure the Wi-Fi option is selected or highlighted.
If your Apple TV is already connected to a Wi-Fi network, you will see the name of the currently connected network displayed. In this case, you can select the network and proceed to the next step to enter the Wi-Fi password. If your Apple TV is not yet connected to any Wi-Fi network, you will see a list of available networks.
Now that you have selected the Network option, continue to the next step to choose your specific Wi-Fi network.
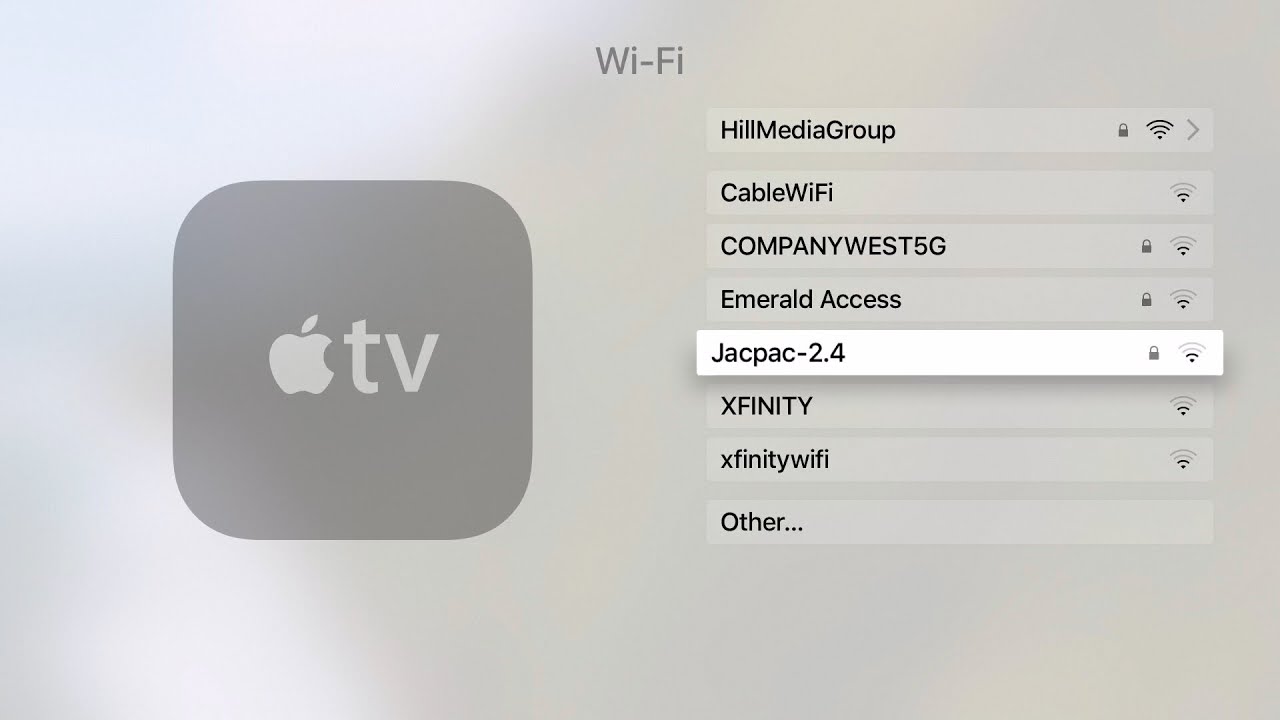
Step 4: Choose Wi-Fi
After entering the Network settings on your Apple TV, it’s time to choose the specific Wi-Fi network you want to connect to. If you have multiple Wi-Fi networks available, this step allows you to select the network that you want your Apple TV to connect to.
Using your Apple TV remote control, navigate through the list of available Wi-Fi networks. The list will display the names (SSID) of the nearby networks that your Apple TV can detect. Use the directional buttons (up, down, left, right) to highlight the desired Wi-Fi network.
As you navigate through the list, pay attention to signal strength indicators or any additional information displayed next to each network name. This can help you choose the strongest and most stable network available to ensure a reliable connection for your Apple TV.
Once you have highlighted the Wi-Fi network you want to connect to, press the “Select” or “OK” button on the remote control to proceed.
If the Wi-Fi network you want to connect to is not listed, make sure that the network is within range of your Apple TV and is properly set up. You may need to troubleshoot your Wi-Fi network or consult with your network administrator to resolve any connectivity issues.
Now that you have selected the Wi-Fi network, proceed to the next step to enter the Wi-Fi password and authenticate your connection.
Step 5: Select your Wi-Fi network
Once you have chosen the Wi-Fi network you want to connect your Apple TV to, it’s time to select it and proceed with the connection process. This step involves verifying the chosen network and confirming your selection.
Using the Apple TV remote control, navigate to the selected Wi-Fi network and ensure it is highlighted or selected. Take a moment to double-check the name of the network to make sure it is the correct one.
If you have chosen the correct Wi-Fi network, press the “Select” or “OK” button on the remote control to confirm your selection. This will initiate the connection process between your Apple TV and the chosen network.
During the connection process, your Apple TV will attempt to establish a connection with the Wi-Fi network. This may take a few seconds as the device authenticates and negotiates the connection details with the network.
While the connection is being established, you may see a spinning loader or progress indicator on your screen. This indicates that your Apple TV is in the process of connecting to the chosen Wi-Fi network.
Once the connection is successfully established, you will see a confirmation message or icon indicating that you are now connected to the Wi-Fi network. At this point, you can proceed to the next step to enter your Wi-Fi password if required.
It is important to note that if you are connecting your Apple TV to a password-protected network, you will need to enter the Wi-Fi password in the next step to complete the connection process.
Step 6: Enter your Wi-Fi password
If you are connecting your Apple TV to a password-protected Wi-Fi network, you will need to enter the Wi-Fi password to authenticate and complete the connection process. This step ensures that only authorized users can access the network.
Once your Apple TV has successfully connected to the selected Wi-Fi network, you may be prompted to enter the Wi-Fi password. This prompt typically appears in the form of an on-screen keyboard.
Using the Apple TV remote control, navigate through the on-screen keyboard to enter your Wi-Fi password. Each letter, number, or special character on the keyboard will be highlighted as you move the cursor. Press the appropriate button on the remote to select the characters and enter your password.
Take your time to enter the password accurately, paying attention to upper and lower case letters and any special characters. If you make a mistake, you can use the arrow buttons on the remote to navigate and make corrections.
Once you have entered the password, verify that it is correct and then proceed to confirm or submit the password. This will initiate the authentication process.
If the entered password is correct, your Apple TV will authenticate and establish a secure connection with the Wi-Fi network. The on-screen keyboard will disappear, and you may see a loading or connecting indicator while the connection is established.
If the entered password is incorrect, your Apple TV will display an error message indicating that the password is invalid. In such cases, double-check the password and re-enter it to ensure accuracy.
Once the Wi-Fi password has been accepted and authenticated, your Apple TV will be successfully connected to the Wi-Fi network. You can now enjoy all the benefits of a wireless connection with your Apple TV.
Step 7: Wait for connection
After entering your Wi-Fi password and authenticating the connection, you will need to wait for your Apple TV to establish a stable connection with the Wi-Fi network. This final step ensures that your Apple TV can communicate with the network and access the internet smoothly.
During this process, your Apple TV will attempt to connect to the Wi-Fi network and establish a solid connection. This may take a few moments, depending on various factors such as network strength and configuration.
While the connection is being established, you may see a loading or connecting indicator on your Apple TV screen. This indicates that your Apple TV is in the process of finalizing the connection.
Be patient and give your Apple TV a few moments to complete the connection process. Avoid any interruptions or disturbances during this time, as they could disrupt the connection establishment.
Once the connection is successfully established, you will see a confirmation message or indicator on your Apple TV screen. This indicates that your Apple TV is now connected to the Wi-Fi network and ready to be used.
At this point, you can start enjoying all the features and benefits of your Apple TV, such as streaming movies, TV shows, music, and much more.
If you encounter any issues during the waiting period, such as unsuccessful connection or error messages, double-check your Wi-Fi network settings and password. Ensure that your Wi-Fi network is functioning properly and that you have entered the correct password.
In some cases, you may need to reset your Apple TV or restart your Wi-Fi router to resolve any connectivity issues. Refer to the respective user manuals or contact the Apple Support team for further assistance if necessary.
Once the connection is successfully established, you can explore the wide range of entertainment options available on your Apple TV and enjoy hours of entertainment.
Conclusion
Connecting your Apple TV to Wi-Fi is a straightforward process that allows you to unlock the full potential of your streaming device. By following the steps outlined in this guide, you can easily connect your Apple TV to your Wi-Fi network and enjoy seamless streaming of movies, TV shows, music, and more.
In this guide, we covered the essential steps to connect your Apple TV to Wi-Fi:
1. Power on your Apple TV.
2. Navigate to the Settings menu.
3. Select the Network option.
4. Choose your desired Wi-Fi network.
5. Enter your Wi-Fi password.
6. Wait for the connection to be established.
By following these steps, you can ensure that your Apple TV is connected to a secure and reliable Wi-Fi network, allowing you to enjoy uninterrupted streaming and access to a wide range of entertainment options.
Remember to keep your Wi-Fi network password safe and secure, as it is crucial to protect your network from unauthorized access.
If you encounter any issues during the process or have further questions, don’t hesitate to consult the Apple TV user manual or seek assistance from the Apple Support team. They can provide additional guidance and troubleshooting tips to ensure a successful connection.
Now that your Apple TV is connected to Wi-Fi, you can take advantage of all the features and benefits it offers. Explore different streaming apps, download games and apps from the App Store, and even use AirPlay to mirror your iPhone or iPad screen on your TV.
Enjoy the immersive entertainment experience that your Apple TV brings, and make the most of your streaming device with a reliable Wi-Fi connection.