Importance of Cleaning a Gaming Laptop
Keeping your gaming laptop clean is not just about maintaining its appearance, but it also plays a vital role in ensuring its optimal performance and longevity. With regular use, dust, dirt, and grime can accumulate on the exterior, as well as inside the components of your laptop, which can negatively impact its overall functionality.
One of the primary reasons why cleaning your gaming laptop is crucial is to prevent overheating. Gaming laptops are designed to handle heavy workloads and intense gaming sessions, producing a significant amount of heat. However, the accumulation of dust particles on the cooling fans and vents can hinder the proper airflow, leading to overheating. This can result in decreased performance, sudden shutdowns, and even long-term damage to the internal components.
In addition to preventing overheating, regular cleaning also helps to maintain the keyboard and trackpad functionality. Gamers often spend hours typing and navigating through intense gaming sessions. Dust and debris can accumulate between the keys, affecting the responsiveness and performance of the keyboard. By cleaning the keyboard and trackpad, you can ensure smooth and accurate input during gaming sessions.
Cleaning the screen of your gaming laptop is another important aspect to consider. Over time, fingerprints, smudges, and dust particles can build up on the screen, diminishing the visual clarity and overall viewing experience. Regular cleaning of the screen helps to remove these unwanted substances, allowing you to enjoy crisp and vibrant visuals while gaming.
Furthermore, keeping the ports and connectivity options of your gaming laptop clean is essential for seamless connectivity. Dust and dirt can accumulate in the USB ports, HDMI ports, and other connectors, obstructing proper connections and causing disruptions. By regularly cleaning these ports, you can maintain a stable connection with peripherals and external devices, ensuring a smooth gaming experience.
Overall, cleaning your gaming laptop on a regular basis is crucial for maintaining its performance, preventing overheating, preserving the functionality of the keyboard and trackpad, and ensuring optimal connectivity. By investing a little time and effort into cleaning your gaming laptop, you can extend its lifespan and enhance your gaming experience.
Tools Needed for Cleaning a Gaming Laptop
Before you begin cleaning your gaming laptop, it is important to gather the necessary tools to ensure a thorough and effective cleaning process. Here are the essential tools you will need:
- Microfiber Cloths: These soft and lint-free cloths are excellent for wiping away dust and fingerprints from the laptop’s exterior, screen, and keyboard. Avoid using abrasive materials such as paper towels as they can scratch the surfaces.
- Cotton swabs: These small and narrow swabs are perfect for reaching small crevices and cleaning hard-to-reach areas, such as the keyboard keys and ports.
- Compressed air: A can of compressed air is useful for blowing away dust and debris from the cooling vents, keyboard, and other hard-to-reach areas. Ensure to hold the can upright and use short bursts to prevent any liquid from spraying onto the laptop.
- Cleaning solution: To clean the screen and exterior surfaces of your gaming laptop, you can use a gentle cleaning solution specifically designed for electronics. Alternatively, you can mix a small amount of isopropyl alcohol with distilled water in a 50:50 ratio as a DIY cleaning solution.
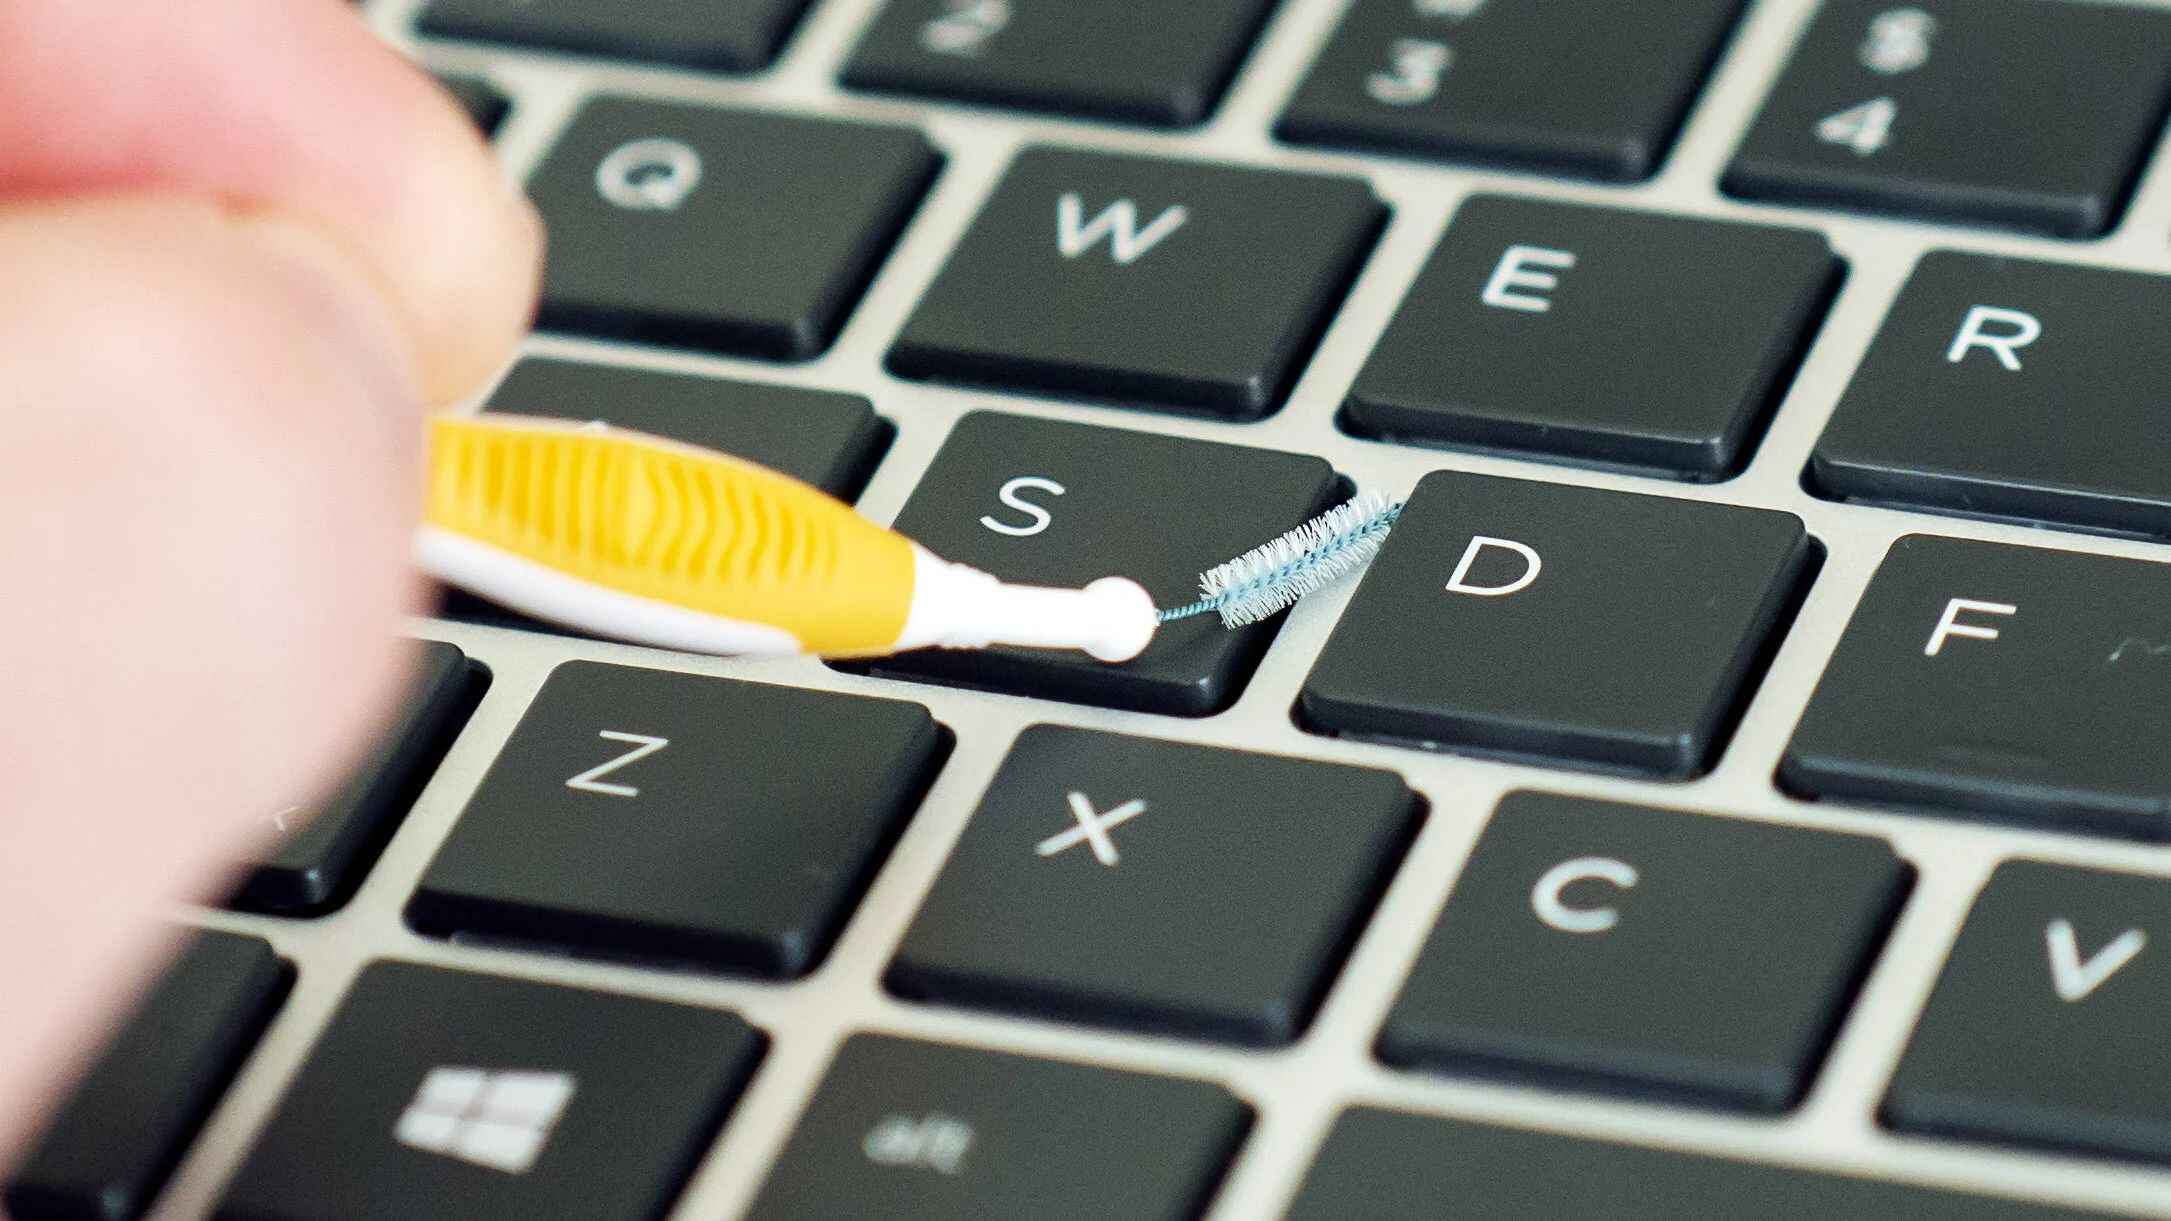
- Soft brush: A soft-bristled brush, such as a toothbrush or a computer cleaning brush, can be used to loosen and remove stubborn dust and dirt from the keyboard, ports, and other intricate parts of the laptop.
These tools are readily available and are cost-effective. It is important to note that when using cleaning solutions or liquids, it’s always best to apply them to the cloth or swab first, rather than directly onto the laptop. This helps to prevent any liquid from seeping into the sensitive components.
By having these essential tools at hand, you will be well-prepared to effectively clean your gaming laptop, ensuring that it remains in optimal condition and ready for your next intense gaming session.
Precautions to Take Before Cleaning a Gaming Laptop
Before you embark on cleaning your precious gaming laptop, it is important to take a few precautions to ensure a safe and effective cleaning process. Here are some essential precautions to keep in mind:
- Power off and unplug: Before you start cleaning, make sure to power off your gaming laptop and unplug it from any power source. This is crucial to avoid any risk of electrical shock or damage to the internal components.
- Allow cooling down time: Gaming laptops tend to get quite hot during use, so it is important to allow sufficient cooling down time before cleaning. By waiting for the laptop to cool down, you reduce the risk of burning yourself or causing damage due to hot surfaces.
- Read the manual: Refer to your laptop’s user manual or manufacturer’s website for specific cleaning instructions and recommendations. Different models may require different cleaning methods or have specific areas that need extra attention.
- Work on a clean surface: Find a clean and flat surface to place your laptop on during the cleaning process. This helps to prevent any dirt or debris from transferring onto the laptop while you clean.
- Handle with care: When cleaning your gaming laptop, be gentle and careful with all the components. Avoid applying excessive pressure or using abrasive materials that may scratch or damage the surfaces.
- Use proper cleaning techniques: Follow the recommended cleaning techniques for each component of your gaming laptop. Use the appropriate tools and cleaning solutions to ensure a thorough and safe cleaning process.
- Avoid liquids near open ports: When using any liquids during the cleaning process, ensure they are not placed near open ports. This reduces the risk of any liquid accidentally entering the laptop and causing damage.
- Allow sufficient drying time: After cleaning, allow the laptop to dry completely before turning it back on or plugging it in. Moisture can cause damage to the laptop’s internal components, so it is important to ensure everything is dry before powering it up again.
By taking these precautions, you can protect your gaming laptop from any potential mishaps or damage while cleaning. Following these guidelines ensures a safe and effective cleaning process, allowing you to maintain the pristine condition of your gaming laptop for many gaming adventures to come.
Cleaning the External Components of a Gaming Laptop
The external components of your gaming laptop are prone to attracting dust, fingerprints, and other debris, making it important to regularly clean them to keep your laptop looking and functioning its best. Here’s how you can effectively clean the external components:
- Cleaning the laptop case: Start by turning off your laptop and unplugging it. Use a microfiber cloth slightly dampened with a gentle cleaning solution to wipe down the laptop’s case, including the lid, sides, and bottom. Take care to avoid getting any liquid into the openings or ports.
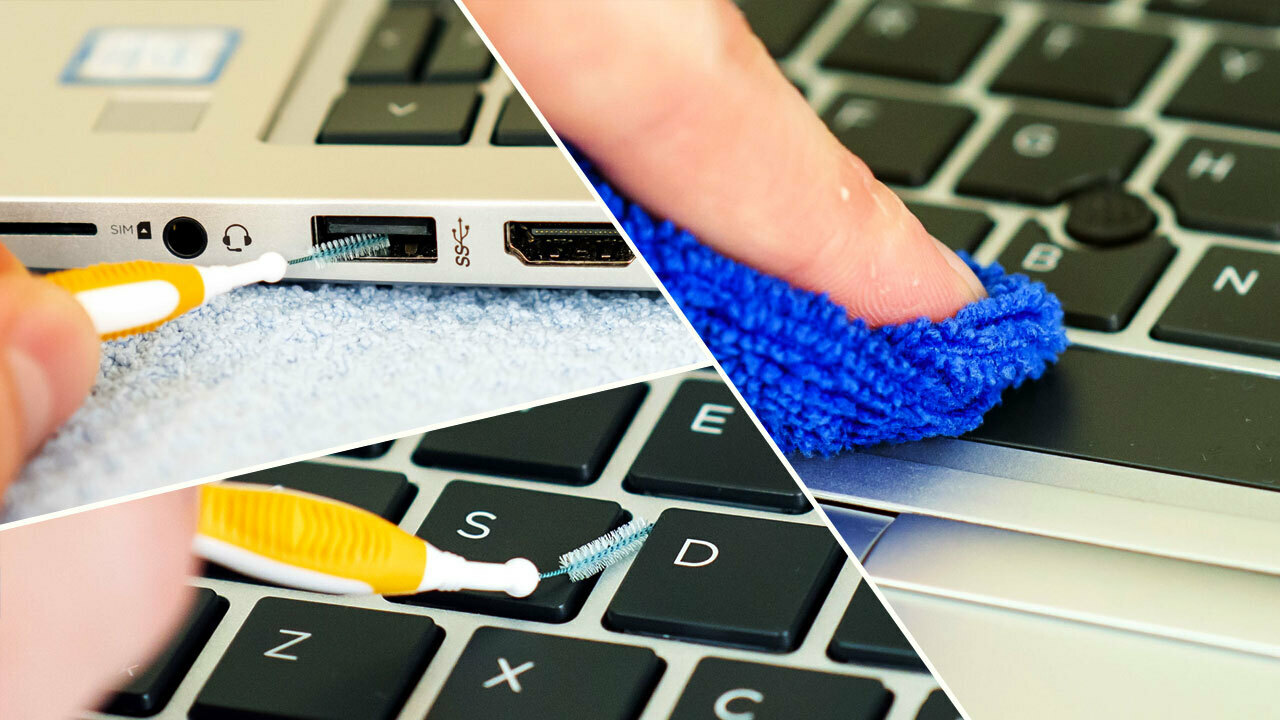
- Cleaning the keyboard: Use compressed air to blow away dust and debris from the keyboard, especially between the keys. You can also use a soft brush or cotton swab to remove stubborn dirt. To disinfect the keys, lightly dampen a cloth with isopropyl alcohol and gently wipe down the keys.
- Cleaning the trackpad: Use a microfiber cloth to wipe down the trackpad in gentle, circular motions. For stubborn smudges or fingerprints, use a cotton swab lightly dampened with a cleaning solution. Be cautious not to apply excessive pressure to avoid damaging the trackpad.
- Cleaning the ports and connectors: Dust and debris can accumulate in the ports and connectors of your gaming laptop, leading to connection issues. Use compressed air and a soft brush to remove any dirt from the ports. Avoid using sharp objects that could damage the contacts.
- Cleaning the exterior screen: To clean the screen, use a microfiber cloth and gently wipe in a circular motion. If there are stubborn smudges or fingerprints, slightly dampen the cloth with a cleaning solution and wipe again. Avoid using excessive pressure to prevent damaging the screen.
- Cleaning the laptop vents: The vents on your gaming laptop can easily accumulate dust, obstructing airflow and causing overheating. Use compressed air to blow away dust from the vents, ensuring proper ventilation and cooling for your laptop.
Remember to always be gentle when cleaning the external components of your gaming laptop. Avoid using abrasive materials or harsh chemicals that could damage the surfaces. Regularly cleaning these components will not only keep your laptop looking clean and polished but also help maintain its overall performance and functionality.
Cleaning the Keyboard and Trackpad of a Gaming Laptop
The keyboard and trackpad of your gaming laptop are two components that require regular cleaning to ensure smooth and accurate input during your gaming sessions. Here’s how you can effectively clean the keyboard and trackpad:
- Gather the necessary tools: Before cleaning, ensure you have a can of compressed air, a soft brush, cotton swabs, and a gentle cleaning solution.
- Power off and unplug your laptop: Before you begin cleaning, it’s important to power off your laptop and unplug it from any power source to avoid any electrical mishaps.
- Start with the keyboard: Begin by using compressed air to blow away any loose crumbs or debris from the keyboard. Pay attention to the gaps between the keys where dirt tends to accumulate.
- Brush away stubborn dirt: Use a soft brush to gently brush away any remaining dirt or dust particles from the keys and the surrounding areas. Be cautious not to apply excessive force to avoid damaging the keys.
- Disinfect the keys: Dampen a cloth or a cotton swab with a small amount of a gentle cleaning solution or isopropyl alcohol. Gently wipe down each key to disinfect and remove any fingerprints or smudges. Ensure the cloth or swab is only lightly dampened and not dripping with liquid.
- Clean the trackpad: Use a microfiber cloth to wipe down the trackpad in gentle, circular motions. For stubborn smudges or fingerprints, use a cotton swab lightly dampened with the cleaning solution. Avoid applying excessive pressure to prevent damaging the trackpad.
- Dry the keyboard and trackpad: After cleaning, ensure that the keyboard and trackpad are completely dry before turning on your laptop or using them again. Allow them to air dry naturally or use a microfiber cloth to gently pat them dry.
It’s important to note that when using any cleaning solution, it’s best to apply it to a cloth or cotton swab first, rather than directly on the keyboard or trackpad. This helps to prevent any liquid from seeping into the sensitive components of your gaming laptop.
By regularly cleaning the keyboard and trackpad, you can maintain their functionality, prevent buildup of dirt and grime, and ensure a smooth and comfortable gaming experience with precise input and control.
Cleaning the Screen of a Gaming Laptop
Keeping the screen of your gaming laptop clean is crucial for enjoying crisp and vibrant visuals while gaming. Here’s how you can effectively clean the screen:
- Gather the necessary tools: Before cleaning, make sure you have a microfiber cloth and a gentle cleaning solution specifically designed for electronic screens. Alternatively, you can create a DIY cleaning solution by mixing isopropyl alcohol with distilled water in a 50:50 ratio.
- Power off your laptop: Before you begin cleaning, turn off your laptop and unplug it to avoid any electrical accidents. Cleaning a powered-off screen will help you see any smudges or dirt more clearly.
- Remove dust and debris: Use a dry microfiber cloth to gently wipe away any loose dust or debris from the screen. Be careful not to apply too much pressure, as this could potentially damage the screen.
- Clean with a gentle solution: If there are stubborn fingerprints or smudges, lightly moisten a clean microfiber cloth with the gentle cleaning solution or the DIY mixture. Make sure the cloth is not dripping wet, as excess liquid could damage the screen.
- Gently wipe the screen: Using the dampened cloth, gently wipe the screen in a circular motion. Start from the top and work your way down, applying gentle pressure. Avoid using excessive force or pressing too hard on the screen.
- Pay attention to edges and corners: While cleaning, be sure to pay extra attention to the edges and corners of the screen, as they can accumulate more dirt and fingerprints. Use gentle circular motions to clean these areas thoroughly.
- Dry the screen: After cleaning, use a dry microfiber cloth to gently remove any excess moisture from the screen. Make sure to dry it completely to prevent streaks or water spots.
It’s important to avoid using harsh chemicals or abrasive materials, such as paper towels or rough cloths, as they can scratch or damage the screen surface. Stick to using microfiber cloths and gentle cleaning solutions specifically designed for screens to ensure a safe and effective cleaning process.
By regularly cleaning the screen of your gaming laptop, you can enjoy a clear and immersive gaming experience with vibrant visuals and reduced eye strain.
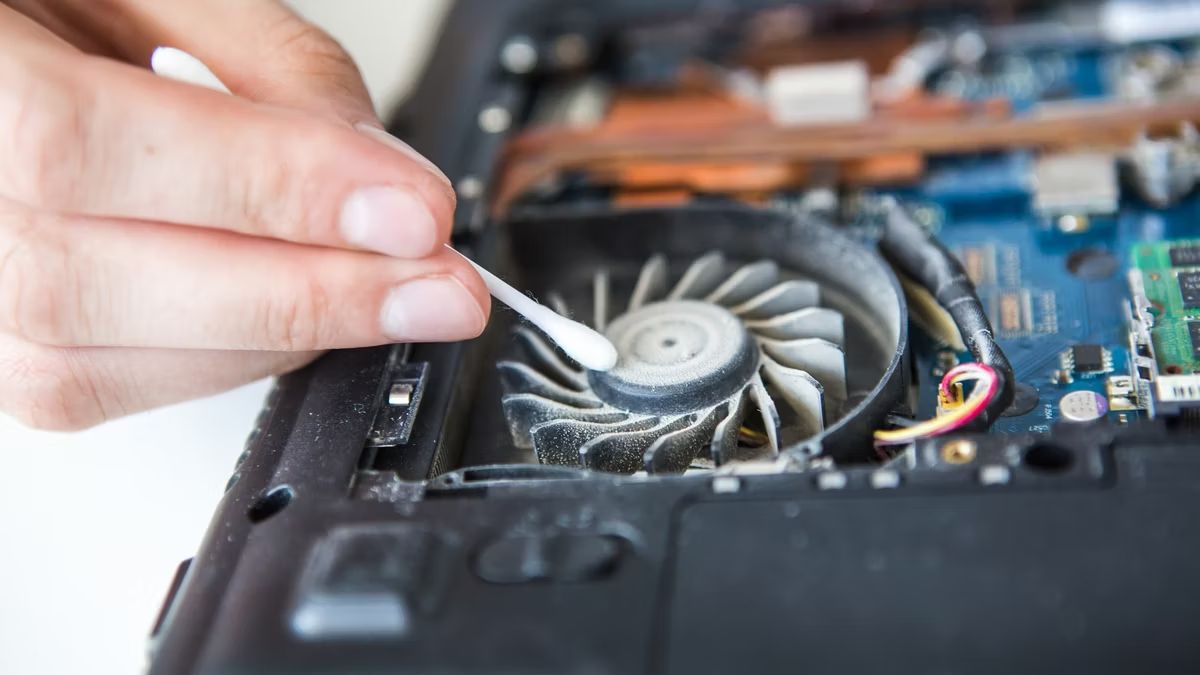
Cleaning the Cooling System of a Gaming Laptop
The cooling system of your gaming laptop plays a vital role in keeping the internal components cool during intense gaming sessions. Dust, dirt, and debris can accumulate in the cooling vents and fans, obstructing airflow and causing overheating. Here’s how you can effectively clean the cooling system:
- Gather the necessary tools: Before cleaning, make sure you have a can of compressed air and a soft brush.
- Power off and unplug your laptop: To avoid the risk of electrical shock, turn off your laptop and unplug it from any power source before cleaning the cooling system. It is important to ensure the laptop has completely cooled down before proceeding.
- Locate the cooling vents and fans: Identify the location of the cooling vents and fans on your laptop. They are usually located on the sides, back, or bottom of the laptop.
- Blow away dust with compressed air: Use the can of compressed air to blow away dust and debris from the cooling vents and fans. Hold the can upright and use short bursts of air to prevent any liquid from spraying onto the laptop.
- Brush away stubborn dirt: Use a soft brush to gently brush away any remaining dirt or dust particles from the cooling vents and fans. Ensure to brush in the direction of the vents to effectively loosen and remove the debris.
- Repeat if necessary: Depending on the level of buildup, you may need to repeat the process of using compressed air and brushing to thoroughly clean the cooling system. Be patient and thorough to ensure optimal airflow.
- Exterior cleaning: After cleaning the cooling system, you may also want to use a microfiber cloth to wipe down the exterior surfaces of the laptop to remove any particles that may have been dislodged during the cleaning process.
Regularly cleaning the cooling system of your gaming laptop helps to maintain proper airflow and prevent overheating. By keeping the vents and fans clear of dust and debris, you can ensure that your laptop performs optimally during those intense gaming sessions.
Cleaning the Ports and Connectivity Options of a Gaming Laptop
The ports and connectivity options of your gaming laptop are important for seamless connections with peripherals and external devices. However, they can accumulate dust and dirt over time, leading to connectivity issues. Here’s how you can effectively clean the ports and connectivity options:
- Gather the necessary tools: Before cleaning, make sure you have a can of compressed air, a soft brush, and cotton swabs.
- Power off your laptop: Before you begin cleaning, turn off your laptop and unplug it from any power source to avoid any electrical accidents.
- Inspect the ports: Take a close look at the ports and connectors on your gaming laptop. Look for any visible dust, debris, or blockages.
- Blow away dust with compressed air: Use the can of compressed air to blow away dust and debris from the ports and connectors. Hold the can upright and use short bursts of air to prevent any liquid from spraying onto the laptop.
- Brush away stubborn dirt: If there are any stubborn dirt or debris particles in the ports, use a soft brush to gently brush them away. Be careful not to apply too much pressure or damage the delicate connectors.
- Use cotton swabs for intricate areas: For hard-to-reach areas or smaller connectors, use cotton swabs lightly moistened with a cleaning solution to wipe away any dirt or grime. Ensure the swabs are not dripping with liquid.
- Allow sufficient drying time: After cleaning, allow the ports and connectors to dry completely before using them or plugging in any devices. Moisture can cause electrical damage or affect the performance of the ports.
- Test the connections: Once the ports and connectors have dried, test the connections with peripherals and external devices to ensure they are working properly. This will help confirm that the cleaning process did not inadvertently affect any functionality.
By regularly cleaning the ports and connectivity options of your gaming laptop, you can ensure stable and reliable connections with peripherals, external devices, and networks. This helps to prevent any disruptions during your gaming sessions and enhances your overall gaming experience.
Maintaining the Overall Performance of a Gaming Laptop
To ensure that your gaming laptop continues to deliver optimal performance and longevity, it is important to implement certain maintenance practices. Here are some tips to maintain the overall performance of your gaming laptop:
- Keep your laptop clean: Regularly clean the exterior, keyboard, screen, cooling system, and ports of your gaming laptop. This helps prevent dust and dirt buildup, which can hinder performance and cause issues such as overheating and connectivity problems.
- Manage storage space: As games and software require ample storage, regularly check your laptop’s storage capacity. If it’s running low, consider uninstalling unnecessary programs and files or upgrading the storage to ensure smooth performance.
- Update drivers and software: Keep your laptop’s drivers and software up to date. Manufacturers often release updates to improve performance, fix bugs, and enhance compatibility with new games and applications.
- Monitor temperature: Keep an eye on your laptop’s temperature during gaming sessions. Use software monitoring tools to ensure that the internal components are not overheating. If temperatures are consistently high, consider investing in a laptop cooling pad for additional airflow.
- Optimize power settings: Adjust your power settings to balance performance and energy consumption. Lowering the display brightness, disabling unnecessary background processes, and optimizing power plans can help extend battery life and enhance performance when needed.
- Use antivirus software: Install and regularly update reputable antivirus software to protect your laptop from malware and viruses. These threats can significantly impact performance and compromise your gaming experience.
- Manage background processes: Close any unnecessary programs and disable startup applications that may consume system resources. This will free up processing power and RAM, allowing your laptop to perform more efficiently.
- Optimize game settings: Adjust the graphics settings within games to find the right balance between performance and visuals. Lowering graphics settings can help improve frame rates and reduce strain on your laptop’s GPU.
- Regularly backup your data: Back up your important files and game saves to an external hard drive or cloud storage. This ensures that in case of any hardware or software issues, your data remains safe and accessible.
- Avoid extreme heat or cold: Protect your gaming laptop from extreme temperatures, as they can negatively impact performance and damage internal components. Avoid exposing your laptop to direct sunlight or leaving it in a car during hot or freezing weather.
By following these maintenance practices, you can maximize the performance and lifespan of your gaming laptop. Regular cleaning, proper storage management, software updates, and mindful usage will help ensure an enjoyable gaming experience for years to come.
Conclusion
Cleaning and maintaining your gaming laptop is crucial for its optimal performance, longevity, and overall gaming experience. By regularly cleaning the external components, keyboard, trackpad, screen, cooling system, and ports, you can prevent overheating, ensure smooth input, maintain clear visuals, and avoid connectivity issues. With the right tools, precautions, and cleaning techniques, you can effectively remove dust, dirt, and grime from your laptop, keeping it in pristine condition.
In addition to cleaning, other maintenance practices are equally important. Managing storage space, updating drivers and software, monitoring temperature, optimizing power settings, using antivirus software, managing background processes, optimizing game settings, regularly backing up your data, and protecting your laptop from extreme temperatures all contribute to maintaining the overall performance and longevity of your gaming laptop.
Remember to always follow the manufacturer’s guidelines and refer to the user manual for specific cleaning instructions and recommendations for your particular gaming laptop model. By investing a little time and effort into cleaning and maintaining your gaming laptop, you can enjoy an uninterrupted and immersive gaming experience for years to come.