Introduction
Gaming laptops are an essential tool for gamers, allowing them to immerse themselves in virtual worlds and enjoy their favorite games with ease. However, after hours of intense gameplay, the keyboard can become filled with dirt, crumbs, and other debris. A dirty keyboard not only hampers the overall gaming experience but also affects the performance and lifespan of the laptop.
Cleaning a gaming laptop keyboard may seem like a daunting task, but with the right materials and techniques, it can be a quick and straightforward process. In this guide, we will walk you through the step-by-step process of cleaning your gaming laptop keyboard, ensuring that it remains in pristine condition.
Regular maintenance and cleaning of your keyboard not only improve its performance but also keep it looking brand new. By following the advice in this guide, you can make your gaming sessions more enjoyable and prolong the life of your laptop keyboard.
So, let’s dive into the materials you’ll need to get started with the cleaning process.
Materials needed
Before you begin cleaning your gaming laptop keyboard, gather the following materials:
- Compressed air: This will help blow away dust and debris from between the keys.
- Microfiber cloth or cotton swabs: These can be used to wipe down the keys and remove any dirt or smudges.
- Rubbing alcohol: This is effective at disinfecting and removing built-up grime on the keys.
- Water and mild soap: You’ll need this to create a cleaning solution for removing sticky residue.
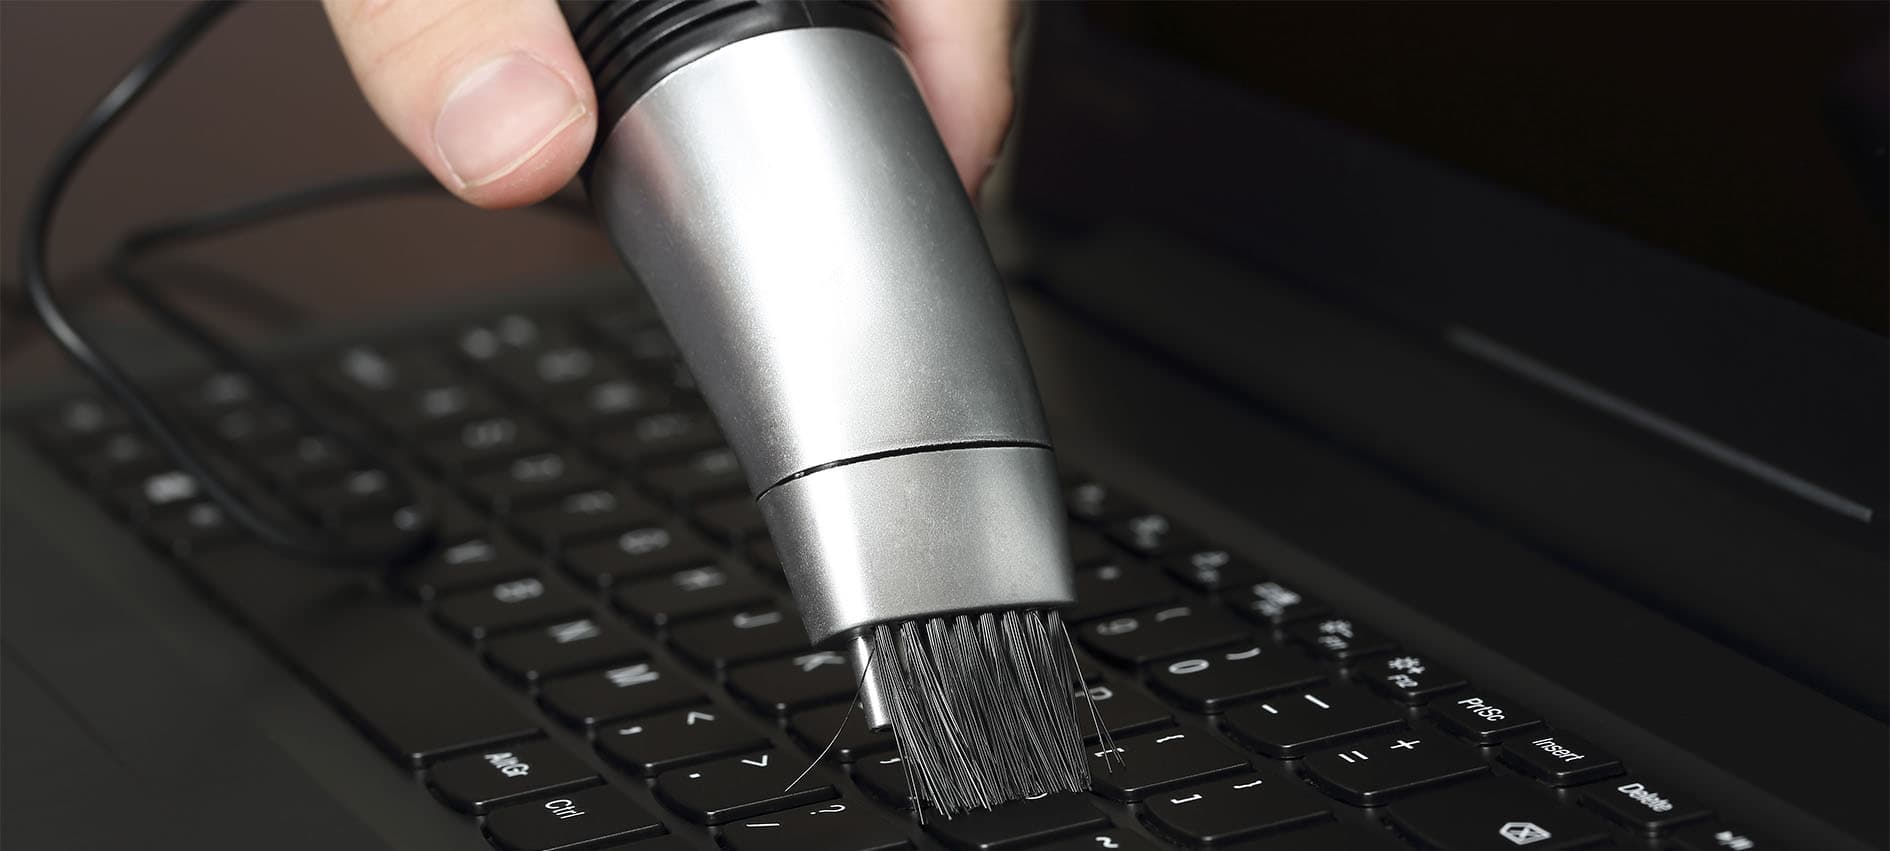
- Soft-bristle brush: Useful for dislodging stubborn debris from hard-to-reach areas.
Having these materials on hand will ensure that you have everything you need to clean your gaming laptop keyboard effectively. Once you have gathered these supplies, we can move on to the step-by-step guide for cleaning your keyboard properly.
Step-by-step guide
Follow these steps to clean your gaming laptop keyboard:
- Shut down the laptop: Before you begin cleaning, make sure to shut down your laptop completely to avoid any accidents or damage.
- Disconnect the laptop from the power source: Unplug your laptop from the power source and remove the battery if possible. This step is crucial to prevent any electrical damage during the cleaning process.
- Remove any external peripherals: Disconnect any external devices connected to your laptop, such as USB drives or headphones. This will make it easier to clean the keyboard without anything getting in the way.
- Turn the laptop upside down and gently shake: With the laptop upside down, gently shake it to remove any loose debris, crumbs, or dust that may have accumulated between the keys. Be careful not to shake it vigorously, as this could cause internal damage.
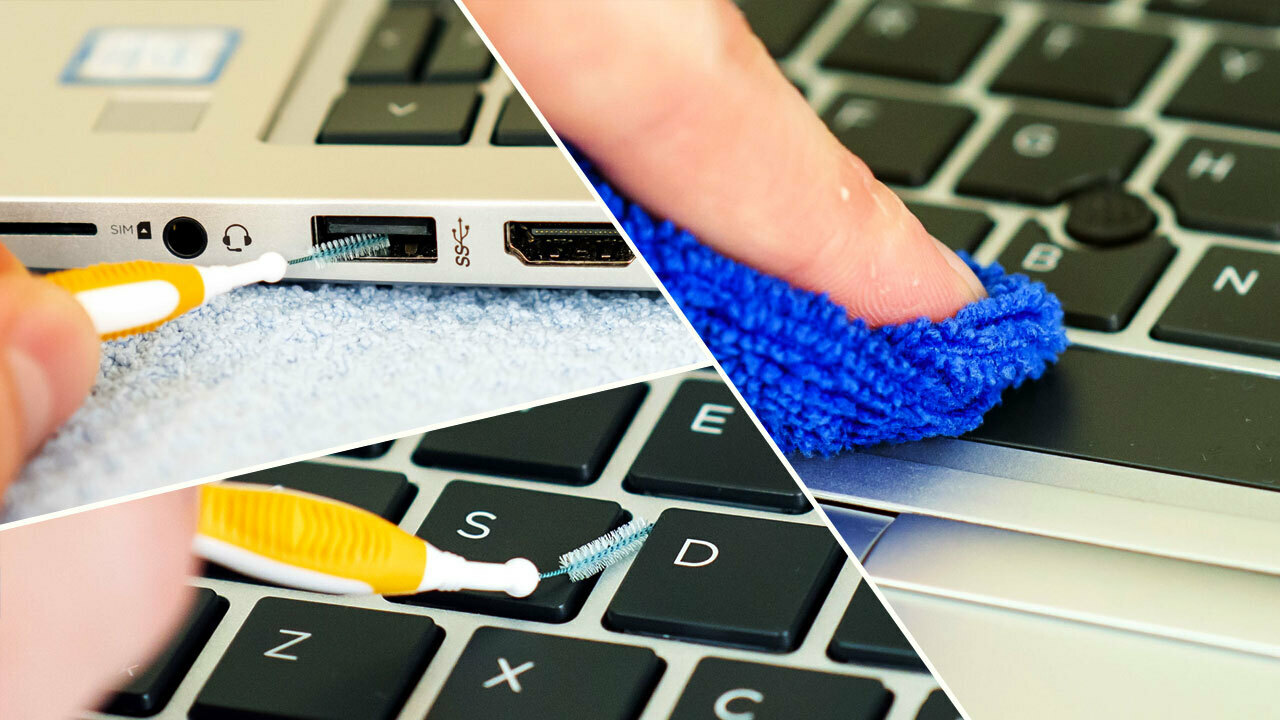
- Use compressed air to blow away dust and debris: Hold the compressed air canister upright and use short bursts of air to blow away any remaining dust or debris. Aim the nozzle between the keys and in hard-to-reach areas to ensure a thorough cleaning.
- Clean the keys with a microfiber cloth or cotton swab dipped in rubbing alcohol: Dampen a microfiber cloth or cotton swab with a small amount of rubbing alcohol. Gently swipe the cloth or swab over each key, paying close attention to any sticky or dirty areas. Avoid using excessive moisture, as it can damage the keyboard.
- Remove sticky residue with a mixture of water and mild soap: If there are sticky residues on the keys, create a mild cleaning solution by mixing water and a small amount of mild soap. Dampen a cloth with the solution and gently wipe the affected keys to remove the residue. Wipe off any excess moisture with a dry cloth.
- Allow the keyboard to dry completely: After cleaning, allow the keyboard to air dry completely before reattaching any peripherals or turning on the laptop. Make sure there is no moisture left on the keys or in the keyboard gaps.
Following these steps will help you effectively clean your gaming laptop keyboard and ensure that it remains in optimal condition for your gaming sessions. However, it’s essential to perform regular maintenance to prevent future build-up and keep your keyboard clean over time.
Shut down the laptop
The first step in cleaning your gaming laptop keyboard is to shut down the laptop completely. It’s crucial to turn off the laptop to prevent any accidental keystrokes or changes while cleaning. Shutting down the laptop ensures that the keyboard remains inactive, making it safer and easier to clean without any interference.
To shut down your laptop, follow these steps:
- Save any ongoing work and close all open applications.
- Click on the “Start” menu located in the bottom left corner of the screen.
- From the start menu, select the “Power” option, which will display various power-related options.
- Click on the “Shut down” option to initiate the shutdown process.
- Wait for the laptop to complete the shutdown process, indicated by the screen turning off or displaying a message that it is safe to turn off the computer.
It’s important to ensure that the laptop is completely powered down and not in sleep or hibernation mode. This will mitigate the risk of accidental activation during the cleaning process, preventing any potential damage to the keyboard or the laptop itself.
Once the laptop is shut down, you can proceed to the next step of disconnecting it from the power source to ensure complete safety throughout the cleaning process.
Disconnect the laptop from the power source
After shutting down your gaming laptop, the next step is to disconnect it from the power source. This ensures that there is no electrical current flowing through the laptop, reducing the risk of damage during the cleaning process.
Disconnecting the laptop from the power source involves two main steps:
- Unplugging the power cord from the laptop: Locate the power cord connected to your laptop. It is usually a cable with a transformer on one end and a plug on the other. Gently remove the plug from the power port on your laptop. This step ensures that no power is being supplied to your laptop.
- Removing the laptop battery (optional): If your gaming laptop has a removable battery, it is recommended to remove it during the cleaning process. This further eliminates any potential power source and reduces the risk of electrical accidents. Refer to your laptop’s manual for instructions on how to safely remove the battery.
By disconnecting your laptop from the power source, you create a safer environment for cleaning the keyboard. This step is vital to protect both the laptop and yourself from any electrical harm.
Once you have disconnected the laptop from the power source, you can move on to the next step of removing any external peripherals connected to your gaming laptop.
Remove any external peripherals
Before you start cleaning the keyboard of your gaming laptop, it’s important to remove any external peripherals that are connected to your device. This includes USB drives, headphones, external speakers, or any other devices plugged into your laptop.
Removing the external peripherals serves two main purposes:
- Provides easy access to the keyboard: By removing external devices, you can access the keyboard more effectively and clean it more thoroughly. This allows you to navigate between the keys and remove any dirt, dust, or debris that may have accumulated.
- Prevents damage to the peripherals: While cleaning the keyboard, it’s possible for cleaning agents or liquids to accidentally come into contact with the connected devices. Removing the peripherals reduces the chance of any damage occurring to them.
To remove the external peripherals from your gaming laptop, follow these steps:
- Ensure that your laptop is turned off and disconnected from the power source.
- Gently unplug any connected USB drives or other external devices.
- If you have headphones or external speakers connected, detach them from the laptop.
By removing external peripherals, you create a clear workspace and ensure that your keyboard cleaning process goes smoothly. Once you have removed all external devices, you can proceed to the next step of turning the laptop upside down and gently shaking it to remove loose debris.
Turn the laptop upside down and gently shake to remove loose debris
Now that you have removed the external peripherals, it’s time to turn your gaming laptop upside down and gently shake it to remove any loose debris that may have accumulated between the keys.
This step is effective in dislodging and removing larger particles such as crumbs, dust, or small objects that may have found their way underneath the keys. By shaking the laptop upside down, you allow gravity to help you in getting rid of this loose debris.
Follow these steps to turn your laptop upside down and shake it:
- Ensure that your laptop is securely held to prevent any accidental drops or damage.
- Turn the laptop upside down and hold it steady with one hand on each side.
- Gently shake the laptop from side to side, allowing any loose debris to fall out. Be careful not to shake it too forcefully to avoid causing any damage to the internal components.
- Continue shaking until you are satisfied that most of the loose debris has been dislodged.
By turning your gaming laptop upside down and gently shaking it, you can effectively remove a significant amount of loose debris that may have accumulated beneath the keys. However, this step may not remove all particles, especially those that are lodged more firmly. To tackle these stubborn debris, we will move on to the next step, which involves using compressed air.
Use compressed air to blow away dust and debris
After shaking your gaming laptop to remove loose debris, the next step is to use compressed air to blow away any remaining dust and debris that may be trapped between the keyboard keys.
Compressed air is a highly effective tool for cleaning keyboards as it provides a strong burst of air that can dislodge and remove stubborn dirt particles. It can reach into the nooks and crannies of the keyboard, ensuring thorough cleaning.
Follow these steps to use compressed air to clean your gaming laptop keyboard:
- Ensure that your laptop is still turned off and disconnected from the power source.
- Hold the compressed air canister upright and read the instructions on the can for any specific precautions.
- Locate the nozzle of the compressed air canister.
- Direct the nozzle between the keys, spacing it a few inches away from the keyboard.
- Press the nozzle to release short bursts of air, aiming to dislodge any remaining dust and debris. Move the nozzle across the keyboard, covering all areas.
- Pay particular attention to hard-to-reach areas and corners where debris may be more likely to accumulate.
- Continue using the compressed air until you are satisfied that the keyboard is free from dust and debris.
Using compressed air to blow away dust and debris ensures a thorough cleaning of your gaming laptop keyboard. However, it is essential to handle the compressed air canister carefully and follow any safety instructions provided by the manufacturer.
Once you have finished using compressed air, it’s time to move on to the next step of cleaning the keys themselves using a microfiber cloth or cotton swab dipped in rubbing alcohol.
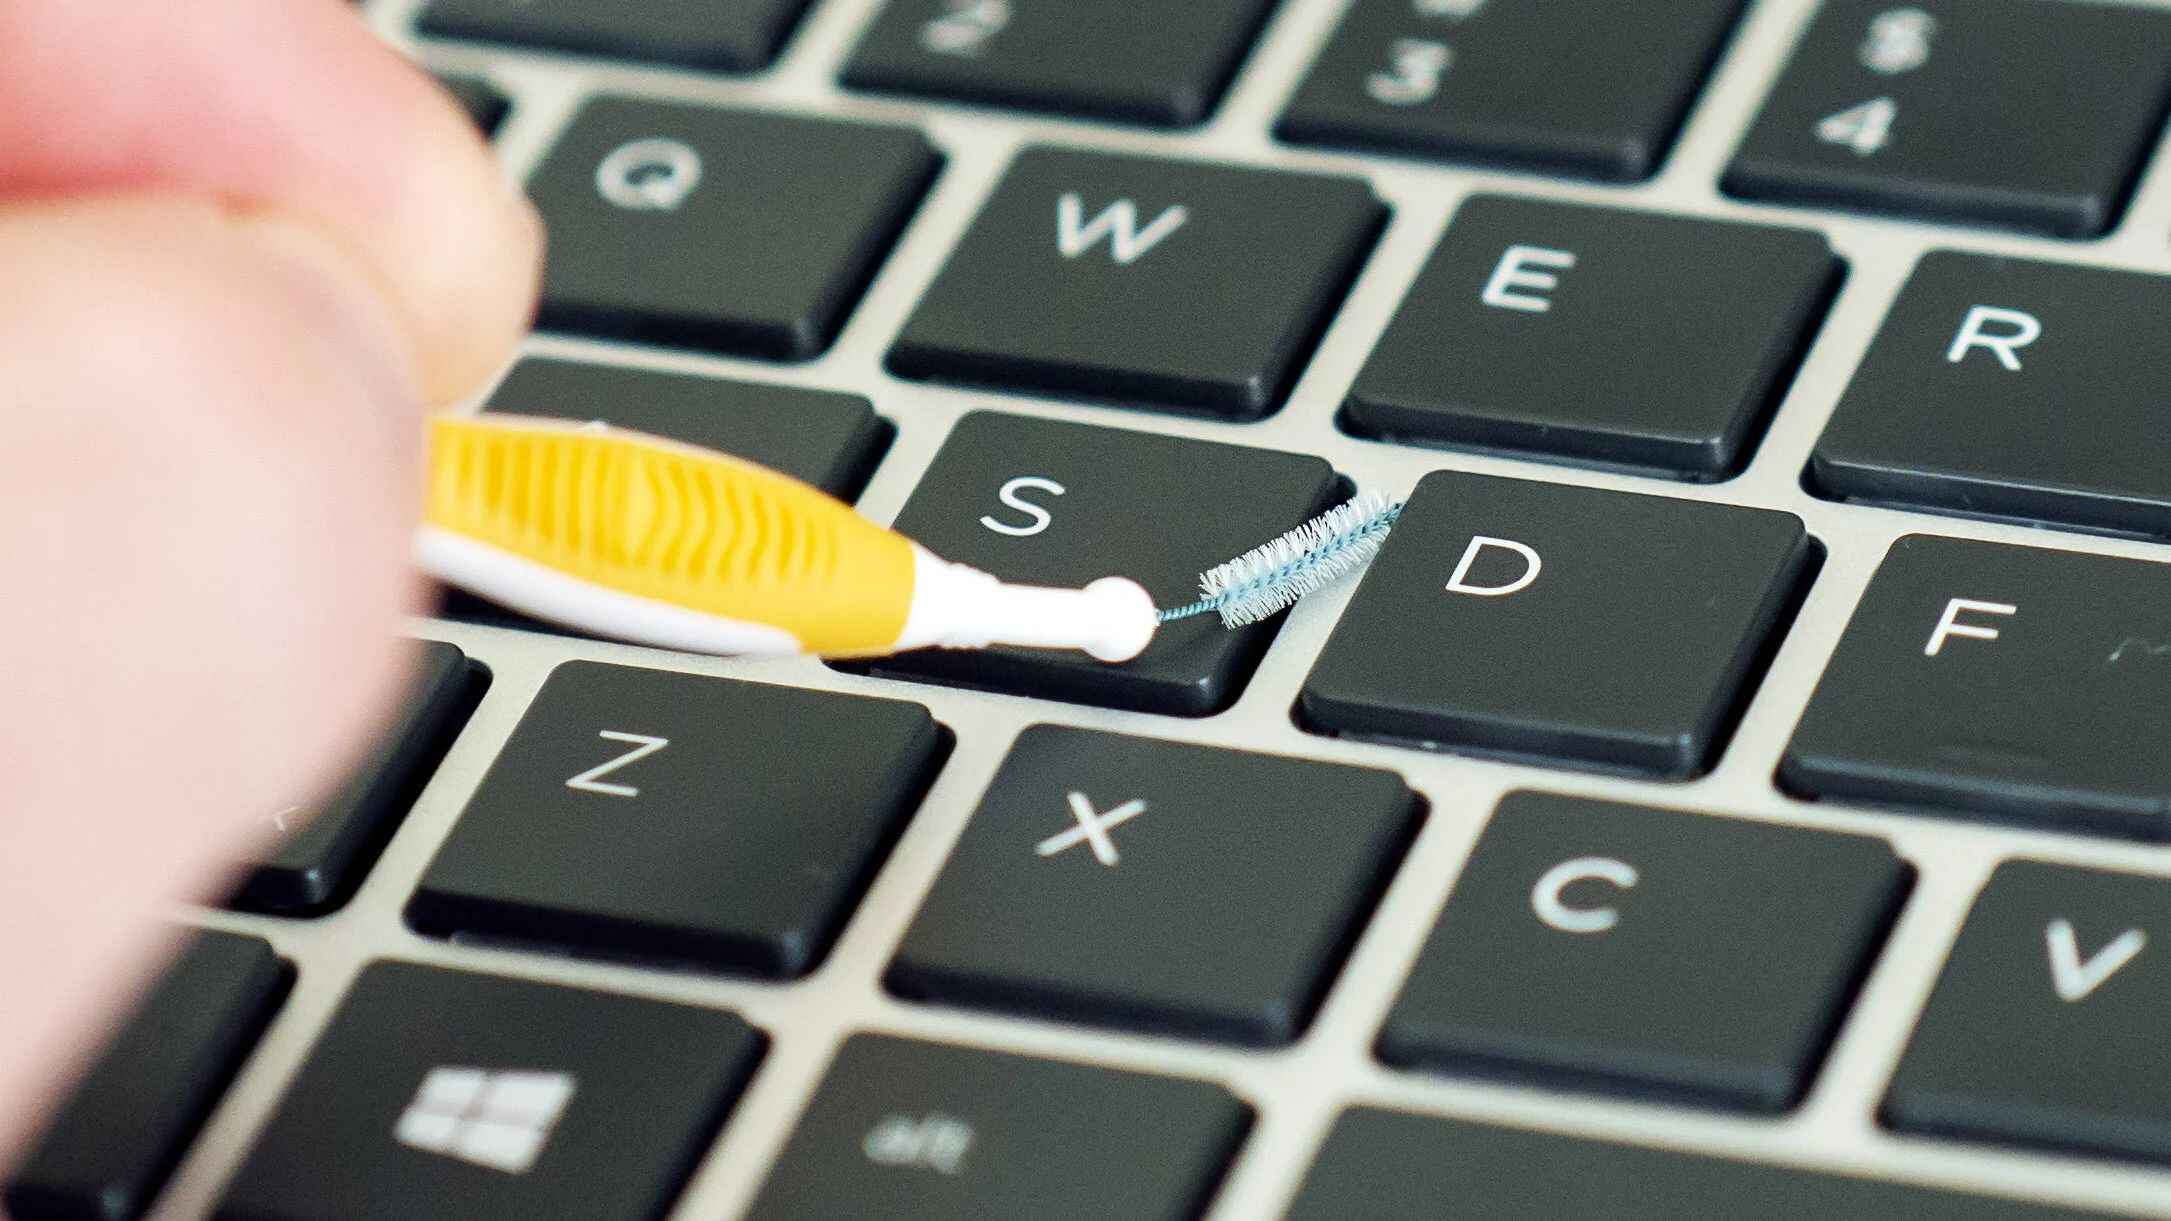
Clean the keys with a microfiber cloth or cotton swab dipped in rubbing alcohol
After using compressed air to remove dust and debris, it’s time to clean the keys of your gaming laptop keyboard. For this step, you will need a microfiber cloth or cotton swab dipped in rubbing alcohol.
Cleaning the keys helps to remove any dirt, oils, or smudges that may have accumulated on the surface. Rubbing alcohol is an effective cleaning agent as it not only disinfects the keys but also helps to remove built-up grime.
Follow these steps to clean the keys of your gaming laptop keyboard:
- Take a microfiber cloth or dip a cotton swab into rubbing alcohol. Ensure that the cloth or swab is not dripping wet, as excess moisture can damage the keyboard.
- Gently swipe the cloth or swab over each key, focusing on removing any dirt or smudges. Use gentle pressure to avoid damaging the keys or pushing debris further into the keyboard.
- Pay close attention to any sticky or dirty areas and give them extra attention to ensure thorough cleaning.
- If using a cloth, you can fold it into a small square and use the edges to clean between the keys.
- Continue cleaning the keys, rotating the cloth or changing the cotton swab as needed, until all keys are clean and free from any visible dirt or smudges.
By cleaning the keys with a microfiber cloth or cotton swab dipped in rubbing alcohol, you remove dirt and oils that can affect the performance and appearance of your gaming laptop keyboard. Additionally, rubbing alcohol helps to disinfect the keys, eliminating any potential germs or bacteria.
Once you have cleaned the keys, you may proceed to the next step of removing any sticky residue that may be present.
Remove sticky residue with a mixture of water and mild soap
In some cases, you may encounter sticky residue on your gaming laptop keyboard keys. This residue can be caused by spills, food crumbs, or other substances that have adhered to the keys over time. To effectively remove sticky residue, you can create a mild cleaning solution using water and mild soap.
Follow these steps to remove sticky residue from your gaming laptop keyboard:
- Mix a small amount of water with a few drops of mild soap in a bowl. Ensure that the soap is gentle and does not contain any harsh chemicals.
- Dampen a cloth with the soap and water mixture. Make sure the cloth is not dripping wet to avoid excess moisture.
- Gently rub the damp cloth over the keys that have sticky residue. Apply light pressure to remove the residue without damaging the keys.
- If the residue persists, try using a cotton swab dipped in the soap and water mixture to target specific areas.
- Once the sticky residue is removed, take a clean, dry cloth and wipe the keys to remove any remaining moisture.
It’s important to note that excessive moisture can damage the keyboard, so use the soap and water mixture sparingly and ensure that you dry the keys thoroughly after cleaning.
By removing sticky residue with a mixture of water and mild soap, you restore the cleanliness and functionality of your gaming laptop keyboard. This step helps to improve typing experience and prevents any sticky keys from affecting your gaming sessions.
Once you have removed the sticky residue, it’s crucial to allow the keyboard to dry completely before reattaching any peripherals or turning on your laptop.
Allow the keyboard to dry completely before reattaching any peripherals or turning it back on
After cleaning and removing any sticky residue from your gaming laptop keyboard, it is crucial to allow the keyboard to dry completely before reattaching any peripherals or turning it back on.
Drying time is essential to ensure that no moisture remains on the keys or in the keyboard gaps, as moisture can cause damage to the internal components or lead to sticky keys.
Follow these steps to ensure proper drying:
- After cleaning, use a clean, dry cloth to gently wipe the keys and remove any remaining moisture.
- Leave your gaming laptop open or position it in a way that allows air circulation around the keyboard.
- Avoid exposure to direct sunlight or heat sources, as this can cause warping or damage to the laptop.
- Allow the keyboard to air dry naturally for at least a few hours, or overnight if possible.
Proper drying time ensures that the keyboard is completely free of moisture before you reassemble and use your gaming laptop. Rushing this step may result in malfunctioning keys or other issues.
Once you are confident that the keyboard is completely dry, you can safely reattach any peripherals and power on your gaming laptop. This ensures that you can continue to enjoy your gaming experience with a clean and fully functional keyboard.
Tips for maintenance and preventing future build-up
Keeping your gaming laptop keyboard clean and well-maintained is essential for optimal performance and longevity. Here are some tips to help you maintain a clean keyboard and prevent future build-up of dirt and debris:
- Regularly clean your keyboard: Make it a habit to clean your gaming laptop keyboard regularly to prevent dirt and debris from accumulating. A weekly cleaning routine can go a long way in maintaining a clean and functional keyboard.
- Avoid eating or drinking near your laptop: Accidental spills or crumbs from food and beverages can easily find their way into the keyboard. Try to avoid eating or drinking near your laptop to minimize the risk of spills and debris entering the keys.
- Use a keyboard cover or skin: Consider investing in a keyboard cover or skin specifically designed for your gaming laptop model. These thin and transparent covers act as a barrier against dust, spills, and oils, preventing them from directly reaching the keys.
- Wash your hands before using the keyboard: Clean hands are less likely to transfer oils, dirt, and sweat to the keyboard. Wash your hands thoroughly before using your gaming laptop to minimize the amount of debris that comes into contact with the keys.
- Avoid using harsh chemicals: When cleaning your keyboard, steer clear of harsh chemicals or abrasive cleaning agents, as they can damage the keys or the keyboard surface. Stick to mild soaps, rubbing alcohol, or approved keyboard cleaning solutions.
- Keep your workspace clean: A clean environment can reduce the amount of dust and debris that settle on your gaming laptop keyboard. Regularly clean your desk or gaming area to minimize the potential for dirt accumulation.
- Store your laptop properly: When not in use, store your gaming laptop in a clean and dust-free environment. Use a protective laptop case or sleeve to shield it from dirt and accidental spills.
- Replace worn-out keys: If you notice any keys becoming sticky or unresponsive, consider replacing them promptly. This can prevent further build-up and ensure smooth functionality of your gaming laptop keyboard.
By incorporating these tips into your regular maintenance routine, you can keep your gaming laptop keyboard clean and in optimal condition. Taking proactive steps to prevent build-up will enhance your gaming experience and prolong the lifespan of your keyboard.
Conclusion
Cleaning your gaming laptop keyboard is an important task to maintain its functionality, performance, and aesthetic appeal. By following the step-by-step guide outlined in this article, you can effectively remove dirt, debris, and sticky residue from your keyboard, ensuring a clean and pleasant gaming experience.
Remember to shut down your laptop and disconnect it from the power source before cleaning. Start by removing any external peripherals and gently shaking the laptop to dislodge loose debris. Use compressed air to blow away dust and then clean the keys with a microfiber cloth or cotton swab dipped in rubbing alcohol. If necessary, remove sticky residue with a mild soap and water solution.
Allow the keyboard to dry completely before reattaching any peripherals and turning on the laptop. Additionally, consider implementing preventive measures such as regular cleaning, avoiding eating near the laptop, using a keyboard cover, and maintaining a clean workspace to prevent future build-up.
With proper maintenance and regular cleaning, your gaming laptop keyboard will continue to provide a smooth and enjoyable gaming experience for years to come. Take the time to care for your keyboard, and you’ll be rewarded with improved performance and a clean gaming setup to dive into your favorite virtual worlds.