Introduction
Welcome to the world of PlayStation, where gaming enthusiasts can immerse themselves in a vast array of thrilling games and digital content. The PlayStation Wallet is an essential feature that allows users to conveniently manage their funds and make purchases on the PlayStation Store. Whether you want to check your balance, view transaction history, or add funds to your wallet, this article will guide you through the process step by step.
With the PlayStation Wallet, you can ensure that you have enough funds to buy your favorite games, expansion packs, or even subscribe to online services. By keeping an eye on your wallet balance and transaction history, you can stay in control of your spending and make informed decisions about your digital purchases.
In this comprehensive guide, we will walk you through the necessary steps to check your PlayStation Wallet, view your transaction history, and add funds. Whether you are a seasoned PlayStation pro or new to the platform, this tutorial will provide you with all the information you need to manage your Wallet effectively.
So, grab your controller and get ready to dive into the world of PlayStation Wallet management. Let’s ensure that you have a seamless and enjoyable gaming experience while making the most of the features available to you!
Step 1: Accessing the PlayStation Store
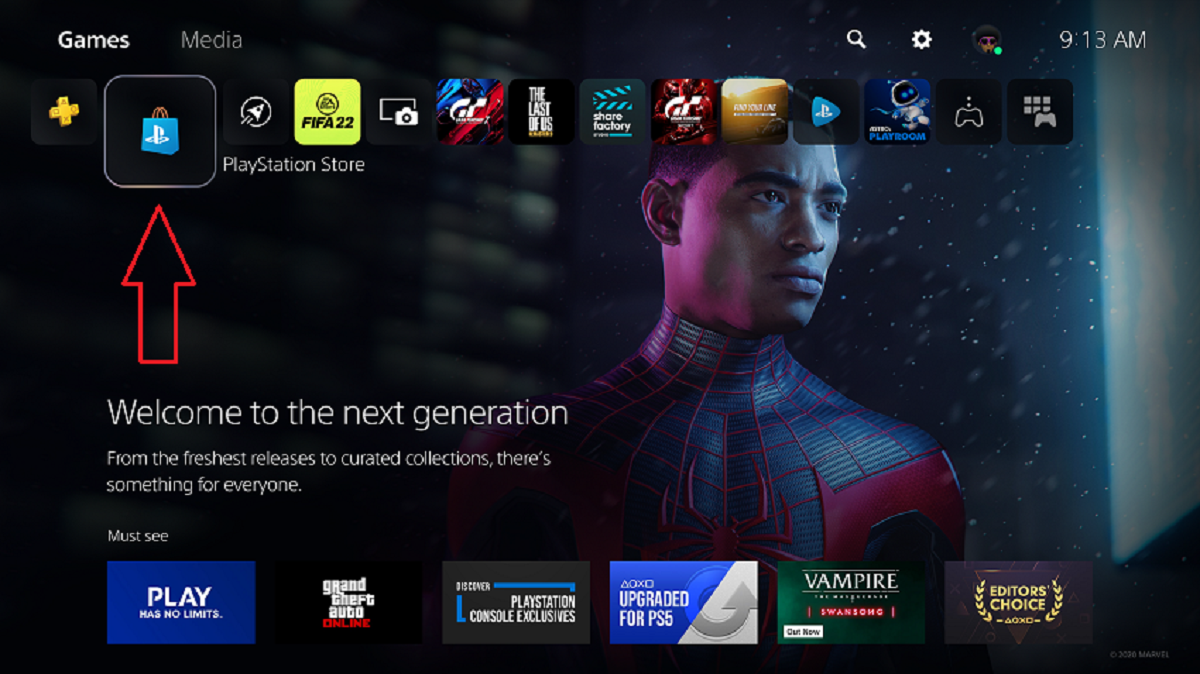
The first step in checking your PlayStation Wallet is to access the PlayStation Store. The PlayStation Store is the digital marketplace where you can find a wide range of games, downloadable content, and other digital items for your PlayStation console.
To access the PlayStation Store, make sure your PlayStation console is turned on and connected to the internet. Once you’re ready, follow these simple steps:
- On your PlayStation console, navigate to the home screen. You can do this by pressing the PlayStation button on your controller.
- From the home screen, scroll to the right and select the “PlayStation Store” icon. It is usually located towards the end of the list of icons.
- The PlayStation Store will now open, and you will be presented with a variety of options such as games, deals, and featured content.
- Use your controller’s directional buttons to navigate through the different sections of the PlayStation Store. You can browse categories, search for specific titles, or explore the curated content.
Once you have successfully accessed the PlayStation Store, you are now ready to proceed to the next step and navigate to the wallet section to check your balance.
Step 2: Navigating to the Wallet
Now that you have accessed the PlayStation Store, it’s time to navigate to the Wallet section to check your balance. The Wallet is where you can manage your funds and keep track of your PlayStation Store purchases. Follow these steps to find your way to the Wallet:
- From the main menu of the PlayStation Store, look for the “Menu” button. This button is usually located in the top left or top right corner of the screen.
- Press the “Menu” button on your controller to open the navigation menu.
- In the navigation menu, you will see a list of options such as “Games”, “TV & Video”, “Apps”, and more.
- Scroll down or navigate through the options until you find the “Wallet” option. It is typically located towards the bottom of the list.
- Select the “Wallet” option to access your PlayStation Wallet.
Once you have successfully navigated to the Wallet section, you will be able to view your wallet balance, transaction history, and other relevant details. Now it’s time to move on to the next step and check your PlayStation Wallet balance.
Step 3: Checking Your PlayStation Wallet Balance
Checking your PlayStation Wallet balance is a quick and easy process. Follow these steps to find out how much funds you have available:
- Once you are in the Wallet section of the PlayStation Store, you will see your wallet balance displayed prominently on the screen. This is the amount of funds you currently have in your PlayStation Wallet.
- If you want to view more detailed information about your wallet balance and transaction history, select the “Wallet” option from the menu on the left side of the screen.
- In the Wallet menu, you will see a breakdown of your current balance, including the amount of funds in your wallet, any active subscriptions, and any pre-orders you may have.
- To check the balance of a specific currency, use the left and right directional buttons on your controller to navigate between different currency options, such as USD, EUR, or GBP.
- Your wallet balance will be displayed for the selected currency. Take note of the balance to keep track of your available funds.
Now that you have checked your PlayStation Wallet balance, you have a clear understanding of how much funds you have available for purchasing games, DLCs, and other digital content. If you want to dive deeper into your wallet activity, continue reading to learn how to view your transaction history.
Step 4: Viewing Transaction History
Viewing your transaction history on PlayStation allows you to keep track of your past purchases and gain insights into your spending habits. Follow these steps to access your transaction history:
- From the Wallet menu in the PlayStation Store, navigate to the “Transaction History” tab. This tab is usually located alongside other options like “Add Funds” and “Payment Methods”.
- Once you are in the Transaction History section, you will see a list of your recent transactions.
- Using the directional buttons on your controller, scroll through the list to view each transaction. The information displayed typically includes the date of the transaction, the name of the purchase, and the amount charged to your wallet.
- If you want to view further details about a specific transaction, such as the transaction ID or associated payment method, select the transaction and choose the “Details” option.
- Continue to scroll through the transaction history to review all your past purchases and their respective details.
By accessing your transaction history, you can stay organized and keep track of your spending patterns. This feature helps you to identify any unauthorized transactions or to recall the name of a specific game or content you have purchased in the past.
Now that you know how to view your transaction history, let’s move on to the final step, which is adding funds to your PlayStation Wallet.
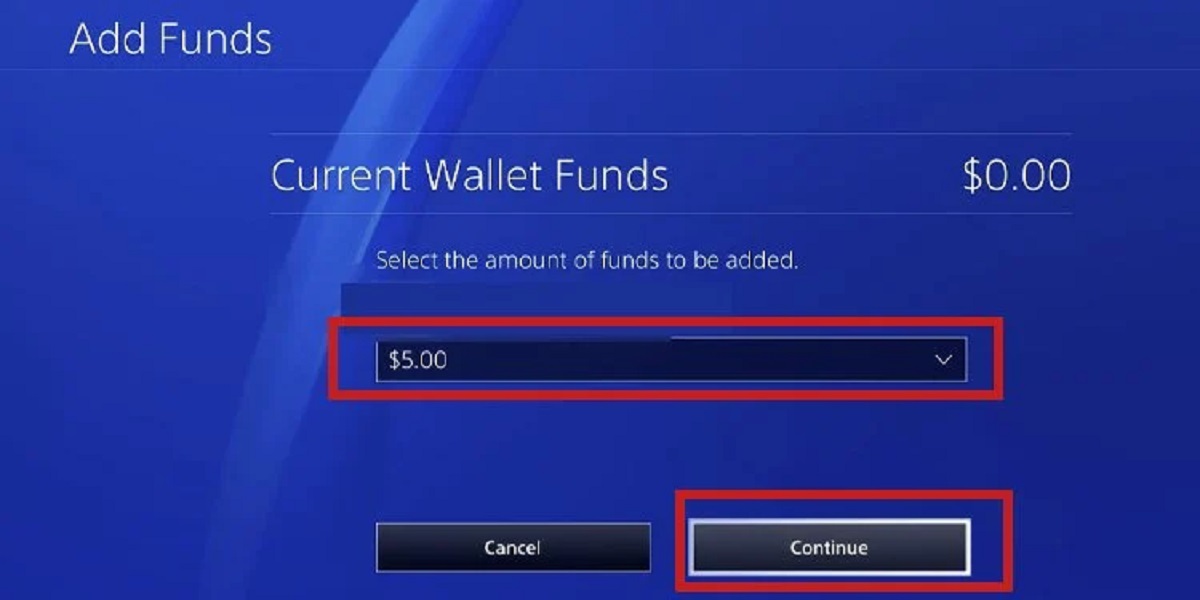
Step 5: Adding Funds to Your Wallet
If you find that your PlayStation Wallet balance is running low, or if you want to take advantage of a great deal or upcoming release, adding funds to your wallet is a simple process. Follow these steps to top up your PlayStation Wallet:
- From the Wallet menu in the PlayStation Store, select the “Add Funds” option. This option is usually located next to the “Transaction History” tab.
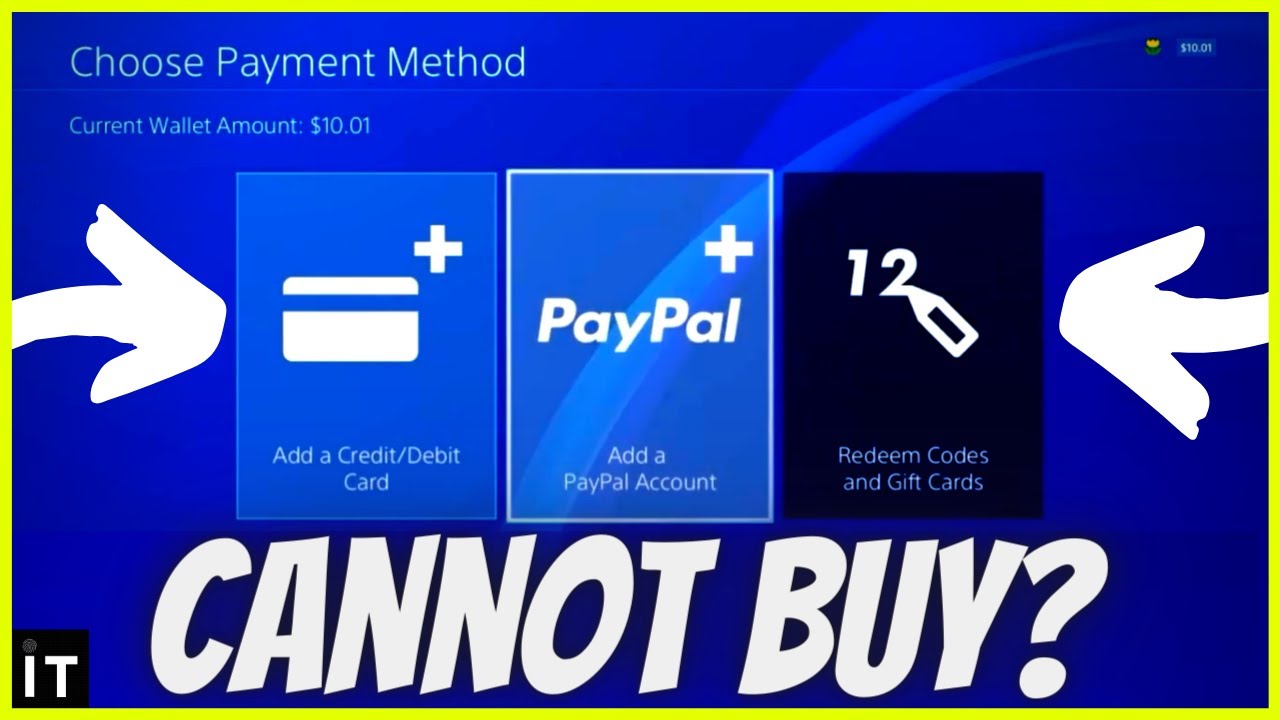
- You will be presented with different funding options, such as credit/debit card, PayPal, or prepaid cards. Choose the payment method that is most convenient for you.
- Follow the on-screen instructions to enter the necessary payment details. This may include providing your card information or signing in to your PayPal account.
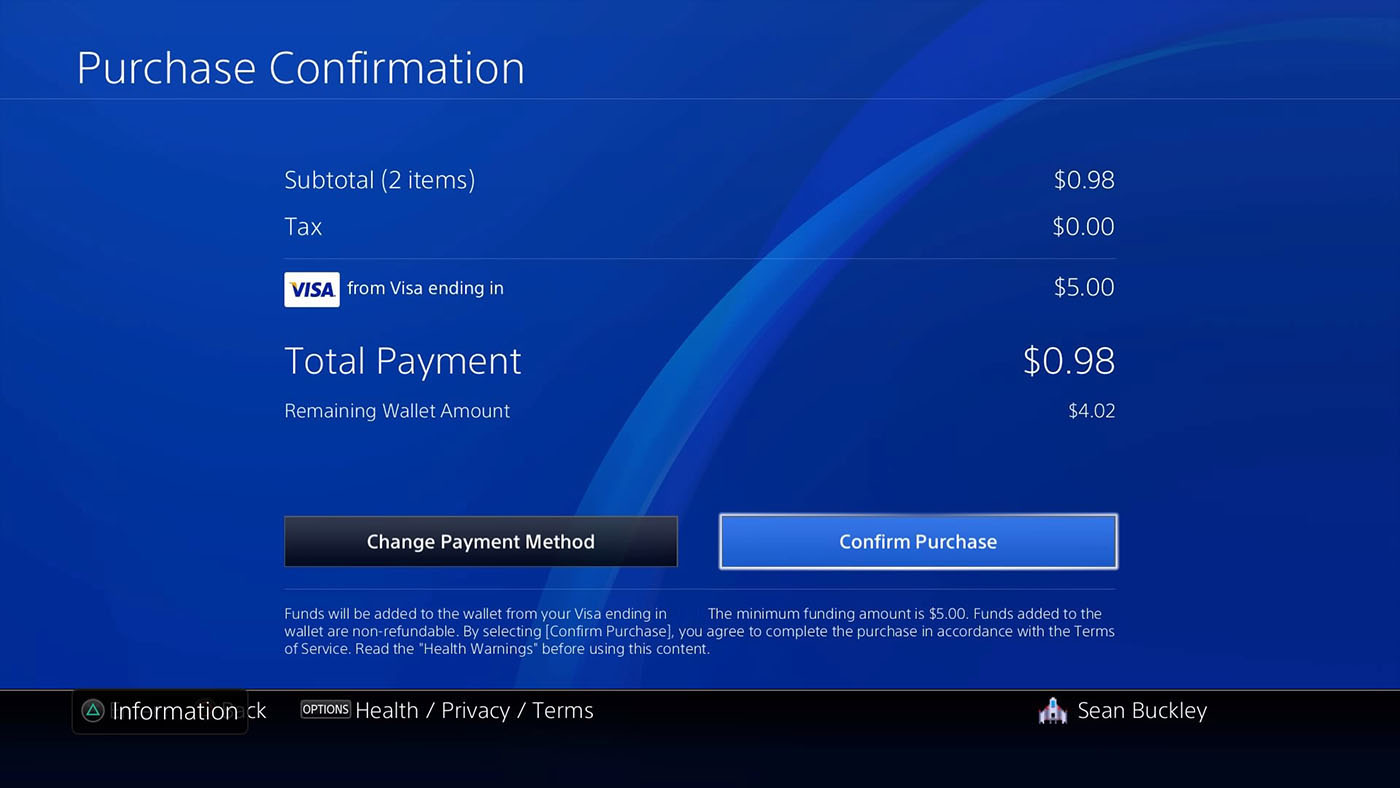
- Once your payment details are verified, you will be prompted to enter the amount you want to add to your wallet. You can choose from predetermined amount options or enter a custom amount.
- Confirm your selection and proceed to the final step to complete the transaction.
After successfully adding funds to your PlayStation Wallet, your new balance will be reflected in your Wallet menu. You can now make purchases on the PlayStation Store using the available funds.
Remember to keep track of your spending and regularly check your Wallet balance to ensure you have enough funds for your gaming desires. By adding funds when needed, you can explore new games, DLCs, and other content without interruption.
Congratulations! You have now completed all the steps to effectively manage and check your PlayStation Wallet. Make the most of your gaming experience and enjoy all the exciting offerings available on the PlayStation Store.
Conclusion
Managing your PlayStation Wallet is crucial for any avid gamer who wants to stay in control of their digital purchases. In this comprehensive guide, we have covered the essential steps to check your PlayStation Wallet balance, view transaction history, and add funds. By following these steps, you can ensure that you have enough funds to enjoy the latest games, DLCs, and other digital content.
Accessing the PlayStation Store is the first step, and from there, you can easily navigate to the Wallet section. Checking your balance is a breeze, providing you with a snapshot of your available funds. You can also view your transaction history, which helps you keep track of past purchases and identify any unfamiliar transactions.
If you find that your Wallet balance is running low, adding funds is a seamless process. With various payment options available, you can quickly top up your wallet and continue your gaming adventures without interruption.
Remember to regularly check your Wallet balance, review your transaction history, and add funds when needed to stay on top of your gaming budget. This will allow you to make informed decisions and ensure that you have a seamless and enjoyable gaming experience on your PlayStation console.
Now that you have mastered the art of managing your PlayStation Wallet, you are ready to explore the vast collection of games, DLCs, and other digital content available on the PlayStation Store. So, grab your controller and dive into the world of gaming possibilities that await you!