Introduction
Welcome to our guide on how to check your computer’s power supply unit (PSU). The PSU is a vital component that provides power to all the different parts of your computer, ensuring they operate correctly. Over time, PSUs can degrade or fail, leading to various issues such as system instability, random shutdowns, or even complete system failure.
By learning how to check your computer’s PSU, you can diagnose potential problems early on and take appropriate action. Whether you’re a curious computer enthusiast or experiencing specific issues with your system, this guide will walk you through the steps to assess the health and functionality of your PSU.
In this guide, we’ll cover everything you need to know about checking your computer’s PSU. We’ll start by discussing the tools you’ll need to perform the inspection. Then, we’ll provide step-by-step instructions on how to assess the PSU’s condition, including checking for physical damage, inspecting power connectors, and examining internal components. Finally, we’ll explore the option of using a PSU tester and when it might be necessary to seek professional assistance for a comprehensive assessment.
By following this guide, you’ll gain valuable knowledge about your computer’s PSU and be better equipped to troubleshoot potential issues. This information can help you determine whether a faulty PSU is the cause of your computer troubles and allow you to take appropriate action to rectify the situation.
Step 1: Gather the necessary tools
Before you begin checking your computer’s PSU, it’s important to gather the necessary tools to perform the inspection. Having the right tools on hand will make the process easier and more efficient. Here are the tools you’ll need:
- Screwdriver set: You’ll need a screwdriver to open the computer case and access the PSU.
- Antistatic wrist strap: To prevent any electrostatic discharge that could damage your computer components, it’s recommended to wear an antistatic wrist strap.
- Flashlight: A flashlight will help you see inside the computer case, especially if the lighting is limited.
- Multimeter or PSU tester: While not essential, having a multimeter or PSU tester can help you assess the PSU’s voltage outputs accurately. These tools measure the voltage, amperage, and resistance of electrical circuits.
Make sure you have the appropriate tools ready before proceeding with the PSU inspection. This will ensure a smooth and hassle-free process, allowing you to get accurate results.
Remember to always exercise caution when working inside your computer case. Avoid wearing any clothing that creates static electricity and be gentle when handling delicate components. Disconnect the power cable and ground yourself by touching a metal part of the case to discharge any static electricity before touching any internal components.
Once you have gathered the necessary tools and taken the necessary precautions, you’re ready to move on to the next step: shutting down your computer and unplugging it.
Step 2: Shut down your computer and unplug it
Before you begin inspecting the power supply unit (PSU), it’s important to shut down your computer properly and disconnect it from the power source. By doing so, you ensure your safety and prevent any potential damage to the components.
To shut down your computer, follow these steps:
- Save any unsaved work you have open on your computer.
- Close all open applications and ensure that no processes are running in the background.
- Click on the “Start” button in the bottom left corner of your screen.
- Select “Shut Down” from the options listed.
- Wait for your computer to completely shut down. You may see a “Shutting down” or similar message on your screen.
Once your computer has fully shut down, it’s time to unplug it from the power source. This step is crucial to ensure your safety and prevent any electrical accidents. To unplug your computer, follow these steps:
- Locate the power cable connected to the back of your computer.
- Disconnect the power cable from the power outlet or surge protector it is plugged into.
- Gently remove the power plug from the back of your computer.
By shutting down your computer and unplugging it, you ensure that there is no power running through the system. This is crucial for your safety and to prevent any accidental electrical shocks. With the computer powered down and disconnected from the power source, you can proceed to the next step: opening the computer case.
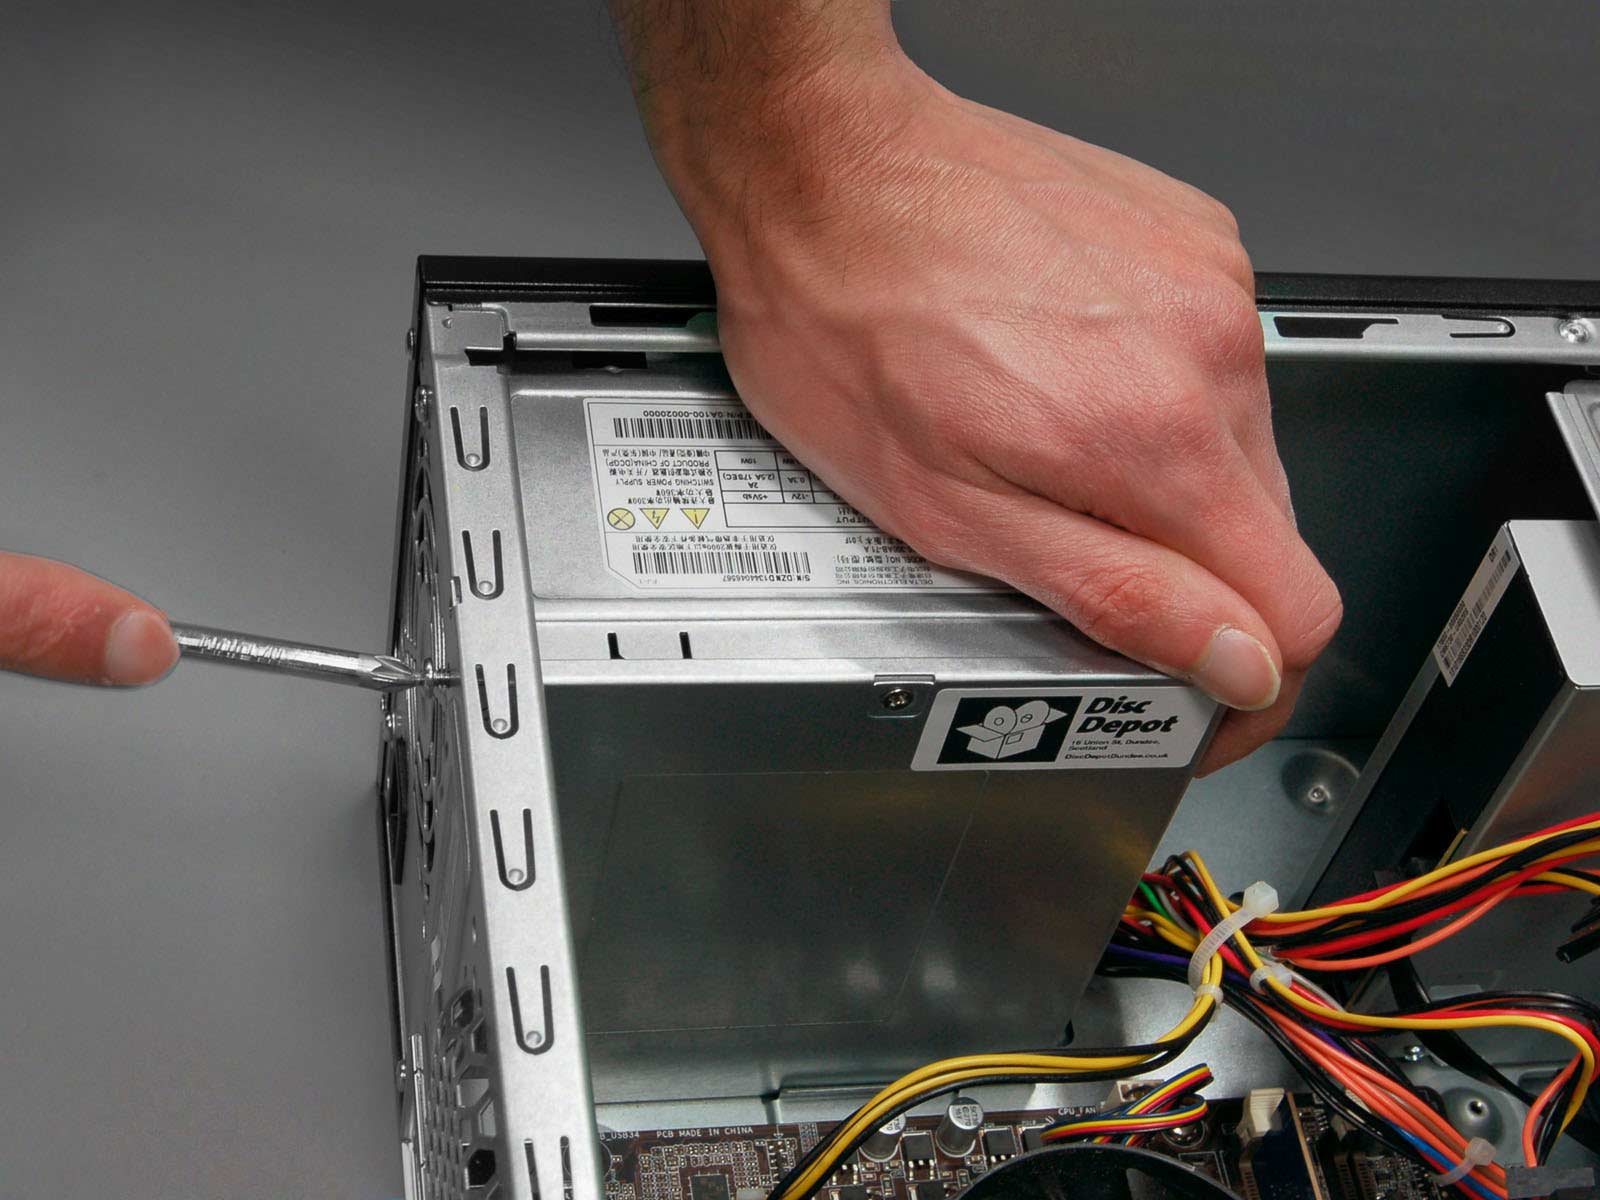
Step 3: Open the computer case
Now that your computer is powered down and unplugged, it’s time to open the computer case to gain access to the power supply unit (PSU). Opening the case allows you to visually inspect the PSU and its connections.
To open the computer case, follow these steps:
- Locate the screws or latches that secure the side panel of your computer case. These are usually located on the backside of the case.
- Using a screwdriver or releasing the latches, remove the screws or open the latches to release the side panel. Some cases may have a thumbscrew that can be twisted by hand.
- Slide the side panel away from the case, exposing the internal components of your computer.
Once the side panel is removed, take a moment to familiarize yourself with the internal layout of your computer. You should be able to identify various components, including the CPU, motherboard, RAM, and of course, the power supply unit.
It’s worth noting that different computer cases may have different designs, so the procedure for opening the case may vary slightly. Some cases may have a removable top panel, while others may require you to remove screws from multiple sides. Consult your computer’s user manual or manufacturer’s website for specific instructions if needed.
Remember to handle the side panel with care and set it aside in a safe place. This will allow you easy access to the PSU without obstruction, allowing for a thorough inspection. With the computer case open, you’re now ready to locate the power supply unit for the next step in the process.
Step 4: Locate the PSU
After opening the computer case, the next step in checking your computer’s power supply unit (PSU) is to locate its position within the system. The PSU is usually situated at the top or bottom rear part of the case, near where the power cord enters the computer.
To locate the PSU, follow these steps:
- Take a look inside the computer case and identify the area where the power cord connects to the back of the computer.
- Trace the power cord from the back of the computer to its point of entry inside the case.
- Once you’ve identified the entry point of the power cord, you’ll find the PSU nearby. It will be a rectangular or square-shaped box with multiple cables coming out of it.
Depending on your computer’s design and case layout, the PSU might be positioned vertically or horizontally. It’s important to note that the PSU should not be confused with other components such as the CPU cooler or graphics card, which may also have fans and cables attached.
If you’re having trouble locating the PSU, consult your computer’s user manual or manufacturer’s website for specific information regarding your model. Additionally, online resources and forums pertaining to your computer brand or model might provide visual guides or images to assist you in finding the PSU.
Once you have successfully located the PSU, you can proceed to the next step, where you will determine the wattage of your power supply unit.
Step 5: Determine the PSU’s wattage
Knowing the wattage of your power supply unit (PSU) is an important factor in determining its capability to power your computer’s components adequately. The wattage of the PSU denotes the maximum power output it can provide. To determine the wattage of your PSU, follow these steps:
- Visually examine the PSU unit for a sticker or label. This label is typically located on one side of the unit and provides important information, including the wattage.
- Look for a section on the label that indicates the wattage or maximum power output. It is usually labeled as “W” or “Watt”.
- Note the numerical value mentioned next to the wattage. This value represents the wattage rating of your PSU.
Keep in mind that the PSU’s wattage should meet the power requirements of your computer’s components. If you plan to upgrade or add more power-hungry components to your system, it is essential to ensure that your PSU can handle the increased power demands.
If you cannot find the wattage information on the PSU label or if the label is missing or illegible, there are other methods to determine the PSU’s wattage:
- Check your computer’s specifications: If you purchased a pre-built computer, the wattage of the PSU might be specified in the system’s documentation or on the manufacturer’s website.
- Search online: If you know the make and model of your PSU, you can search the manufacturer’s website or online retailers for the specifications.
- Use software tools: There are software programs available that can detect and display various system information, including the wattage of your PSU.
By determining the wattage of your PSU, you can ensure that it is capable of adequately powering your computer’s components. In the next step, we will inspect the PSU for any signs of physical damage.
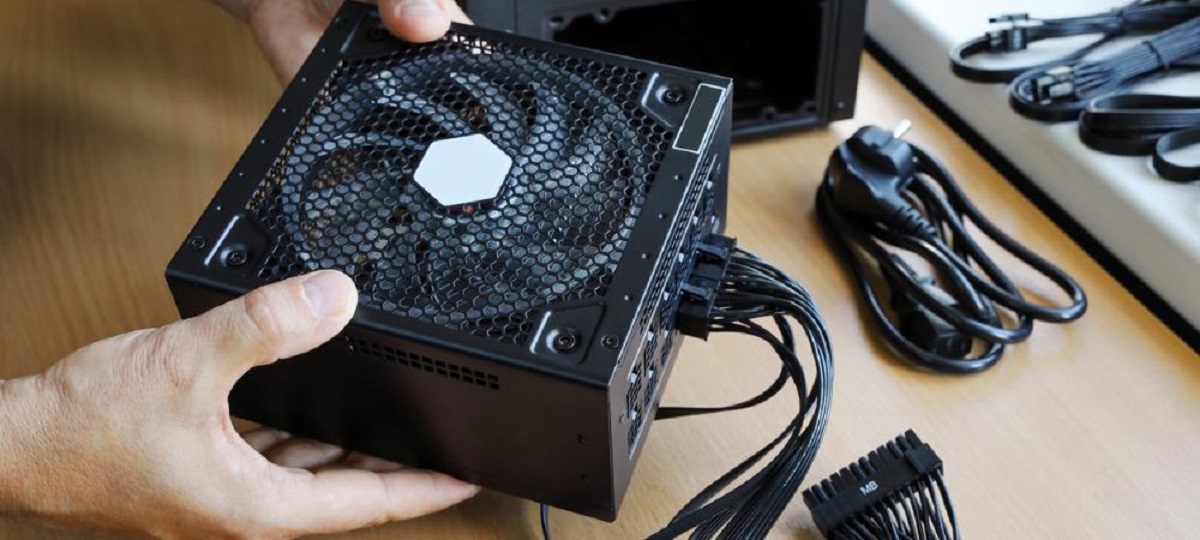
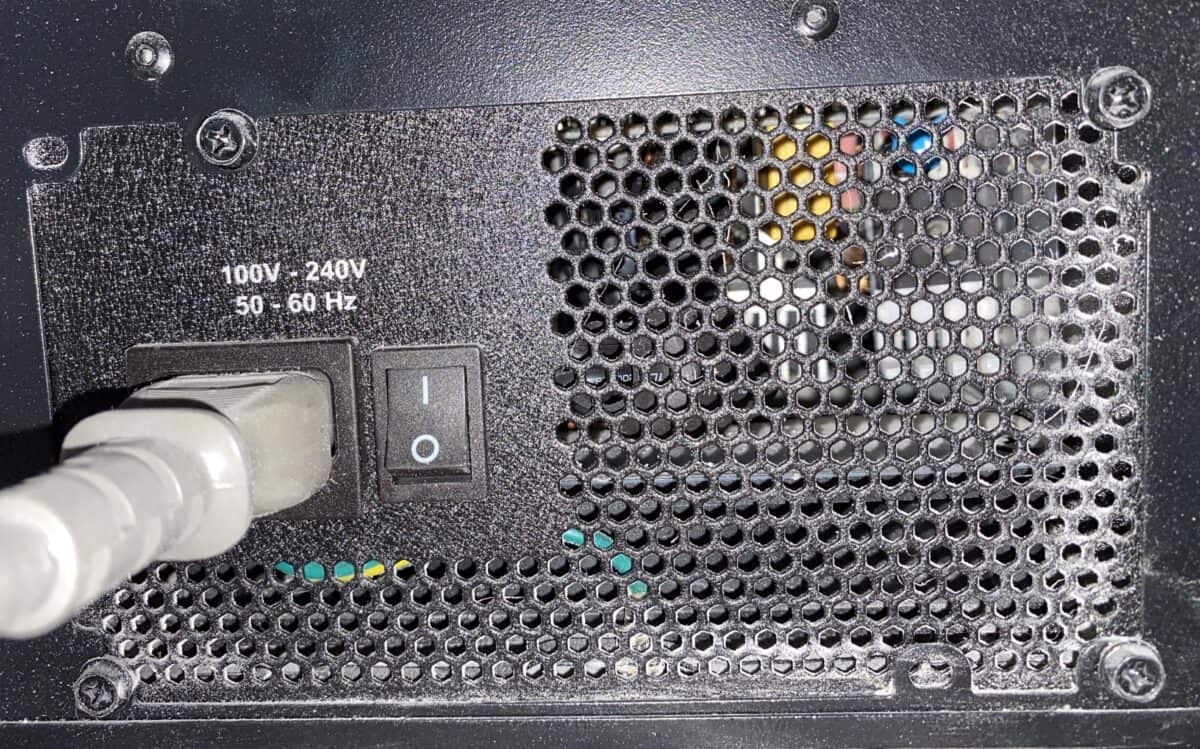
Step 6: Check for physical damage
Examining the power supply unit (PSU) for any physical damage is crucial to ensure its proper functioning and to prevent any potential hazards. Physical damage to the PSU can lead to various issues, including power failures, electrical shorts, or even fires. To check for physical damage, follow these steps:
- Carefully inspect the exterior of the PSU. Look for any visible signs of damage such as dents, bulges, cracks, or bent metal components. Pay attention to the fan area and all the connecting ports.
- Check the fan. Ensure that it spins freely without any obstructions. A noisy or non-functioning fan may indicate an issue with the PSU, as the fan is responsible for cooling the unit.
- Inspect the cables and connectors. Ensure that they are securely fastened and undamaged. Look for any frayed wires, loose connections, or signs of overheating such as discoloration or melting.
- Smell for any unusual or burning odors. A strong odor coming from the PSU could indicate a component failure or electrical damage.
It’s important to note that if you detect any physical damage or suspect any issues with the PSU, it is best to replace it rather than attempting to repair it. It is not recommended to open the PSU for repairs, as it can be dangerous due to high voltages and capacitors that can retain electrical charge even when unplugged.
Checking for physical damage is an essential step to ensure the safety and reliable operation of your computer system. By identifying any signs of damage, you can take appropriate action to replace or repair the PSU, preventing any further complications or potential risks.
In the next step, we will examine the power connectors of the PSU.
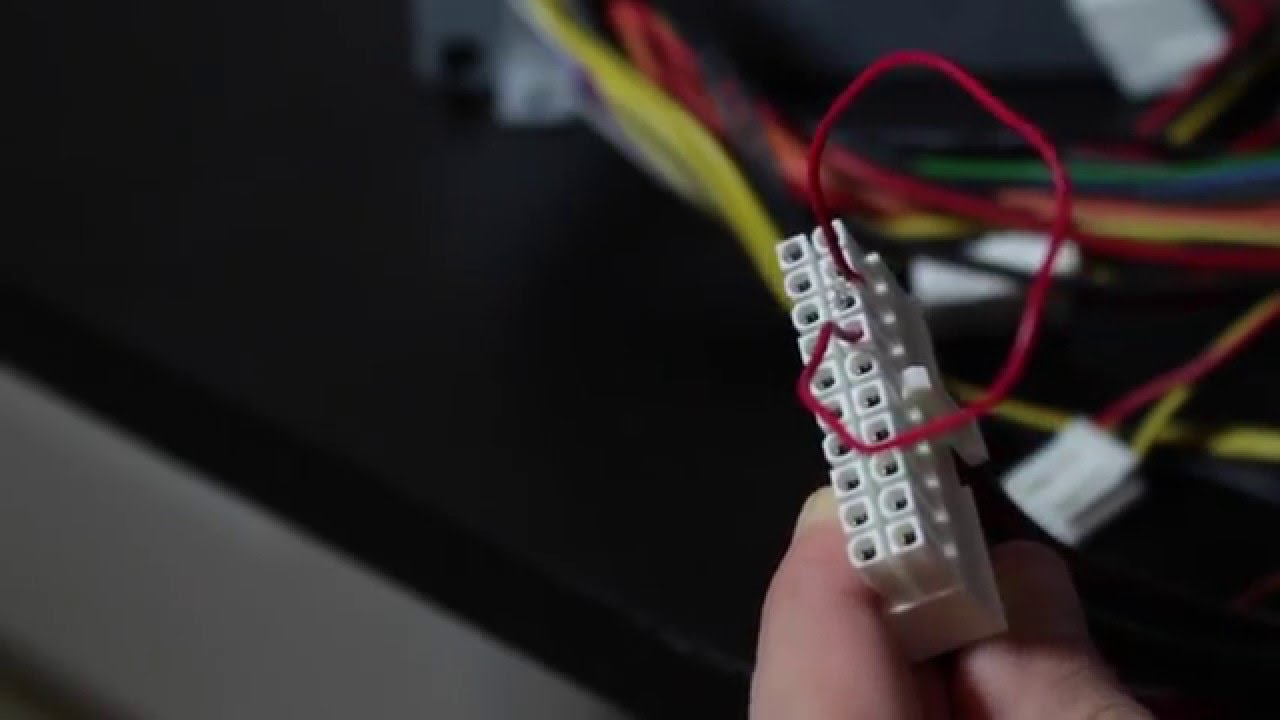
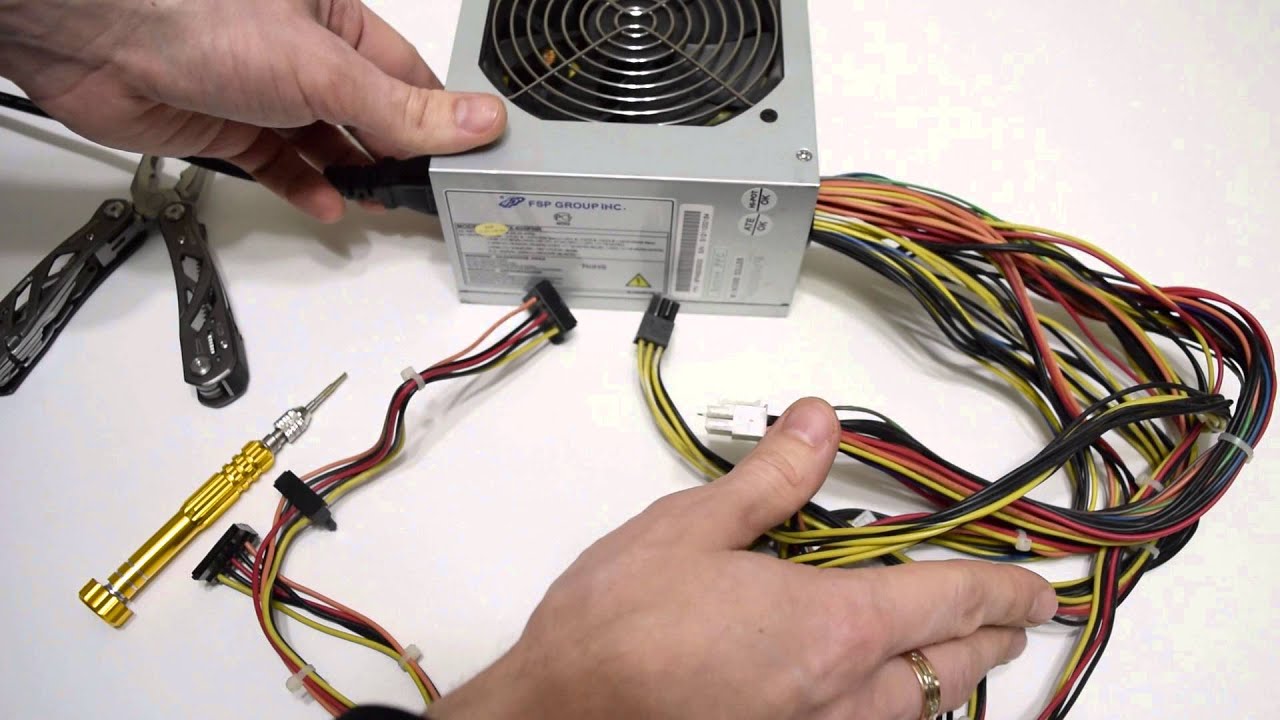
Step 7: Check the power connectors
Inspecting the power connectors of your power supply unit (PSU) is essential to ensure secure and proper connections between the PSU and your computer’s components. Loose or faulty power connectors can lead to power delivery issues or intermittent electrical contact. To check the power connectors, follow these steps:
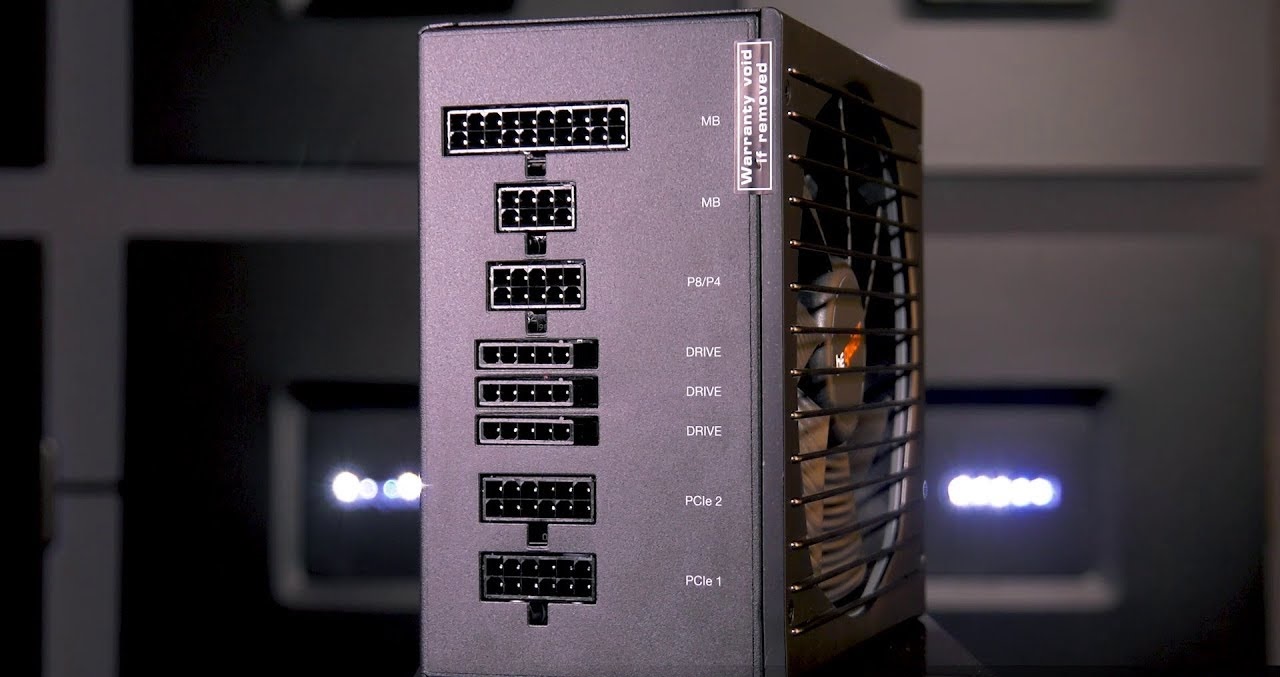
- Examine each power connector coming from the PSU. These connectors include the main motherboard power connector (usually a 24-pin or 20+4-pin connector) and additional connectors for peripherals such as SATA, PCI-E, or CPU power.
- Ensure that each connector is firmly plugged into its respective component. Gently push or wiggle each connector to verify that it is securely attached.
- Check for any signs of damage or wear on the connectors. Look for bent pins, broken clips, or discoloration. Any visible damage should be addressed promptly.
- Inspect the cables for any kinks, twists, or fraying. A damaged cable can cause issues with power delivery and should be replaced.
If you encounter any loose connectors, gently reseat them until they click into place. It’s important to avoid using excessive force, as this could damage the connectors or components. Similarly, if you notice any damaged connectors or cables, it’s best to replace them to ensure a reliable and secure connection.
Additionally, ensure that each power connector is correctly inserted and aligned with the corresponding port or slot. Mismatched or improperly connected power connectors can lead to a variety of issues, including system instability or component failure.
By checking the power connectors of your PSU, you can confirm that all connections are secure, reducing the risk of power interruptions and ensuring the smooth operation of your computer system. In the next step, we will examine the internal components of the PSU.
Step 8: Inspect the internal components of the PSU
Inspecting the internal components of the power supply unit (PSU) is essential to check for any potential issues or abnormalities that may affect its performance. While it is generally not recommended for users to open and tamper with the PSU due to safety reasons, a visual inspection can help identify certain problems. Here’s how you can inspect the internal components of the PSU:
- Ensure the PSU is unplugged from the power source before proceeding with the inspection.
- Using a flashlight, carefully peer into the openings or vents of the PSU. Take a look at the internal components, such as capacitors, transformers, and circuit boards.
- Check for any signs of physical damage, such as bulging or leaking capacitors, burnt components, or charred areas.
- Inspect the fan blades and surrounding area for any dust buildup or obstructions that might impede airflow. Dust accumulation can lead to overheating issues.
- Look for any loose connections or cables. Ensure that everything is securely soldered and properly connected.
- Check for any signs of excessive heat, such as discoloration or melted plastic near the internal components. Overheating can cause performance issues or even PSU failure.
It’s important to emphasize that opening the PSU should be done by trained professionals due to the risk of electric shock or damage to sensitive components. If you suspect any internal issues with your PSU, it’s recommended to seek professional assistance for a thorough examination and repair.
However, for a preliminary inspection, a visual examination of the internal components can provide valuable insights into the PSU’s overall condition. If you notice any significant damage, it’s crucial to replace the PSU promptly to avoid further complications and potential risks.
In the next step, we will explore the option of using a PSU tester for a more comprehensive evaluation of the PSU’s functionality.
Step 9: Use a PSU tester
Using a PSU tester can provide a more comprehensive evaluation of the power supply unit (PSU) and its functionality. PSU testers are specialized tools designed to measure and confirm the voltage outputs of the PSU accurately. While not essential for everyone, a PSU tester can be a valuable asset for troubleshooting power-related issues. Here’s how to use a PSU tester:
- Ensure that the PSU is unplugged from the power source before connecting the tester.
- Locate the 24-pin connector on the PSU. This large connector provides power to the motherboard. If your PSU has a modular design, connect the appropriate cables to the tester. Otherwise, insert the tester’s connectors directly into the 24-pin socket on the PSU.
- Connect any additional cables or adapters as required by the PSU tester instructions. This may include CPU, SATA, or PCIe connectors that will simulate power output to these components.
- Turn on the PSU using the tester’s on/off switch or button.
- Observe the readings on the PSU tester display. The tester will provide voltage readings for each power rail, including +3.3V, +5V, +12V, and -12V.
- Compare the measured voltages against the standard voltage values specified for your PSU. If the readings deviate significantly from the standard values, it indicates a potential issue with the PSU and further action may be necessary.
Using a PSU tester provides you with a more accurate assessment of the PSU’s voltage outputs, which helps identify any power-related problems. However, it’s important to note that while a PSU tester can provide valuable information, it cannot diagnose more complex issues such as intermittent power delivery or instability. For such cases, it’s advisable to consult a professional technician.
By using a PSU tester, you can gain further insights into the condition of your PSU and determine whether it requires replacement or further troubleshooting. However, remember to exercise caution and follow the manufacturer’s instructions when using a PSU tester to ensure your safety and the accurate evaluation of the PSU.
In the final step, we will discuss when it might be necessary to seek professional assessment for a comprehensive evaluation of the PSU and potential repairs.
Step 10: Consider a professional assessment
If you’ve followed the previous steps and still encounter issues with your power supply unit (PSU), or if you’re uncertain about the results of your inspection, it may be time to consider seeking professional assistance for a comprehensive assessment. Professional technicians have the expertise and tools necessary to diagnose and repair more complex PSU-related problems. Here are a few situations where a professional assessment may be necessary:
- Intermittent power issues: If your computer experiences sporadic power failures, random shutdowns, or unexpected restarts, it could indicate an underlying problem with the PSU that may require professional attention.
- Inability to power on: If your computer fails to power on at all, even after ensuring the PSU is properly connected and functioning, there may be an internal fault that needs to be diagnosed and addressed by an expert.
- Suspected PSU failure: If you notice any signs of PSU failure, such as odd noises, burning smells, or visible damage, it’s advisable to have it inspected by a professional to prevent further damage or potential hazards.
- Complex system requirements: If you’re planning to upgrade your computer with power-hungry components or build a high-performance system, it’s crucial to consult a professional to ensure that your current PSU is capable of meeting the increased power demands.
- Manufacturer warranty: If your PSU is still under warranty, it’s wise to contact the manufacturer for guidance and support. They may provide troubleshooting assistance or recommend a certified technician for further inspection.
Professional assessment not only brings expertise and knowledge but also eliminates the risks associated with handling sensitive electrical components. They can use advanced diagnostic tools and techniques to accurately identify the root cause of the issue and provide appropriate solutions.
By considering a professional assessment, you can gain peace of mind knowing that your PSU will be thoroughly evaluated and any underlying issues will be addressed. Additionally, professional technicians can provide guidance and recommendations for replacement or repairs, ensuring the optimal performance and safety of your computer system.
With the completion of these steps, you’re now equipped with the knowledge of how to check your computer’s PSU. Remember to prioritize safety, follow proper procedures, and seek professional assistance if needed. By maintaining a healthy PSU, you can ensure the reliable operation of your computer for years to come.
Conclusion
Checking your computer’s power supply unit (PSU) is an essential task to ensure the proper functioning of your system and diagnose any potential issues. By following the steps outlined in this guide, you can gain valuable insights into the health and functionality of your PSU.
We began by emphasizing the importance of gathering the necessary tools, such as a screwdriver set, antistatic wrist strap, flashlight, and possibly a multimeter or PSU tester, to perform a thorough inspection. Opening the computer case allowed us to locate the PSU, determine its wattage, and assess any physical damage or loose connections.
Inspecting the internal components of the PSU, such as capacitors, transformers, and circuit boards, helped identify potential issues that might affect its performance. Checking the power connectors ensured secure connections between the PSU and computer components, reducing the risk of power interruptions.
Using a PSU tester allowed for a more accurate assessment of the PSU’s voltage outputs, providing valuable information about its functionality. However, when in doubt or encountering complex problems, it’s recommended to seek professional assistance for a comprehensive evaluation and potential repair.
Ensuring a well-maintained PSU is vital for the stable operation of your computer system. Whether you encountered power-related issues or simply wanted to perform routine maintenance, following this guide empowered you with the knowledge and steps to check your computer’s PSU.
Remember to prioritize safety throughout the process, following proper procedures, and seeking expert guidance when needed. By taking care of your PSU, you can optimize the performance and longevity of your computer system.