Introduction
Are you experiencing slow internet speeds or connectivity issues on your devices? It could be due to your Wi-Fi connection being set to the 5GHz frequency band. Switching your Wi-Fi to the 2.4GHz band can often improve the stability and range of your wireless network.
In this article, we will guide you through the process of changing your Wi-Fi to the 2.4GHz frequency band. We will explain the difference between the 2.4GHz and 5GHz bands and help you assess your current Wi-Fi configuration. Additionally, we will provide step-by-step instructions on how to access your Wi-Fi router’s settings, locate the Wi-Fi band settings, switch to the 2.4GHz frequency, and choose the best channel for optimal performance. Lastly, we will guide you through saving the new settings and verifying the connection on your devices.
By the end of this article, you will have all the knowledge and tools to successfully switch your Wi-Fi to the 2.4GHz band and enjoy improved connectivity and performance on your devices.
Understanding the Difference Between 2.4GHz and 5GHz
Before diving into the process of changing your Wi-Fi to the 2.4GHz frequency band, it’s essential to understand the difference between 2.4GHz and 5GHz and how they affect your wireless network.
The 2.4GHz and 5GHz are two different frequency bands on which your Wi-Fi router can operate. Each band has its advantages and considerations:
- 2.4GHz: This band is more common and widely used, as it offers longer-range coverage and better penetration through obstacles like walls and furniture. However, due to its popularity, it’s often crowded, leading to potential interference from other devices such as microwaves, cordless phones, and Bluetooth devices.
- 5GHz: This band provides faster speeds and is less crowded. It is ideal for high-bandwidth activities like video streaming and online gaming. However, the 5GHz signal has a shorter range and may have difficulty penetrating walls and other physical barriers.
When your Wi-Fi router is set to the 5GHz band, you may experience faster speeds and less interference within close proximity. However, as you move further away from the router or encounter more physical obstacles, the signal strength may diminish significantly.
On the other hand, the 2.4GHz band offers a wider coverage area and better signal penetration, making it the preferred option for larger homes or spaces with multiple walls. It is also worth noting that not all devices support the 5GHz band, so if you have older devices, they may only be compatible with the 2.4GHz frequency.
By understanding these differences, you can determine if switching to the 2.4GHz band is the right choice for you. Now that you have a grasp of the basics, let’s move on to the next step: assessing your current Wi-Fi configuration.
Assessing Your Current Wi-Fi Configuration
Before making any changes to your Wi-Fi band, it’s important to assess your current Wi-Fi configuration to determine if switching to the 2.4GHz band is necessary or beneficial for your situation.
To begin, take a moment to check the Wi-Fi connections on your devices. This will provide valuable insight into the frequency band currently in use. Most devices display the Wi-Fi network name (SSID) along with the frequency band, typically labeled as “2.4GHz” or “5GHz.” If you see “5GHz” mentioned, it means your device is connected to the 5GHz band.
Next, consider the layout of your home or office. Are there multiple floors or partitions? Are the walls made of thick materials such as concrete or brick? These factors can affect the signal strength and reach of your Wi-Fi network. If you have difficulty getting a strong signal in certain areas, changing to the 2.4GHz band may help alleviate this issue.
Another factor to consider is the number of devices connected to your Wi-Fi network. If you have many devices connected simultaneously, such as smartphones, tablets, laptops, smart TVs, and smart home devices, the 2.4GHz band might be more suitable due to its wider coverage area and ability to handle multiple connections better.
Finally, if you frequently experience interference or intermittent connectivity issues, especially when using devices that are farther away from the Wi-Fi router, switching to the 2.4GHz band could potentially resolve these problems.
By assessing your current Wi-Fi configuration and understanding its limitations, you can make an informed decision about whether to switch to the 2.4GHz band. Once you have determined that it’s the right choice for you, let’s explore how to access your Wi-Fi router’s settings and make the necessary changes.
Accessing Your Wi-Fi Router’s Settings
In order to change your Wi-Fi band from 5GHz to 2.4GHz, you’ll need to access your Wi-Fi router’s settings. Here’s a step-by-step guide on how to do it:
- First, ensure that your device is connected to the Wi-Fi network you want to modify.
- Open a web browser like Google Chrome, Mozilla Firefox, or Safari.
- In the address bar, type in the IP address of your Wi-Fi router. The default IP address is often printed on the router or can be found in the user manual. Common IP addresses include 192.168.0.1 or 192.168.1.1. Press Enter to go to the login page of your router’s settings.
- You will be prompted to enter the username and password for your router. If you haven’t changed these credentials before, refer to the router’s documentation or check the manufacturer’s website for the default username and password. Enter the necessary information to log in.
- Once logged in, you will be presented with the router’s admin interface or dashboard. The layout and options may vary depending on the router model and brand.
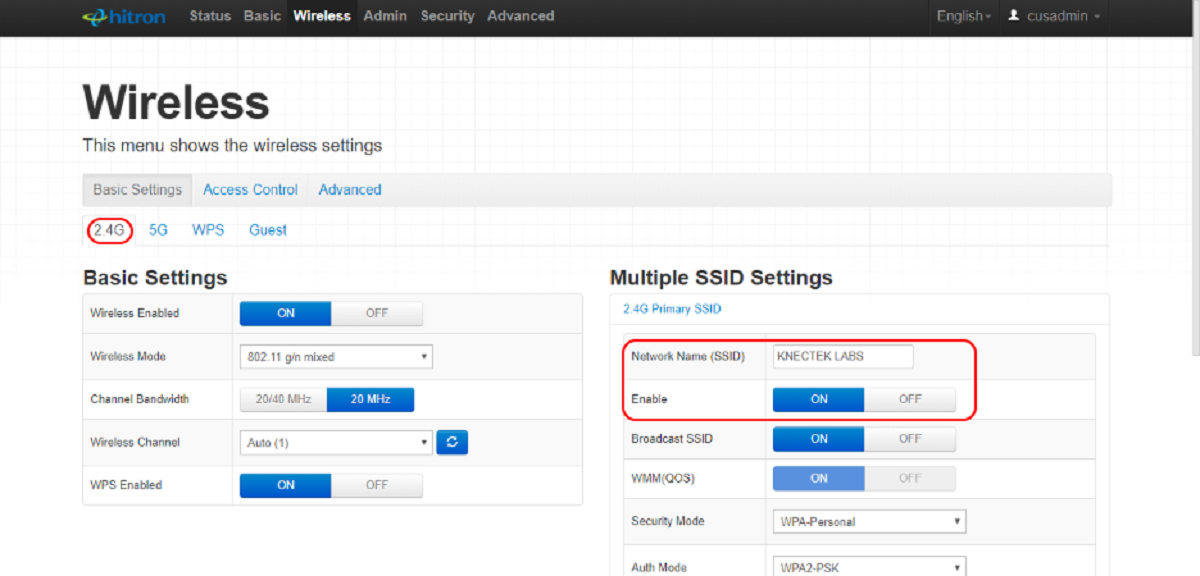
- Look for a section or tab that relates to “Wireless” or “Wi-Fi” settings. Click on it to access the wireless settings page.
- Within the wireless settings page, you should see an option to select the frequency band. Usually, it will be labeled as “Band” or “Frequency Band” with options like “Auto,” “2.4GHz,” and “5GHz.”
- Select the “2.4GHz” option to switch your Wi-Fi band to the 2.4GHz frequency.
- Lastly, find the “Save” or “Apply” button on the page and click it to save the changes. Your Wi-Fi router will then restart with the new settings.
It’s important to note that the steps mentioned here are general guidelines, and the specific process may vary depending on your Wi-Fi router’s make and model. If you encounter any difficulties or if the interface appears different, consult your router’s documentation or visit the manufacturer’s website for detailed instructions.
Now that you have successfully accessed your Wi-Fi router’s settings, it’s time to locate the Wi-Fi band settings and make the switch to the 2.4GHz frequency.
Locating the Wi-Fi Band Settings
Once you have accessed your Wi-Fi router’s settings, the next step is to locate the Wi-Fi band settings section. Here’s a guide on how to find it:
- Look for a tab or menu item labeled “Wireless Settings” or “Wi-Fi Settings” in the router’s admin interface.
- Click on the tab or menu item to expand the settings related to your Wi-Fi connection.
- Within the Wi-Fi settings page, search for an option that refers to the frequency band or band selection. This option may be labeled as “Band,” “Wireless Band,” or “Frequency Band.”
- Click on the dropdown menu or selection box associated with the frequency band option to reveal the available options.
- Select the “2.4GHz” option to switch your Wi-Fi connection to the 2.4GHz frequency band.
Please keep in mind that the location and terminology of these settings may vary depending on your router’s make and model. Manufacturers often design their router interfaces differently, so you might need to explore different tabs or menus to find the Wi-Fi band settings.
If you are having trouble locating the Wi-Fi band settings, refer to your router’s documentation, user manual, or visit the manufacturer’s website for specific instructions tailored to your router model.
Once you have successfully located the Wi-Fi band settings and selected the 2.4GHz option, it’s time to proceed to the next step: switching to the 2.4GHz band on your Wi-Fi router.
Switching to 2.4GHz on Your Wi-Fi Router
Now that you have accessed the Wi-Fi band settings in your router’s admin interface, it’s time to switch your Wi-Fi connection to the 2.4GHz frequency band. Follow these steps to make the switch:
- Locate the Wi-Fi band selection dropdown menu or radio buttons within the Wi-Fi settings page of your router’s admin interface.
- Click on the dropdown menu or select the radio button that corresponds to the frequency band selection.
- Select the “2.4GHz” option from the available frequencies.
- Review the other Wi-Fi settings on the page to check if there are any additional optimizations or features you may want to adjust. These settings can vary based on your router’s capabilities and manufacturer.
- Once you are satisfied with the changes, look for a “Save” or “Apply” button on the page and click it to save the new Wi-Fi band settings.
- Wait for your Wi-Fi router to apply the new settings. This process usually takes a few seconds to a minute.
After successfully switching your Wi-Fi router to the 2.4GHz band, it is important to note that your Wi-Fi network may temporarily disconnect and reconnect as the changes are applied. This is normal, and you should allow a bit of time for devices to reestablish the connection to the updated Wi-Fi band.
Keep in mind that different router models may have variations in terms of interface layout and options. If you encounter any difficulties during the process, consult your router’s documentation or visit the manufacturer’s website for specific instructions tailored to your device.
Now that you have successfully switched your Wi-Fi router to the 2.4GHz band, the next step is to choose the best channel for optimal performance. Let’s explore this further in the next section.
Choosing the Best Channel for 2.4GHz
After switching your Wi-Fi router to the 2.4GHz band, it’s important to choose the best channel for optimal performance. The channel you select can greatly impact the quality and speed of your Wi-Fi connection. Follow these steps to select the best channel:
- Access your Wi-Fi router’s settings by typing the IP address into your web browser and logging in.
- Look for a section or tab labeled “Wireless” or “Wi-Fi” settings within the router’s admin interface.
- Locate the channel selection or channel settings option within the Wi-Fi settings page.
- Typically, the channel options are displayed as numbers from 1 to 11 (or sometimes up to 14, depending on your region).
- By default, most routers are set to “Auto” or “Automatic” channel selection, which allows the router to choose the least congested channel. However, this setting may not always select the best channel.
- To manually select a channel, choose one that is less congested based on the Wi-Fi analyzer application or software recommendations.
- If you are unsure, you can try using a Wi-Fi analyzer tool, which is available as a smartphone app or computer software. These tools scan and analyze the Wi-Fi channels used by nearby networks, helping you identify the least crowded channels.
- Once you have identified the best channel, select it from the dropdown menu or input the channel number in the channel selection field.
- Save the changes by clicking the “Save” or “Apply” button in the Wi-Fi settings page of your router’s admin interface.
It’s important to note that the recommended channel may vary depending on your geographical location and the presence of neighboring Wi-Fi networks. To ensure the best performance, periodically check and adjust the channel settings if needed.
Now that you have selected the best channel for your 2.4GHz Wi-Fi network, it’s time to save and apply the new settings on your router. Let’s move on to the next section to learn how to do this.
Saving and Applying the New Settings
After making changes to the Wi-Fi band and channel settings on your router, it’s crucial to save and apply the new settings to ensure they take effect. Here’s how to do it:
- Find the “Save” or “Apply” button on the Wi-Fi settings page of your router’s admin interface.
- Click on the “Save” or “Apply” button to save the changes you have made to the Wi-Fi band and channel settings.
- Wait for the router to apply the new settings. This process may take a few seconds to a minute.
- During this time, your Wi-Fi network may disconnect temporarily as the router restarts or adjusts the settings. This is normal, and you should allow a bit of time for devices to reestablish the connection using the updated configurations.
- Once the new settings have been applied and the router has restarted, your Wi-Fi network should be using the 2.4GHz band with the selected channel.
It is important to note that the exact steps and interface layout may vary depending on your router’s make and model. If you encounter any difficulties or if the interface appears different, refer to your router’s documentation or visit the manufacturer’s website for detailed instructions specific to your router.
Now that you have successfully saved and applied the new settings on your Wi-Fi router, the next step is to verify the connection on your devices. Let’s move on to the final section to learn how to do this.
Verifying the Connection on Your Devices
After changing your Wi-Fi band and channel settings on your router, it’s important to verify the connection on your devices to ensure they are correctly connected to the 2.4GHz Wi-Fi network. Here’s how you can do this:
- On your device, go to the Wi-Fi settings.
- Look for the available Wi-Fi networks and select your network.
- If prompted, enter the Wi-Fi password correctly to connect to the network.
- Once connected, check the network details or properties of the Wi-Fi connection on your device.
- Look for information such as the network name (SSID) and the frequency band.
- Ensure that the network name matches your Wi-Fi network’s name and that the frequency band is listed as 2.4GHz.
If the network name matches and the frequency band is indeed set to 2.4GHz, congratulations! Your devices are now connected to the 2.4GHz Wi-Fi network.
If for some reason the devices are still connected to the 5GHz band, ensure that you selected the correct settings on your router and saved the changes. Retry the connection process on your devices to establish a connection with the 2.4GHz frequency band.
In some cases, you may need to restart your devices to force them to search for the Wi-Fi network again. Additionally, it’s advisable to forget the previous network connection on your devices and reconnect them to the updated 2.4GHz Wi-Fi network.
If you encounter any issues during the verification process or if the connection is not established as expected, double-check the settings on your router and consult your device’s documentation for troubleshooting steps.
With the connection successfully verified on your devices, you can now enjoy the improved stability and range offered by the 2.4GHz Wi-Fi network.
Conclusion
Changing your Wi-Fi network’s frequency band from 5GHz to 2.4GHz can improve the stability and range of your wireless connection. By understanding the differences between the two frequency bands and assessing your current Wi-Fi configuration, you can determine if switching to the 2.4GHz band is the right choice for your situation.
Accessing your Wi-Fi router’s settings is the first step in the process. From there, you can locate the Wi-Fi band settings and switch to the 2.4GHz band. It is also important to choose the best channel for optimal performance by considering factors such as network congestion and neighboring Wi-Fi networks.
After making the necessary changes, saving and applying the new settings on your Wi-Fi router is crucial to ensure they take effect. Take note that your Wi-Fi network may temporarily disconnect and reconnect during this process, which is normal.
Finally, verify the connection on your devices to ensure they are correctly connected to the 2.4GHz Wi-Fi network. Check the network details and properties on your devices to ensure they reflect the desired band and network name.
By following these steps and guidelines, you can successfully switch your Wi-Fi to the 2.4GHz band and enjoy improved connectivity and performance on your devices.
Now that you have the knowledge and tools to make the switch, go ahead and optimize your Wi-Fi network for a better wireless experience!