Introduction
In today’s technology-driven world, having a secure Wi-Fi network is essential to protect your personal data and maintain a reliable internet connection. One way to ensure the security of your network is by regularly changing your Wi-Fi password. If you are a Verizon customer and want to learn how to change your Wi-Fi password, you’ve come to the right place.
Verizon provides high-speed internet services to millions of customers across the United States. With their advanced routers and user-friendly interfaces, changing your Wi-Fi password is a straightforward process that can be done in a few simple steps. By doing so, you can prevent unauthorized access to your network and enjoy a more secure online experience.
In this article, we will guide you through the process of changing your Wi-Fi password on a Verizon router. We will provide step-by-step instructions, along with helpful tips to ensure a smooth transition. Whether you want to update your password for security reasons or if you suspect someone else might have access to your network, following the steps outlined in this guide will enable you to take control of your Wi-Fi security.
Please note that the process of changing your Wi-Fi password may vary slightly depending on the model of your Verizon router. However, the general steps we will outline should be applicable to most Verizon routers.
So, without further ado, let’s dive into the steps you need to follow to change your Wi-Fi password on a Verizon router.
Step 1: Accessing the Verizon Router
Before you can change your Wi-Fi password, you need to access your Verizon router’s settings. To do this, you will need a computer or mobile device that is connected to your Verizon Wi-Fi network.
1. Start by ensuring that your computer or mobile device is connected to the Wi-Fi network provided by your Verizon router. This is important as you will need an active internet connection to access the router’s settings.
2. Open a web browser on your device. Common web browsers include Google Chrome, Mozilla Firefox, and Microsoft Edge. It’s important to note that some older browsers may not be compatible with the router’s settings page, so make sure you are using an up-to-date browser.
3. In the web browser’s address bar, type in the default IP address for Verizon routers, which is typically “192.168.1.1” or “192.168.0.1”. Press Enter to proceed.
4. The browser will now load the router’s login page. Here, you will be prompted to enter a username and password. If you’ve never changed these credentials before, you can try using the default login information. For most Verizon routers, the default username is “admin” and the default password is either “password” or “admin”. If these credentials do not work, check the documentation that came with your router or visit the Verizon support website for assistance.
5. After entering the correct username and password, click on the “Login” or “Sign In” button to access the router’s settings page. If the credentials are accepted, you will be granted access to the router’s administrative interface.
Congratulations! You have successfully accessed your Verizon router’s settings. In the next step, we will guide you through locating the Wi-Fi settings section, where you can change your Wi-Fi password.
Step 2: Logging into the Router
After accessing the settings page of your Verizon router, the next step is to log in using the correct credentials. This will grant you access to the various configuration options, including the Wi-Fi settings.
1. Once you have entered the router’s IP address in your web browser and pressed Enter, you will be directed to the login page.
2. On the login page, you will need to provide the username and password that are associated with your Verizon router. As mentioned earlier, the default username is usually “admin” and the default password can be “password” or “admin”. If you have previously changed these login credentials, be sure to enter the updated information. If you are unsure about your login details, refer to the router’s documentation or visit the Verizon support website for assistance.
3. After entering the correct login credentials, click on the “Login” or “Sign In” button to proceed.
4. If the provided credentials are accurate, you will be granted access to the router’s administrative interface. Here, you will find different sections and settings that allow you to configure various aspects of your router’s functionality.
It’s important to note that if you have trouble logging into your Verizon router, there might be a few reasons for this. Firstly, ensure that you are using the correct IP address to access the router’s settings. Verify that you have entered the correct username and password, as any typos or capitalization errors can prevent successful login. If all else fails, consider performing a factory reset on your router and using the default login information to regain access.
Now that you have logged into your Verizon router, you are ready to move on to the next step – locating the Wi-Fi settings section where you can change your Wi-Fi password.
Step 3: Locating the Wi-Fi Settings
After logging into your Verizon router’s administrative interface, you need to navigate to the section that contains the Wi-Fi settings. This is where you will find the option to change your Wi-Fi password.
1. Once you are logged in, look for a tab or menu option labeled “Wireless” or “Wi-Fi”. This may be located at the top, side, or bottom of the router’s settings page, depending on the specific model and firmware version.
2. Click on the “Wireless” or “Wi-Fi” tab to access the Wi-Fi settings section. Here, you will find an array of options related to your wireless network, including the option to change the Wi-Fi password.
3. In some routers, the Wi-Fi settings may be further categorized under sub-menus like “Security” or “Network Settings”. Click on the appropriate sub-menu that corresponds to the Wi-Fi settings.
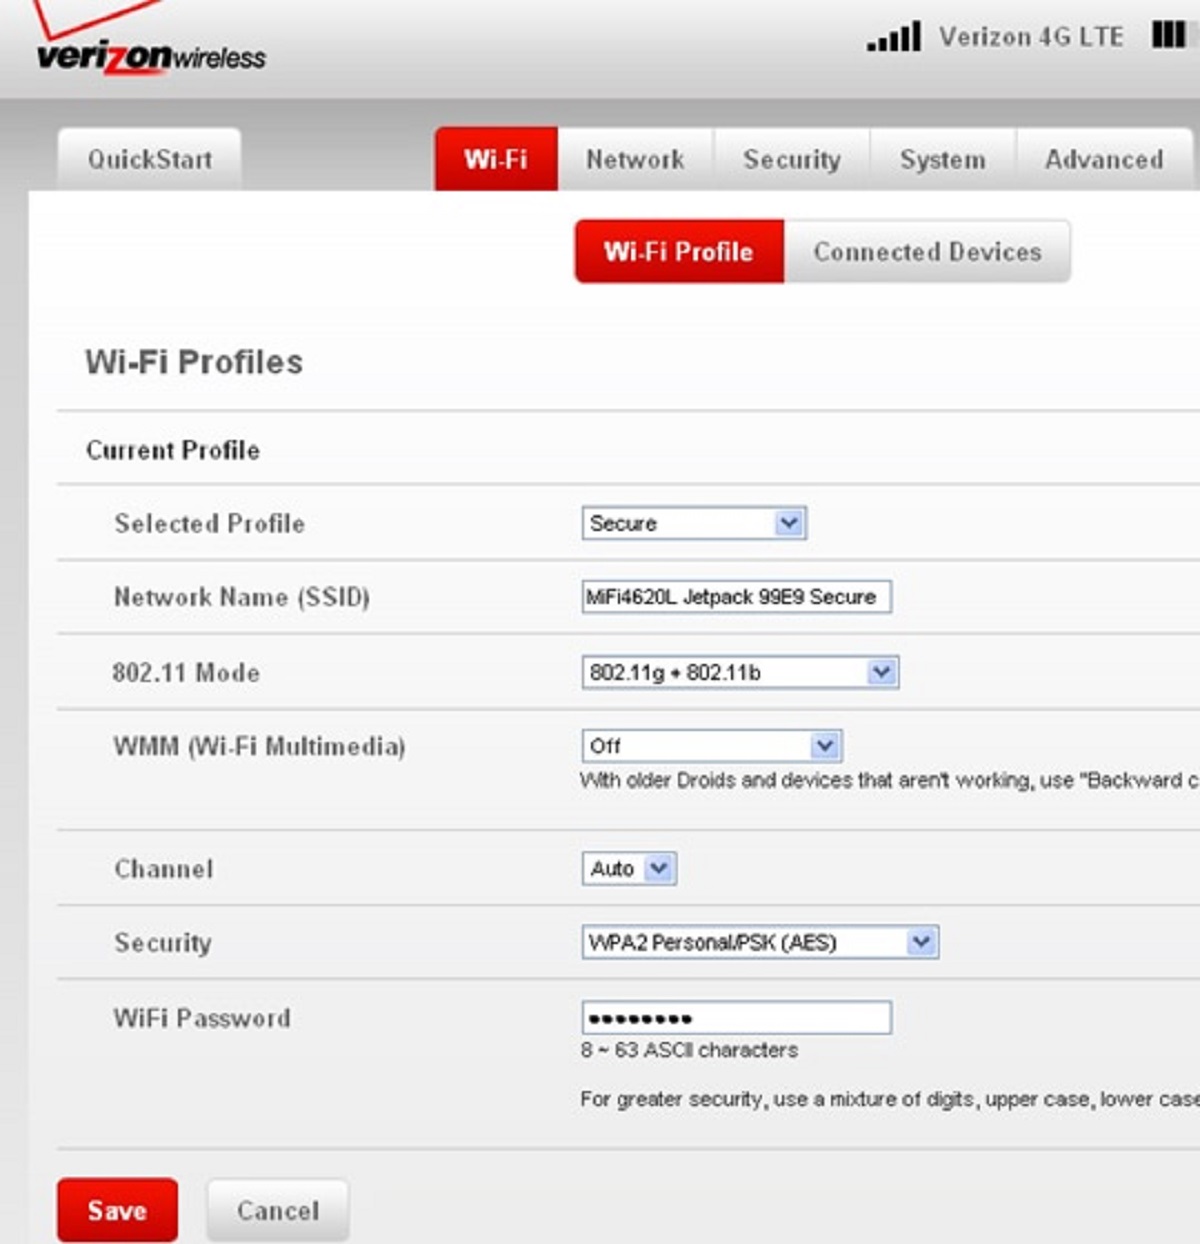
4. Once you have located the Wi-Fi settings section, you will see various options such as SSID (Network Name), Wi-Fi password, Encryption Type, and more. These settings may differ slightly depending on your router’s model.
Now that you have successfully located the Wi-Fi settings section, you are ready to proceed with changing your Wi-Fi password. In the next step, we will guide you through the process of updating your Wi-Fi password to ensure better network security.
Step 4: Changing the Wi-Fi Password
Once you have accessed the Wi-Fi settings section on your Verizon router’s settings page, you can now proceed with changing your Wi-Fi password. Follow the steps below to update your password:
1. Locate the field that displays your current Wi-Fi password. It may be labeled as “Password,” “Passphrase,” or “Security Key.” This field will typically show a series of asterisks or dots to hide the actual password.
2. Clear the current password by selecting the field and deleting the existing characters. Ensure that the field is empty before proceeding.
3. Enter your new Wi-Fi password in the designated field. Your password should be strong and secure, consisting of a combination of uppercase and lowercase letters, numbers, and special characters. Make sure to choose a password that is not easily guessable, and avoid using personal information or common words.
4. Some routers may have specific requirements for password length or character types. If there are any specific guidelines or restrictions for your router, they will typically be mentioned on the settings page. Make sure to adhere to these requirements to ensure that your new password is accepted.
5. Take a moment to double-check your new password to ensure that it has been entered correctly. Remember, passwords are case-sensitive, so pay attention to uppercase and lowercase letters.
Now that you have entered your new Wi-Fi password, you are one step closer to securing your network and ensuring the privacy of your internet connection. In the next step, we will guide you through saving and applying the changes to your Verizon router’s settings.
Step 5: Saving and Applying the Changes
After changing your Wi-Fi password on your Verizon router, it is essential to save and apply the changes to ensure that the new password takes effect. Follow these steps to save and apply the changes to your router’s settings:
1. Locate the “Save” or “Apply” button on the Wi-Fi settings page of your router. This button may be at the bottom or top of the page, or it may be in a separate section specifically for saving changes.
2. Click on the “Save” or “Apply” button to save your new Wi-Fi password and apply the changes to your router’s settings. This action may take a few moments as the router processes and implements the changes.
3. It’s important to note that during this process, your Wi-Fi network may temporarily disconnect, and you may need to reconnect any devices that were previously connected to your network with the old password.
4. Once the changes have been successfully saved and applied, you will be notified on the settings page or redirected to a confirmation page. Some routers may require you to log in again using the new password to access the settings page.
Congratulations! You have successfully changed your Wi-Fi password on your Verizon router. Your network is now secured with a new password that you control. Make sure to remember or store your new password in a safe place to avoid any future inconvenience.
In the next step, we will guide you through the process of reconnecting devices to your Wi-Fi network using the updated password.
Step 6: Reconnecting Devices to the Wi-Fi
After changing your Wi-Fi password on your Verizon router, it is important to reconnect all your devices to the network using the updated password. Here are the steps to reconnect your devices:
1. On each device that was previously connected to your Wi-Fi network, navigate to the Wi-Fi settings menu. This can usually be found in the device’s settings or preferences.
2. Look for the Wi-Fi network name (SSID) of your Verizon router in the list of available networks. It should be the same as before, but you may need to refresh the list if it doesn’t appear immediately.
3. Select the Wi-Fi network to connect to it. You may be prompted to enter the new Wi-Fi password.
4. Enter the new Wi-Fi password exactly as you entered it when changing it on your Verizon router’s settings page. Remember that Wi-Fi passwords are case-sensitive, so make sure to enter uppercase and lowercase letters correctly.
5. Once you have entered the new password, click or tap on the “Connect” or “Join” button to establish a connection to the Wi-Fi network.
6. After a few moments, your device should successfully connect to the Wi-Fi network. You can verify the connection by opening a web browser or using any apps or services that require an internet connection.
Repeat these steps for each device that needs to be reconnected to the Wi-Fi network. It’s worth noting that some devices may prompt you to forget or remove the old Wi-Fi network from their saved networks list before adding the new network.
By following these steps, you have now successfully changed your Wi-Fi password on your Verizon router and reconnected your devices to the updated network. Your Wi-Fi network is now secure with a new password, providing you with enhanced privacy and protection.
As a final reminder, it is good practice to periodically change your Wi-Fi password to ensure the ongoing security of your network. This helps prevent unauthorized access and keeps your personal information safe.
Conclusion
Changing your Wi-Fi password on a Verizon router is a crucial step in maintaining the security and privacy of your network. By following the simple steps outlined in this guide, you can easily update your password and protect your personal data from potential unauthorized access.
We started by accessing the Verizon router through a web browser and logging into its settings page. Then, we located the Wi-Fi settings section, where we were able to change the Wi-Fi password to a strong and secure one.
After making the password change, we saved and applied the new settings to ensure that the updated password took effect. This might cause temporary disconnection from the network, but it’s a necessary step to implement the changes.
Lastly, we discussed the importance of reconnecting devices to the Wi-Fi network using the updated password to maintain uninterrupted internet access. It’s essential to properly input the new password on each device to establish a secure connection.
Remember, regularly changing your Wi-Fi password is a good practice to safeguard your network and prevent unauthorized access. It is recommended to update your password every few months or whenever you suspect a breach or need to revoke access from previous users.
By following these steps and staying proactive in managing your Wi-Fi security, you can enjoy a safer online experience for yourself and your connected devices. So, take control of your network and secure your Wi-Fi connection by changing your Verizon router’s password today.